Category Archives: Glenmutchkin
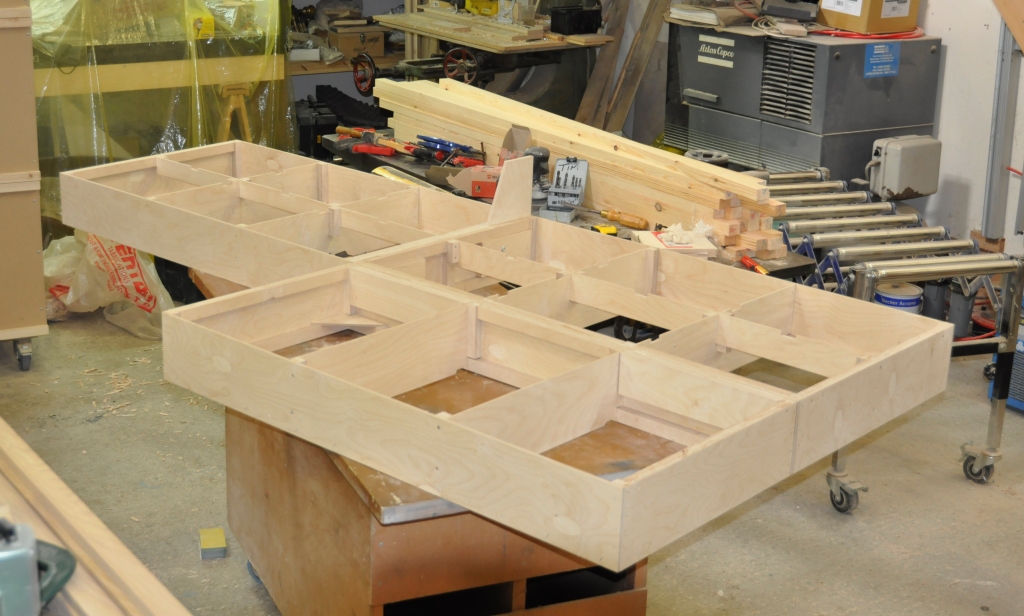
Baseboards coming along……….
Tim and Julian’s business has been doing rather well so far this year, which has meant that they have not had time to accommodate me at their joiners shop and hence baseboard construction has been slow. However, I did manage to get down today and we have got the first four boards quite close to finished.
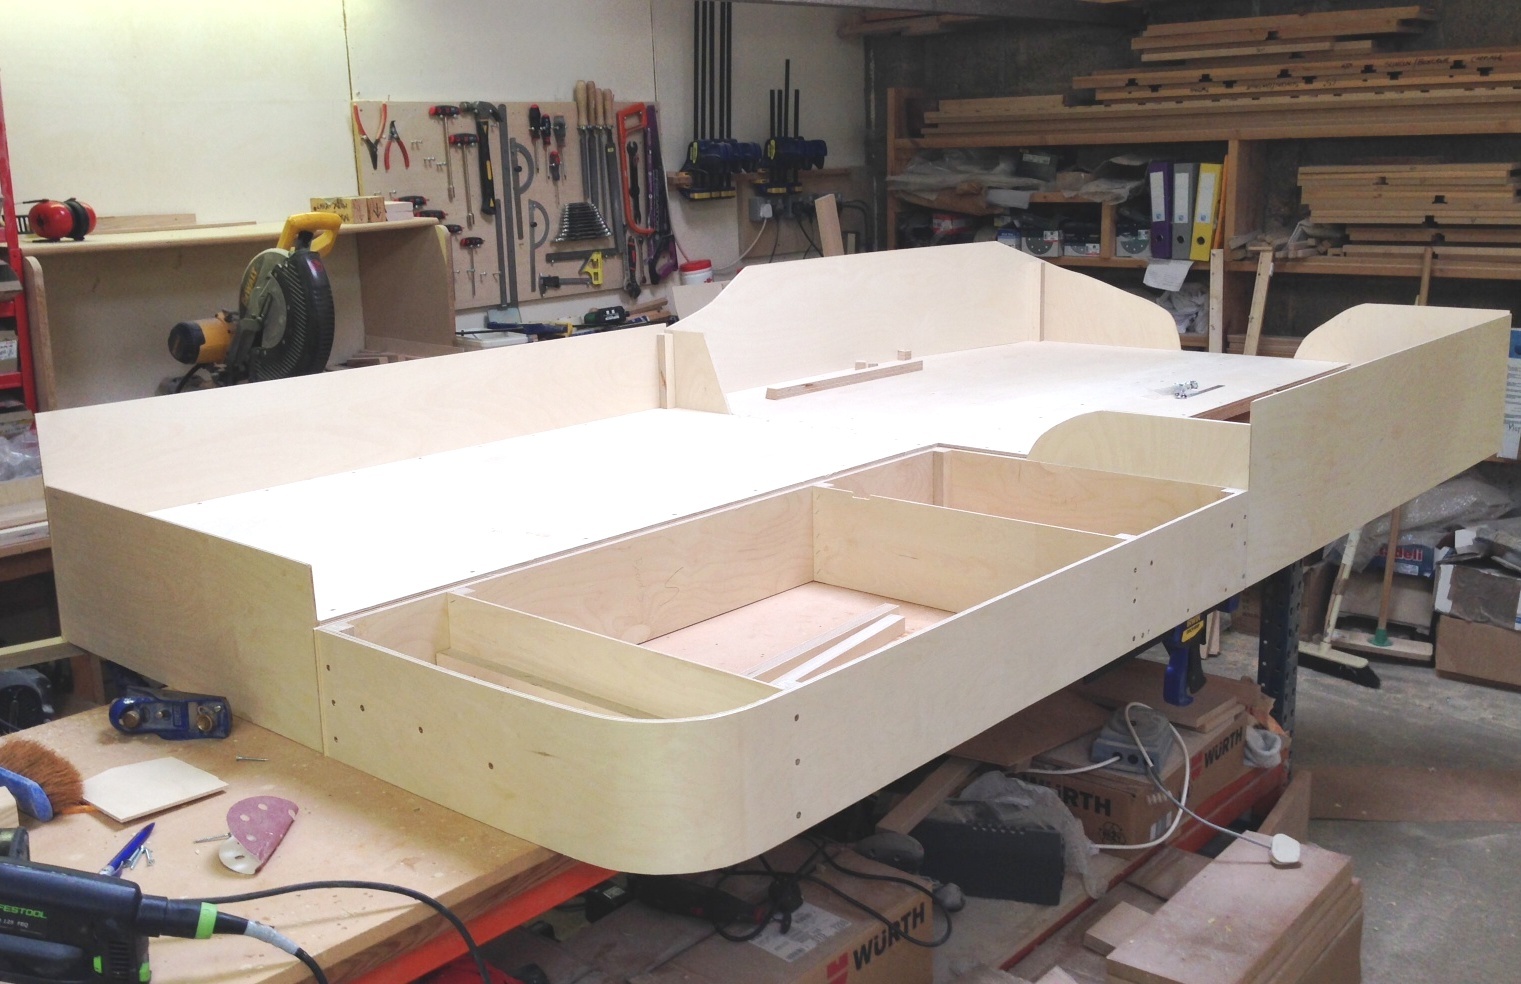
This view will look straight at the train shed, with the bay to the right (it does come onto the nearest board; this is a bit not yet done. The remainder of the platforms be to the right and the goods yard will be behind the trainshed/platforms. If you want to be reminded of the trackplan, it can be found here or here.
Tim and Julian look on the four boards and give them a comparison for size. The overall depth is 1200m deep and the length of the boards in visible is 2.6m. This view would be from the bridge (see the trackplan links), looking back over the yard and the end of the platforms. The ground will be raised here, but falling away to the left.
A view from the buffer stops, well it would be but you wouldn’t be able to see them for the end of the trainshed. The ground will slope down substantially to the right and be above rail level to the left.
I hope to get these four boards finished in my next visit and also the beams that they will sit on (and will be attached to the legs already made).
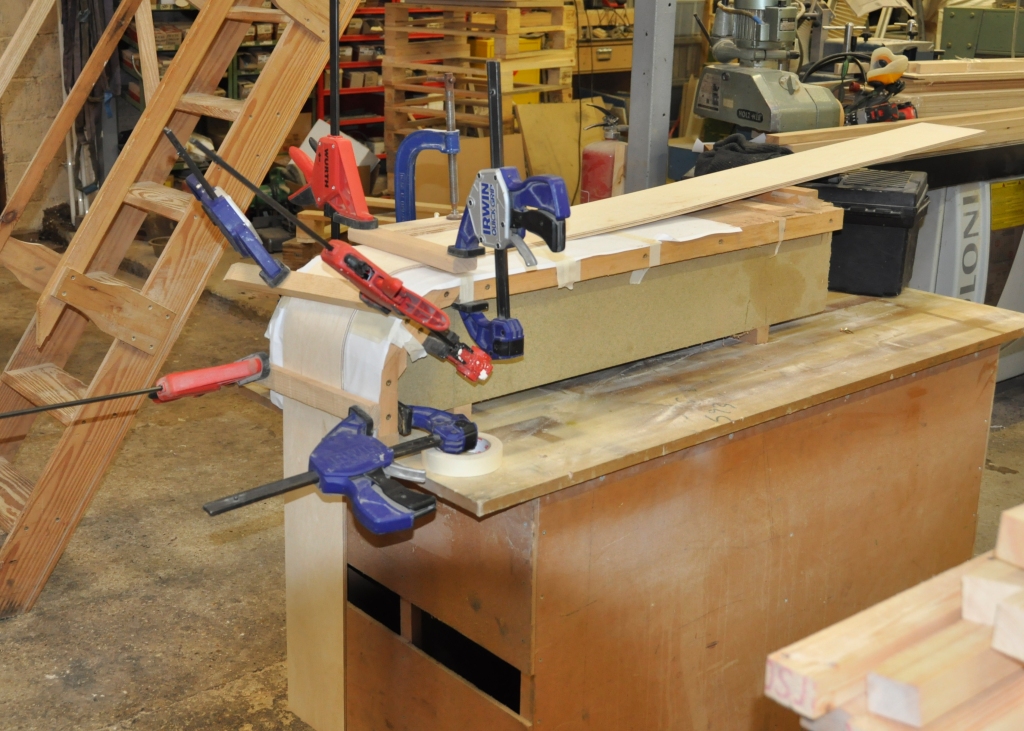
Baseboard Supports
I have been putting more work into the baseboard supports this weekend.
Rather than to go for adjustable feet, I have elected to make the junction between the beams and the trestles adjustable. This was formed fairly simply by utilising a pair of bolts that are permanently secured to the trestles and then clamp a plate between a pair of nuts. This plate will then be fixed to the underside of the beams.
Simple enough idea, but I went for M10 bolts because I wanted to be sure they did not get bent or broken as these components are moved around. This meant that there was a lot of drilling and cutting to do – so much so that I broke three drills (two of which were 10mm so fairly chunky) and melted my Black & Decker! Not quite such a cheap solution as I had in mind but this is what was created:

More on my casting and etching
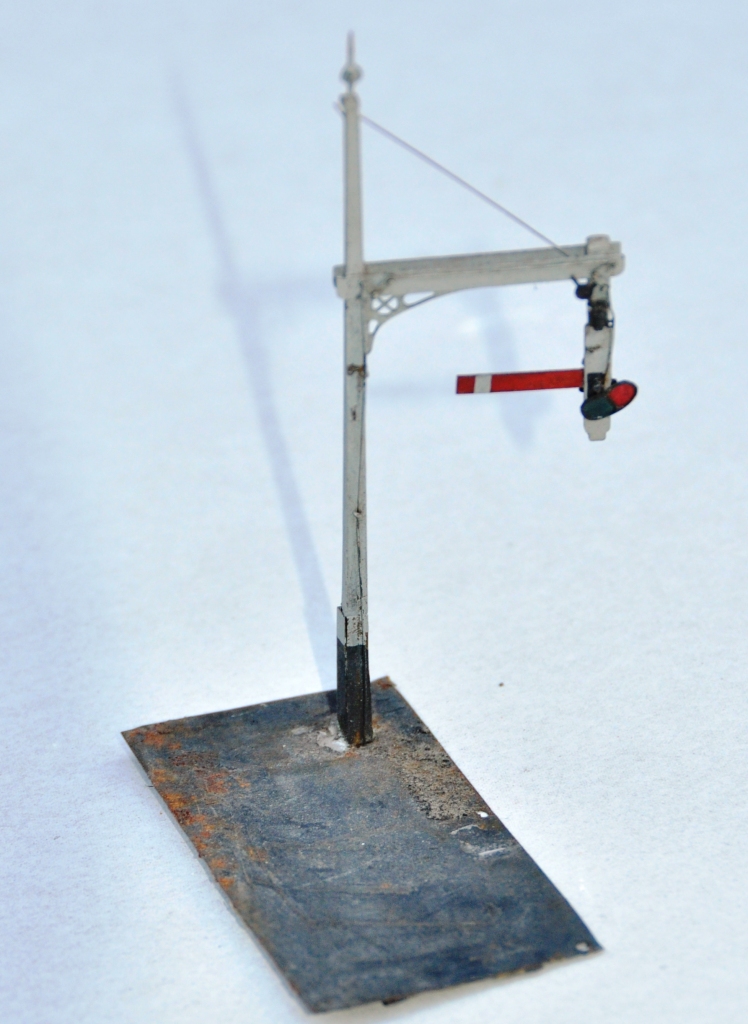
We haven’t had an update on the etching and mastering that I have been doing for the signals for a while.
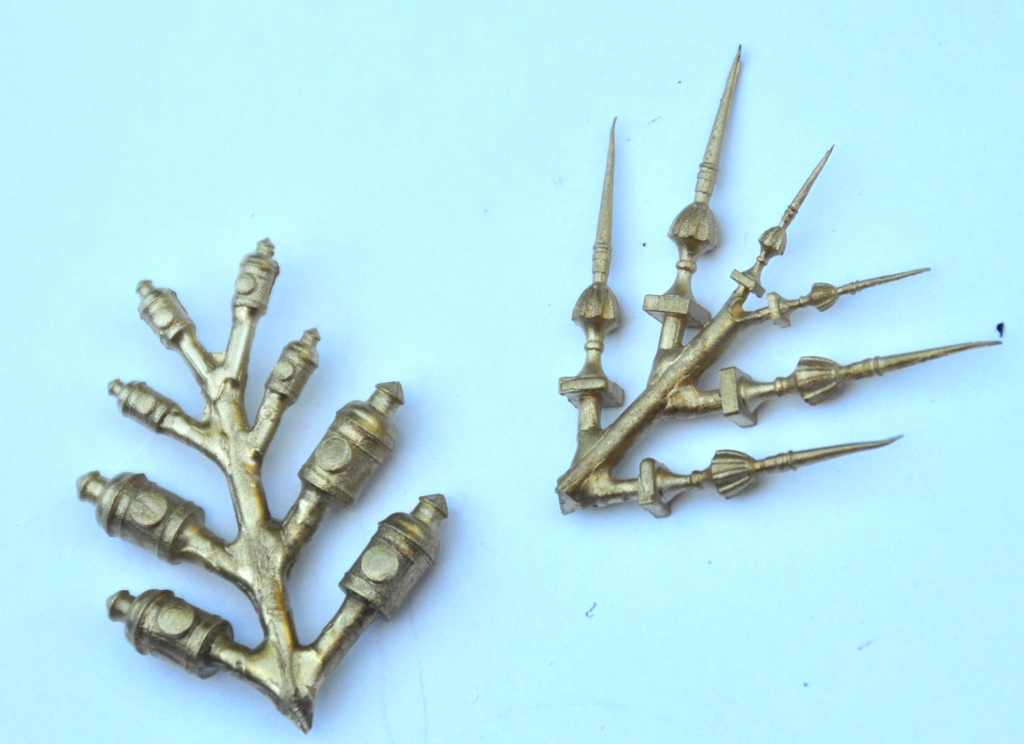
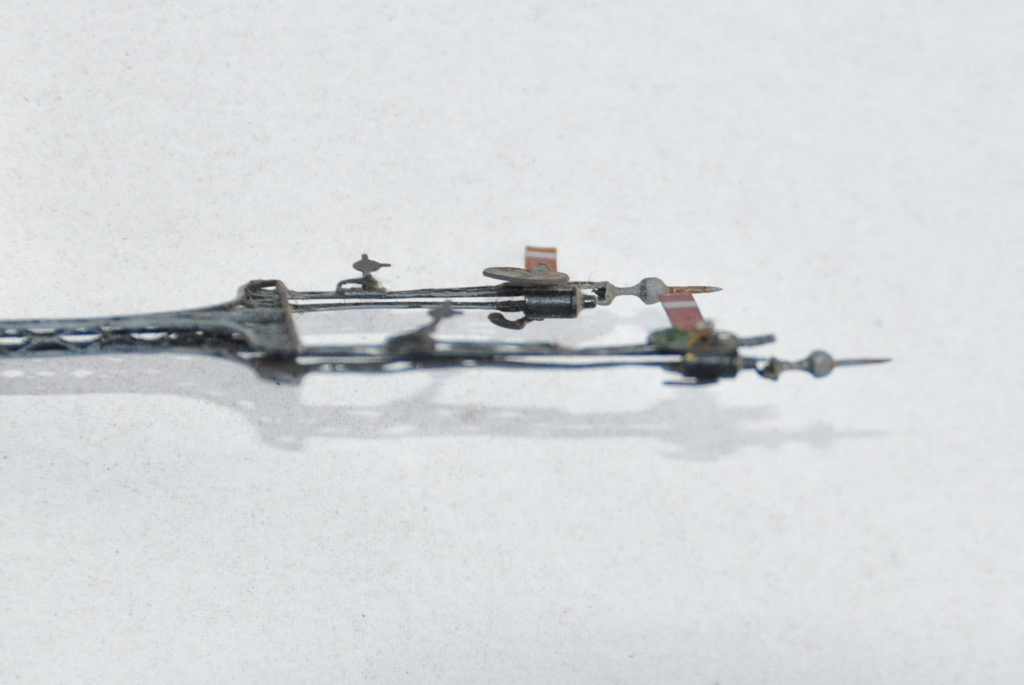
Well, I have had both the rapid-prototype masters and etching in. Using the former, I have also had my first set of lost wax casting done – in this case for the lamps and finials. This is what they look like – which I think is pretty good and a lot better than the white metal ones from MSE.
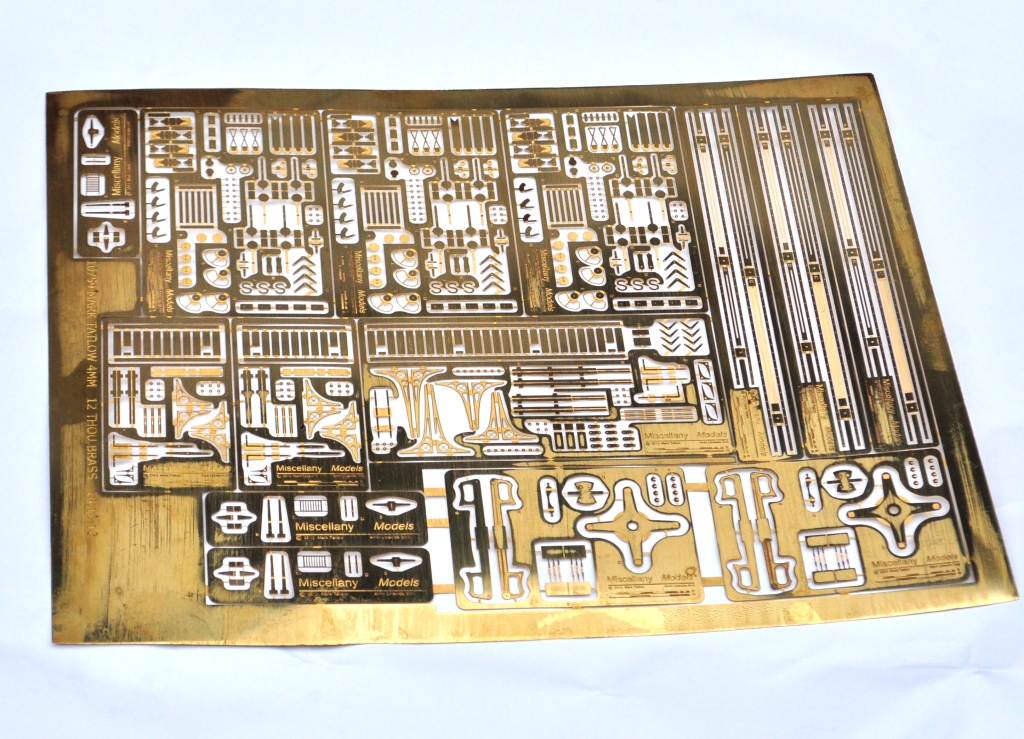
and the etching looks like this – brackets, arms, ladders and a few other bits and pieces.
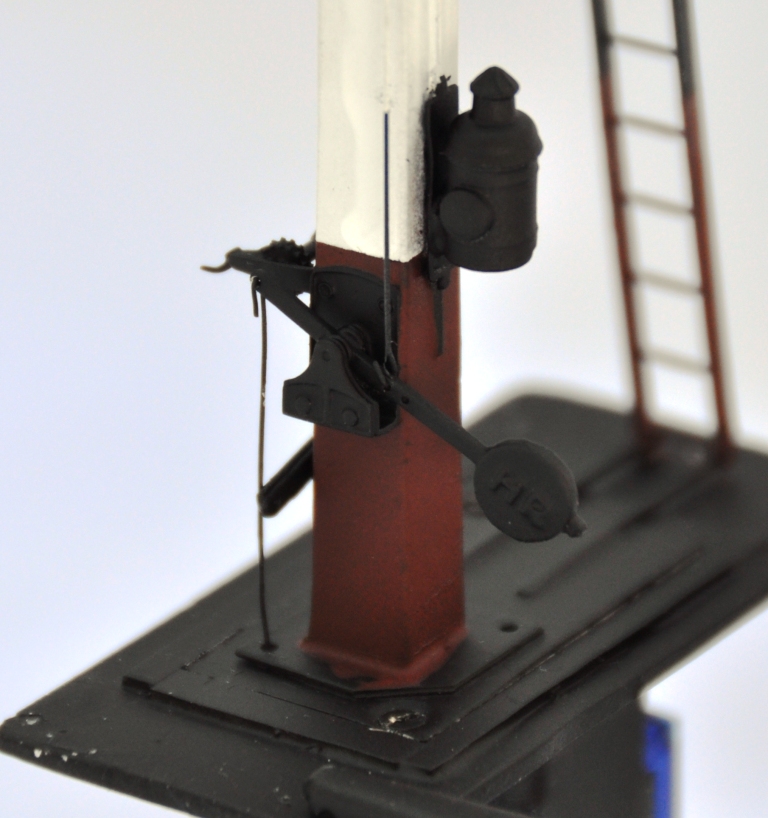
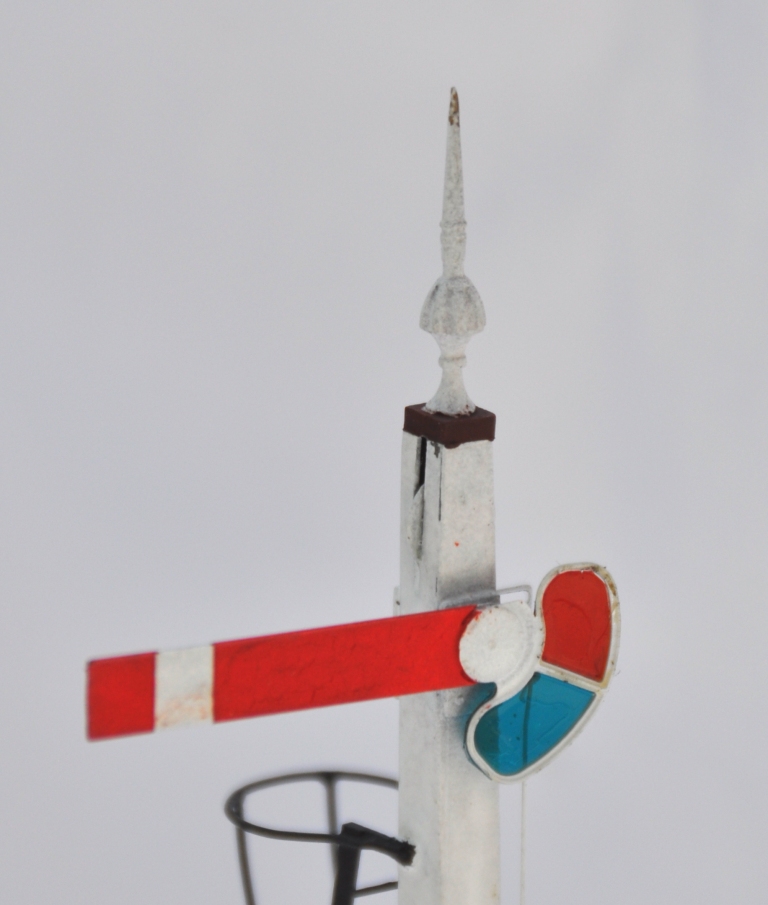
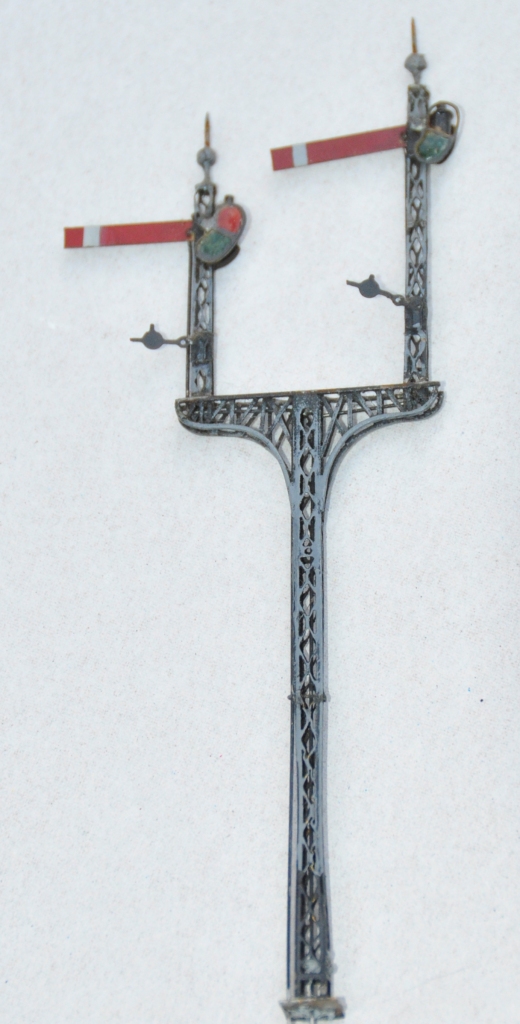
So it was time to make a signal – in this case a fairly simple single arm Highland signal. So using a post from Lochgorm and then my parts for the arms, spectacle plates, windlass, balance levers, ladders, finials and lamp, this is what it has come out like:


and the castings close up looked like this.
So all in all, I am pretty chuffed!
It does mean that I think there is some more signal building to come on these pages……….
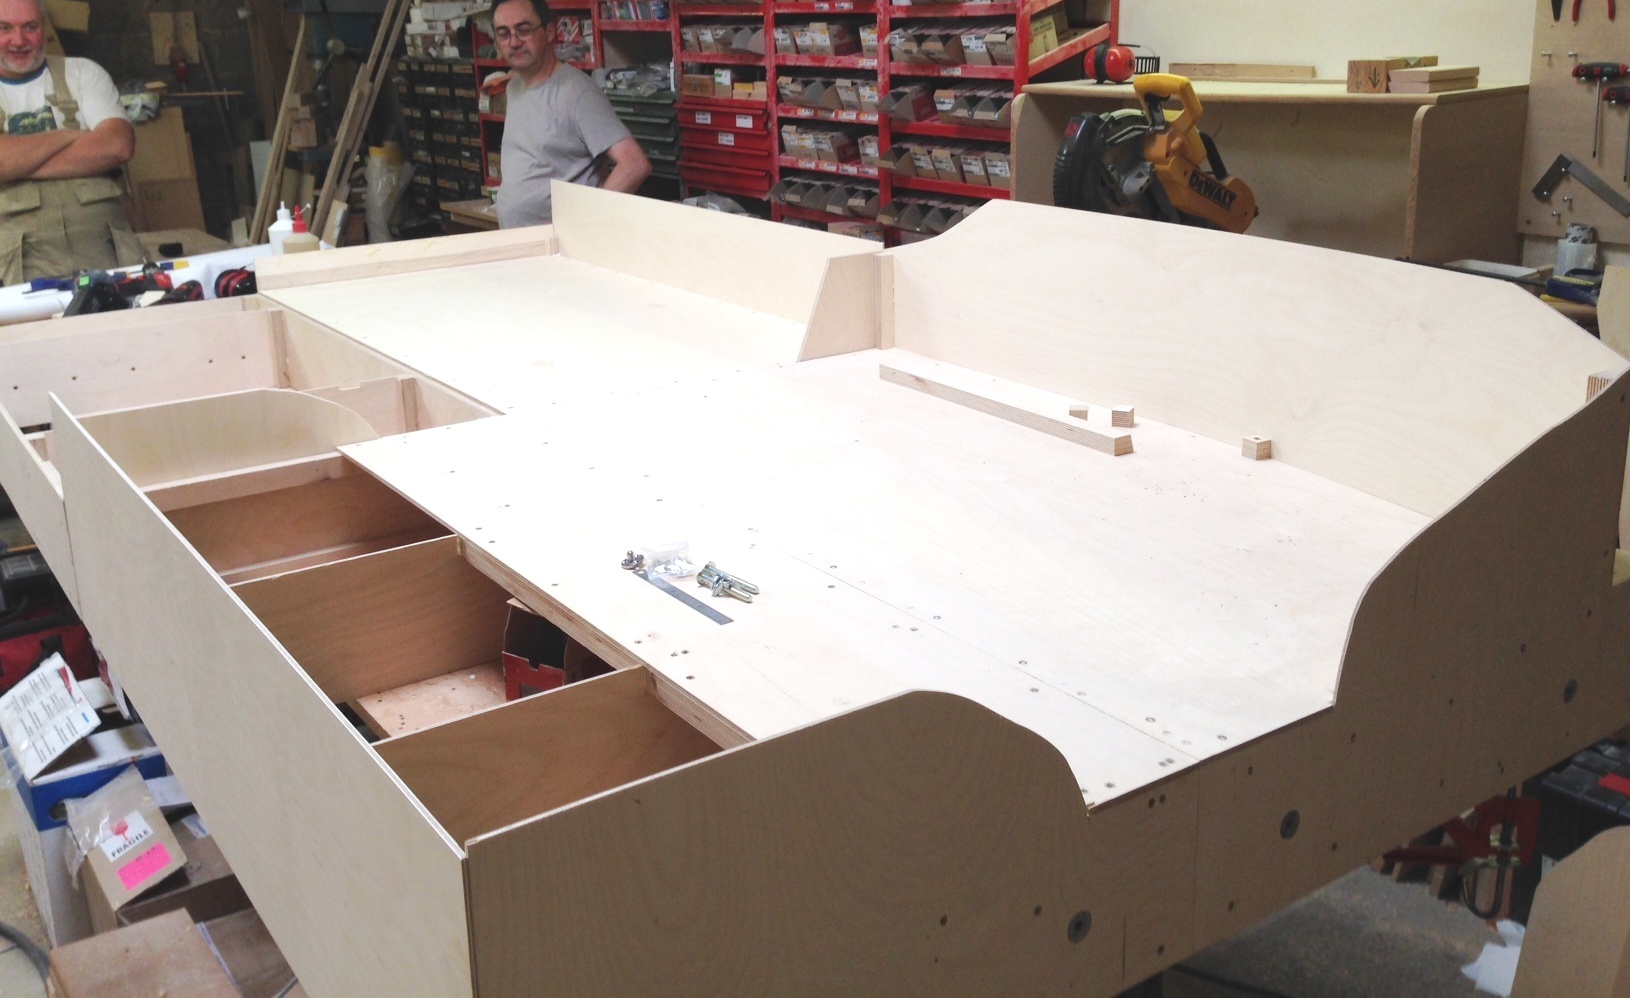
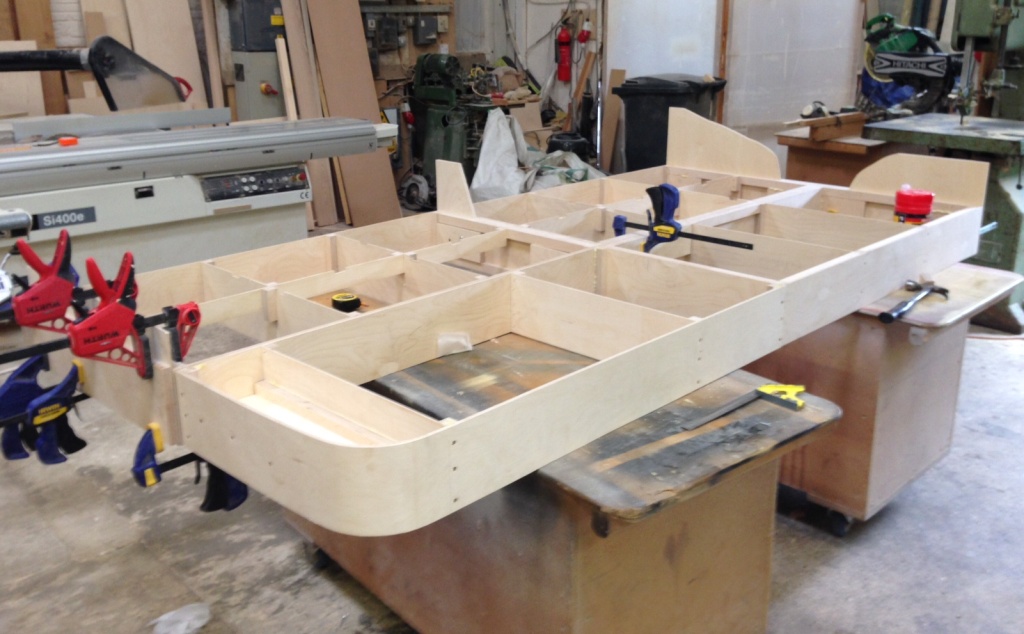
More Baseboards and A Peek at Benfieldside
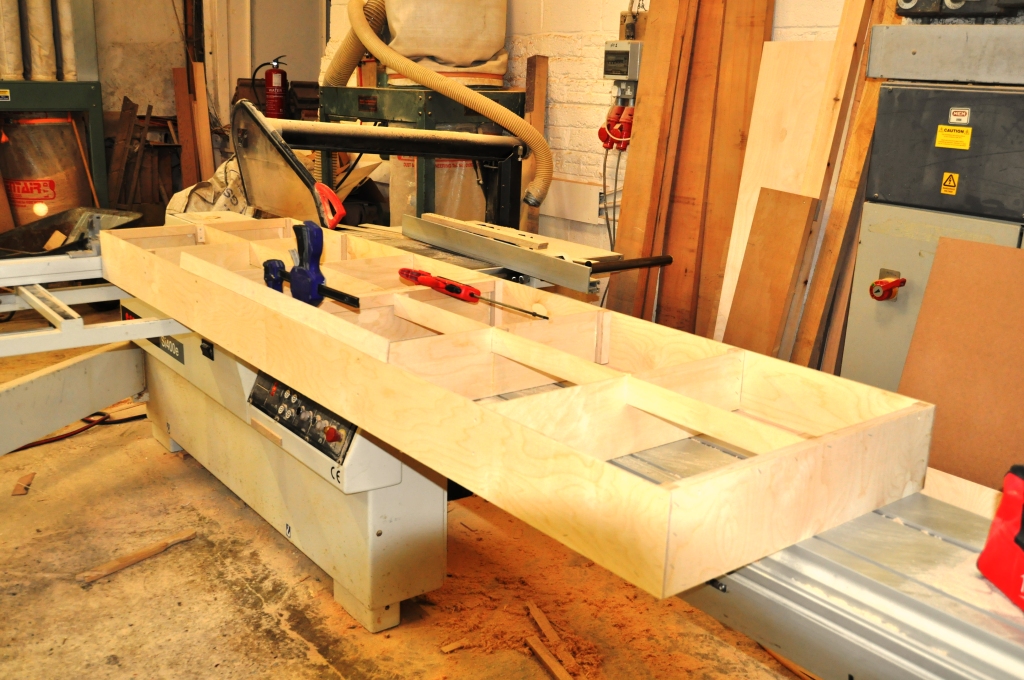
I managed to get most of another day done on the baseboards at Tim & Julian’s workshops. The bulk of the first four are now done; although the decks are still to be put on these. A slightly fuzzy picture to show the progress is below:
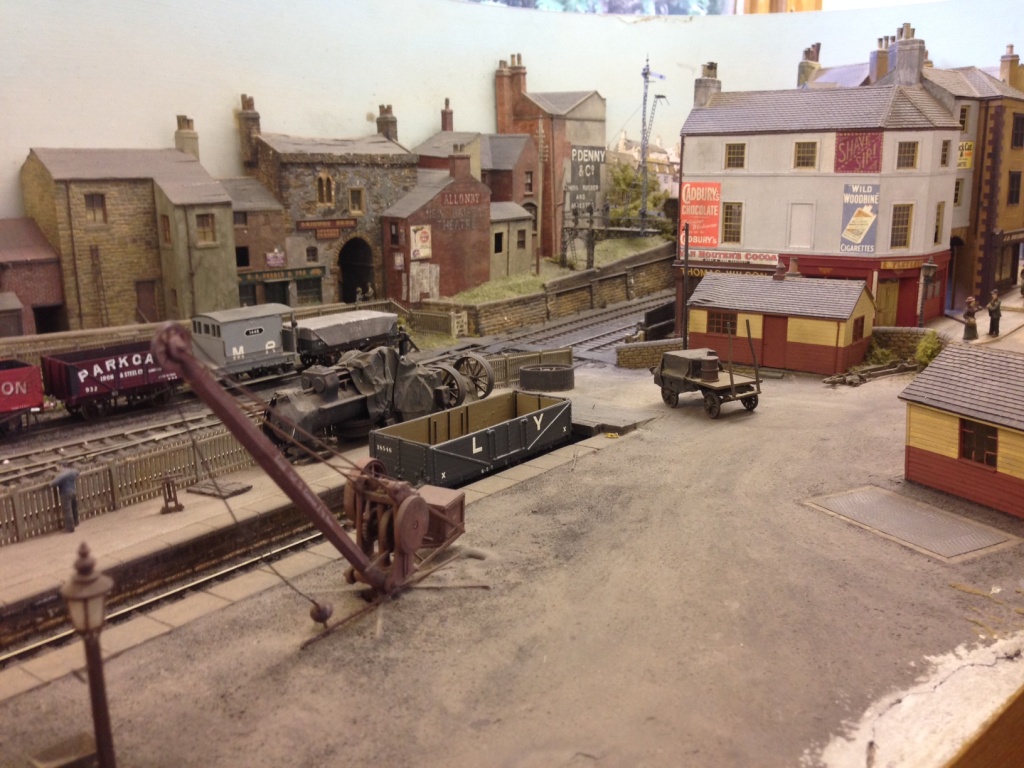
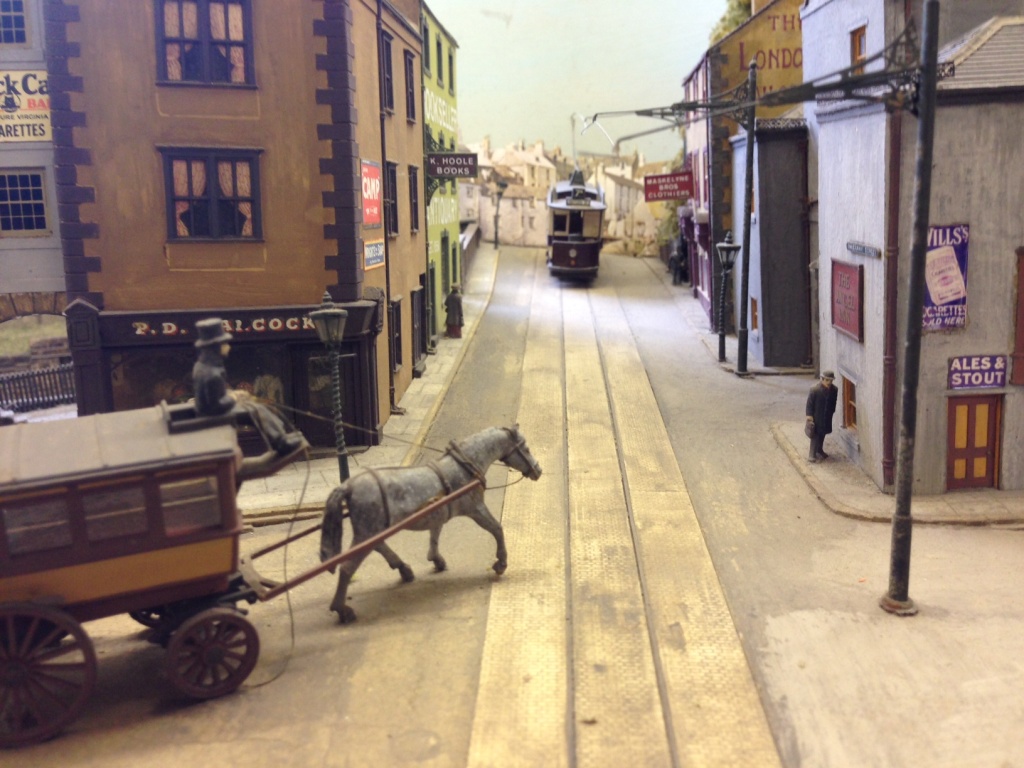
In addition to this, I had a look at their layout Benfieldside. As noted in past posts, they have recently acquired this from John James, who was the custodian of it for some years. Its original building was John Wright.
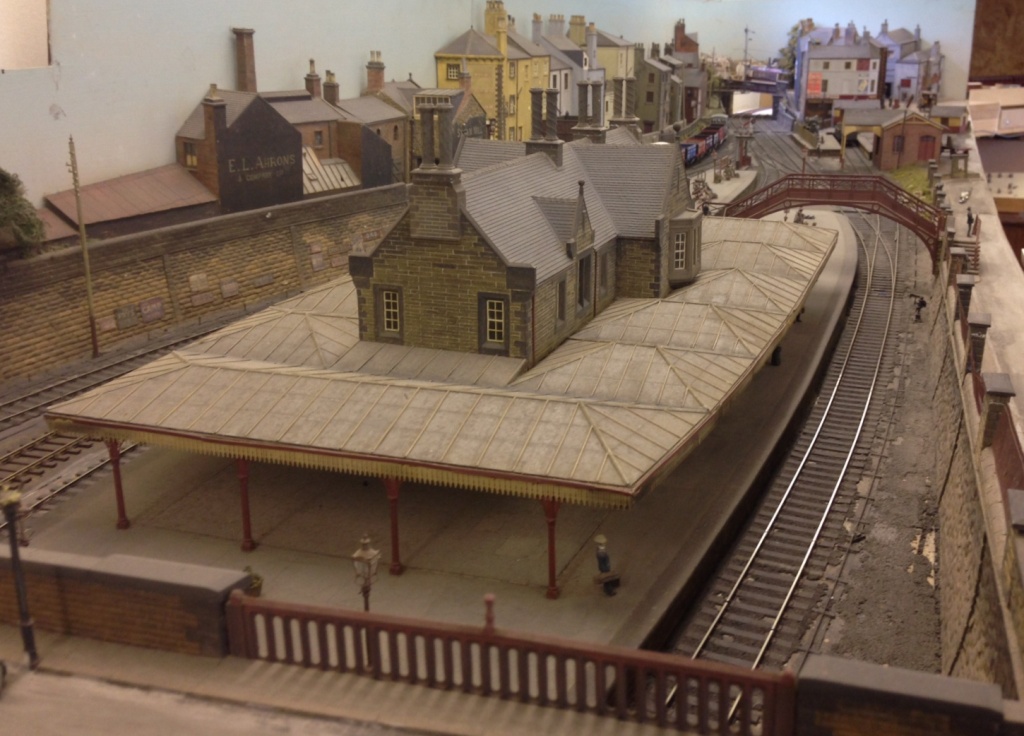
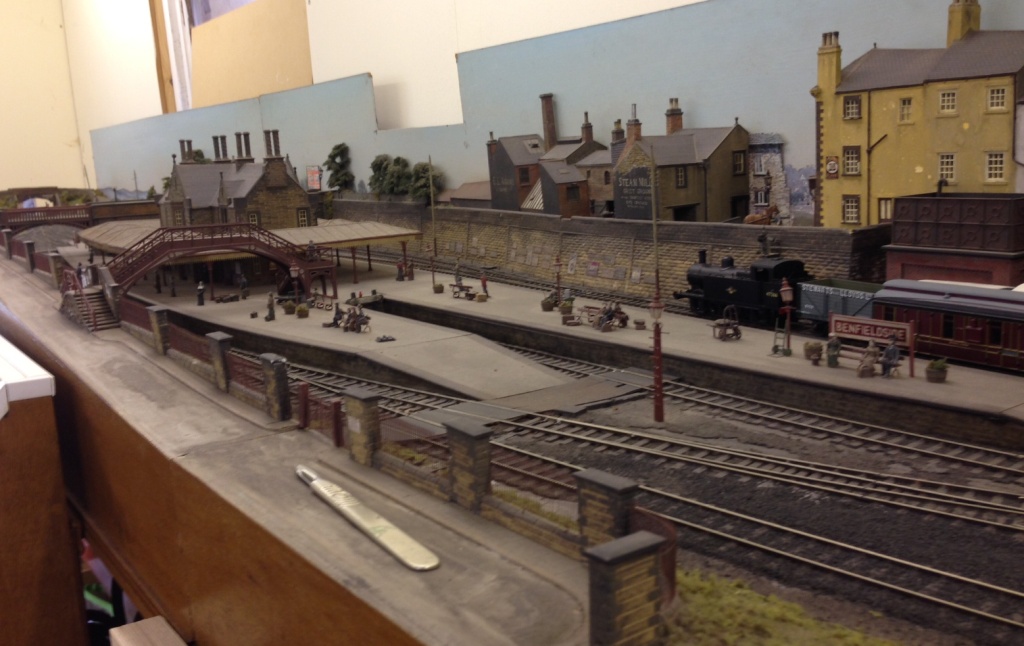
A great layout; I think anyway!
I have managed to restore the first two signals – well entirely rebuild one! I will post some pictures in the next few days with a bit of luck.
One good turn leads to another…………
I managed to get most of another day in Tim & Julian’s joinery workshop. With the assistance of Tim, we managed to get the three boards assembled with pattern maker’s dowels; along with the beginnings of the ground profiles.
A start was also made on the last of the four boards that will form the main station area. I didn’t want an ordinary square board on the corner as the layout will be viewed both front on and from the end. Therefore, we have had to profile the corner piece around a mould.
But all this help does have a price……………………. Tim and Julian have recently acquired Benfieldside. This rather exquisite layout was built by Martin Wright and was subsequently owned by John James. If you want to see how good it is, find yourself MRJ 38 and you will see what I mean!
Over the years, the layout has suffered some damage so it is going to need to be restored. This is where the use of Tim and Julian’s joinery shop ceases to be free – there are a number of damaged signals and even more that are missing altogether. My brief is restore those that still exist and to set them up for servo operation. Here are the first three; all of which have different issues.
This one has a shattered post and is missing its access gantry/ladder. In addition, the signal arm has become detached and as the signal is slotted (ie the arm is within a slot in the post), this is going to be quite difficult to fix in situ.
This one also suffers from problems associated with the slotting – when Martin made this he only used lattice work for the front and back in order to provide a slot for the arm. This however has made the signal very weak. In addition, the gantry and ladder are missing.
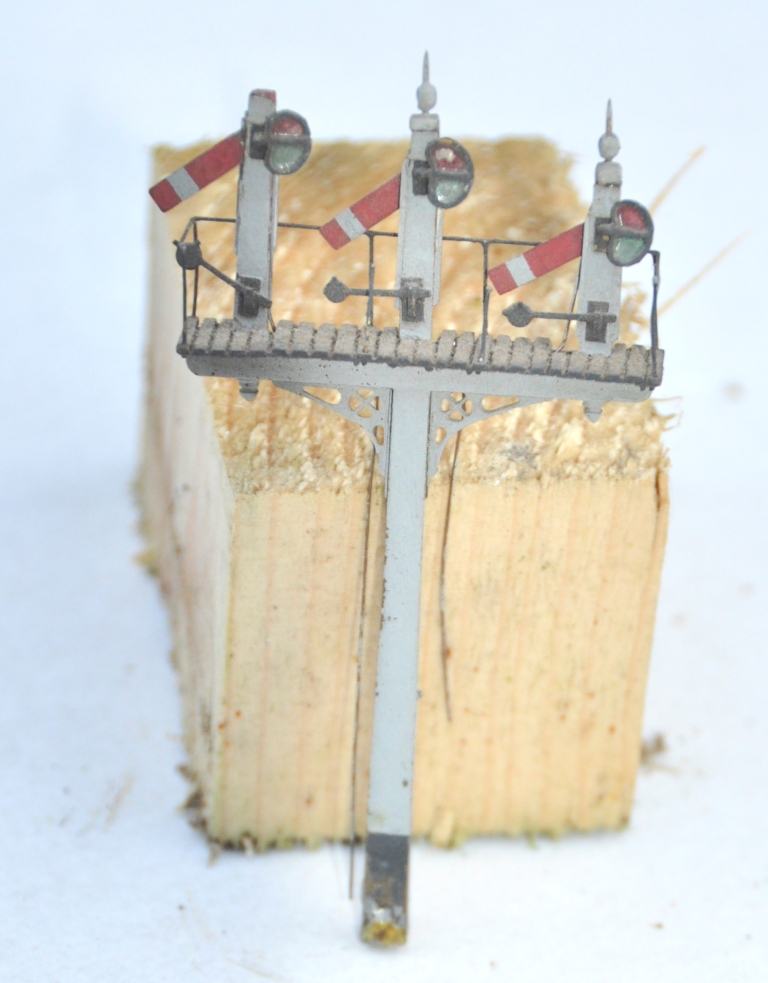
One of the arms us detached from its operating arm, its ladder and finial are also missing.
Fortunately, the North Eastern used Mackenzie & Holland as their signal suppliers as well as the Highland. Therefore, I will get to use my etches! Anyway, the signals have been stripped and restoration has started; a post next week will show how they are coming along.
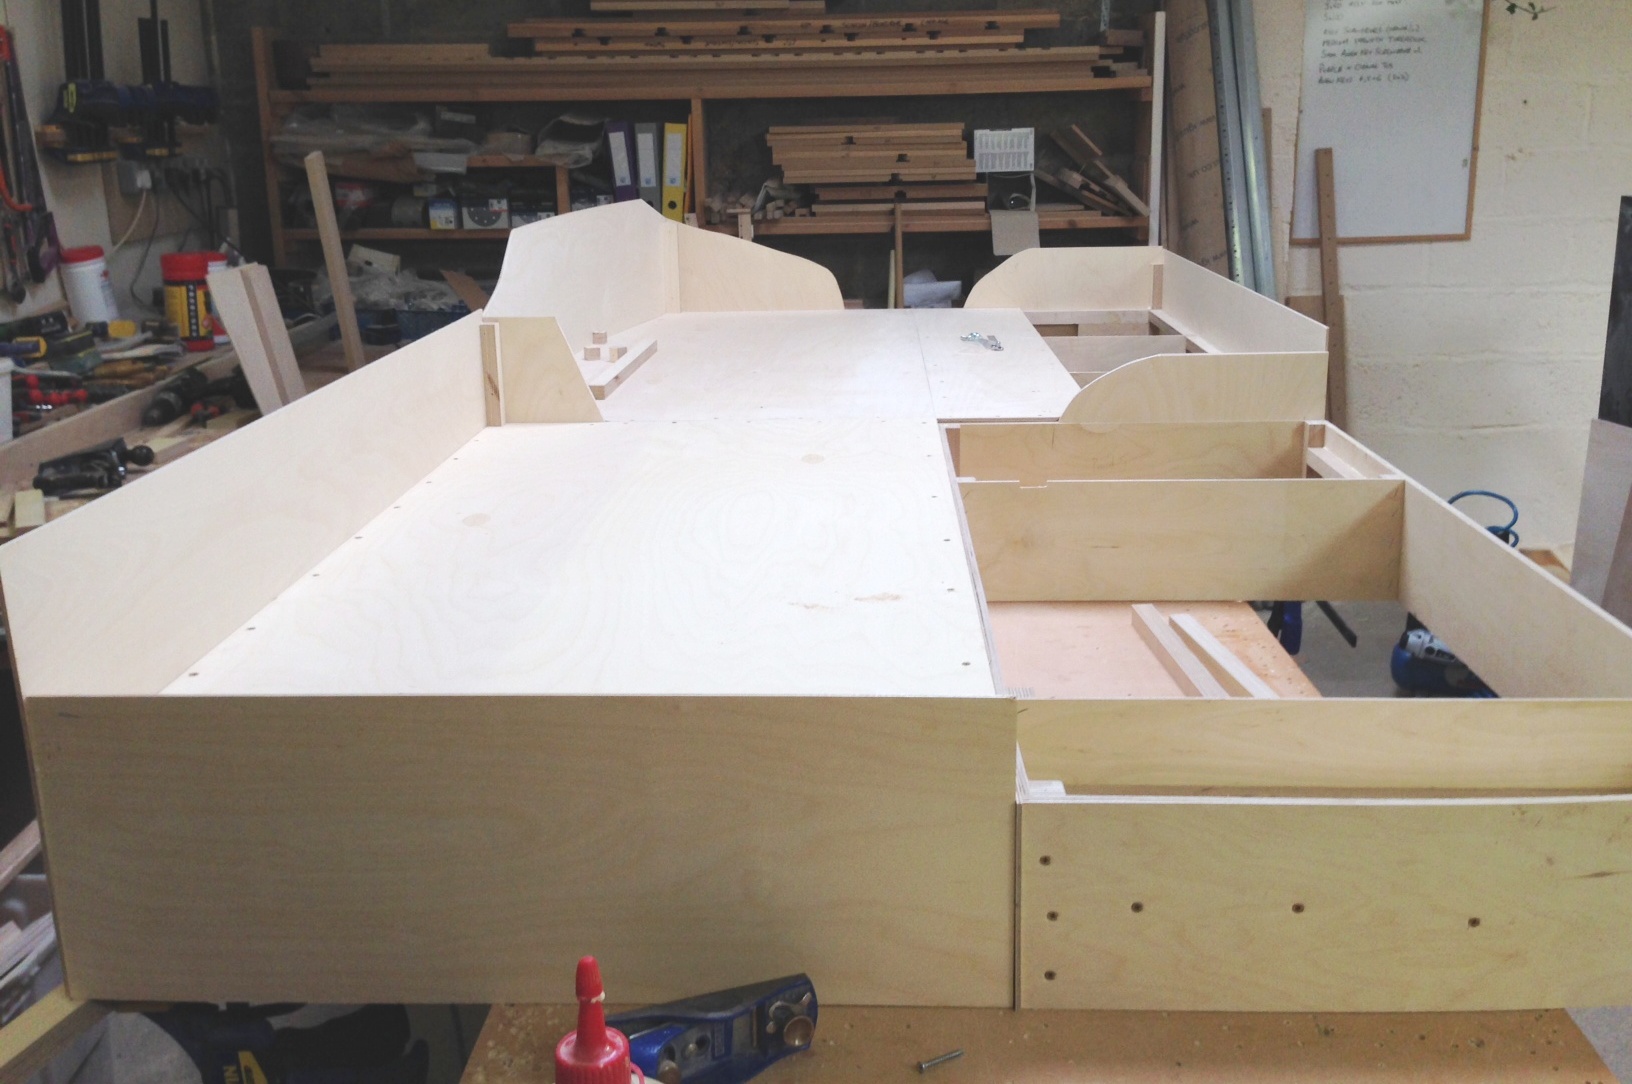
Timber!
A fairly big day in Glenmutckin’s life today; the start on baseboards.
As I mentioned in the last post; a couple of my team who help on Portchullin made the mistake of both criticising my carpentry skills and then admitting that they ran a joinery business. I guess you can see that they thus talked their way into a task and we spent day one in doing these today.
I know that a bad workman blames their tools; but by god having all the proper kit makes things much faster and a great deal more accurate!! To say nothing of someone who knows rather more about joinery than I do!!
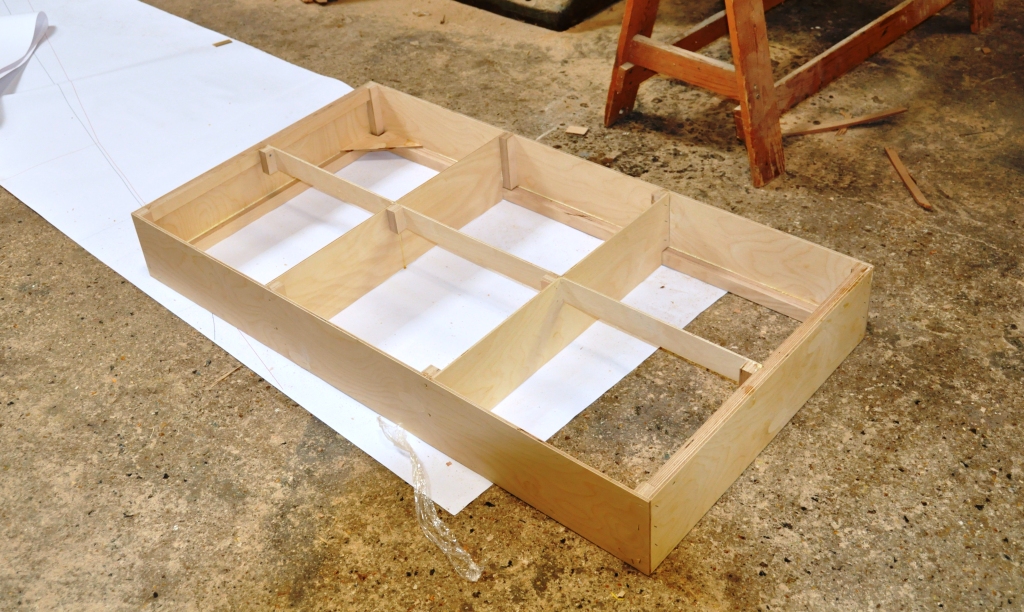
The intended design will be predominantly open design around a skin of ply. Initially a rectangular box is being made, as above. After we have made the first batch of these we will then laminate a further layer of ply around this to provide the material to support the raised scenery and also to house the rebates for the pattern makers dowels – when we have done it hopefully the pictures will make it more clear.
We got three of these boxes made today; here are two of them – what is particularly pleasing is that they are perfectly level across the joint (see the bit of timber laid across the joint). This is an area that I really did not get right on Portchullin and I note that lots of other modellers don’t either – right up to the famous person modelling Leamington Spa.
So thanks Tim and Julian – I am sure some signals can work their way back!
And a small plug for my hosts; if you are looking for a powered loft ladder; give them a try http://www.st-joinery.co.uk/electricloftladder.html?gclid=COfvoN-HyrwCFYWWtAodjCQAcw
Where did we get to…………?
When last I updated you on Glenmutchkin, we were making the legs. These have been reassembled and look like this:
They are not yet finished as I wish to make a mount for the support girders; so it will soon be time to prevail on my brother again!! However, I have been tinkering with plans and have come up with the baseboard layout and a rather tidier rendition of the basic plan:

A little unusually, I am making the layout two boards deep as I am trying to get a lot of “depth of field” in the model. Portchullin works very well in this regard to the right side where there is a bank and you do not see the back of the layout but less so in the station building area or across the bridge. The depth of field is intended to try and overcome this but I will be having quite high hillsides behind again for much the same reason.
I am hoping that I have been able to book a bit of time in some friend’s joinery shop this week to make a start on the building of these. Five of the boards are relatively simple; the last two (nos 3 & 7) a lot less so. One of the chief areas that Portchullin lets itself down on is the quality of the baseboards – compensation/springing is a must on steam locos for example! My friends (Tim & Julian) pointed this out with some vigour and told me that they really knew being joiners…………well you can see where that led for the next layout!
Every favour has a price though; so I am down to build something in return for them!
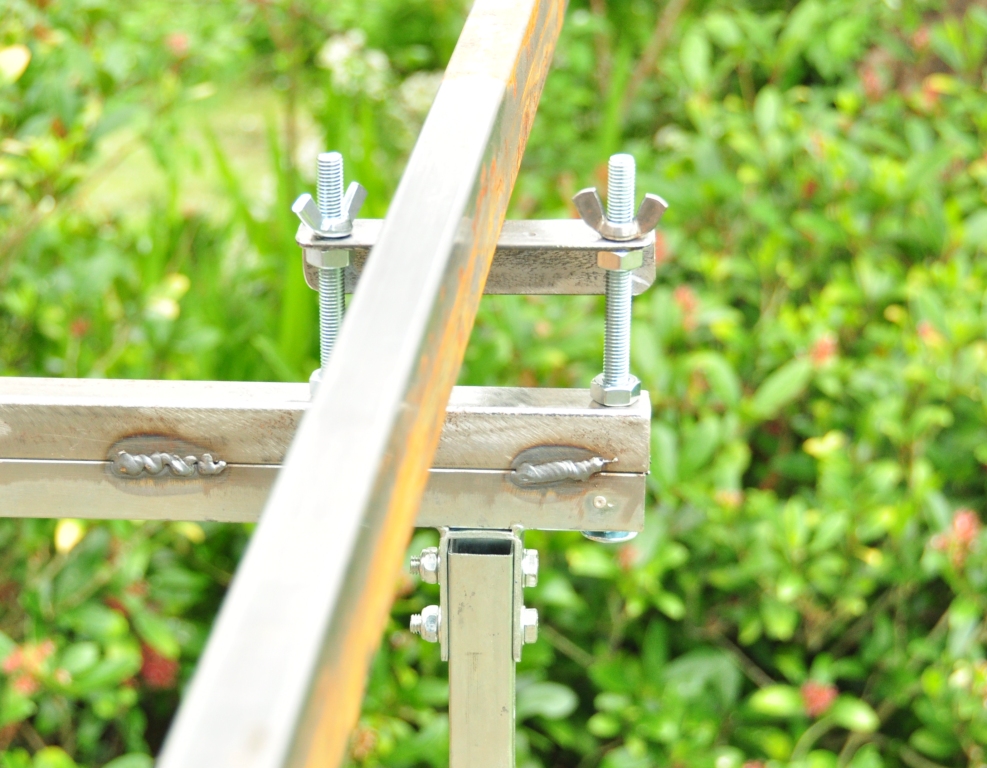
Cutting and Shutting
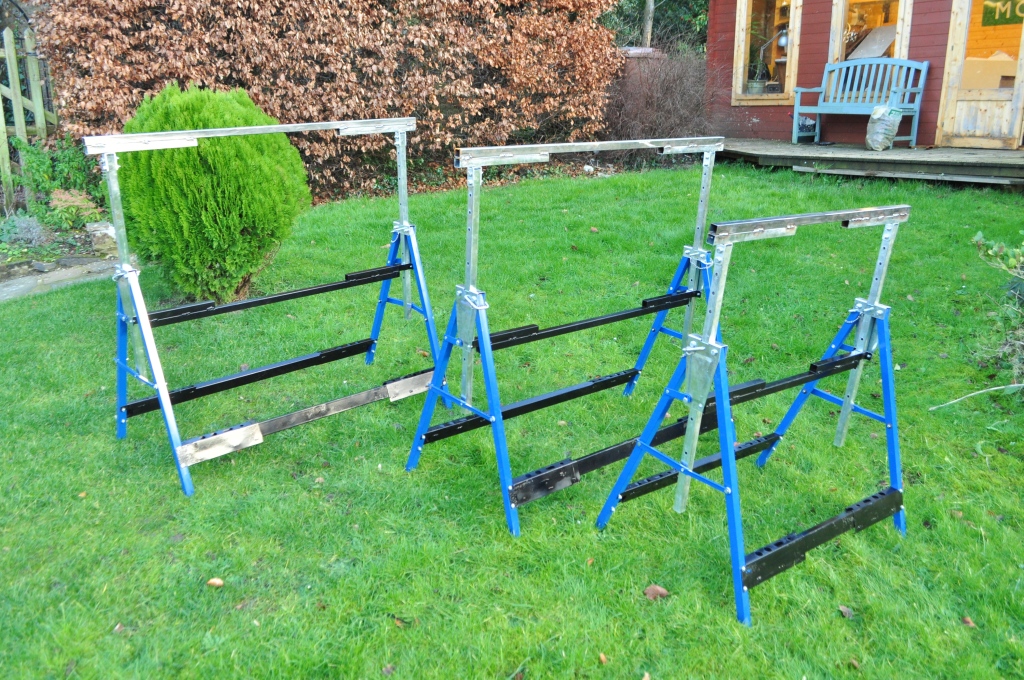
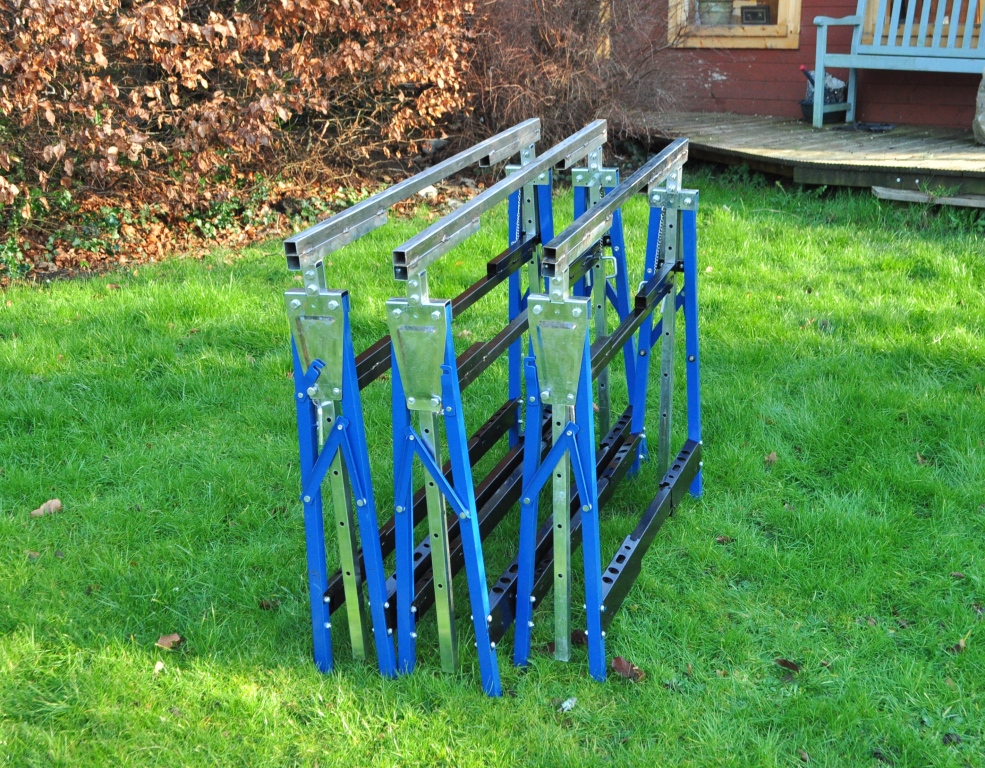
I wished to use builder’s trestles for the supports for Glenmutchkin as they fold down, are very sturdy and durable (and are fairly cheap). But, I also wished to go for a fairly full depth on the layout and they only come in the one depth (about 26 inches). This meant I needed to cut and shut them, to make them into a stretch trestle.
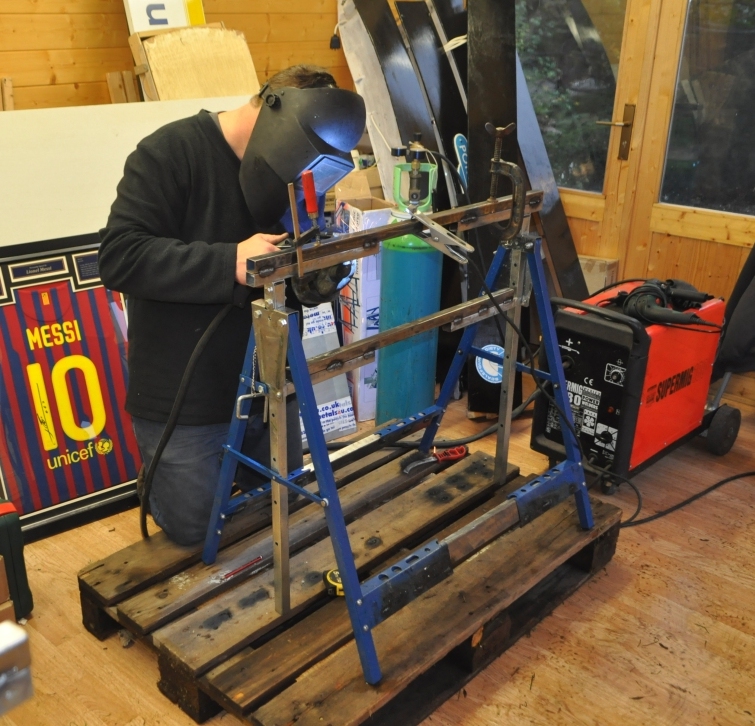
Fortunately, my father in law was over at the weekend, and he has had 40 years in the motor trade so could tell us a thing or two about how to cut and shut (sorry Bernard!). So, coupled with my brother and his welder, we have managed to cut and shut the first three trestles (the others do not need the same treatment).
Here is my brother James hard at work on the smaller of the three.
I need to sort out a better means of storing Portchullin’s lighting pelmets. One of the lessons I have learnt from Portchullin is that it has too many odd shapes and insufficient thought on how it should be stored/transported.
Cutting the first Sod
Tomorrow should be a big day for Glenmutchkin, because if my brother remembers we will be cutting the first sod of the layout building.
Now all good railway lines start with a ceremonial cutting of the first sod by the Duchess of something or other; typically with a nice silver spade and after which everybody retires to the local hostelry for a fine dinner…………….whilst the navvies start the really hard work. Well we probably will only be different by dropping the silver spade.
More seriously, as long as he does not get blown away in the forecast storms, my brother will be bringing his welding kit over with him, so we can make a start on the big chunky bits.
Welding kit……………on a model railway; am I going crazy? You’ll have to come back to find out!
Etching Artwork
I have not actually picked up a modelling knife or soldering iron for a couple of weeks now; largely because I got a bit of a bug for sorting out the etch artwork.
I have now completed, I hope, all of the artwork I will need for all of the signals that will be required on Glenmutchkin. Indeed, it should do all the signals I and just about anyone else ever needs for any scheme based on the Highland era!!!!
I am fortunate that I have a couple of an 1895 McKenzie & Holland catalogue and a further partial copy from a bit later. I have also been provided with a number of really good drawings of bracket signals from M&H, prompted by my ramblings on the web. This has given me with a pretty good handle on how they were constructed and I can draw up rather more comprehensive (and a little more specific to the Highland) artwork than are available form any of the other sources.
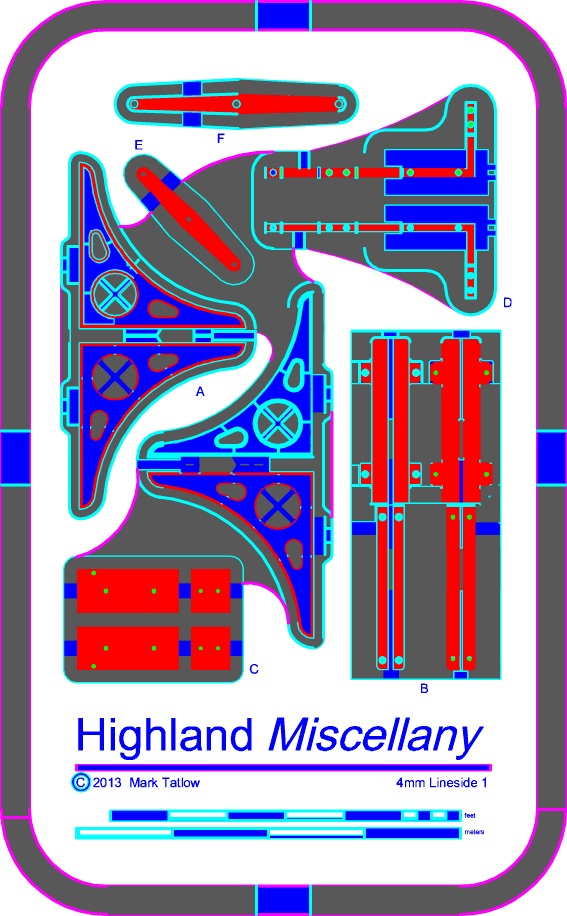
So this is what I have come up with. Firstly, an etch of all of the arms, balance weights and a track mechanism for raising the lamp to the top of the post (I think this was peculiar to the Highland):

and then an etch that includes the large brackets used for the multi-doll signals and all of the support brackets and landing.
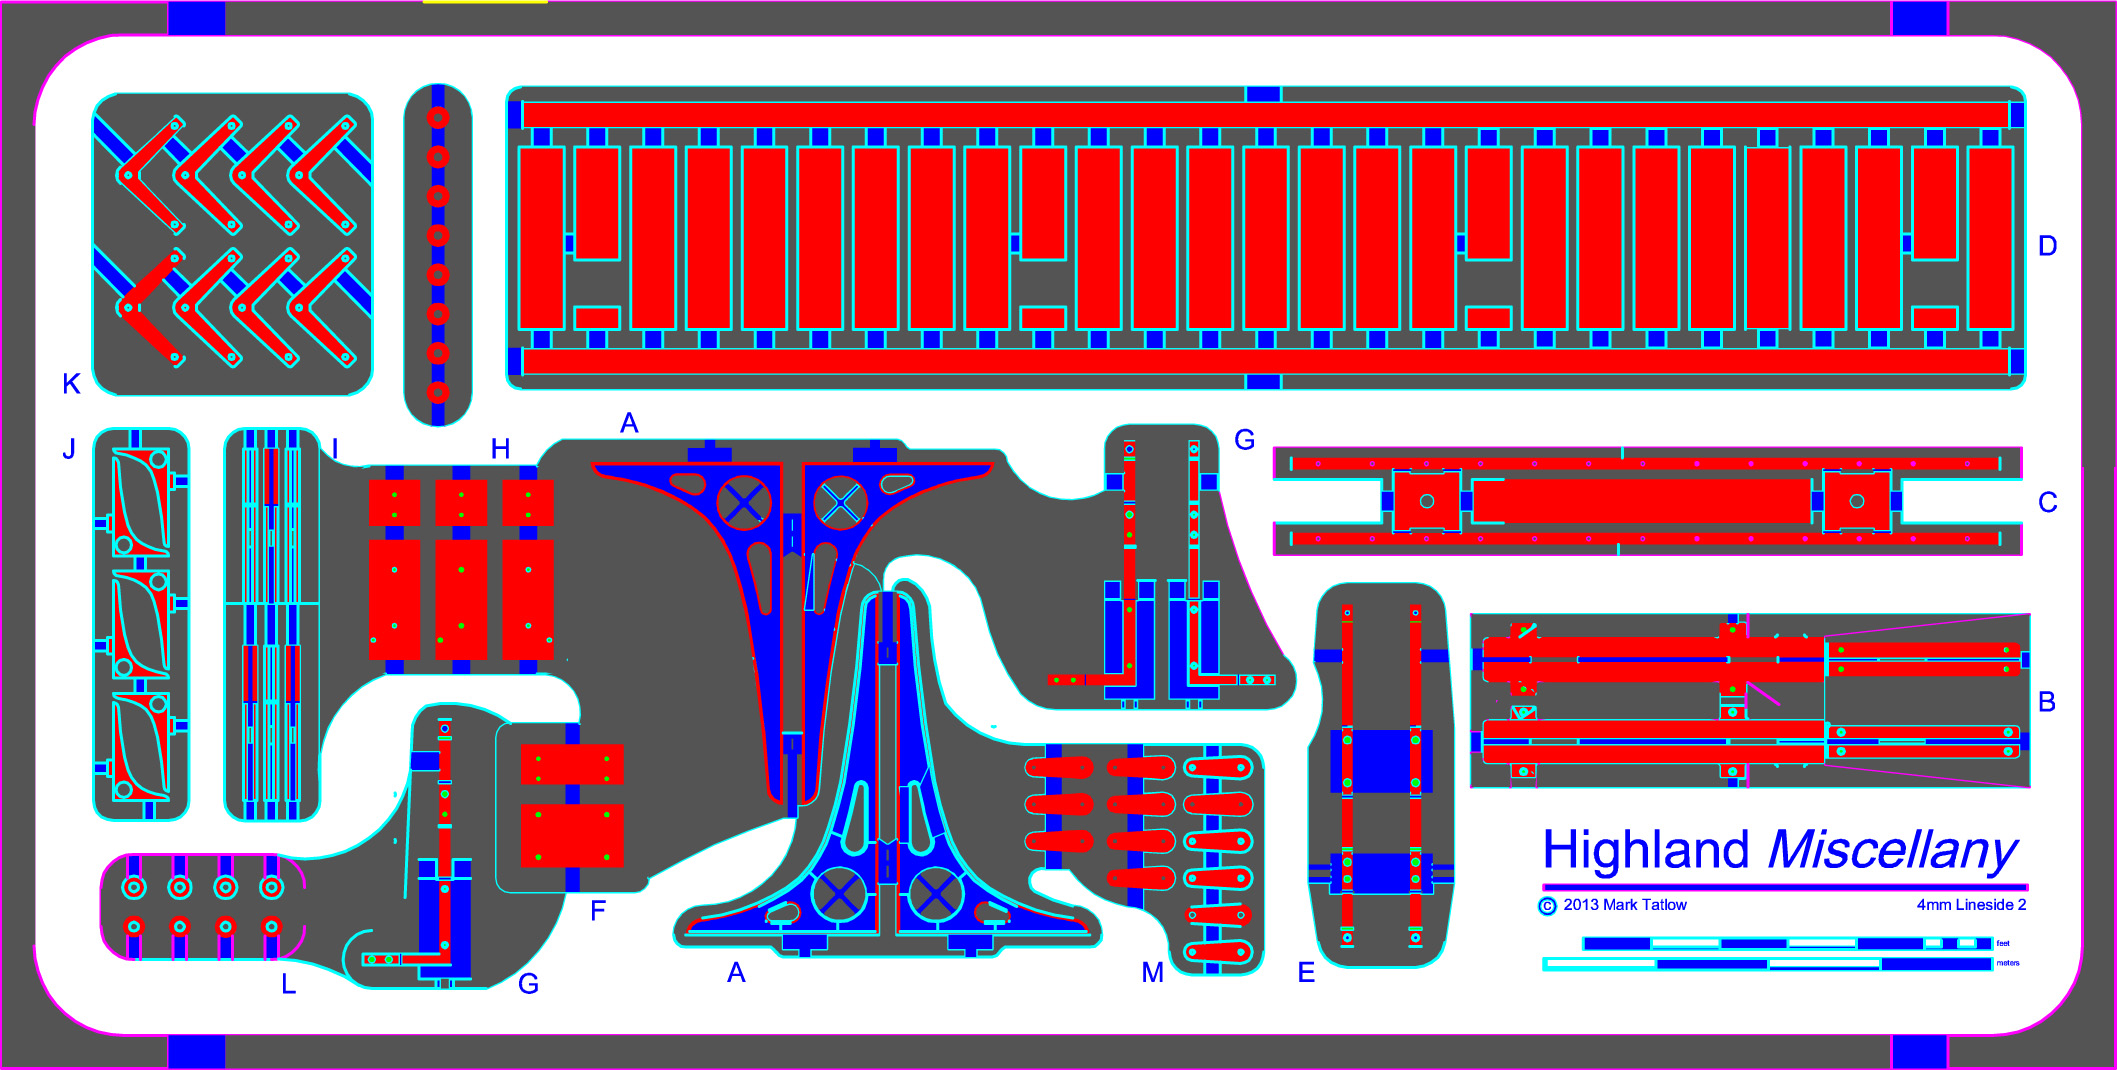
and this one is the smaller bracket; used on twin doll signals:
I have been recommended to use PPD as a first port of call for etching, so they have been winged off tonight. Lets see what a week or so brings us…………..
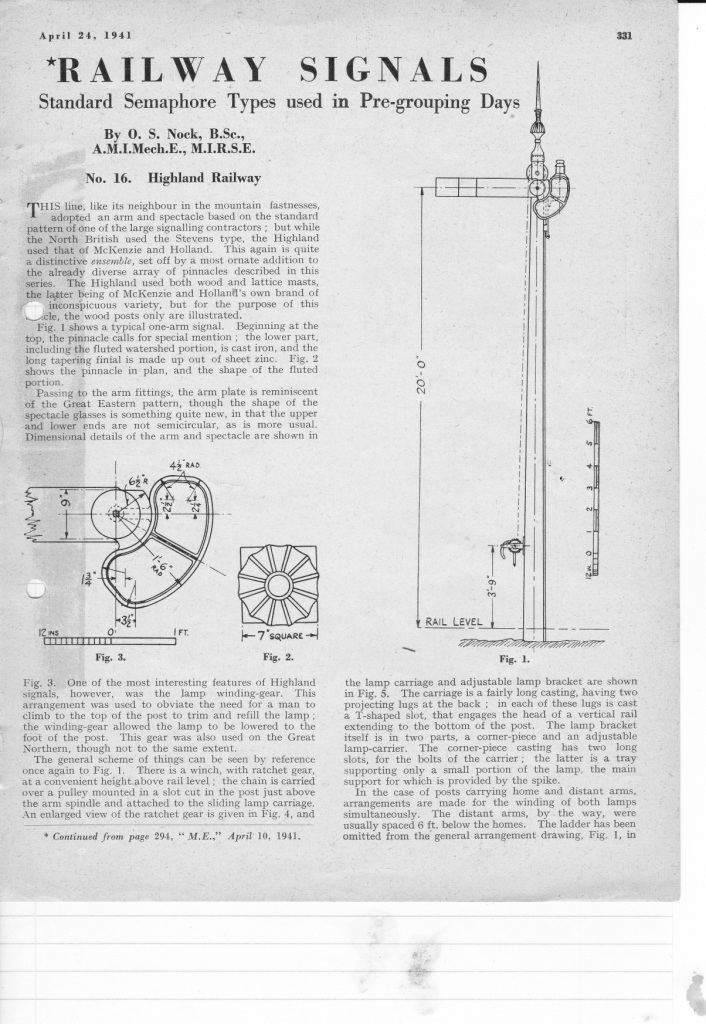
As this is now out of copyright, an article by OS Nock on the Highland’s signals from the Model Engineer might be of interest too – it may even show what I am trying to make in the etchings a little more clearly.

And for my next task, I am going to have another bash at the water column and the finial; more on this when I think I have been successful!
