Blog Archives

Lining Things Up….
As usual, I set off over the festive break with plans to do all sorts of things and failed to do any of them fully. One aspect that I did get moved forward though was the painting and lining of a couple of my six wheeled coaches.
Back in my youth, lining pens held no fear and I could genuinely dash off a fully lined coach in a few evenings. Thirty years of pushing a computer keyboard has dulled my drawing skills to the point where I am close to terrified to pick up a bow pen and I have not had the nerve to line a coach for a long time. I am confronting this fear in a couple of months by attending a class run by Ian Rathbone on painting and lining at Missenden Railway Modellers. In the meantime, however, I can still line utilising transfers, in this case those provided by Fox Transfers.
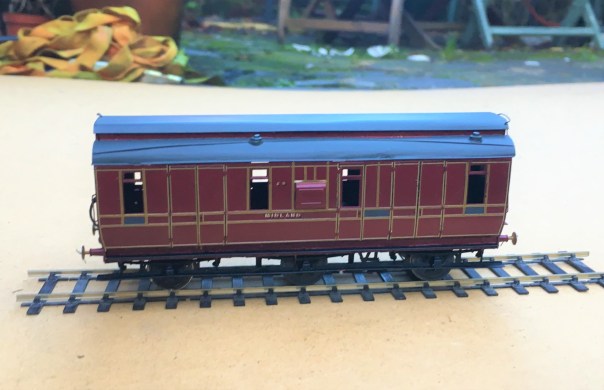
Being preformed in straight lines, these do work best for the square panelled beading of some of the Midland Clayton stock, like my dia 501 full brake. I had taken care in designing this with beading sizes that were correct (and matched the Fox Transfers). They thus work quite well I think.
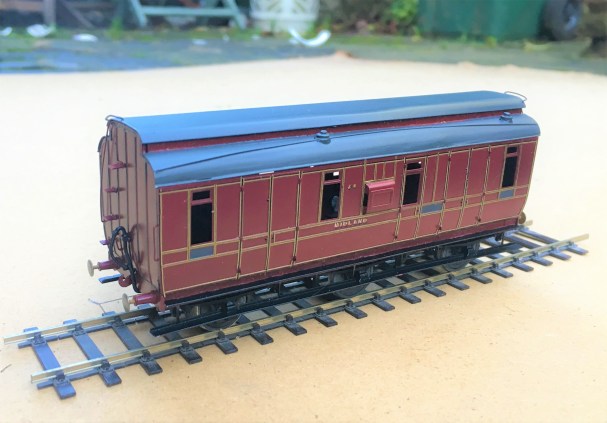
I deliberately left the handrails and door handles off at this stage to make the lining easier but the door hinges still created problems that I will need to touch in with acrylic paints; burnt ochre looks about right. I also still need to block in the black to the head and foot of the sides plus where the lengths of transfer where they crossed – I will do this with a Roting pen as I still feel confident enought to wield this!
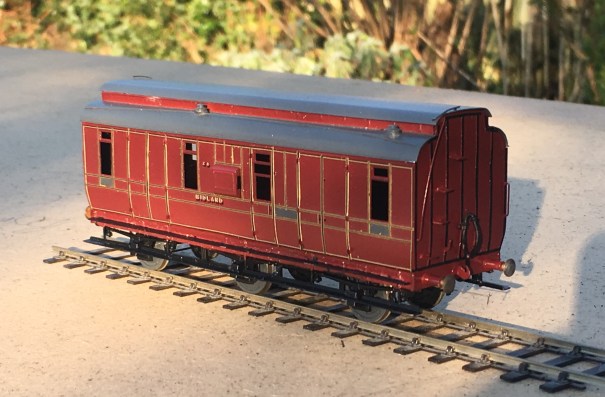
So there is still plenty to do, but I am dead chuffed with this and it will soon be finished and ready for service.
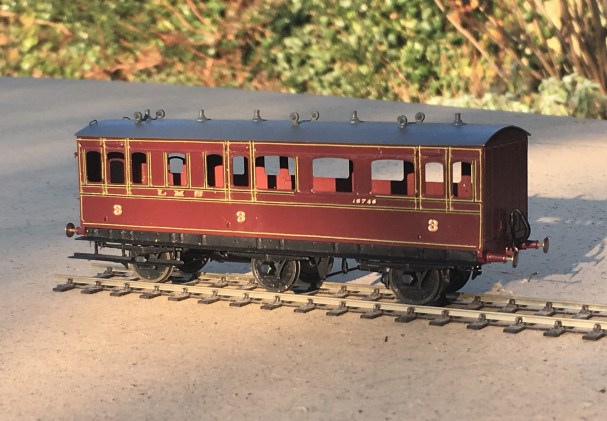
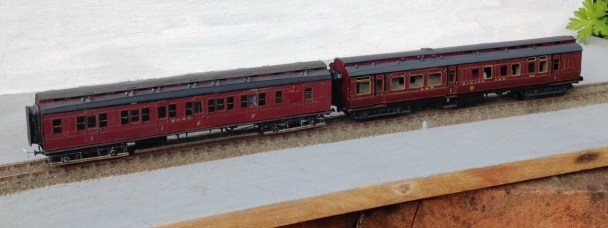
Second up is a Lochgorm Models third class saloon that has been waiting for its lining for rather longer. It is a more difficult prospect to line as it has round corners to the panels and, over the doors and windows, shallow arcs. These can’t be formed with transfers as these are straight. I have thus used the transfers for the straight sections and then brush painted the curved sections with cadmium yellow acrylic paint.
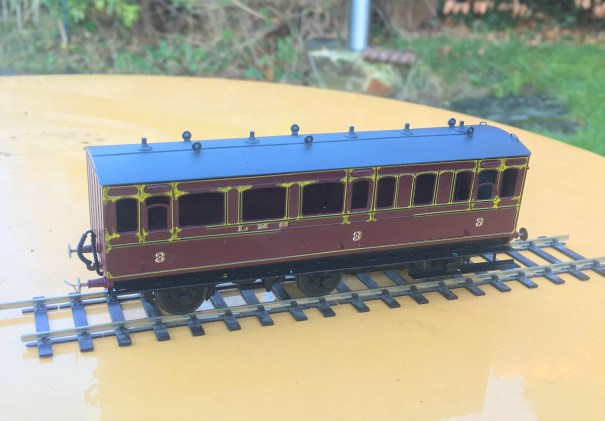
If all goes well, the Roting pen can then be used to infill the black to the centre and form the curves across the windows and doors. Lets see!

Diagram 51 Full Brakes – Test Build part 5; now in glorious technicolor!
The pages of this blog have charted the development of a proposed kit to build the Highland Railways dia 51 full brake; well finally it is finished and we get to see them in the flesh and painted up.
The kit can produce, with a bit of modification, two variants of door and I have now build both of them. First up the cupboard door version painted in crimson lake and minus full footboards.
Second we have the sliding door version, this being modelled with full step boards and in Highland Olive green.
Apologies that the technicolor photos are a bit short on gloriousness; it is fair p*ssing down today and this is the most light that I could get to take any photos!
If you want to recap on the earlier blogs that show the development of the proposed kit, you can find them here:
Part 1 – getting underway with the body
Part 2 – drawing the chassis and roof to a conclusion
Part 3 – the build of the second vehicle (sliding door version)
Part 4 – details of the spring bogies that accompany these (and many other coaches)
I do now have a batch of these back from the etchers and I aim to conclude the instructions on Monday/Tuesday. I will then make a notification that they are available but at present I cannot provide the castings and those to the bogie are rather important. If you can scavenge from a Lochgorm kit some Iracier axleboes/springs, you will be able to complete the kit; if not then I am seeking to either source some of these castings or produce my own. So watch this space.

Cornish Modelling and the Demon Barber of Fleet Street
Don’t worry – this is not announcement of being turned to the dark side of modelling “Green With Rivets” (aka the GWR)! Instead it is a reference to a week’s trip to the extreme west of Cornwall to support my wife who was appearing in a musical that was running for a week at the Minack Theatre – more of this later……
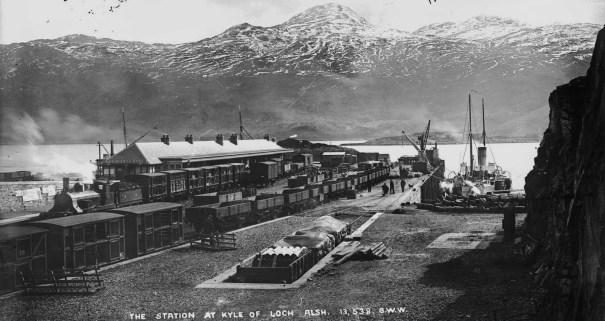
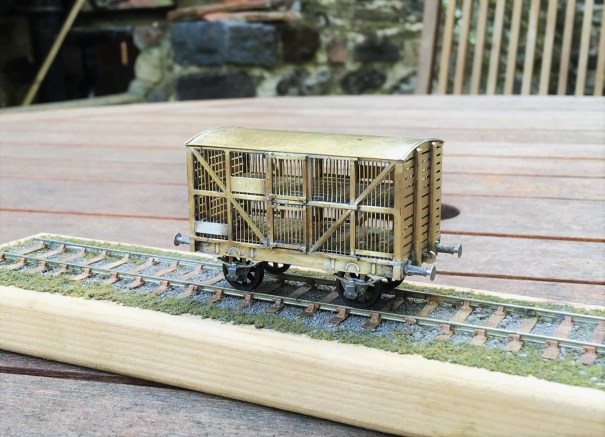
As I was expecting to have a degree of time hanging around whilst the Mrs was on stage, I took a little modelling with me – in this case, a Jones era double deck sheep van. As can be seen in this George Washington Wilson photograph of Kyle – sheep traffic was an important source of traffic to the Highland Railway – the majority of the train in the platform are sheep vans and there is also a row of them in the foreground.
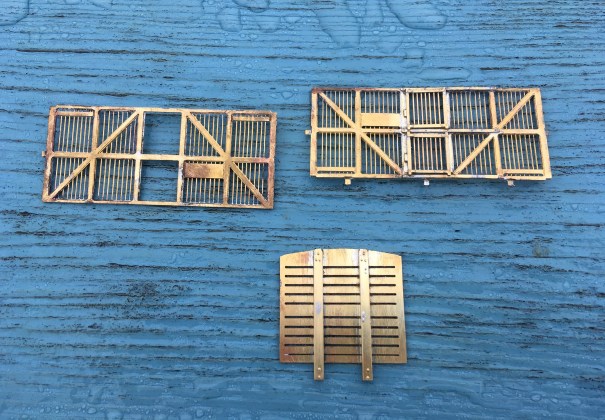
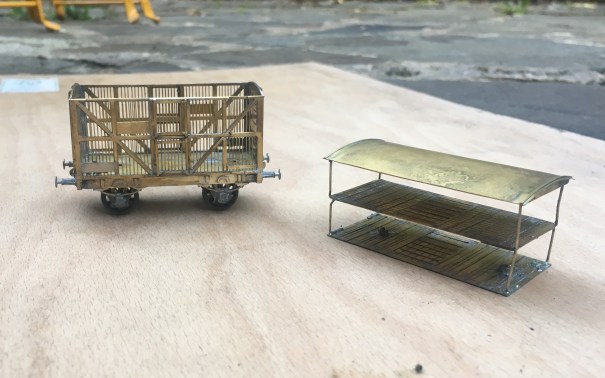
Ever with the eye to efficiency, the Highland developed a double deck van to double the number of sheep that could be transported in one vehicle. I believe that the Cambrian Railway and several railways in Ireland had similar vehicles, but otherwise these were characteristic of the Highland’s lines to the west coast and clearly I have to have a rake of them. Unfortunately, there is quite a lot of effort in each one………….for example each side below is made up of five layers of laminate (and they are delicate too)!!
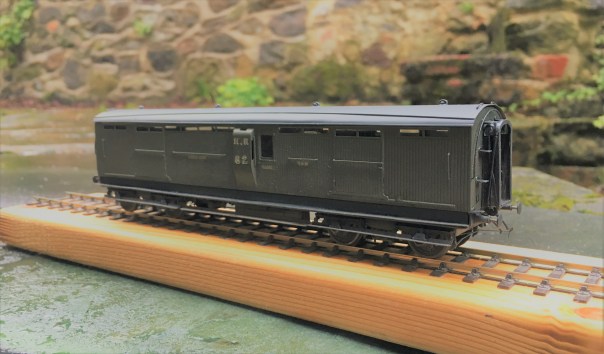
The highland had several versions of these vans, this time I chose the second era of van, which has a single door and diagonal bracing; I do have plans for some of the other diagrams so this is a topic we will revisit at some point! The starting point for this vehicle was an etched kit from the Lochgorm range (presently unavailable, but we are all hoping……) and as already hinted, it is not an easy one! This is mostly due to the delicacy of the parts and the multi-layering of the etches that take up a lot of care to line up with each other. It takes a fair few hours simply to get the sides made up and ready for assembly and then you still have the metal bracing to do!
There were a number of elements to the kit that did not work for me. The various tabs you see in the above image are to help locate the various floors with each other but in practise they are not correctly located and just get in the way – so I whipped them off! I also ditched the compensated suspension and instead used spring suspension instead with some trusty Bill Bedford sprung units.
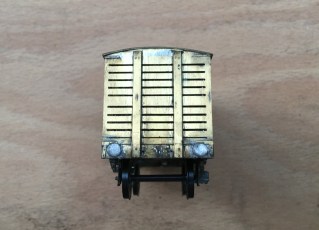
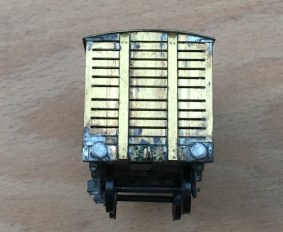
However, I did not spot the biggest problem until it was too late. There is an error with the design of the kit ends where one of them is missing the top gap between slats. The correct end is as per the right hand picture and had I have spotted this prior to the assembly of the ends, I would have been able to insert the additional gap with a piercing saw. Having missed the problem until after I had built the van, I decided not to sweat the parts apart to cut in the slat. It only shows to those that know it is wrong; the problem is that I am one of them so it does niggle!
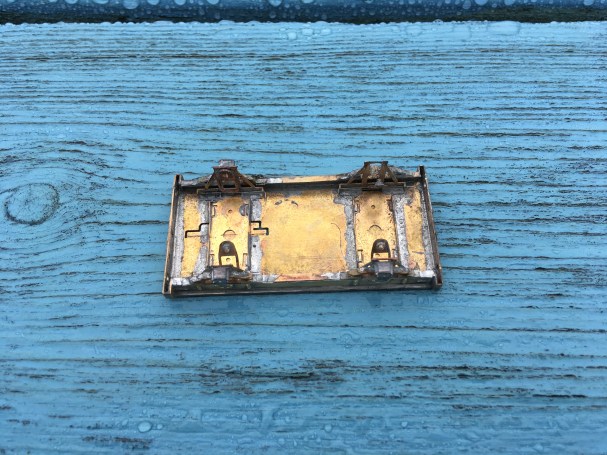
Contrary to the instructions, I did not loose lay the floors in place and instead created a cage arrangement by hanging the floors from rods that were secured to the roof. As can be seen below, this enables the roof and the floors to be released from the interior of the van. As with all my vans/coaches, this is secured in place with some bolts and nuts, so that the roof can be clamped tightly in place (I hate the cracks of doom that I see on otherwise fine models where roofs are not properly secured!). The detachable roof is necessary to both paint the vehicle but particularly populate it with the necessary sheep. You would be startled by how many sheep are required to fill one of these – around 50 and it costs a fair amount to populate each van. Thus, I have in mind casting some of my own in resin, although that is a story for another day.
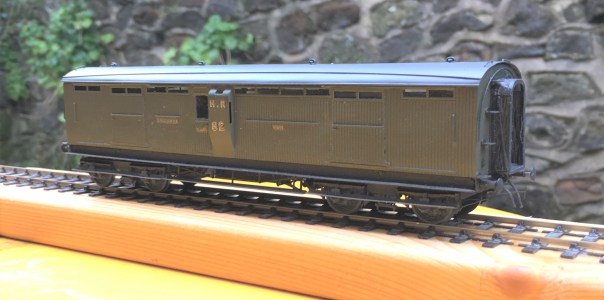
The problems with the kit did not finish with the problems noted to date. The iron strapping was not quite right, the springs for the axleboxes are too big and the brake lever/shoe seemed excessively skinny. Thus, these were all adjusted or replaced with alternatives. All this effort and problems to solve meant that the van took a great deal longer to finish than the week that I had available – so it has taken until now to photograph it. This is what it looks like and rather dainty and different I think it is too!
And what of the Minack Theatre? Well, for any that do not know it this theatre’s setting is simply breath-taking, being set in the cliff side only three miles short of Land’s End. As you can see, vertigo is an issue for visitors and all of the set, props and costumes had to be carried down to the stage level – exhausting work that took us three hours! One of other downsides of the theatre is that the seals, dolphins and basking sharks can sometimes be seen over the shoulders of the cast – which is distracting as you can imagine!
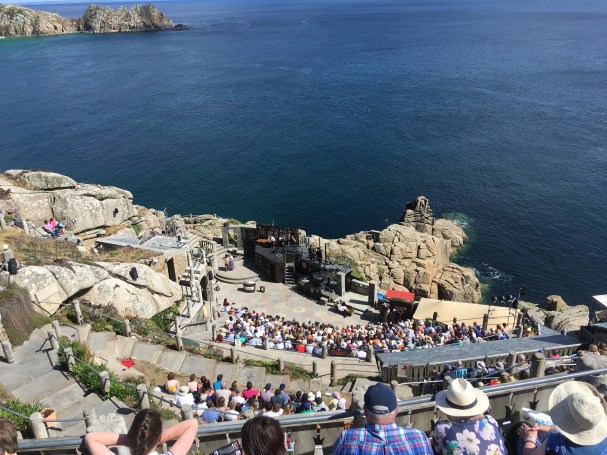
Only my wife was on stage, my duties including the stage building and front of house duties but with 7 public performances in five days, plus rehearsals there wasn’t that much time for modelling!

The musical being performed was Sweeney Todd – The Demon Barber of Fleet Street which follows the revenge that its namesake extracts on a corrupt judge and his beadle (with quite significant amounts of collateral!) for wrongly arranging for him to be transported. The most recent Hollywood version is pretty dark and definitely less watchable as a result – our version has just as death but with a great deal of humour too; especially as the leads had some pretty good comic timing to deliver it well.
The by-product of all these killings (ie bodies!) found its way into pies and one of the more jolly parts of the performance is where all the customers of these pies extol the virtues of their meaty dishes. So with apologies for my rather crude phone videoing; enjoy……………(I did, although strangely I had no taste for pasties whilst I was down in Cornwall!)………..

Clyde Bogie
The stock for Glenmutchkin has a recent addition and a rather beautiful one too.
This is a Clyde Bogie; the prototype being designed by David Jones and delivered in 1886. Initially this was a top link locomotive of the line but as time went past it was relegated to lesser duties. On Glenmutchkin it will be one of the locomotives for the branch passenger trains – equivalent to what the real locomotive did at the end of its live. This particular example was the last in service and lasted until 1930 and, as you can see, it picked up the LMS’s first livery of fully lined Crimson Lake.
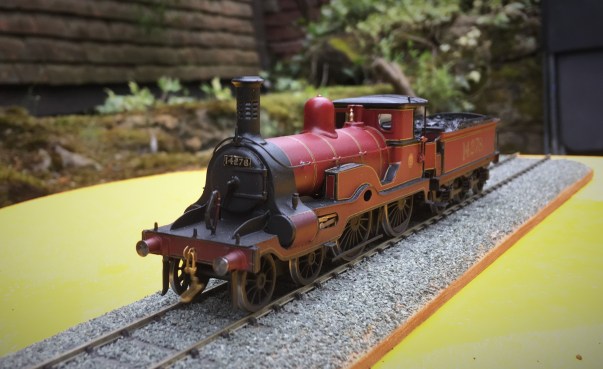
The model was built for me by John James from a Lochgorm Models etched kit. It is fair to say it was not an easy kit to master and John has cursed me a fair amount I believe for asking him to do this particular prototype…………… He would have cursed more if he also had to make the louvred chimney!

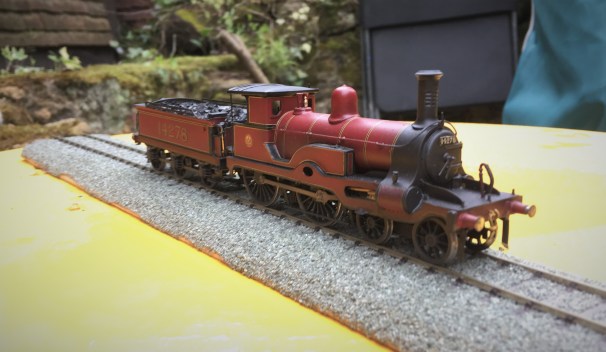
Since John has delivered it to me I have fitted a sound chip and some AJs. I need to fit some loco crew too before long. I suspect I am not going to find another sound fitted Clyde Bogie anytime soon as I have only ever seen one other built example so I can confidently say this is a first! I also seem to have disturbed the seating of the tender chassis as it is sitting rather low – a little task to attend to soon.

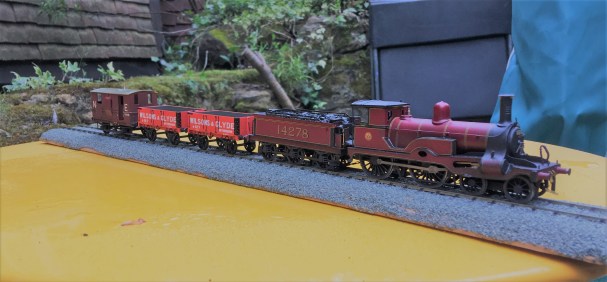
I have not been entirely idle whilst John has been busy and have been doing a number of little projects. Most of these will appear in future blogs but the pair of Wilsons & Clyde open wagons will not because this is effectively the same as the NB Jubilee Wagon I discussed previously. However, it is worth noting that Wilsons and Clyde were known to be one of the major providers of loco coal to the Highland so I am presuming these to be loco coal wagons.
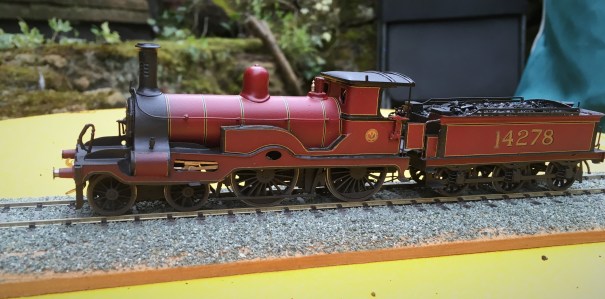
And here is a picture of 14278 in action; albeit not at this point with sound fitted.

Dirty Models……..
Now, I wonder if that heading will gather a few extra viewings………..?
As I have mentioned before on this blog, every few months I catch up with a group of mates to have a joint modelling session. The general gist of these is a combination of banter, a bit of modelling, more banter, a visit to the pub, even banter, a bit more modelling and all nicely rounded off with some more banter.
Last week saw us on the south coast to do some weathering – or rather some of us. One of our number was preparing for their imminent marriage whereas Oly (one half of OTCM) felt his budding TV stardoom was a sufficient excuse to hang up his airbrush. We do fear that Oly may not return to the fold; preferring instead to do his modelling with Brad, Leonardo and Denzil once he makes his silver screen debut in the autumn – don’t forget your roots Oly……….
We were all concentrating on different things; Peter constructed the better part of a bridge for his Aultbea layout and Chris was weathering some rather neat little shunters. For my part, I concentrated on weathering some of the stock that I have been building lately (and sometimes not so lately!):
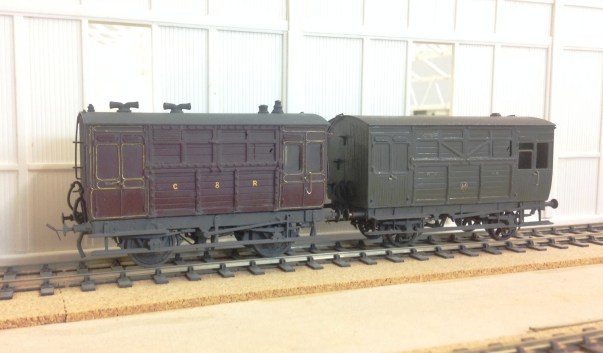
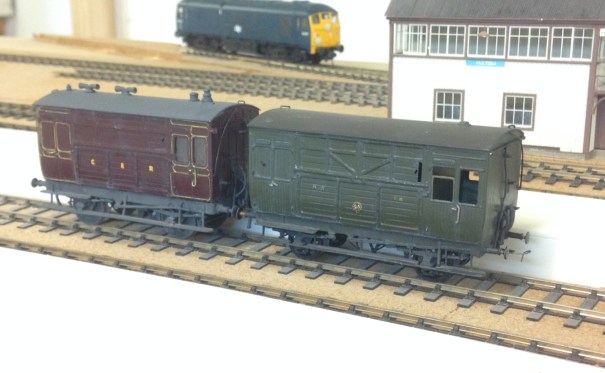
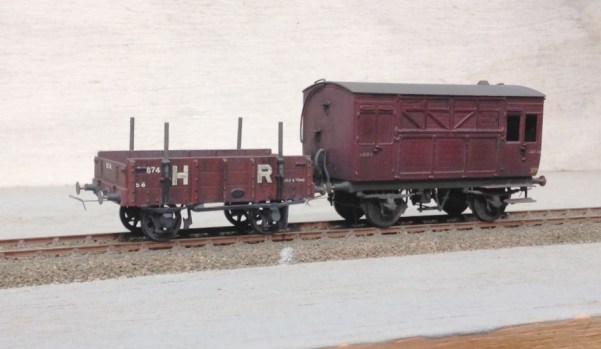
First up is a pair of horseboxes. On the right is my HR version based on a Microrail kit – still in need of some glazing. On the left is the Caledonian’s equivalent based on a kit from by Spratt & Winkle. Both are in their pre-group livery as can be seen. As such stock was used in passenger trains, I have sought to give them an aged but largely cleaned feel – with the dirt largely present around ironwork and difficult to clean spots.
Having mucked up the weathering of some brake vans at the previous weathering session, I was also keen to get these corrected. This is where I have got with them.
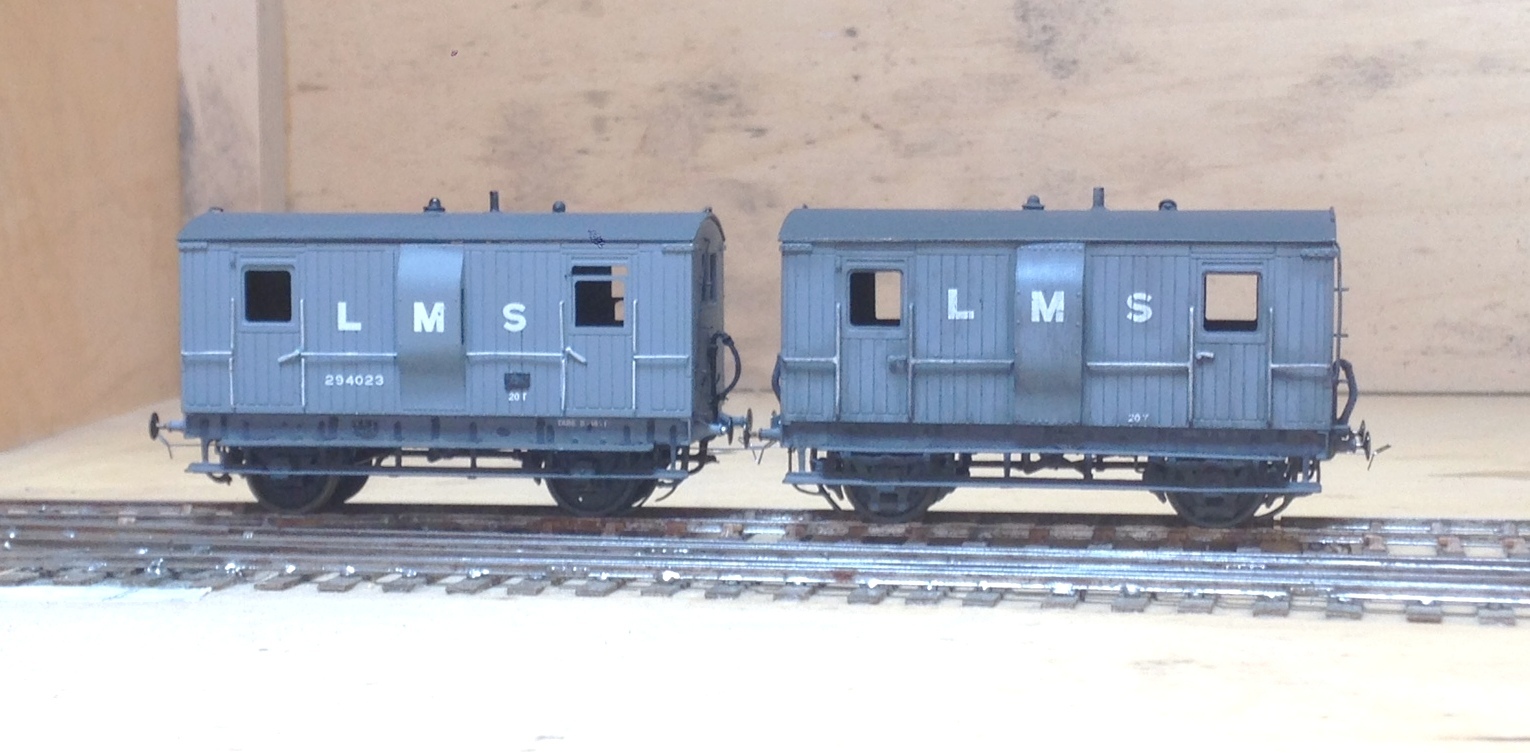
As can be seen, I do not follow the school of thought that the pre-group or 1920’s era stock was constantly pristine. If you bother to look at contemporary photographs, little is clean and some of it is downright grubby. Railways in the steam era were very dirty places; it is inevitable where so much coal, ash and smoke prevail. Furthermore, I can not see even the most houseproud of railway companies regularly (or probably ever) cleaning their goods stock and most of these show stock that is care worn and soiled. This is the feel I am seeking to capture; not the utterly neglected and on its last legs look of the final days of steam but of railway materials that earn a living the hard way.
The pair of brake vans above are to HR diagram 39 from 1922 and are from a Lochgorm Models kit. There is some doubt whether they were delivered in 1922, as there are no known pictures of any of them in HR livery. However, I applying the “its my trainset rule” a number of modellers have painted them in Highland colours; including Paul Bannerman whose example is below.
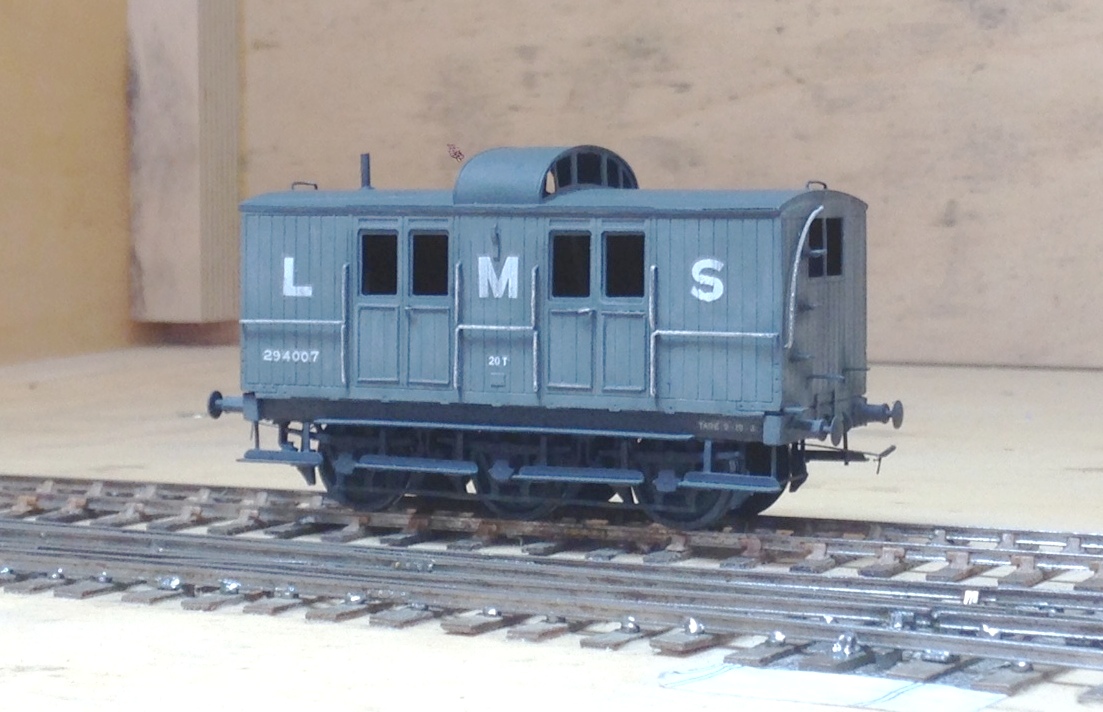
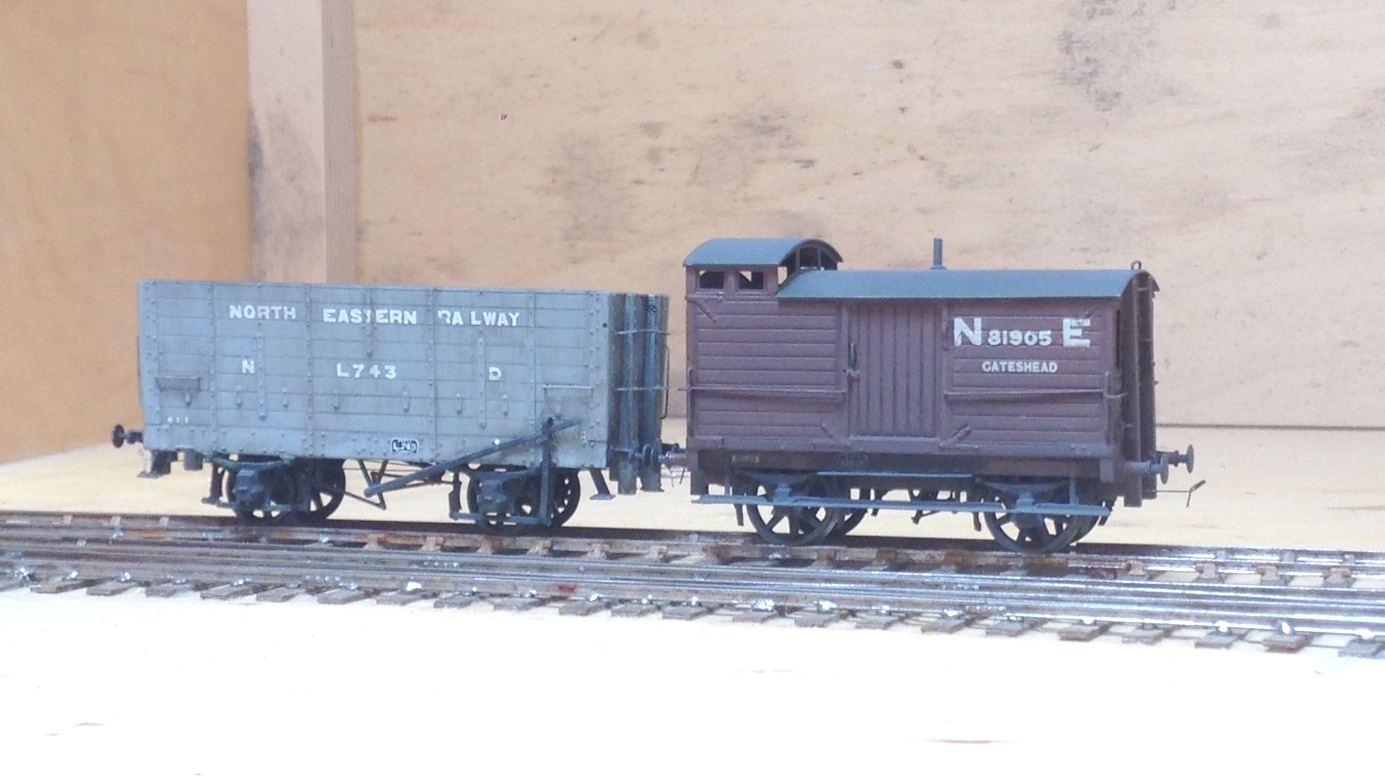
The other highland brake van I weathered was the diagram 38 brake van. This originates from a Microrail kit and may well still be available from David Geen occasionally at shows as he does own the rights to the artwork. I have modified this with the early pattern roof look outs. These allowed the guard to look over the train around the twisting curves that characterised parts of the Highland’s system. However, there were complaints about whacked heads as the guards came up and down the steps to look onto the lookouts and as a result they were modified with approach cutouts on the roof – take a look at the Lochgorm’s page above to see an example.
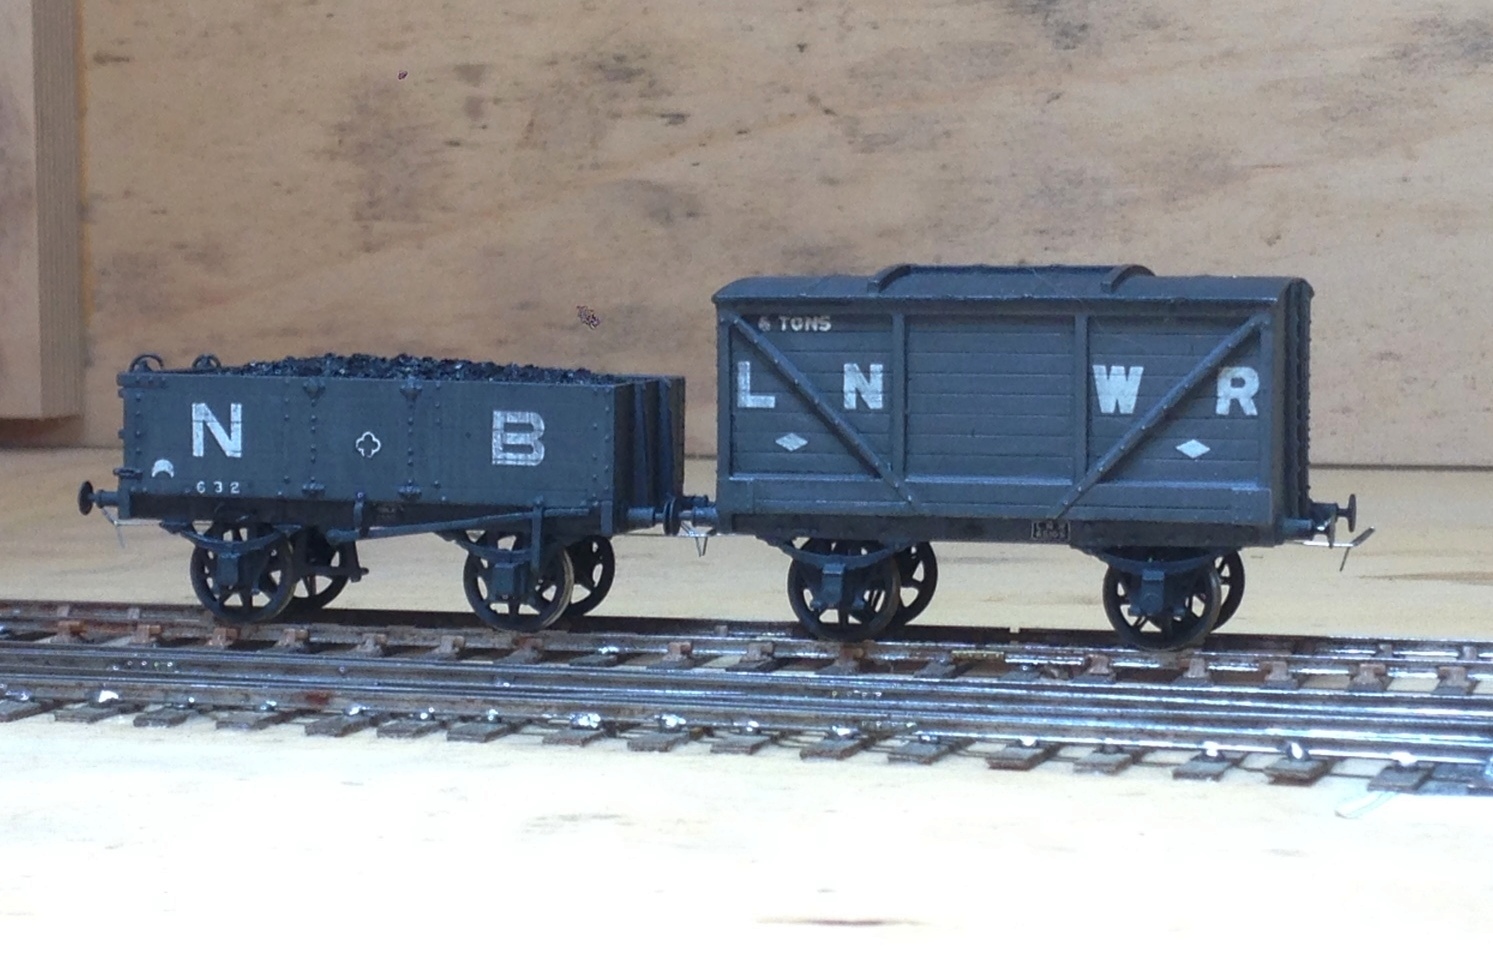
Next up on the weathering front were some wagons and NPCS. The first pictures being the weathering to a couple of the items I have described in the pages here – the Oxford Rail NB jubilee wagon and the Mousa Models LNWR van.
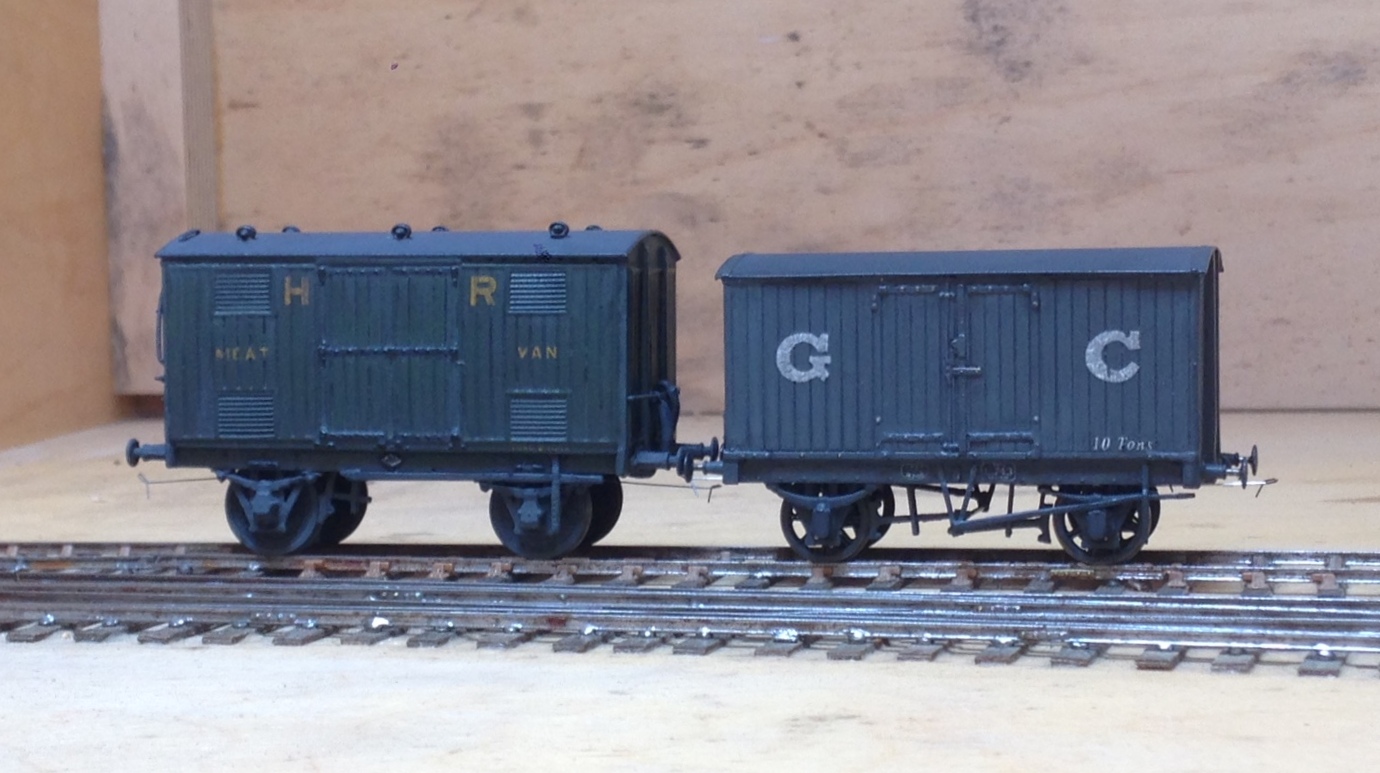
And then some rather more ancient models of mine, a Highland Railway meat van from a Sutherland Castings kit and a GC van from another Mousa Models kit.
Finally, a group of wagons for Benfieldside. The hoppers have been seen before and the brake van we will hear more of another day.
More Weathering Results
The class 24 skinhead was not the only output from the weathering day last weekend – indeed, it was a very busy day!

First up were some of my 1920’s rilling stock – both Highland, a timber truck from a Model Wagon Co whitemetal kit and a horsebox from a Lochgorm etched kit. Both are now close to finished – a load is requird for the former and some glass for the latter (and probably a light colour inside the groom’s compartment.
Neat vehicles though and I am pleased with them – less so than the brakevans that I managed to dislodge the lettering upon and may well need to be stripped – as you would imagine, no photos of these and nor any photo’s from today’s efforts with paintstripper!
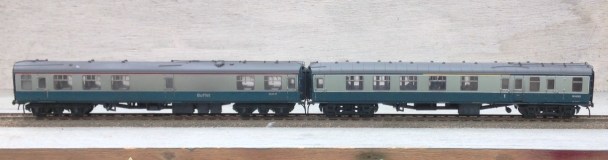
But the main additional output was some more coaches for Portchullin. I managed three and Peter Bond looked close to finishing his third as I left, so we had a proper little production line going!
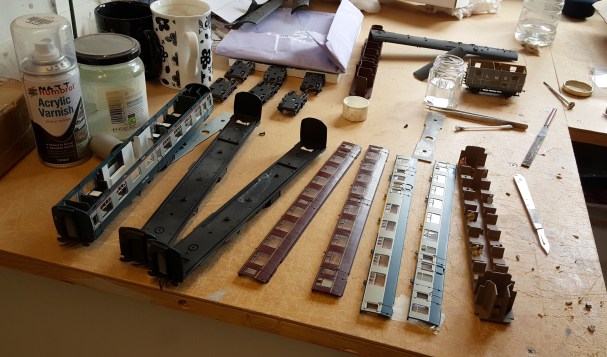
The technique was essentially the same as I described for the class 24, although as you can see the model was broken down rather more (in part to populate the interior of the carriages – I do hate seeing trainloads of empty coaches on model railways!). However, for the maroon coach, rather than using thinners to take back off the paint, T-Cut was used. This is an abrasive so does not work in quite the same manner but acheives broadly the same effect except that it also polishes the paint. I did not think this was right for the blue/grey coaches (they were finished in satin in reality) but the maroon coaches were in a gloss finish and the T-cut gives a slight sheen without actually getting to gloss. I did eventually think it was a bit too shiny, so did waft over with the finest of sprays of the “gunk” again just to take it back a touch.
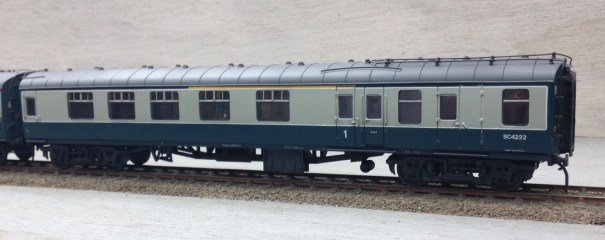
The Bachmann Mk 1s are very good models that have stood the test of time well. They are a doddle to convert to P4; taking maybe 60-80 minutes a go. There are a couple of things to look out for – firstly is that the side frames are a touch to tight for true guage wheels and need to be filed back. The plastic is quite flexible and does create burrs fairly easily, so once the filing has been done some work with a sharp scalpel is required to clean this up.
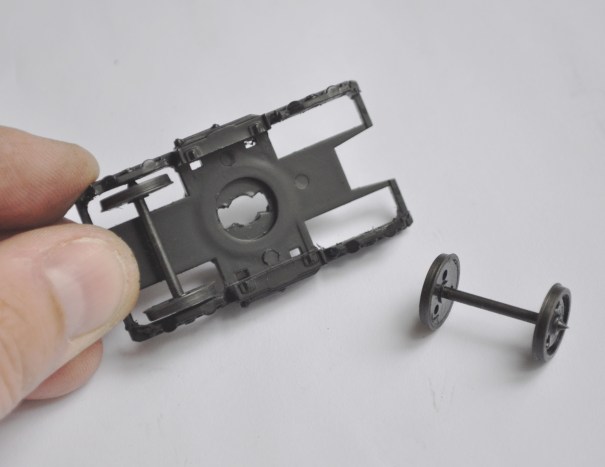
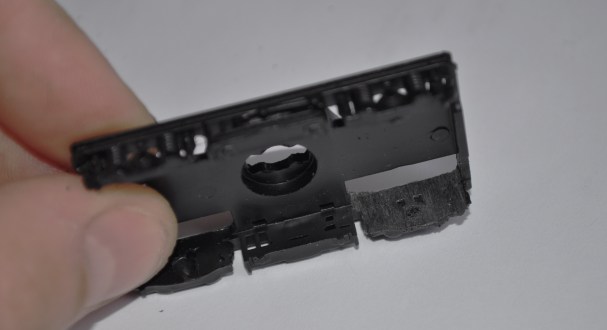
The next caution is that the bogie mounts are not always parallel with the rail head, meaning that the bogie can lean forward or backward. This is caused by the chassis being screwd a little over-hard onto the body, causing it to flex slightly. You are just as likely to have done this as the manufacturers and I get around it by making it rock slightly with some thin (20 thou) strip like this.
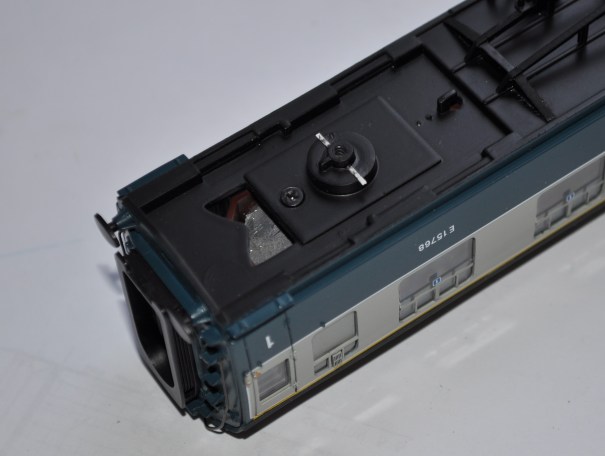
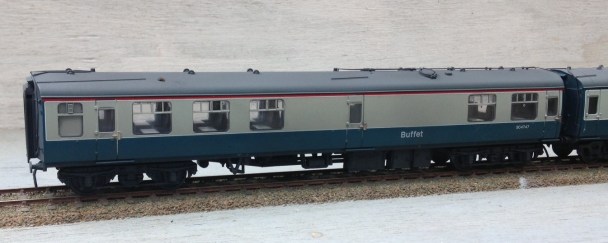
Arguably one of their weaknesses is the corridor connection which is a tad toy-train (well it is a toy train!). A dodge that I have started to do is fit a few of my vehicles with some black foam in the door jambs. Make this so that it sticks out 3-4mm and engages in the equivilent of the adjacent vehicle to block out the light. A simple dodge that makes a big difference. It does mean that the vehicles that are fitted thus have to be in the centre of the train (as the foam looks crude where it is exposed) but this can be done with care – for example a buffet would nearly always be in the centre of a train, so this is the vehicle of the two I fitted with this.

New Shoes for Some Old Friends
Over the last few weeks, I have been revisiting a number of model coaches that I have built in the past, typically quite some time in the past as most of these have been around since either my teens or twentys!
Over the years techniques have changed and I undoubtedly would not build most of them in the manner that I originally built them if I was confronted with doing them again. Having said this, on the whole my handiwork – especially in respect of the painting and lining was really quite good. I seem to have lost my lining mojo in particular, so I am not sure I could line as well as this now. This is something that I really must get to grips with this, as I still have a lot to do!
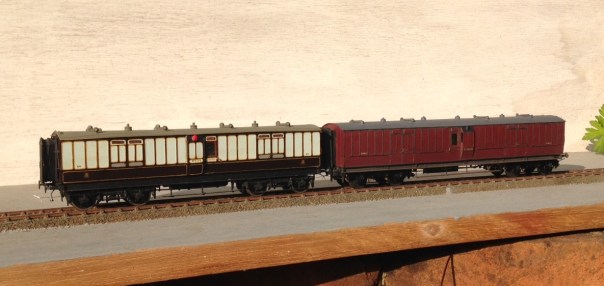
a pair of full brakes, the one to the left is a West Coast Joint Stock (from a London Road Models kit) and that to the right is straight LNWR (from a Microrail kit)
But the biggest area of difficulty with the coaches is that the bogies were generally formed around beam compensation units. These are OK for a couple of coaches behind a branch train but they impart far too much friction for a full main-line train as I aspire too. This is impossible to overcome whilst retaining the compensation units, the bar is the cause of the problem and it has to go!
To overcome this, Bill Bedford sprung boiges are being retro-fitting to all of my existing stock. These rely on separate hornblocks that secure a pin-point bearing in them – so rolling resistance is significantly reduced. The hornblocks are held in place by way of guitar wire and the effect is that they glide around the trackwork. They thus give the impression of weight and inertia that is much better than compensation (it is possible to get compensation that does not use the rocking beams that are the cause of the fritchion I am complaining about).
A Midland & North British luggage composite (from a PC Models kit) and a LMS (ex Midland) dining car (from a 5522 Models kit).
The Bill Bedford units are only an inner bogie and they still need to have some form of detailing on the outside. Some of these have entirely cosmetic outers, either of plastic or white metal but the two Midland coaches and the Highland TPO have something slightly different. On these, I utilised the original etched bogie sides and laminated them onto the Bill Bedford inners. This is very successful as it improves the Bill Bedfords notably by making them a lot stiffer and you get the crispness of the etching process.
This is one of my fathers, so I can’t claim credit for anything but the bogies. A Highland Railway TP (fully scratchbuilt). Obviously, no painting has as yet been done, so it does rather look like a ganster with gold teeth!
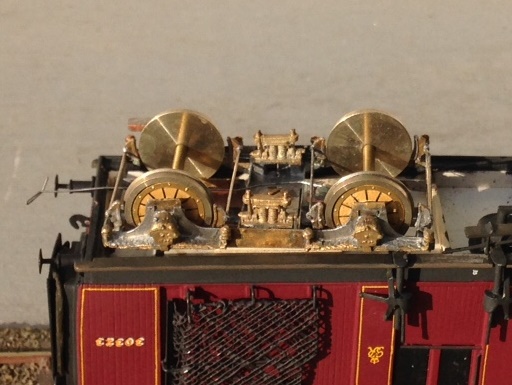
It is rather challenging to see how the Bed Bedford sprining unit sites inside the outer skins (from a Lochgorm kit) – so I will write up the process in a future blog – but this is what it looks like from the outside.
If, by the way you fancy some Fox Pressed Steel bogies that are neatly sprung and look the part – and almost all pre-group modellers ought to – keep watching the space. Subject to a test build or two, there will shortly be one available on the market.
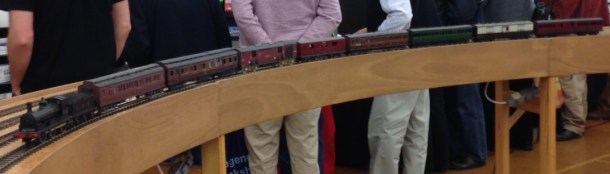
To test them, I took them and a few other coaches to ExpoEM to use their test track. Here we see a Barney with eight on – albeit a rather od mix for the train and there is a fair amount of painting and lining still to be done.
And to prove that they really do work and also to allow you to see how they glide, a quick youtube video: https://www.youtube.com/watch?v=6D7a_cWwGhg&feature=youtu.be

Scrap Tank Test Build – Part 7; Boiler Assembly and Finishing the Cab
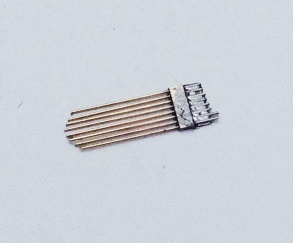
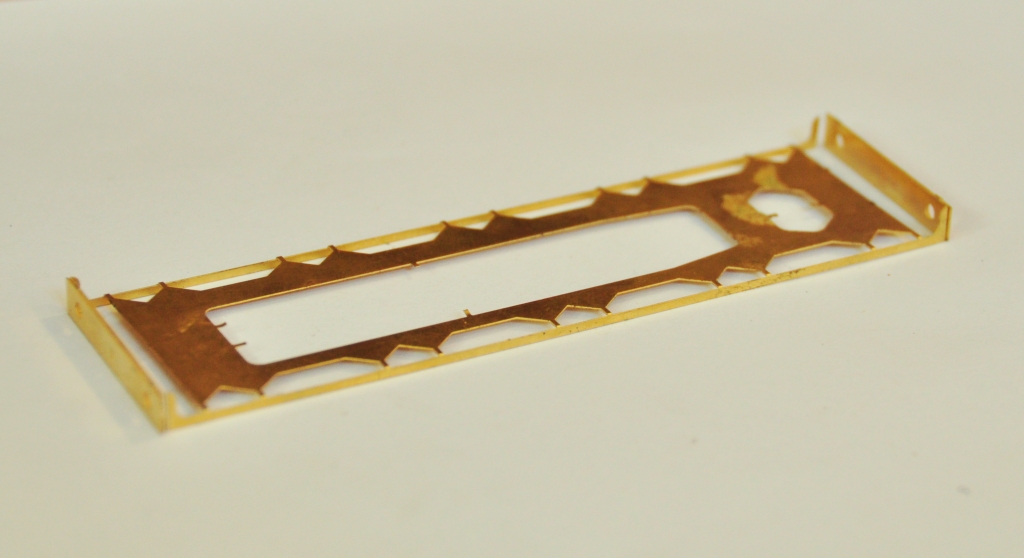
Next up is the finishing of the detailing of the cab. Common with many tank engines there were grilles over the rear windows. For these, I toyed with the idea of doing these as a single etch, a bit like the Mainly Trains one (and possibly others) but elected instead that the slight roundness of the bars needed to be captured, so this meant that brass rods were going to be required. If I had either etched small holes or soldered these on top of the cab etch, I felt that getting consistency of spacing was unlikely and that this would detract from the finished effect. Thus, it was time for a little jig.
This jig is simply a sheet of brass with holes for the wire at the appropriate spacings along with half etched lines arranged such that when the jig is folded over, the wire is trapped between them. This is what it looks like with the wire in and the jig folded over (along with a dab of solder to hold it all still):
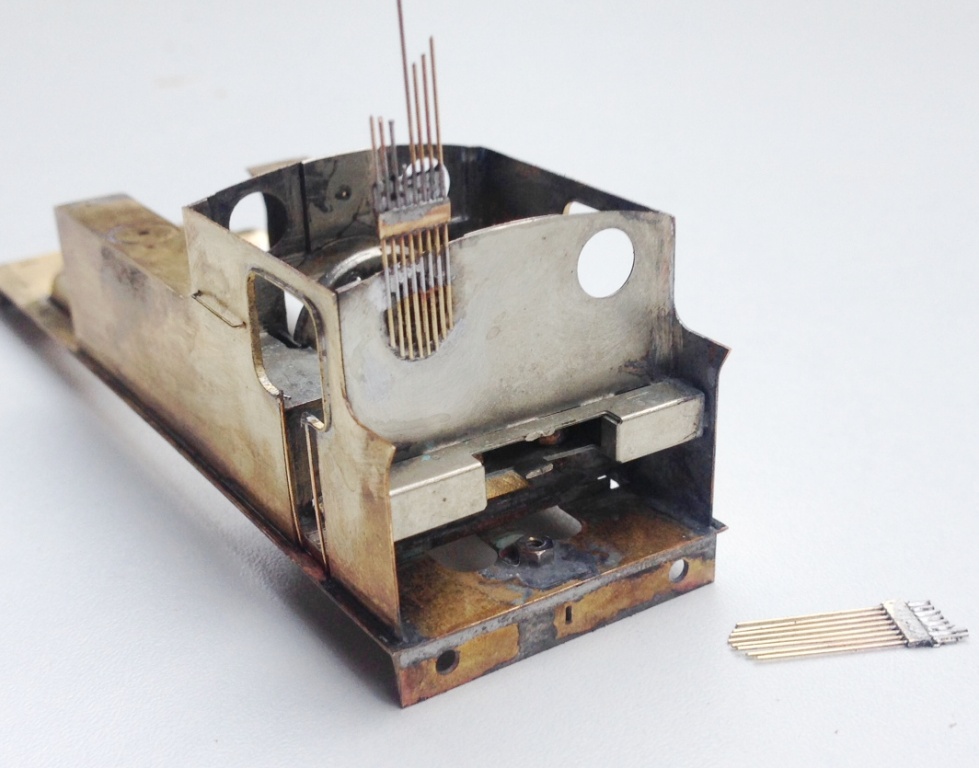
You will note that in the picture above, I have trimmed the wire rods to a gentle curve to reflect the curve of the spectacle plate and in the picture below, this has been soldered on the ring around the window. The jig is then snipped off and the rods can be cut away. I found that by using a scalpel, it was possible to cut a nick in the rods and then the wire could be carefully lifts so that it snapped at the point of the nick. It was necessary to ensure that the rods were soldered well to the sides as if this joint failed it was then pretty difficult to get them soldered back down neatly; I will include a space jig in the production etch of the kit to give the user a second chance!
There is also a beading around the cab side openings, a common feature on pre-grouping locomotives. This was relatively simple to fit, although I did make it a tad too fat deliberately to assist in the process – it can then be filled back to a thinner dimension and in the process any slight irregularities taken away in the filing. In this example the stanchions are probably a bit far away from the cab sheets, so there will be a slight adjustment on the final version.
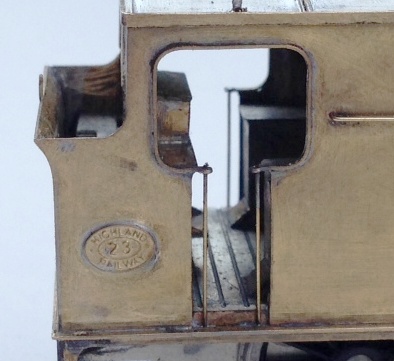
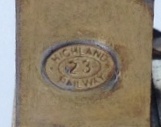
Also worthy of note is the cabside number plate, which I am dead chuffed with. This is a cruel enlargement as the whole plate is only 6mm across and to clearly be able to read the text which is only 0.7mm high is pretty good I reckon!
After finishing the cab detailing, it was time to add the boiler onto the tanks/running plate and she is beginning to look like the real thing, although perhaps looking a little naked due to the missing dome and chimney at present!
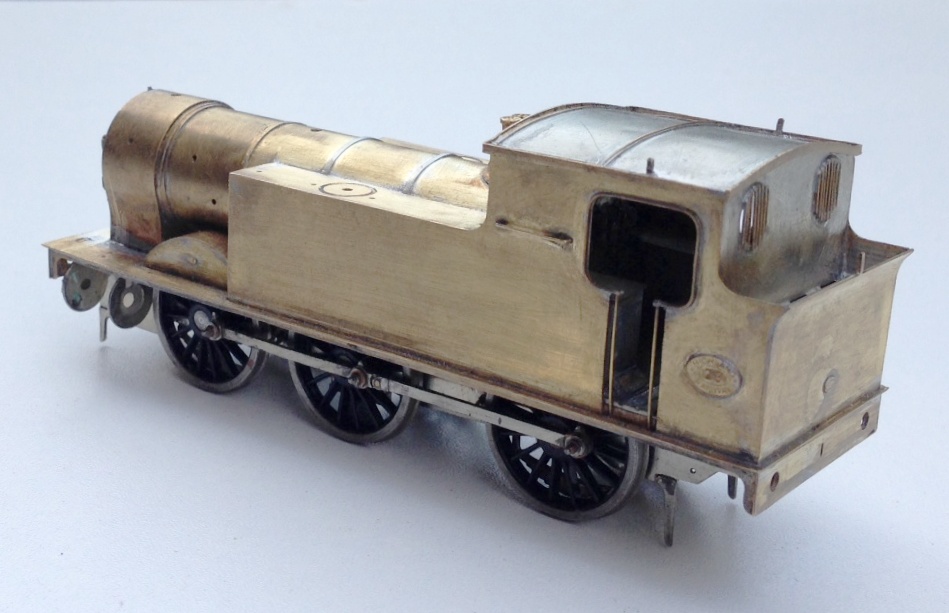
I have fitted a safety valve bonnet and safety valves from those intended for the Strath/Loch and available from Lochgorm Models. I also formed the front splashers, which I had tried to make easier by the use of some tabs and formers. These did assist in the assembly but I then found that they fouled with the wheels, as I had made the splashers true to scale and the tolerances did not allow for the tabs. I will have another think here and might come up with a jig, as splashers are sometimes a bit painful to fit.
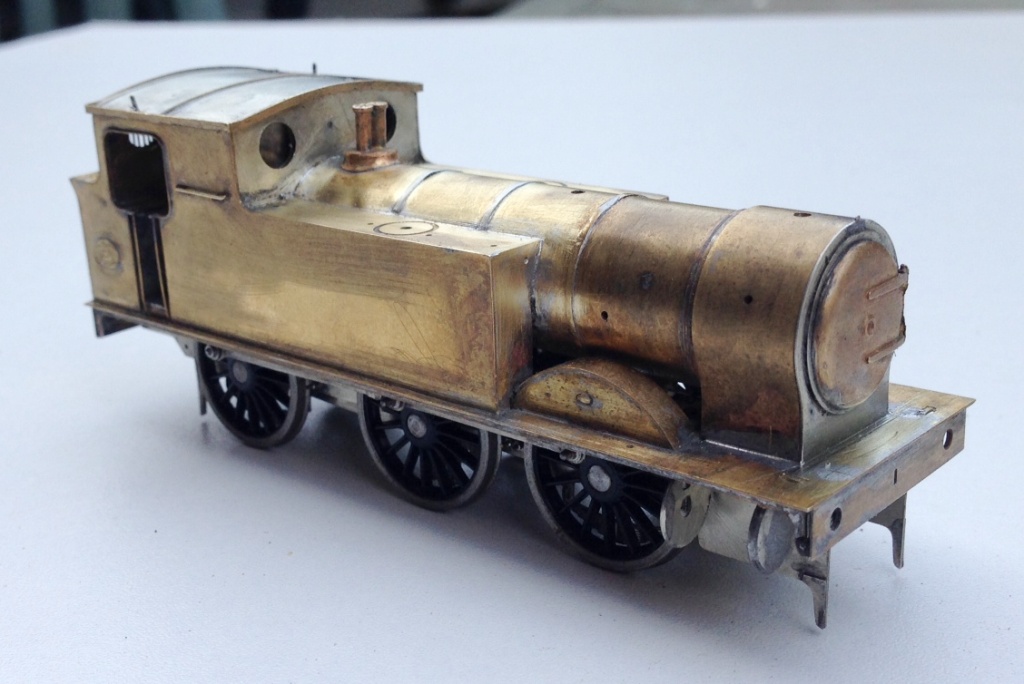
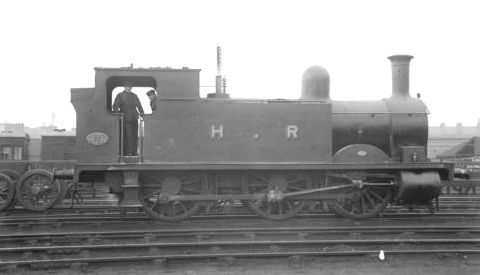
And this is what she presently looks like; definitely beginning to look like the real thing (a reminder of which is below). For those of you that are coming to Scalefour North I will bring her along for you to have a look at. As we are now about up to date with her construction (you didn’t think I can build that quickly did you?!?!) and because I am away the whole of this weekend at Scalefour North, there will be a hiatus a bit before the next posting.
Scrap Tank Test Build – Part 6; Boiler and Running Plate
Now that the much of the bulk of the above running plate work has been completed, the running plate valences can be fitted. As these are nearly always long and thin, they are prone to distortion in the kits I have built – so it is time for another jig!! This one holds the valences at numerous places to stop it flexing and to hold it straight.
With this, it is a doddle to fit the valences in their correct place and solder them without distortion. I did find that the running plate flexed significantly at the end of the tanks; so the final version is going to include a pair of temporary stiffeners that fold down and stop this. This would be the moment when they are removed to allow the valancing to take their place.
And onto the boiler. In a departure from normal practise, I am not including a flat etch to be rolled into a boiler – it is relatively difficult to get even a pre-rolled boiler into a neat tube without a visible seam and if you do not have a rolling machine it is effectively impossible to do so. In addition, where boilers have been half etched to create boiler bands I find that the half etched elements that remain are overly delicate. This was something that caught me out a while back when I drilled such and area to take handrail knobs and badly distorted the metal – this kit is still sitting in its box now and I am probably going to have to replace the boiler.
With these problems in mind, I simply used a piece of brass tube from Eileens; easier and much more durable and if I were sratch-building I would not even think of taking a different route. This did still leave the need for some rolled parts, to make the smokebox and I have sought to use another little trick here to make these easier to fit – some tags and eyes. The tags are strips of half etching that pass through the eyes and then tugged back. This can’t impart a curve into the metal but does allow the parts to be pulled tight and makes it easier to solder into place without much of lip. Mind you, they were a tad short and will be lengthened slightly in the production run.
A second additional laminate is then needed to form the outside of the smokebox and down onto the saddle.

I did find another little error when it came to the front of the smokebox. Whilst the diameter for the front that I had drawn had allowed for the thickness of the two laminates, when you fit these there is also a layer of solder between them and whilst this ought not be that thick, it was just enough to make the fronts too small. In the production run, I will deliberately make this a tad too big as it is easy enough to file it back but much more difficult to add the missing metal (I didn’t, I just made a fresh one from sheet metal). The smokebox door is not mine, the door from the Lochgorm Models Loch is the right size judging by the photographs (note the drawing in the old man’s book has it being smaller but this does not match the photos, so I ignored it in this respect – sorry Dad!).
The downside of using tube as a boiler is that boiler bands need to be considered. I have provided these in the kit (again using the strap and eye technique). I chose to fit them on this kit although in practise I think any metal boiler band is too thick and would probably have done it with a transfer sheet if this was not a test build (done prior to painting, the thickness of the transfer is enough to show through the paint on what will be a single colour to the boiler).
Only the top of the boiler is visible after the first ring and a bit, so can be cut away to leave lots of room for the motor, weighting and DCC chip. I may try and fit this with sound, so who can give a view on what it might have sounded like – a jinty is my favoured guess?
Christmas is the season for…………. jolly well finishing stuff off!
Over the break, I have been concentrating on trying to finish things. Like many people, I find it much easier to start a kit or project than it is to get it fully finished. Indeed, do we every truly finish our models – certainly not our layouts!
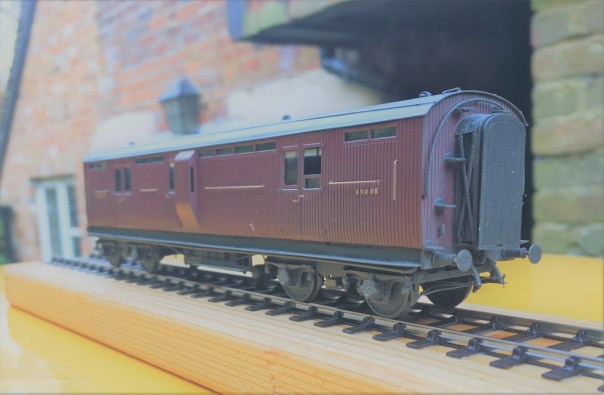
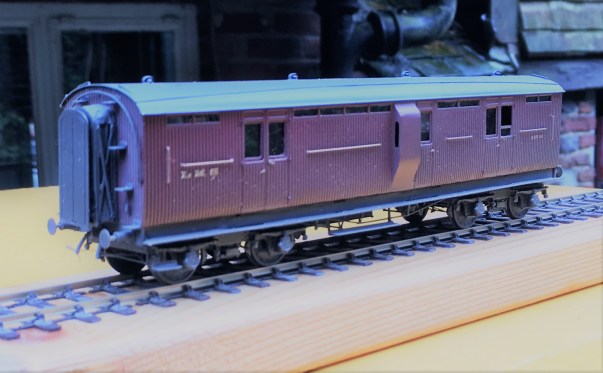
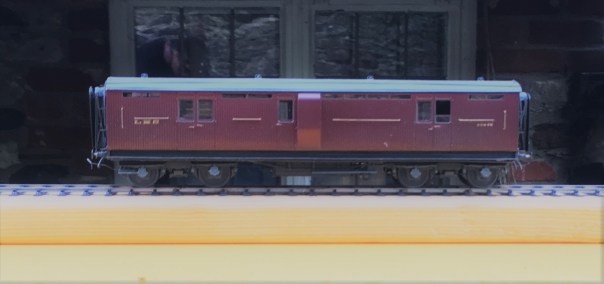
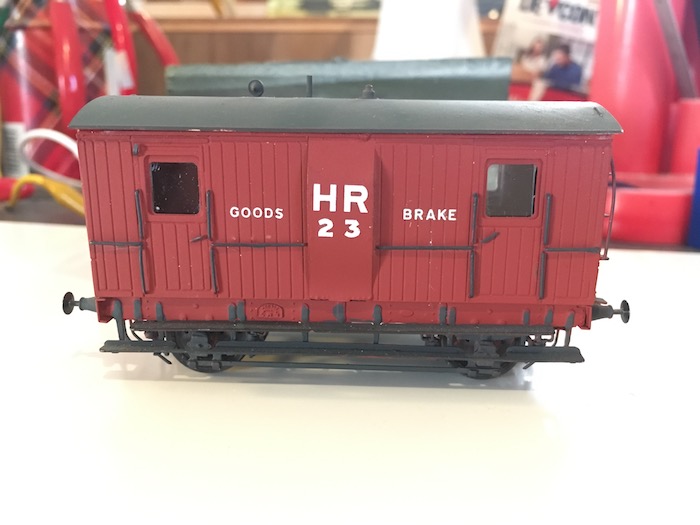
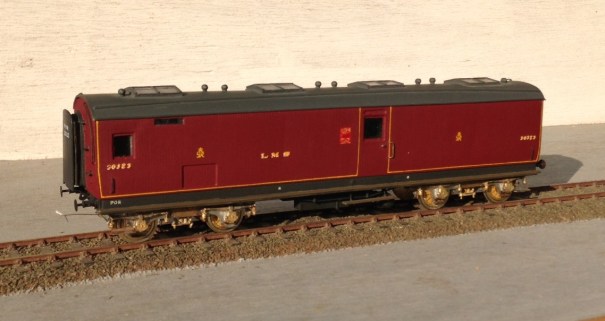
Back in March 2013, I completed a dia 39 goods break. These were the final Highland Railway break vans and it is not clear that they were actually finished prior to the end of the HR era. Given that I model in the mid 1920’s, I am quite content to do this in LMS grey which to date I have not seen the model depicted in! The main body painting has been completed and the van has been lettered but weathering, the interior and final detailing/glazing is still to be completed. Based on the Lochgorm Models kit with minimal adjustments (a few pipes below the chassis and sprung W irons in lieu of the compensation provided in the kit) this is what it presently looks like:
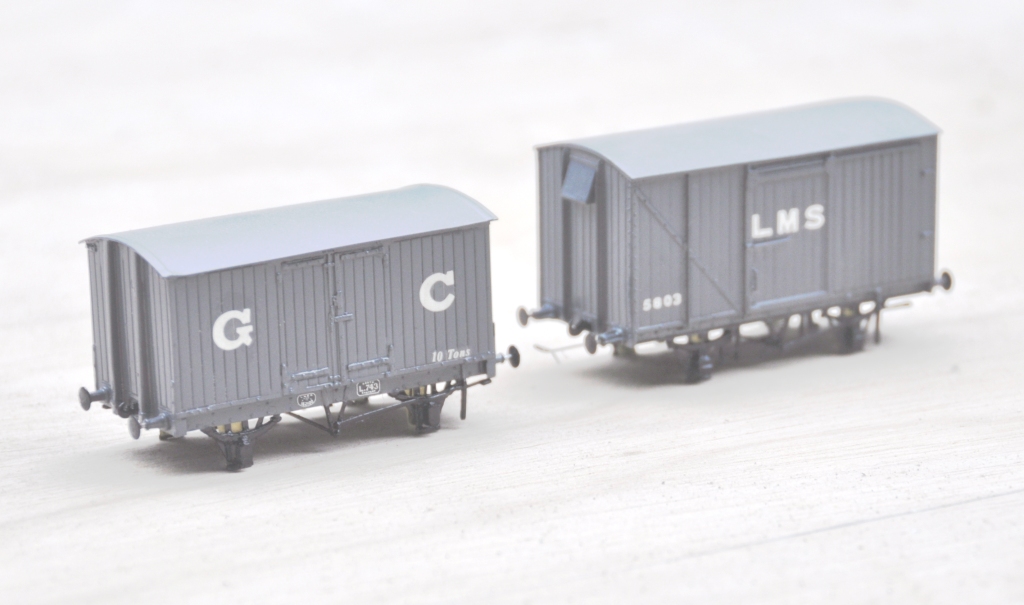
Also coming through the paint shops are a pair of vans. The first is a Great Central van build from a Mousa Models etched brass kit and the other is a LMS early standard van from an injection plastic moulded kit from Cambrian Models. Both are pretty simple models to build; the Mousa Models one was built as designed and no adjustments were found to be necessary. I only fitted springing to the Cambrian one and got rid of the rather too thick W irons in the process. Again the bulk of the painting is complete, but some dirtying work is definitely still required.
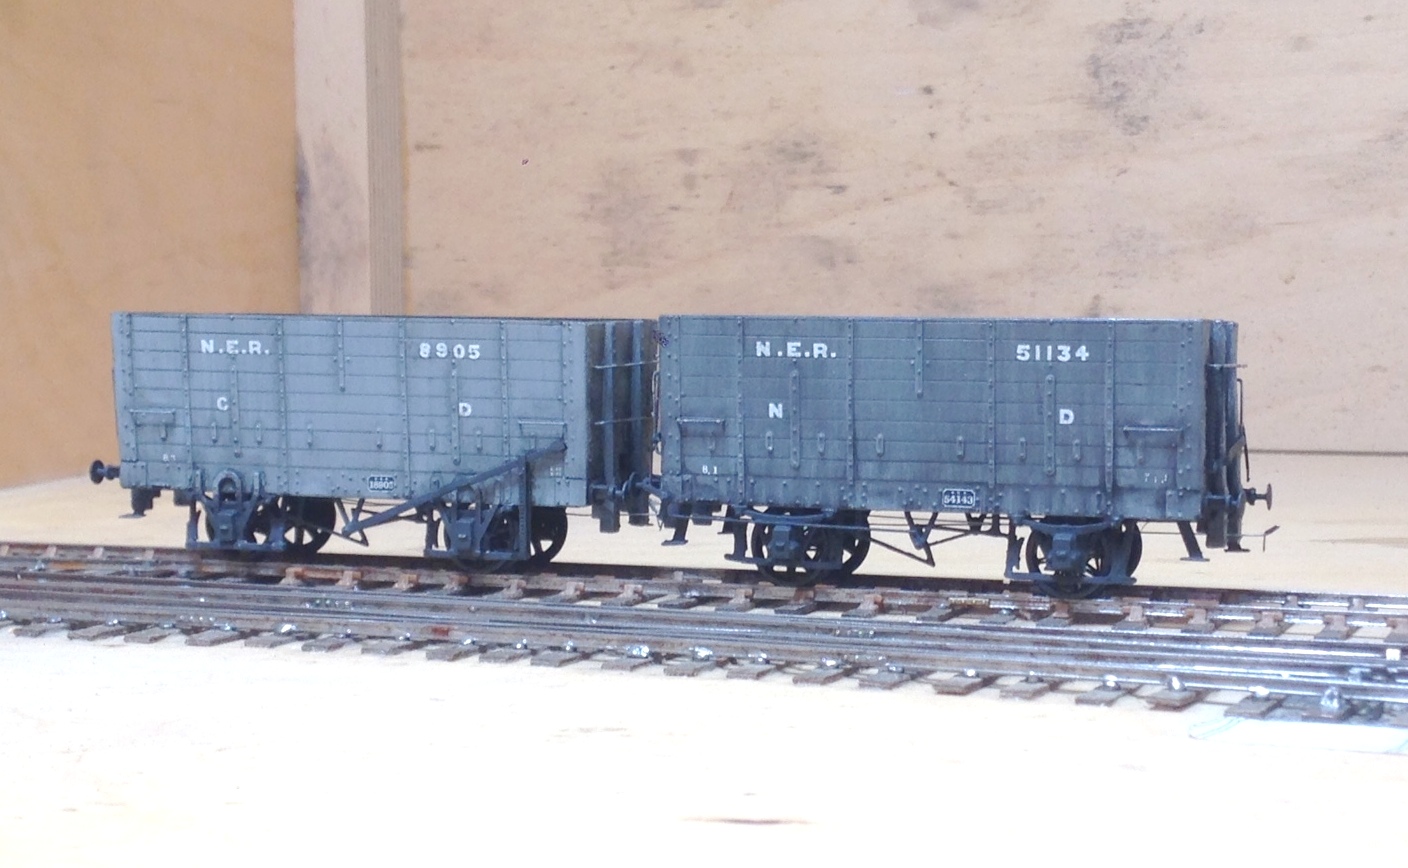
Apologies for the slightly squiffy photos; I left it a bit late in the day to take them and the light was poor. I have made a lot of progress painting the NER hoppers, but the photos of these really did not make it and need to be repeated. Something to post tomorrow I suspect!
