Blog Archives
A Ransome & Rapier Crane
Readers of this blog will recall that my father has a significant interest in breakdown cranes; he has published a series of books on them and is the honoury president of the Breakdown Crane Association. As a result of this, a few years ago, he took a call from Bachmann when they started to research the possibility of filling a gap in the ready to run scene for a accurate breakdown crane. He delighted in being sworn to secrecy on this until the model was announced and now, some five years later, it has finally arrived on the shelves.
So after a somewhat unsatisfactory retail experience with Rails of Sheffield (which I won’t be repeating, there are plenty of other retailers out there), an example of a Ransomes & Rapier 45 ton crane arrived not much more than a couple of hours spare so that it could be parcelled up in its Christmas wrapping for my father. Now that it has reemerged, it is time to take a look at it.
Prototype
The prototypes originate from the early years of the last world war and were initiated by the British Government; in part in anticipation of a lot of emergency repairs being required following enemy action and also for use on the continent once a toehold had been achieved. Initially a total of six were made, going to the SR and GWR but subsequently a further order of nine were made, mostly for the military but with a couple for the LNER and another for the SR. The example I bought being from the latter batch, being initially based in Gorton on the ex GCR system.
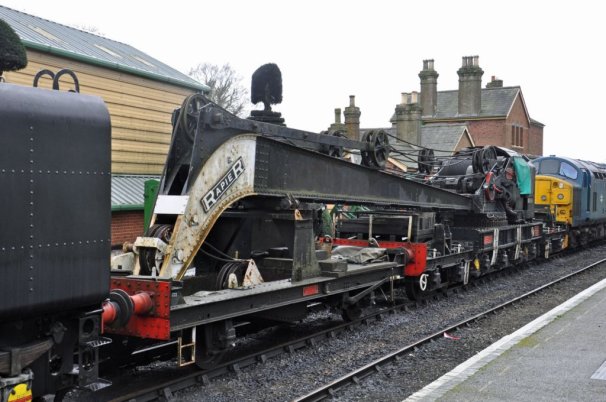
There were detail differences, with many of the railway company vehicles utilising standard components from their eventual owners. The valve chests for the cylinders moved to the exterior in the later batches and the operation of the loading of the relieving bogies became hydraulic latterly. The biggest changes, however, related to the match wagons where there was both variety of arrangements of tool boxes at the time of building and generations of modifications thereafter.
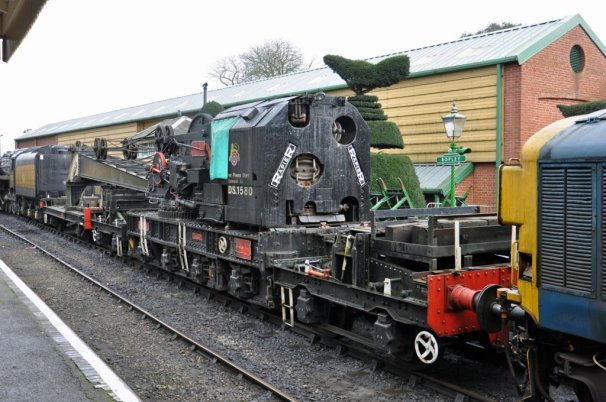
The cranes lasted until the mid 1980’s and a number of them survive in preservation, so if you want to see the real thing you might want to head to the Midhants Railway (on which the prototype photographs were taken and reproduced with kind permission of Carl Watson), the Bluebell Railway, the Great Central Railway, the North Yorkshire Moors Railway or the Swanage Railway. Below is a link to a video of the Midhants crane in action:
Model
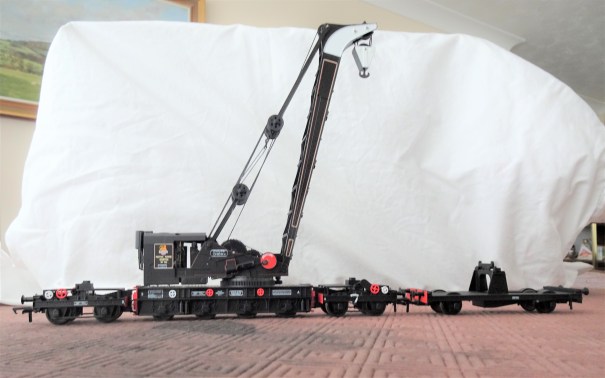
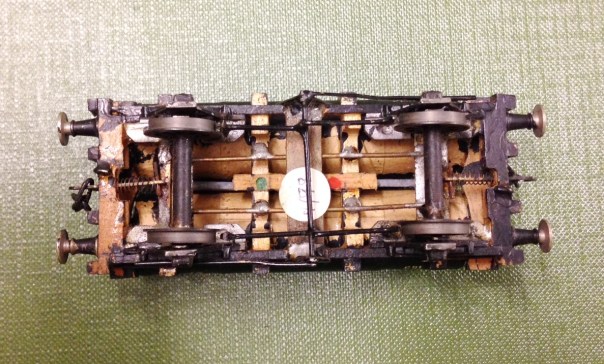
The first thing you notice with the model is that it is some way from the toy train end of the model train market. The prototype is smothered in detail; with the fine bracing between the sides of the jib, the gear trains, axleboxes and flywheels all being a bit out of the ordinary for the ready to run market. Bachmann have had a really good go at this and for the greater part they have got it right – very few could model a crane as well as this. There are, however, several compromises made to enable them to be operable. This particularly shows at the bearing points at the head of the jib (exposed metal when they shouldn’t be visible) and on the crankpin nuts to the flywheels (way too big and hexagonal). I understand why this was done, but it sticks out to my eyes! Some touching in of paintwork will help (but not be perfect) and the replacement of nuts with something more subtle should be possible.
The detail is very delicate and the model needs to be handled very carefully as a result. Even the most careful (and I don’t count myself in this group) are unlikely to keep all the detail in place on any model that does not merely sit in the display cabinet. With a recommended retail price of £250, substantially more than any other product that is not filled with motors & electronics, it is doubtful that too many will end up in the hands of children – maybe that is just as well!
The model I bought, the early BR model in black – Bachmann ref SKU: 38-802, has a match truck without tool boxes. This is correct for the specific crane post the early 1950s but what is not is the missing insides to the splashers. This seems to be a compromise to accommodate OO wheelsets without making the splashers excessively deep. It is easy enough to fill in the open spaces if you model in one of the wider gauges and it will make a big difference.
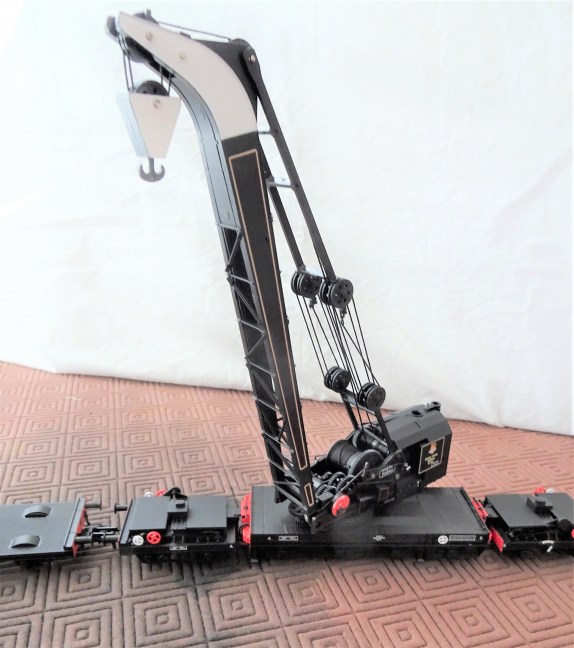
The painting and livery is particularly fine on the model. Even better there are some exquisitely delicate etched plates that can be applied on top of some of the plates. I suspect I see the shadow of Mr Hanson on them.
Options
It looks realistic to get P4 wheels into the crane underframe and definitely so for the runners/match wagon. I would, however, be concerned as to whether a four axle vehicle could survive all but perfect track in P4 and how many of us have that? I suspect that it will all be very tight too, so some pretty large radius curves would be needed if a P4 model can get around them. Of course I will have a go, but it is not high on the to do list at the moment!
I think it is only a matter of time before someone looks at trying to motorise the crane. I think I will say good luck to them! Getting micromotors in might be possible for at least movement along the track but that still leaves slewing of the crane deck, raising of the jib and raising of the hook to go – getting another three in looks pretty difficult to me! The model does include internal hand operated mechanisms for the latter two movements – there are access panels that pop out to reveal a socket to receive a hand wheel. Thus, it is realistic to stage scenes, but not (in my eyes anyway – I really do look forward to someone having a go!) to make a fully operating model.

What is a must though is to add the paraphernalia of clutter the real cranes acquired in operation. Photographs show that they typically attracted lumber sections, jacks, chains and tarpaulins as if they were magnets. Cranes, not being front line stock in the public eye, tended not to suffer repaints very frequently and as they stood outside, they did weather and pick up corrosion spots. So any self respecting modeller needs to do something about how clean they look.
Although there is a very long in the tooth model crane from Hornby, it is somewhat of an uncomfortable marriage of several different cranes (the really old Hornby Doublo diecast version is better but quite crude), so does not cut the mustard. There are a limited number of kits for other cranes – notably the D&S Models Cowen Sheldon 15 ton breakdown crane (an example of one might grace these pages eventually!) but these are full on kits. Thus Bachmanns cranes are not only attractive models in their own right but they have a field fairly clear of competitors.
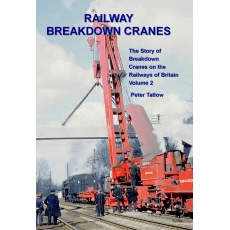
If you want the book on the prototype you need volume 2 of my father’s book – at present it is out of print but it is hoped with a bit of pressure on the publishers, Crecy, they can be persuaded to do a further print run.
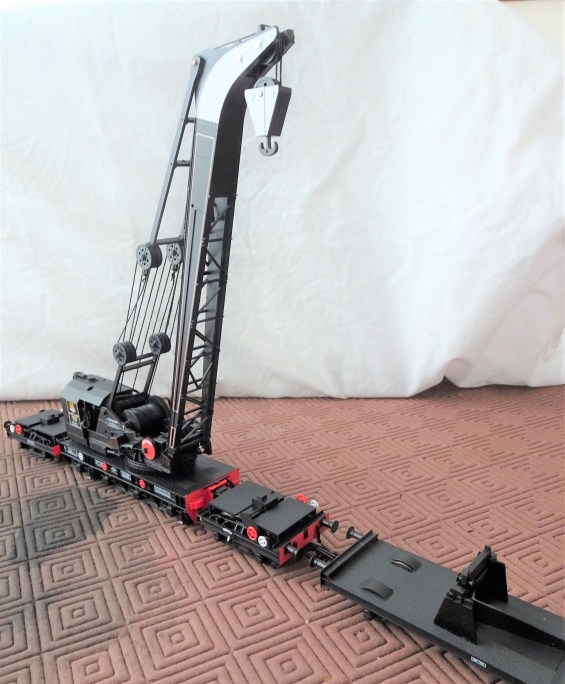
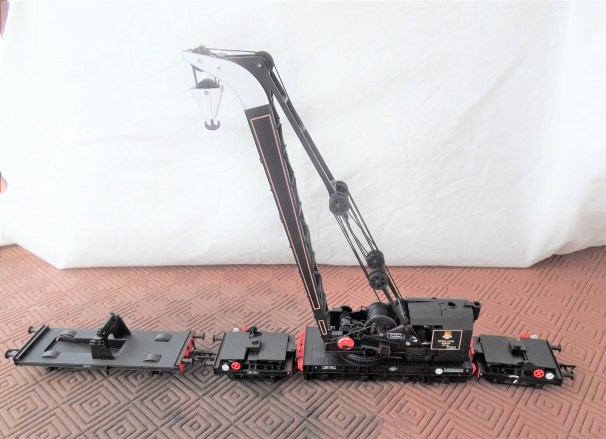
The Bachmann crane is presently available in an SR livery, a GWR livery and then a pair of BR liveries – the 1950s livery shown above and a later gulf red livery. An example of the latter is below:


Controlling Bottom Works Sidings
Followers of this blog will probably be aware that I share some of my model railway escapades with the two authors of the blog OTCM. Both of the authors are in the process of putting together entries into a competition to build cameo layouts being orchestrated by the publishers Titfield Thunderbolt. Cameo layouts was the topic of a book written by Ian Rice and seeks to describe a small layouts seeking to use presentation techniques to capture a slice of the whole in a convincing manner.
To be fair to Oly, his entry is largely complete as long as he does not seek to tinker with it too much(!), the same could not be said for Chris’s entry – titled Bottom Works Siding – so he has some catching up to do! To assist Chris I offered to make his signals and after a few weeks of work we have reached the point where they are complete.
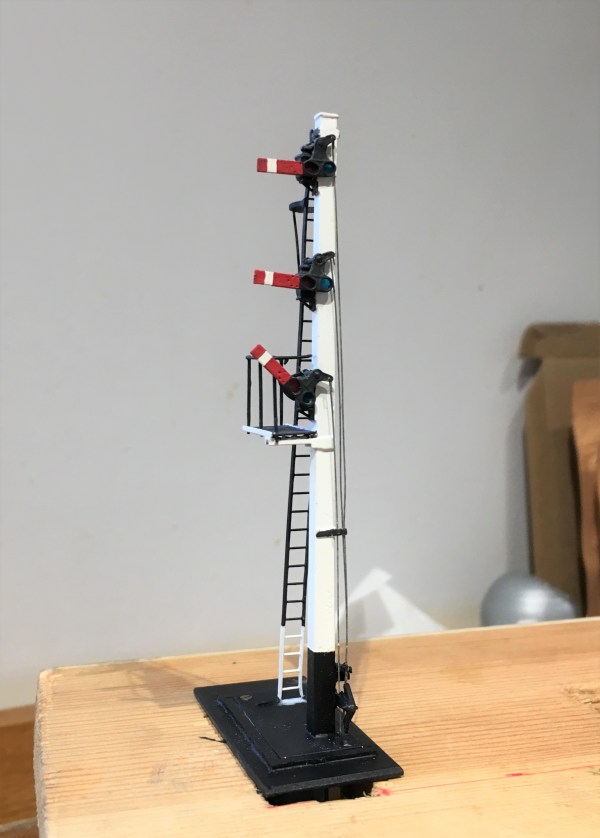
Chris’ model is based on the GCR’s route over the pennines at its Yorkshire end. It will represent a set of transfer sidings from the Woodhead route electrification to a industrial line serving a coking plant – so I suspect we will get to see a fair amount of grot in the finished article! Its signals are LNER or BR(E) practise which is mildly different to what I have built before in some regards but not others as there was a lot of standardisation between the LMS and LNER (and BR more or less adopted LMS practise). So first up (above) is an LNER standard wooden post with replacement BR miniature upper quadrant arms. The post is a piece of brass square section that I filed to a taper (hard work) with predominantly Masokit’s fittings (which I found to be notably better than MSE’s equivalent).
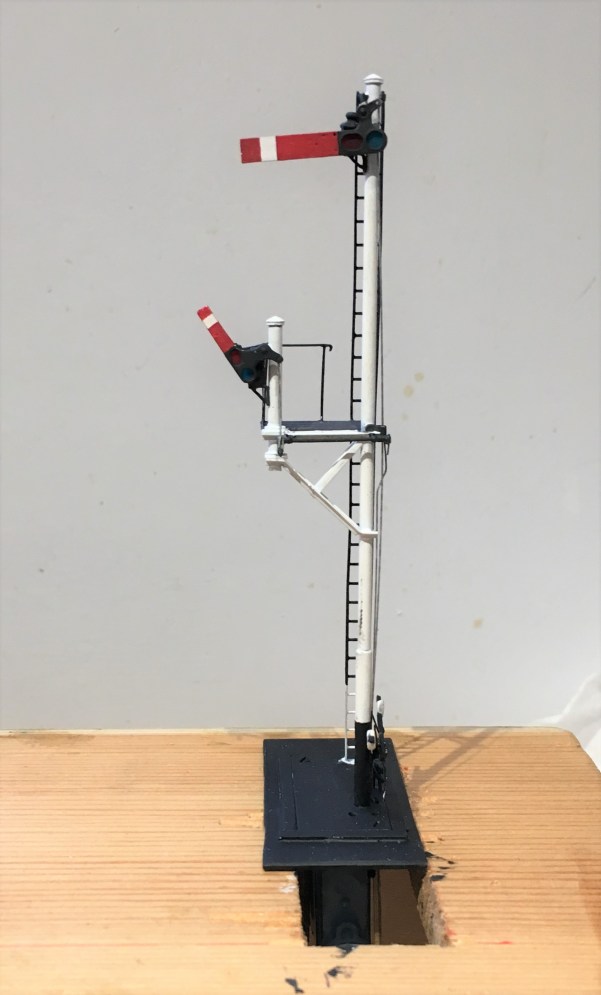
This one is effectively a standard LMS/BR tubular post signal (apparently with brewer’s droop – sorry!) with a small bracket that has another miniature arm signal to it. This is assembled with a combination of tubes and angle section from Eileen’s Emporium, along with some more Masokit’s arms.
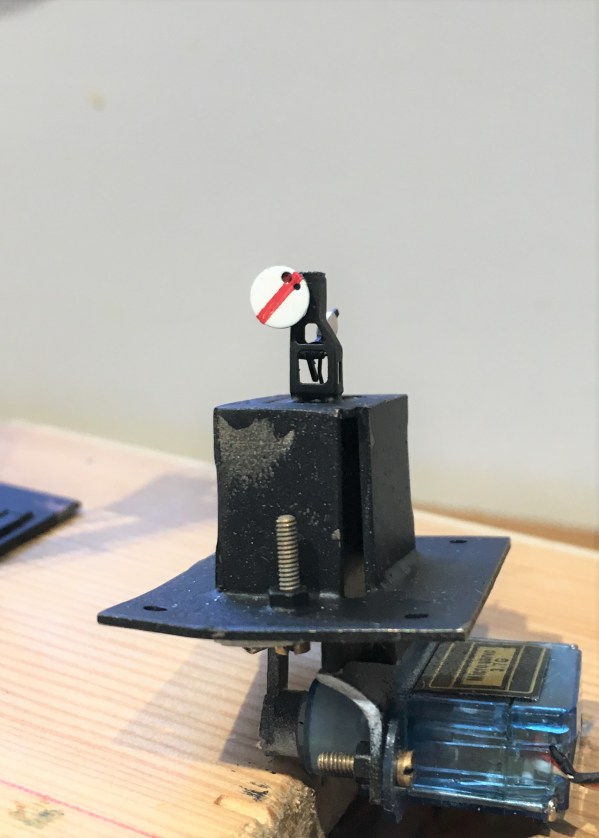
And finally a miniature ground signal – which despite being startling small was not actually all that difficult to build – it being based on a excellent little etched kit from Palatine Models.
As a result of a lost camera, there are not really any meaningful photographs of the signals being created but fear not, I still have a few to go for Glenmutchkin, so there will be some to come! In the meantime, and to prove that they really do go, here are some videos.
In the fullness of time, I dare say we will get to see these in situ, so why not subscribe to Oly and Chris’ blog, to get an instant notification?

Dirty Models……..
Now, I wonder if that heading will gather a few extra viewings………..?
As I have mentioned before on this blog, every few months I catch up with a group of mates to have a joint modelling session. The general gist of these is a combination of banter, a bit of modelling, more banter, a visit to the pub, even banter, a bit more modelling and all nicely rounded off with some more banter.
Last week saw us on the south coast to do some weathering – or rather some of us. One of our number was preparing for their imminent marriage whereas Oly (one half of OTCM) felt his budding TV stardoom was a sufficient excuse to hang up his airbrush. We do fear that Oly may not return to the fold; preferring instead to do his modelling with Brad, Leonardo and Denzil once he makes his silver screen debut in the autumn – don’t forget your roots Oly……….
We were all concentrating on different things; Peter constructed the better part of a bridge for his Aultbea layout and Chris was weathering some rather neat little shunters. For my part, I concentrated on weathering some of the stock that I have been building lately (and sometimes not so lately!):
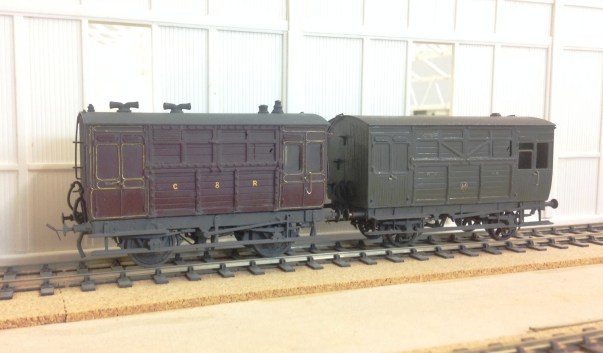
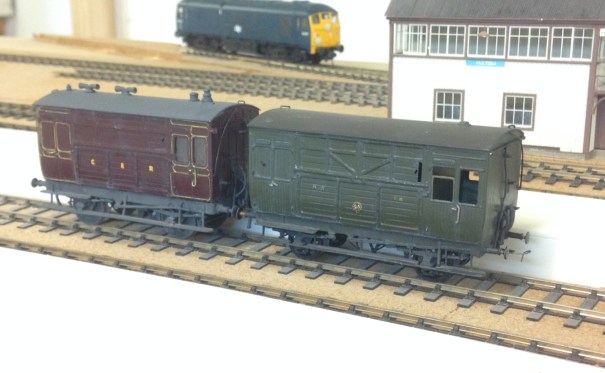
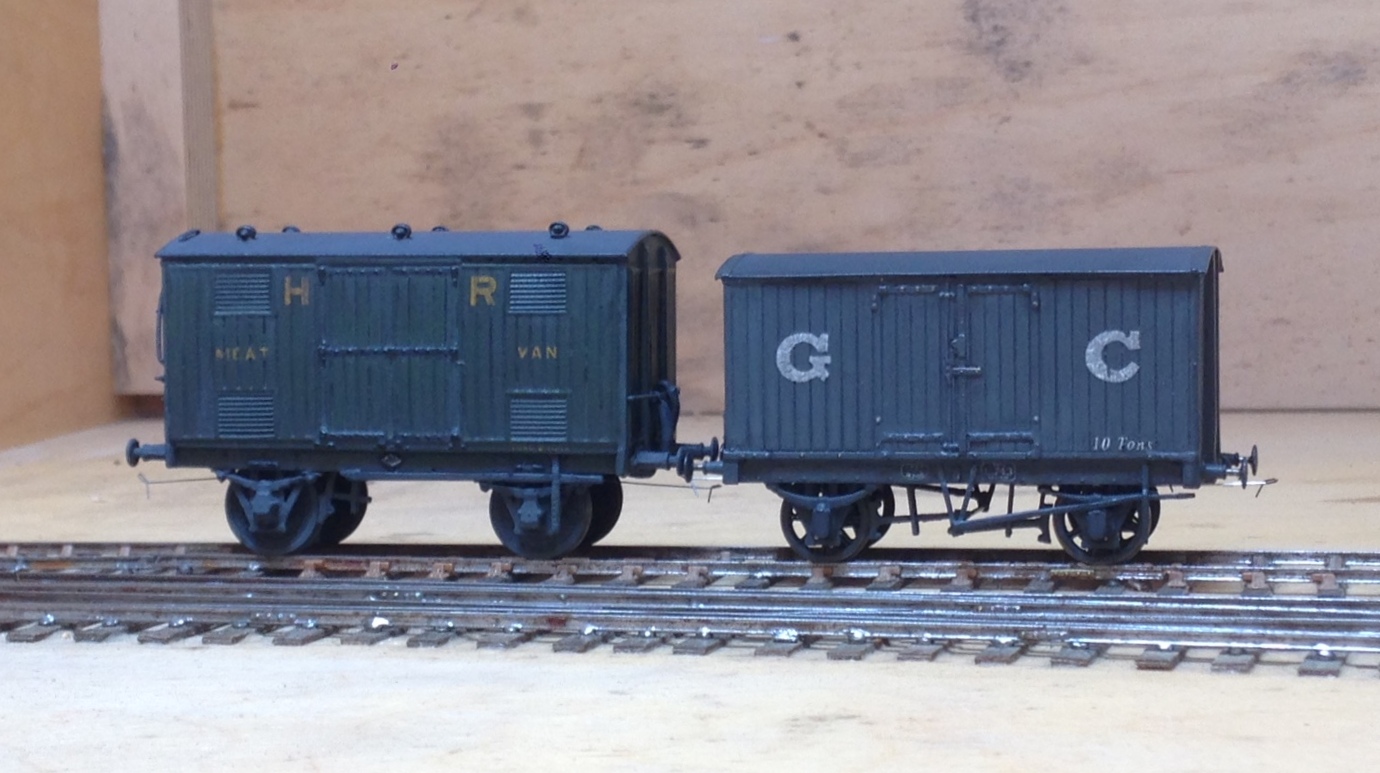
First up is a pair of horseboxes. On the right is my HR version based on a Microrail kit – still in need of some glazing. On the left is the Caledonian’s equivalent based on a kit from by Spratt & Winkle. Both are in their pre-group livery as can be seen. As such stock was used in passenger trains, I have sought to give them an aged but largely cleaned feel – with the dirt largely present around ironwork and difficult to clean spots.
Having mucked up the weathering of some brake vans at the previous weathering session, I was also keen to get these corrected. This is where I have got with them.
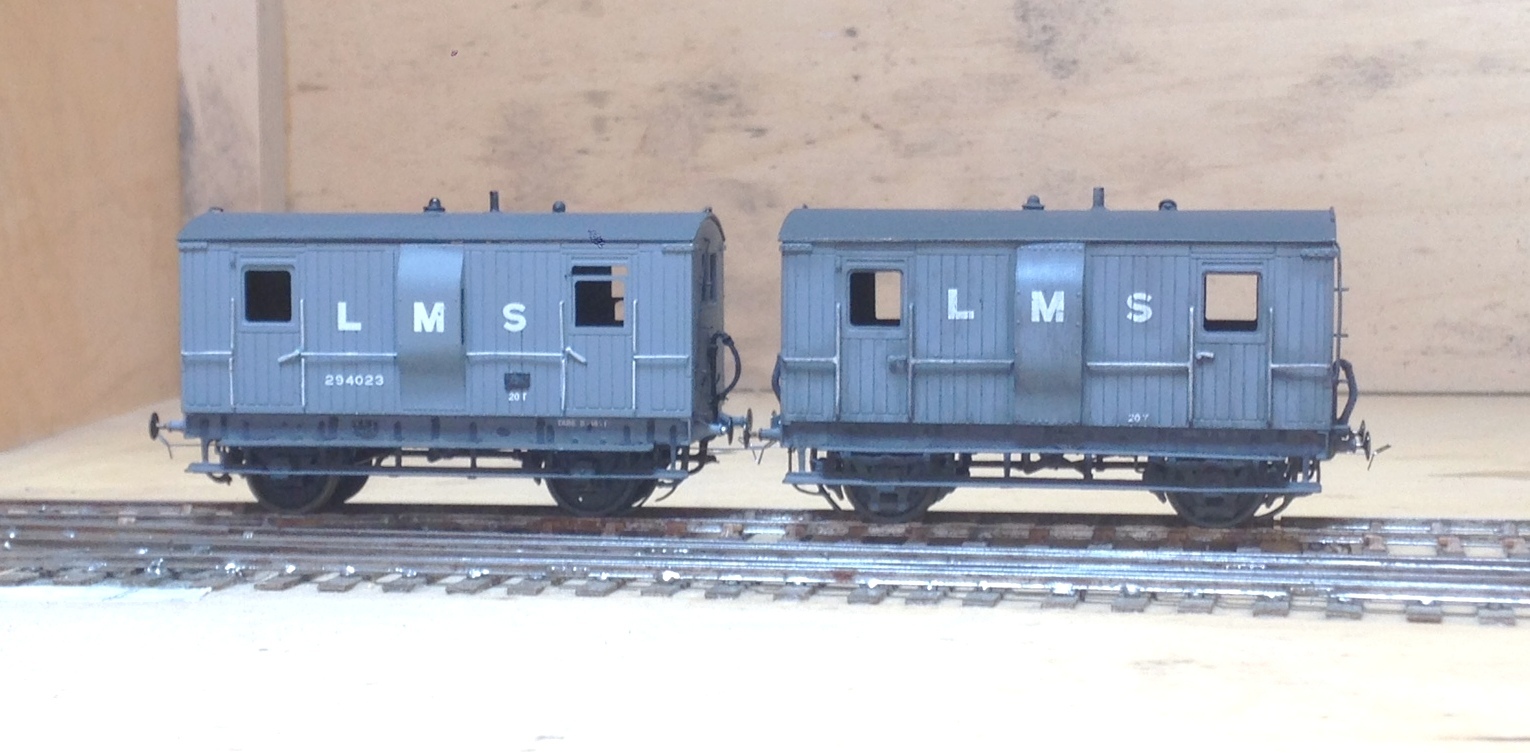
As can be seen, I do not follow the school of thought that the pre-group or 1920’s era stock was constantly pristine. If you bother to look at contemporary photographs, little is clean and some of it is downright grubby. Railways in the steam era were very dirty places; it is inevitable where so much coal, ash and smoke prevail. Furthermore, I can not see even the most houseproud of railway companies regularly (or probably ever) cleaning their goods stock and most of these show stock that is care worn and soiled. This is the feel I am seeking to capture; not the utterly neglected and on its last legs look of the final days of steam but of railway materials that earn a living the hard way.
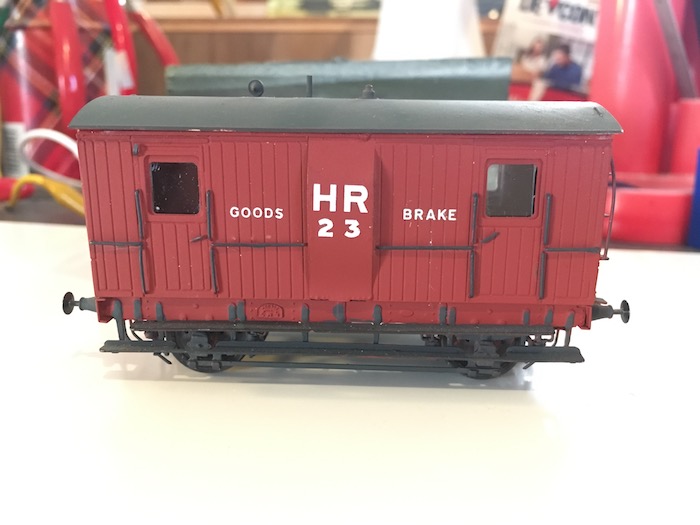
The pair of brake vans above are to HR diagram 39 from 1922 and are from a Lochgorm Models kit. There is some doubt whether they were delivered in 1922, as there are no known pictures of any of them in HR livery. However, I applying the “its my trainset rule” a number of modellers have painted them in Highland colours; including Paul Bannerman whose example is below.
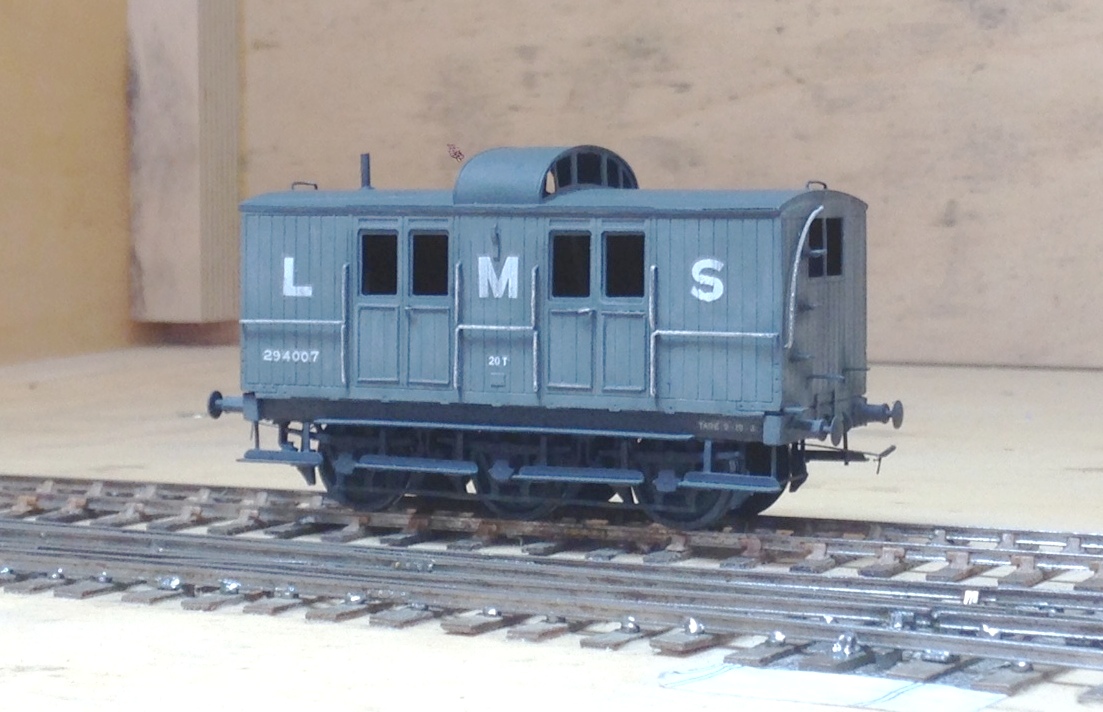
The other highland brake van I weathered was the diagram 38 brake van. This originates from a Microrail kit and may well still be available from David Geen occasionally at shows as he does own the rights to the artwork. I have modified this with the early pattern roof look outs. These allowed the guard to look over the train around the twisting curves that characterised parts of the Highland’s system. However, there were complaints about whacked heads as the guards came up and down the steps to look onto the lookouts and as a result they were modified with approach cutouts on the roof – take a look at the Lochgorm’s page above to see an example.
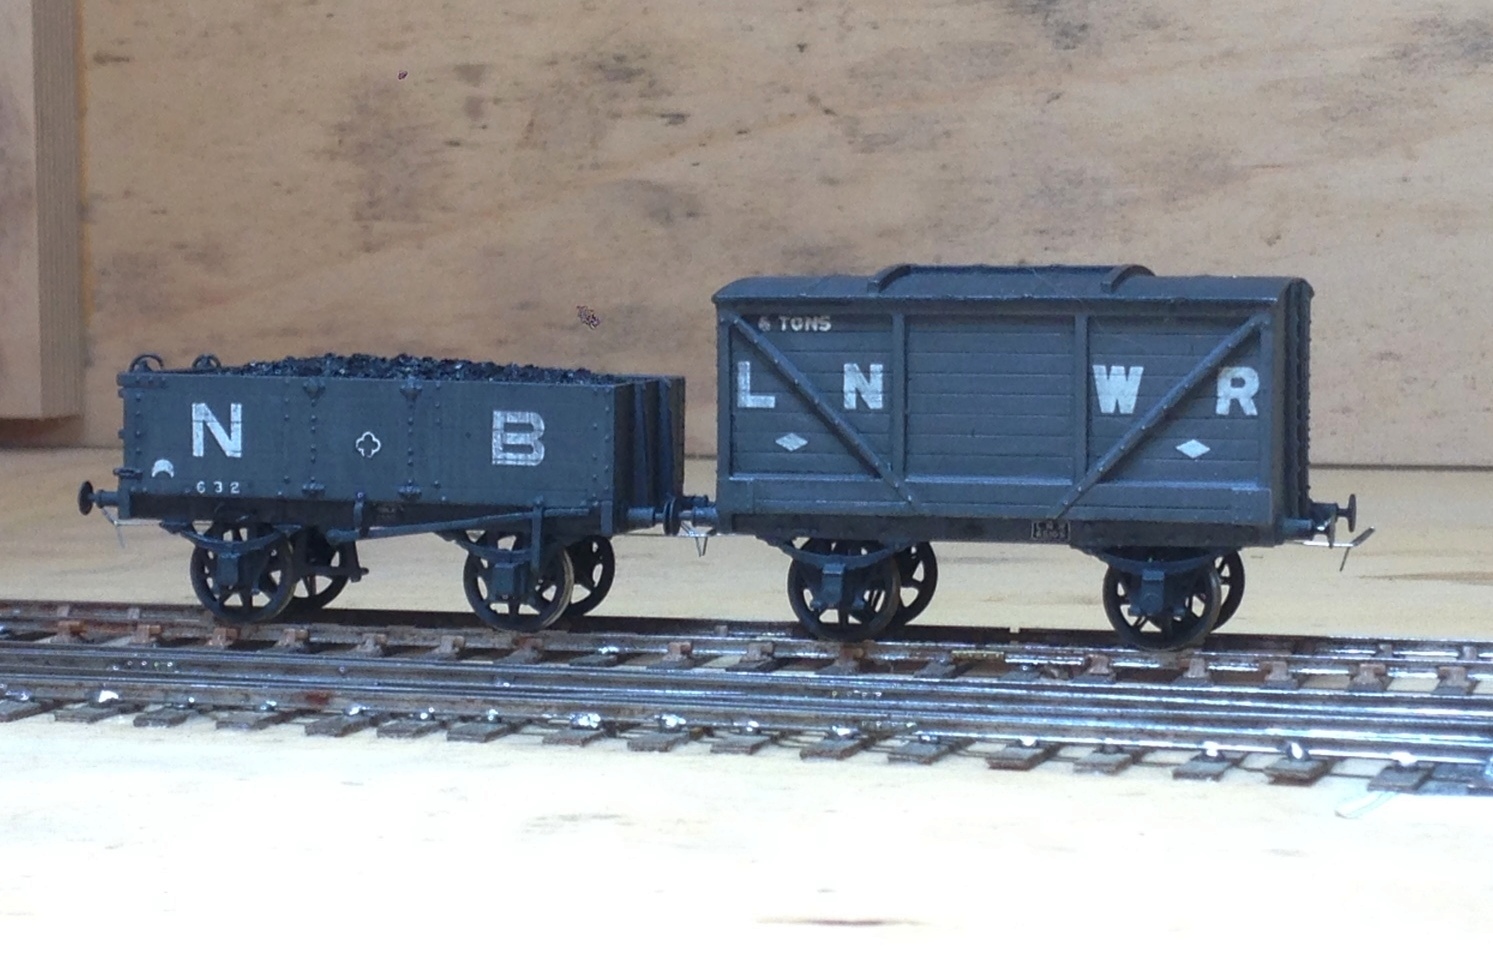
Next up on the weathering front were some wagons and NPCS. The first pictures being the weathering to a couple of the items I have described in the pages here – the Oxford Rail NB jubilee wagon and the Mousa Models LNWR van.
And then some rather more ancient models of mine, a Highland Railway meat van from a Sutherland Castings kit and a GC van from another Mousa Models kit.
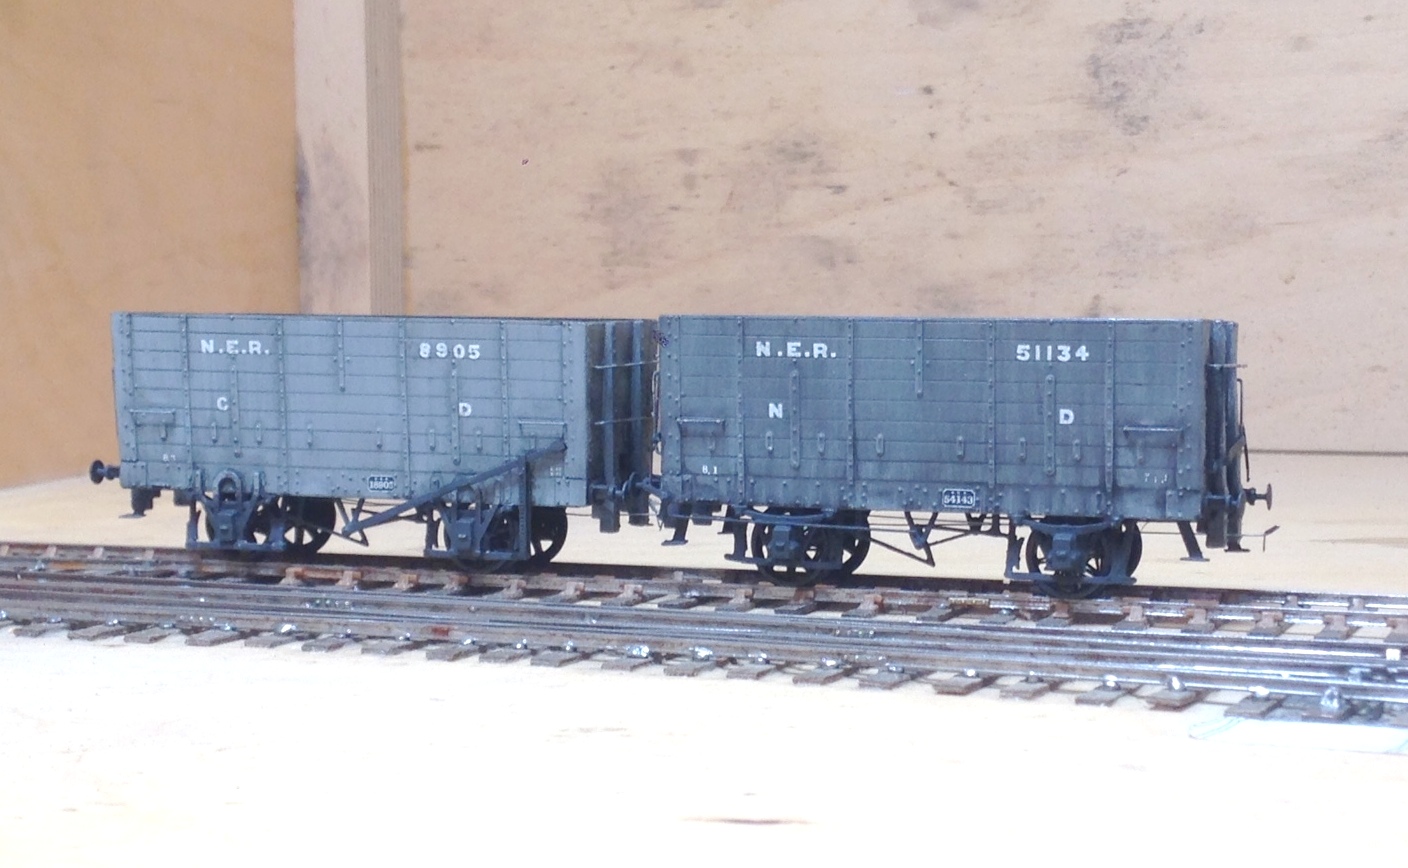
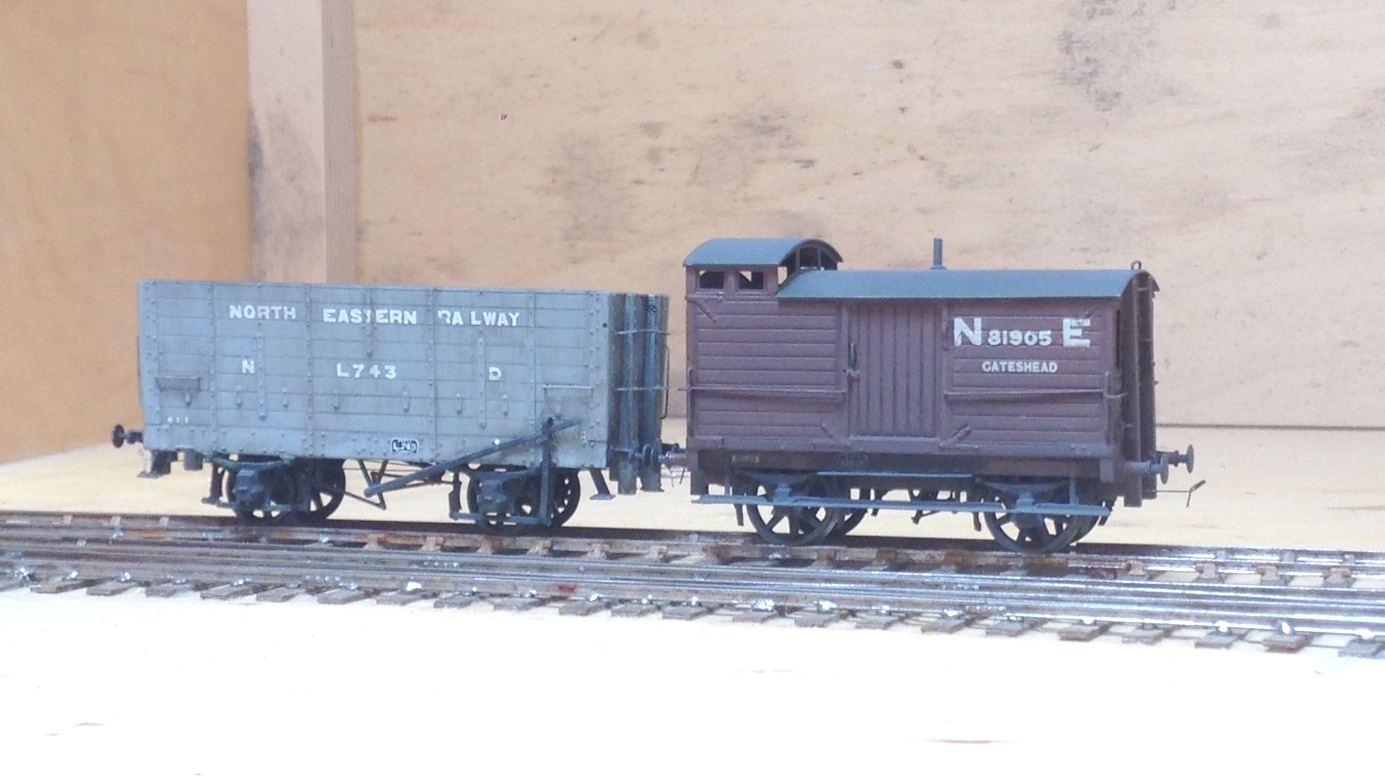
Finally, a group of wagons for Benfieldside. The hoppers have been seen before and the brake van we will hear more of another day.
A Return Ticket to Buckingham – Part 3, the Automatic Crispin
Peter Denny’s Buckingham branch was very much an operational layout; for many years Peter’s children – Stephen and Crispin – were his chief assistant operators. However, as his children grew up they weren’t always available and Peter found himself operating short-handed. He found this frustrating as the need to cover the missing person interfered with the remainder of the operators.
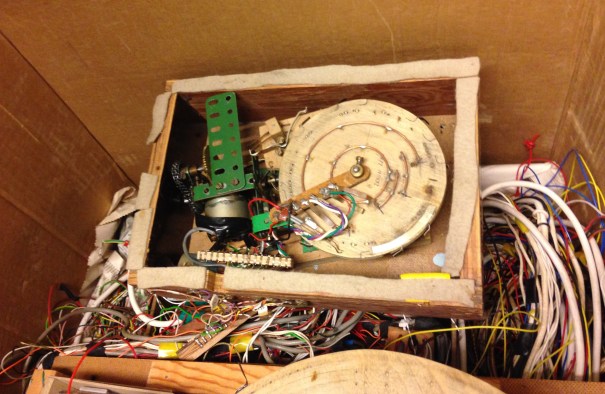
This provoked the creation of the Automatic Crispin, one of the more famous parts of the layout. Long before the use of DCC, micro-processors or automatic shuttles, this was an electromechanical computer – and very ingenious (and mind bogglingly complicated) it is too. This was designed by Peter’s other son – Stephen – and took the place of Crispin to operate a portion of the layout automaticaly, in response to requests and commands from the other operators.
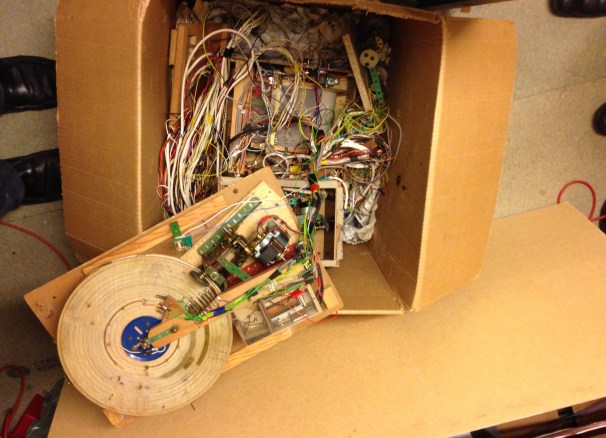
The heart of the system are a pair of disks and a paper chart with holes in it; all powered by motors and the enivitable mechano! The disks contain a series of metal studs or runners, each of which is connected to either the bell, the block instrument, the track or turnout relays. Running across these were a series of wiper blades of brass that connected power to the studs or runner as required.
The operation of the disk was initiated by Grandborough Jct’s signalman. As he sends a bell code, this sends a pulse of power to initiate the motor to rotate the disks or the paper chart on one segment; this first segment sends power to activate a bell code reply (each stud giving a ping). When this is answered by Grandborough Jct, in addition to acknowledging the offering forward of a train with a further bell code, it sets the block instrument. The acknowledgement of the latter being the next command to operate the correct route into the fiddle yard and power up the track in order to allow the train to arrive. The arriving train would hit a dead portion of track at the end of the fiddle yard to stop it running away, but in the process would send the “train out of section” bell code back to Grandborough Jct to allow the line to be cleared.
The story always told by Peter was that the Automatic Crispin was required when the real Crispin went to University but I think it is time to share with the world that this was a white lie. Crispin’s more prosaic explanation was that he had discovered girls at the time and all of a sudden, playing with Daddy’s trainset didn’t seem quite so interesting…….
As can be seen in the pictures, at present the Automatic Crispin is presently in bits, but is all beleived to be complete. It is part of Tony’s master plan to reassemble this; its orignator Stephen is apparently up for assisting to, so who knows?
To conclude the last of these three posts on Buckingham Central, a few photographs and to give you a chance to see the Automatic Crispen in action, take a look at this link to the BBC News article on Peter’s death and some video from circa 1980 of the layout – enjoy!
http://news.bbc.co.uk/local/cornwall/hi/people_and_places/history/newsid_8700000/8700293.stm
It is fair to say that Peter Bond and myself were not as proficient as Peter and his sons in this, sounds like we need some more practise Peter……..

A Return Ticket to Buckingham – Part 2; Peter Denny’s Modelling
When I was still in my shorts, I used to peruse my father’s extensive collection of railway magazines for hours on end – the Railway Modeller, Model Railway News and the Model Railway Constructor. I even marked in pen articles I particularly liked (not for long, the old man soon warned me off that approach!). My memories from this period of Buckingham were not about its operational possibilities but for its modelling.
Whilst the years have passed and there are now a fair number of fine layouts that have eclipsed Buckingham, back in the 1970s (when I was leafing through these magazines) these were not common and going back to when the articles were being written 10 or 15 years before, only a very few even got close to the standard of Peter’s modelling. So this post will illustrate what state of the art 1960s scenic modelling looked like.
As can be expected of a layout that is 50+ years old, wear is showing in places and prior to his death, Peter Denny did have a programme of repair and improvement underway. One of the aspects to be dealt with was the trees made of sprigs of lichen on trunks made of wire or heather – these had not faired well.
Tony had been mulling over what to do about this and consulted with Peter’s children who still have an interest in their father’s layout and seem to act as “non-exec directors” to the board. The conclusion was “do as Peter would have done” and as a result little upgrades and repairs are being completed to Buckingham, so the layout will still develop. In the case of the trees, replacements will be made of sea moss and ground foam.
One story that Tony was able to share with us, which I do not think is widely known, is why Peter selected the Great Central for his modelling. Apparently, he initially started modelling the Great Western but soon found that there were a few too many people that knew a too much about the GW. He was concerned any incorrect details would be found out and so he sought out a rather lesser known prototype. He settled on the GC because he wanted a prototype that had wooden post signals (he could not work out how to make lattice posts); he liked the brown and cream full coach livery that the GW & the GC shared and he did not want a company that used outside valve gear because he was concerned whether he could model it!
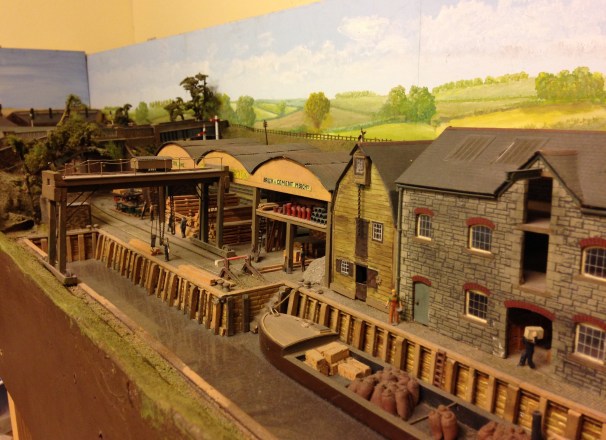
The layout contains a number of quite clever little cameos, often segregated from one another with a bridge or a blocking building. This means that there are quite a number of such scenes within close to each other without it looking too crowded.
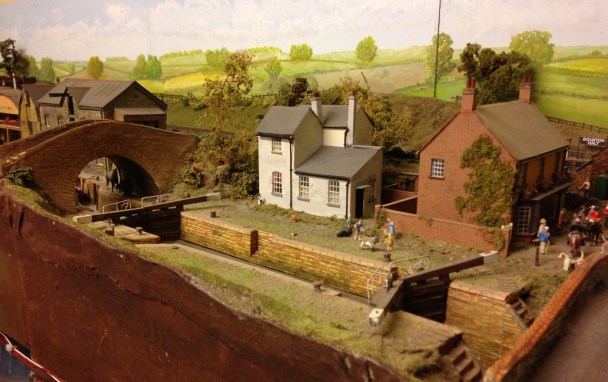
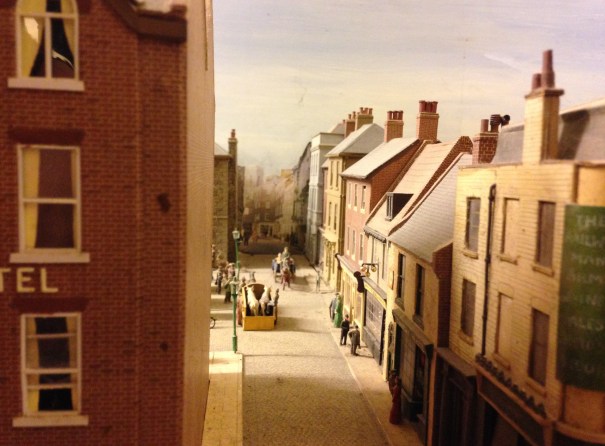
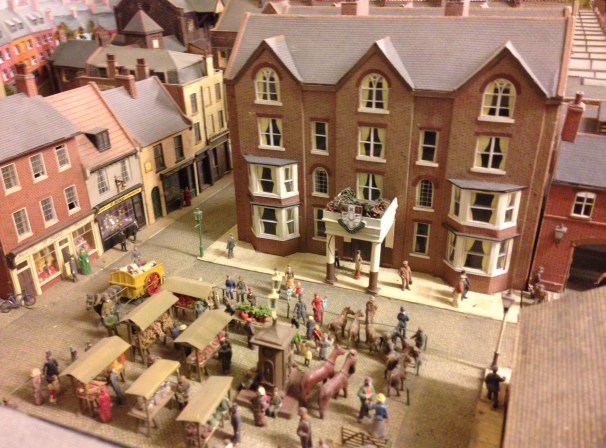
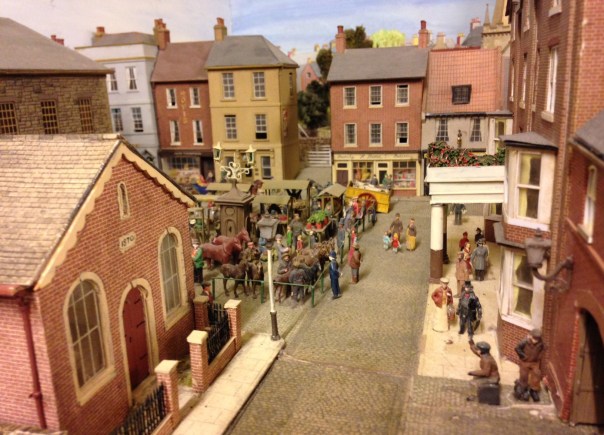
Beyond the buffer stops of Buckingham, a market square and a pair of streets were modelled. Obviously, it is market day to generate a couple of extra trains – you can’t call this a cliche, because it was essentially the first example so every other example is the cliche!
In the final part, I will take a last look at the layout and also one of its more iconic features – the Automatic Crispen; with a shock horror revelation………..

A Return ticket to Buckingham – Part 1; A Running Day
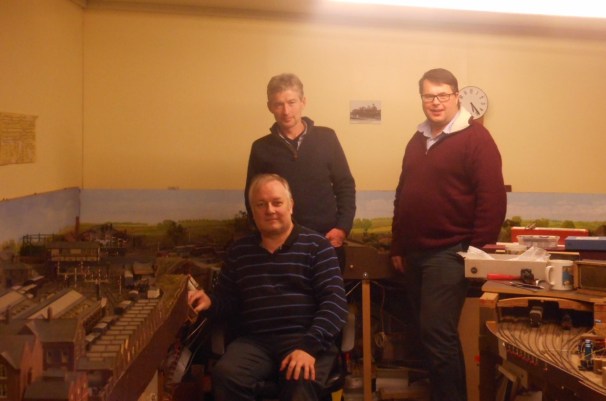
For my 100th post we ought to choose an interesting topic, so it is fortunate that I recently wangled a return invite to visit Peter Denny’s Buckingham Great Central on a journey back home from the north east!
I was accompanied on the visit by Peter Bond and although perhaps not initially intended, this turned into quite a long operating session. Fortunately, there were several cameras on hand; so there are plenty of photographs – sufficient to split this posting into two or even three, so look out for further installments in a couple of days time!
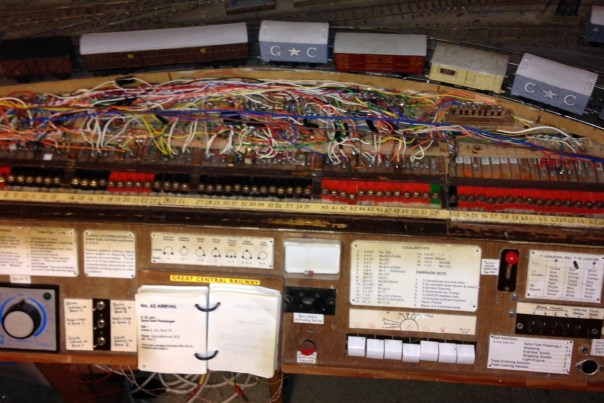
Pete managed to blag command of Buckingham’s control panel; which is the most complicated of them – so he did regret his decision at times! Here he is looking suitably perplexed!
Perhaps with good reason…………..this is the control panel:

And this is the signal diagram:

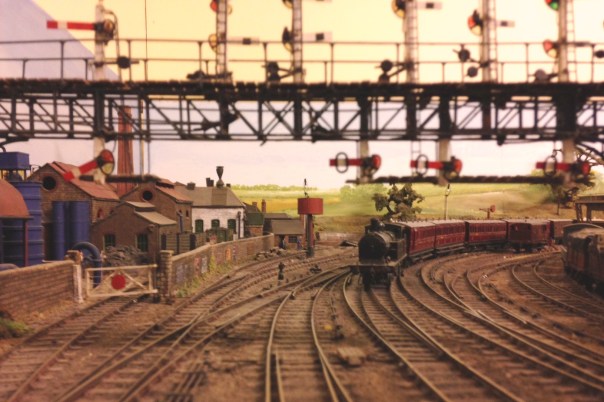
All platforms have calling on arms, all lines have inner/outer homes and the platforms operate to receive and deliver! So, there are a fair number of signals to contend with – all (well, nearly all if we are honest!) of which work and need to be complied with. Here for example is the main home gantry………….

On this occasion, I operated Grandborough Jct, which has a less exacting timetable but even so, its control panel has a few idiosyncrasies. It (like that to Buckingham) is entirely handbuilt including its switches so some of them need to be coaxed across, others need to be pushed firmly and a few – most of the signals – do not yet work. There were also hand made block instruments and some signal bells to contend with.

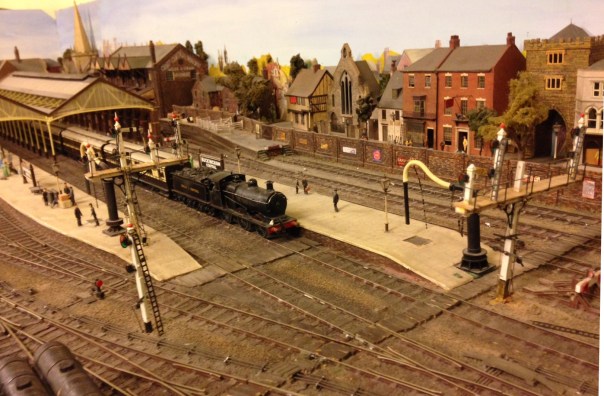
Buckingham operates to a careful conceived timetable, that plots a “day in the life” of a busy market town station, not so inconveniently located for travel to London. There is a variety of fast and semi-fast commuter trains to London; a pair of pick up goods trains; local services services and a couple of services that come off the Leighton Buzzard branch which continue through Grandborough Jct to terminate in Buckingham, such as this one just coming to a stop at Bourton Halt and disturbing a hunt:

Even with over three hours at the regulator, we managed less than 20% of the day’s timetable; so we were going at around 120% of real time. Peter originally had a speeded up clock to keep the pace moving (which Tony, the layout’s now owner has on the wall but does not use). Apparently, you needed an experienced team to keep up with the clock and – just like the real thing – if you started to fall behind the whole system quickly becomes bunged up!

The timetable contains just over a hundred train movements. It starts in the morning with newspaper and milk trains, getting the town ready for the day. Then the early morning commuter trains start, along with connecting local services. A little later, the London expresses start, timed a little faster for the city suits to use (and pay for, they are posh coaches!). Here is one waiting for the right of way.
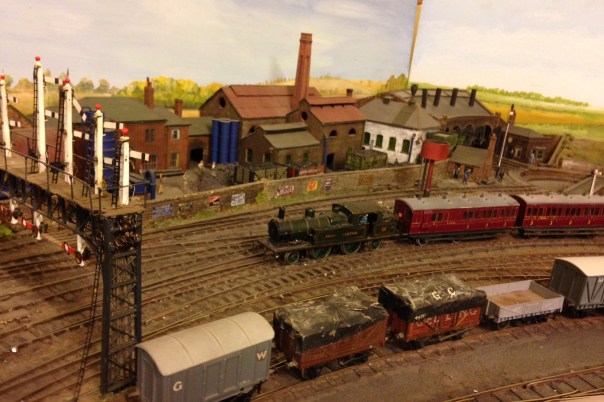
Once the morning rush is out of the way, a more settled period starts and the freight trains move around the layout interspersed with local passenger trains. However, towards the end of the day the reverse happens with the returning commuters. By the end of the evening, Buckingham is chock-a-block with trains, as you can see here:

But this is not the end of the day, because all of the locos need to be released and sent to the sheds, the trains remarshalled and made ready for the next day (which was great, because Grandborough Jct had no moves so I could go and poke Pete for all the errors he was making…………).
And here are the day’s operating crew!
So thanks for joining me on this blog; we are a minnow by some standards with around 40,000 hits but I hope there are things in here that interest you and maybe even some sources of inspiration!
Buckingham Central – Plan
In support of my earlier post on the visit to Buckingham, and in response to Michael, here is the trackplan for Buckingham.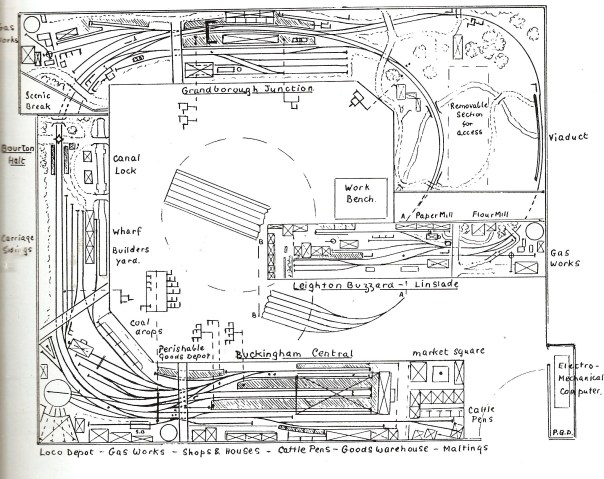
Tony tells me that there have been a couple of slight changes to this plan, but these are fairly cosmetic.
At the time of my visit, Leighton Buzzard was not set up, hence there being no pictures!

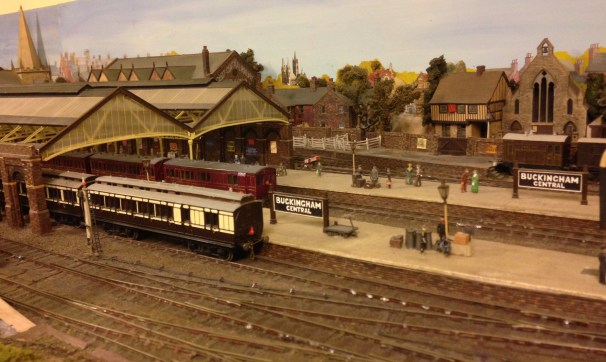
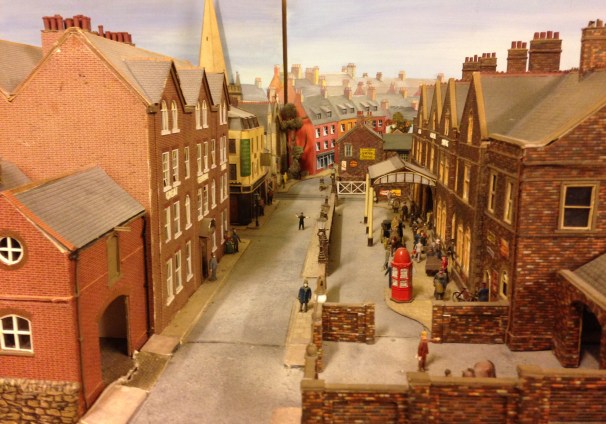
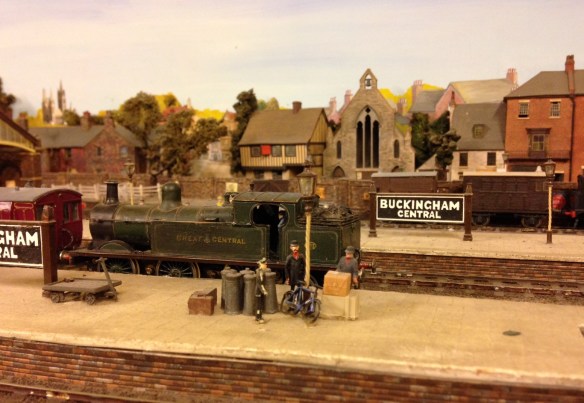
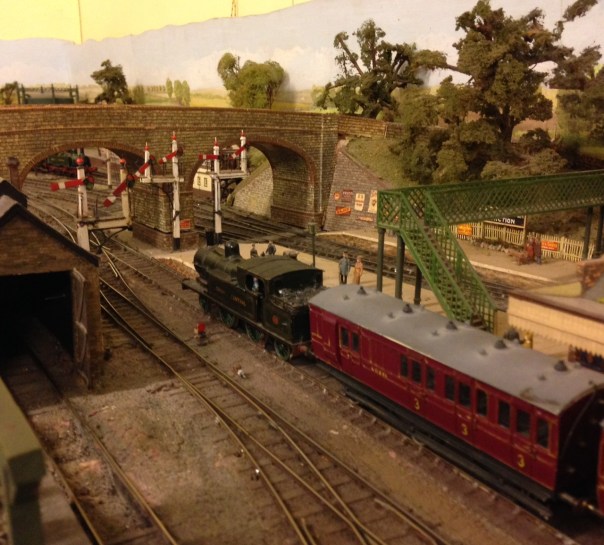
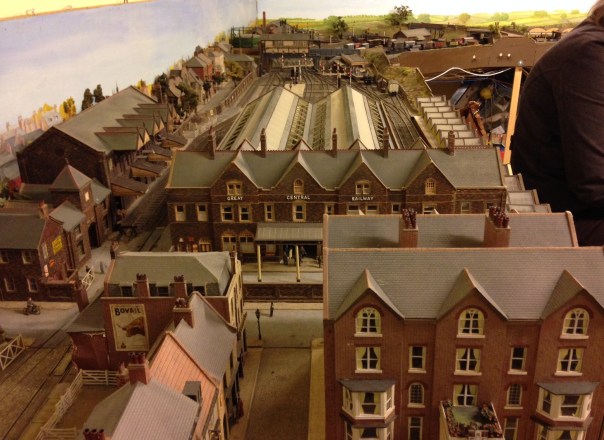
Buckingham Central
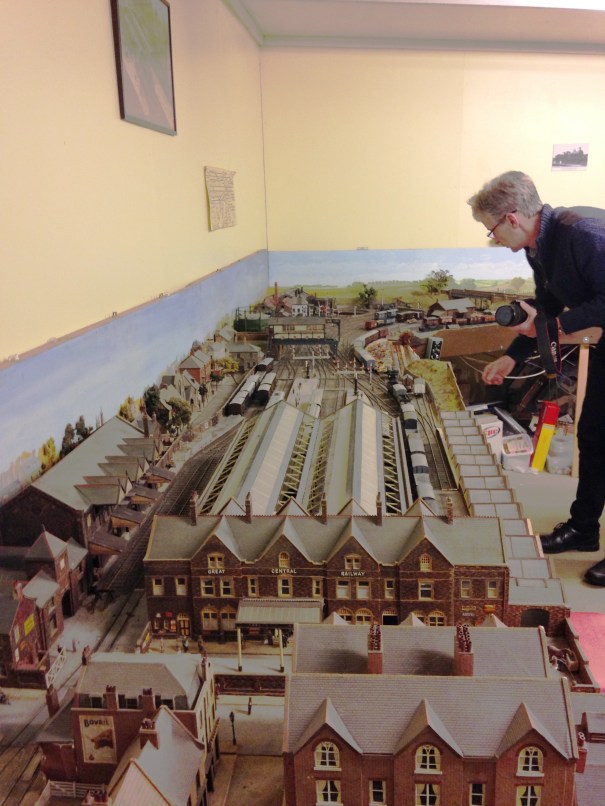
As we had to travel to Nottingham today to return my son to uni, we took the opportunity of accepting a fairly long standing offer to see Peter Denny’s Buckingham branch which now resides with Tony Gee.
Most of you will, I suspect, be aware that Buckingham was about the first EM gauge layout ever constructed (apparently, there was one other at about the same time) and can thus be said to be pretty much the daddy of the finescale model railway.
The layout has origins that go back as far as 1947, so is approaching 70 years old. There are a number of elements that go back to this era still on the layout, including the tank loco shown above which was built from the very earliest of plastics; I hope I look as good as that when I hit 70!
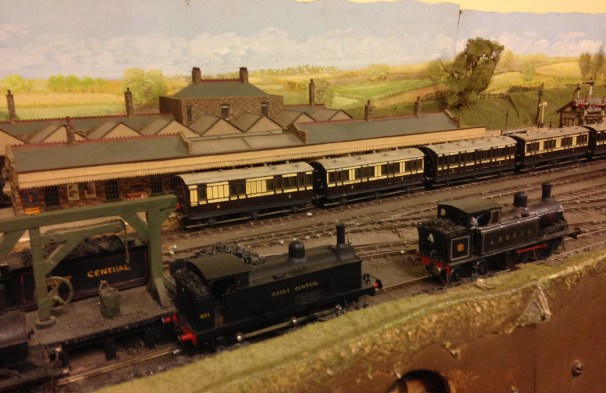
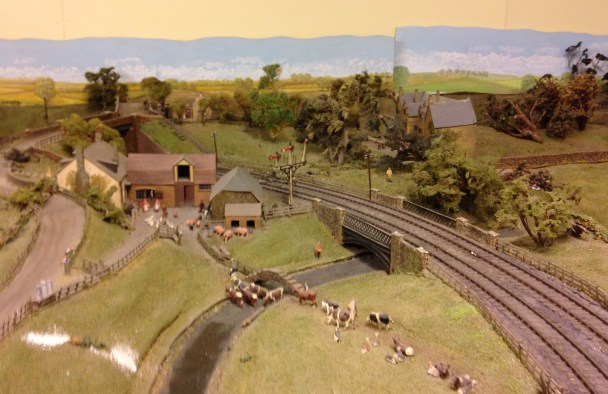
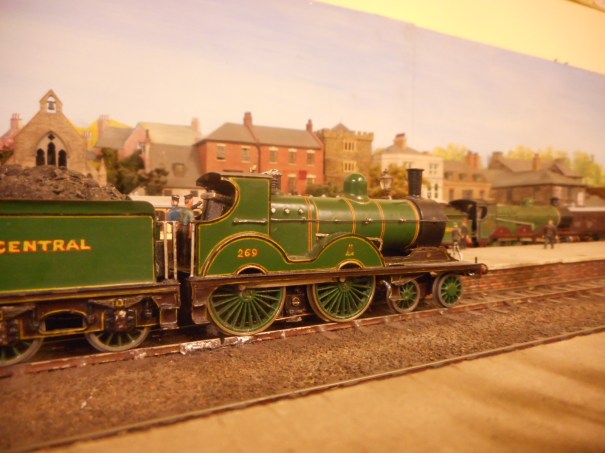
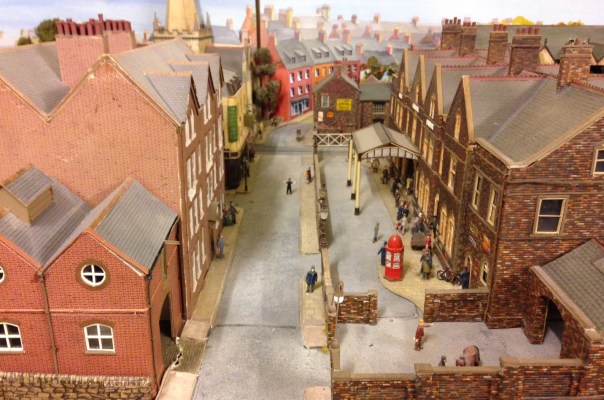
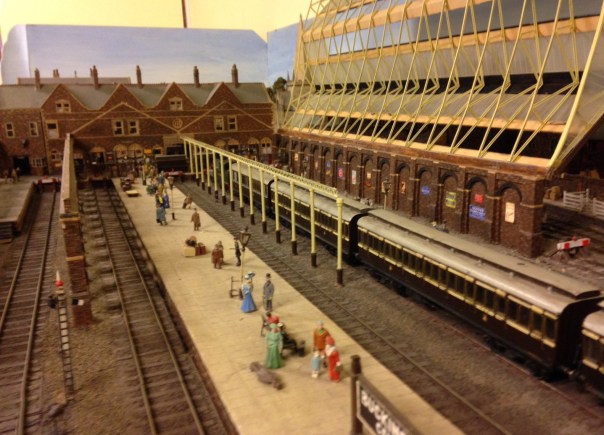
Whilst there have been several generations of layout, the core has always been an imaginary line to Buckingham from the Great Central mainline to London. Buckingham is, of course, a much bigger town in this imaginary world and justifies a fairly significant service of commuter, local, parcels and goods trains. In the view below, we see a “businessman’s express” for London readying for departure from Buckingham and then below that the peace and quiet of the station once it has gone.
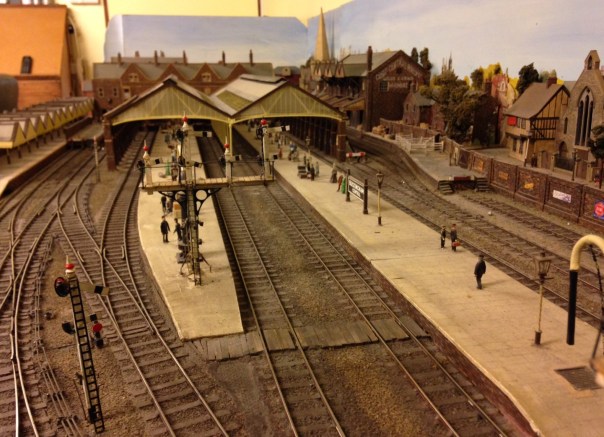
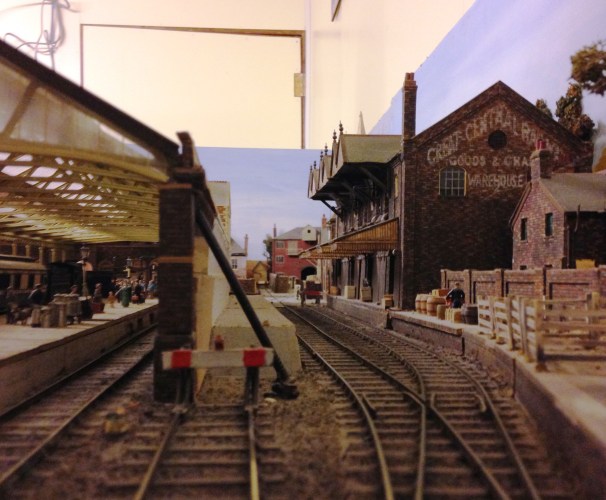
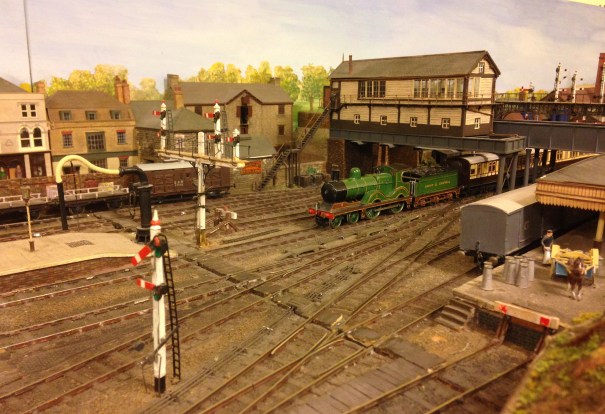
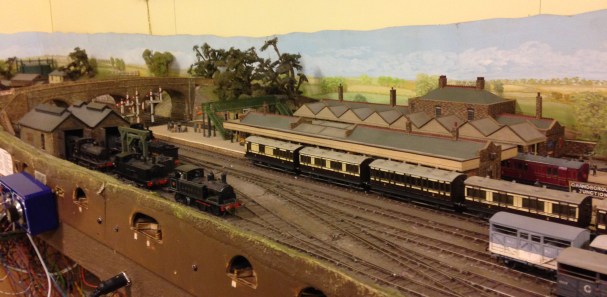
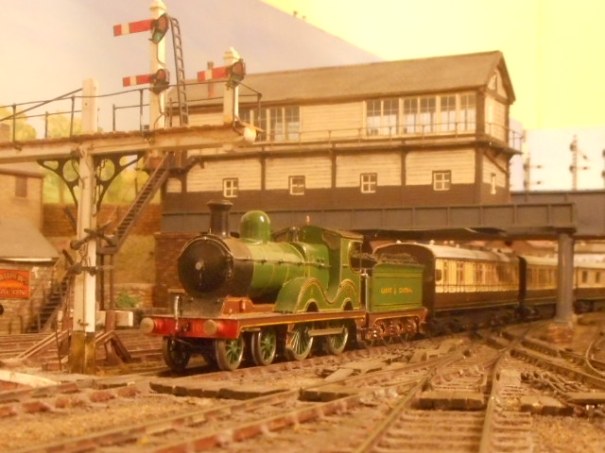
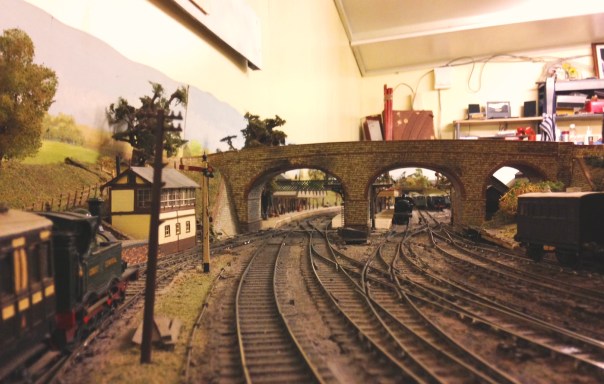
As befits an important station, there is a complicated station throat, controlled by quite complex signalling and a fine box over the line.
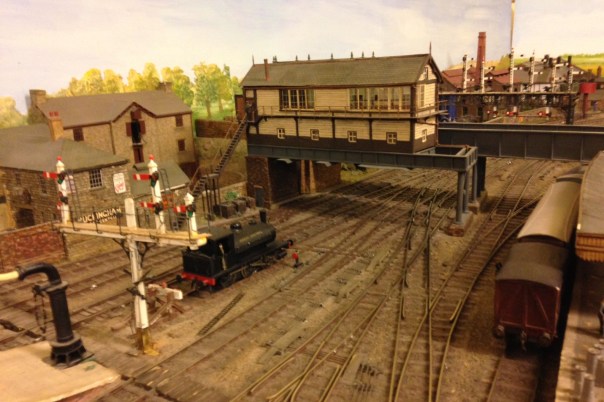
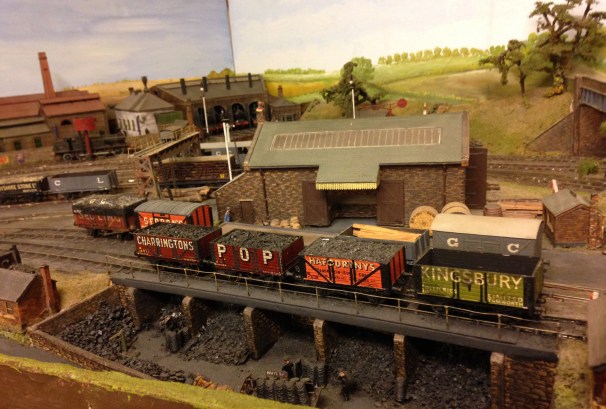
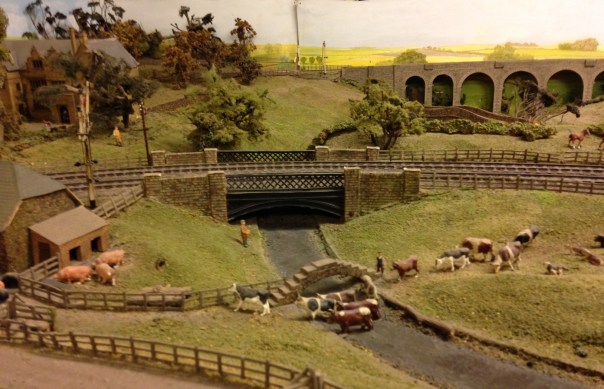
The other principal station was Grandborough Junction (the third station, Leighton Buzzard Linslade, was dismantled at the time of our visit). This was a busy junction and had a pair of branches going off it and crossing countryside.
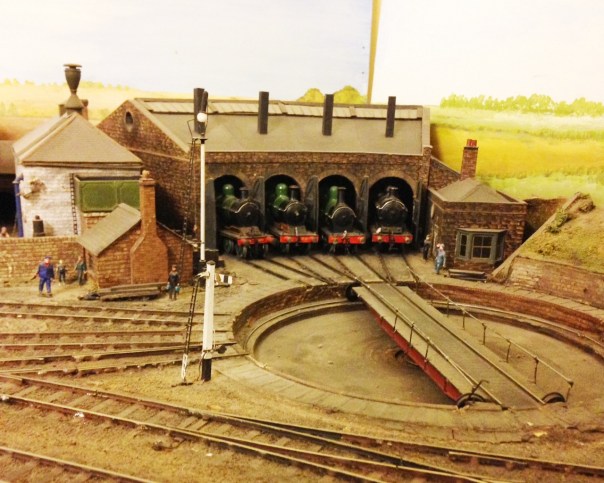
I particularly remember an article on “filling corners of your railway” – where he showed a gas works at one point and then an engine sheed – well here is that engine shed! Mindful of my turntable sagas (see November posts), I was half disappointed that this one worked so well – although it did have a very fierce growl when it operated!
Peter Denny was also a prolific writer so the layout adorned the pages of most of the british magazines – and even apparently a Japanese one! Certainly, it was a layout that I regularly read about in my father’s collection of back issues so it was a happy chance to see something that had a formative impact on the early days of my hobby. I still have a big book entitled Miniature and Model Railways – signed Happy Christmas Mark – from Gordon 1977! – that has a section on Buckingham which I perused before leaving to remind myself of the layout!
A lot of his articles were on building things for the layout – remember, this was built in the late 1940s, 50s and 60s and the alternative (when available which was rare) were tinplate. Here are some examples of the quality of Peter’s modelling.
The story as to why Peter Denny selected the Great Central Railway as his prototype is worthy of retelling too – as they made me chuckle. Apparently, he originally wished to model the Great Western and took his first completed model – a siphon (which is still on the layout) – to the Model Railway Club proudly one evening. There it was met with both admiration but also the sucking of teeth as various prototype details were pointed out as being incorrect. Now, woe betide me to say anything critical of Great Western followers but on the back of this, Peter decided he needed to find a prototype that less people knew about so that he would not get pulled up on technical details again! He rather liked the brown and cream coaches, so he did a search and found that the Great Central had them too – so a swap of allegiances was promptly implemented!
Resources were clearly a lot more challenged when Peter was modelling, most of the models make plentiful use of timber and card – it puts some of my efforts with much more sophisticated techniques!! Peter even used CSBs (see wagon below – well, nearly CSBs any; what do you think of that Will/Russ?).
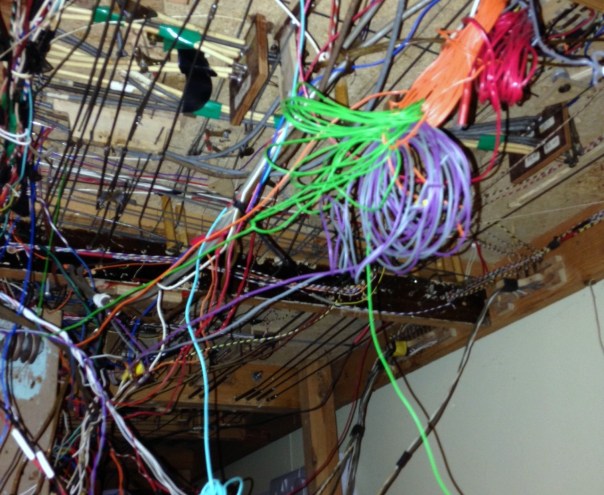
But above all else, Buckingham is a layout for operating and is both very complex and quite simple at the same time. There is a substantial amount of electrical logic such that lines only become electrically active when they are correctly signalled. Even attempting to run a train in the opposite direction to that which is signalled is prohibited. All this uses hand built switches, many of which are mechanically linked to the single or turnout. As you would imagine, this creates a somewhat complex warren both above and below board!
DCC anyone…………..
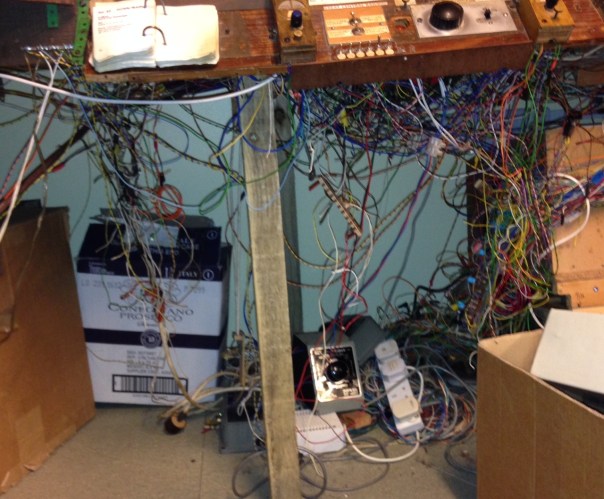
Even now, Tony is not fully aware of what the layout can do and there are plenty of teasers that need to be overcome to get it to operate properly – “aghh yes, this lever needs to be pulled over really hard to make the contact” but the next time “don’t pull that one over fully, or it doesn’t quite work“. It essentially needed to be caressed and humoured to operate – but operate it did even for ham fisted Tatlow!
We spent a happy couple of hours playing with the trains; dealing with arrivals, sorting out loco’s for the return work and shunting the platforms and yard. I thoroughly enjoyed myself – so thank you Tony and I’ll definitely come again!
I have now added a trackplan in an addition post here.
