Blog Archives

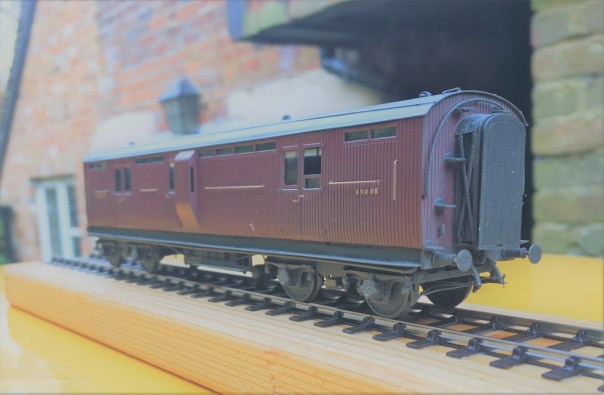
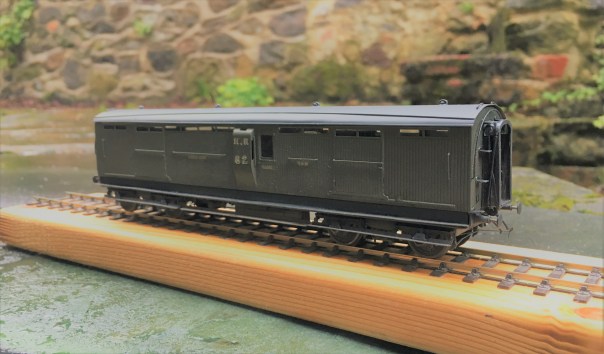
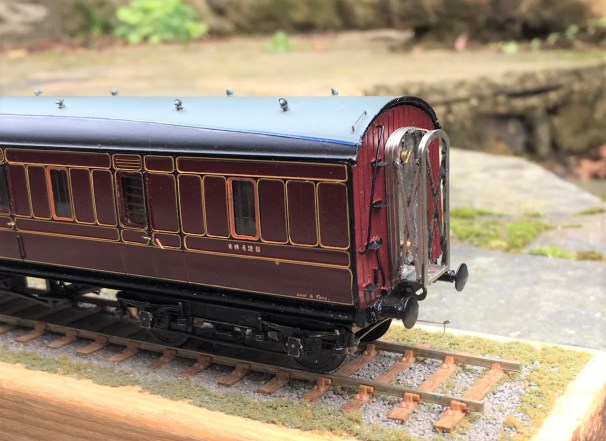
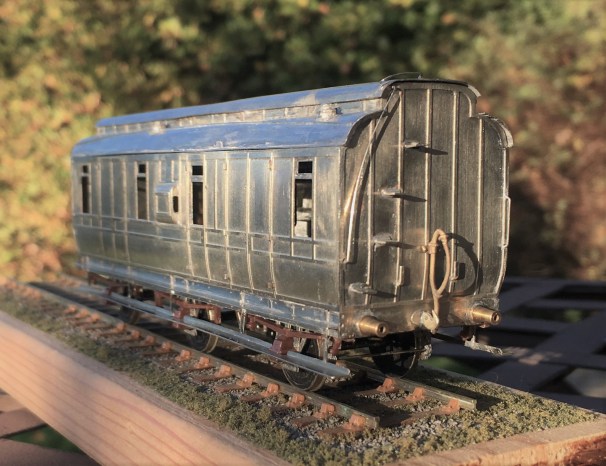
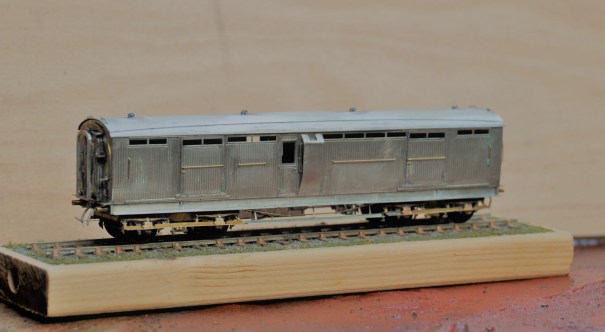
Diagram 51 Full Brakes – Test Build part 5; now in glorious technicolor!
The pages of this blog have charted the development of a proposed kit to build the Highland Railways dia 51 full brake; well finally it is finished and we get to see them in the flesh and painted up.
The kit can produce, with a bit of modification, two variants of door and I have now build both of them. First up the cupboard door version painted in crimson lake and minus full footboards.
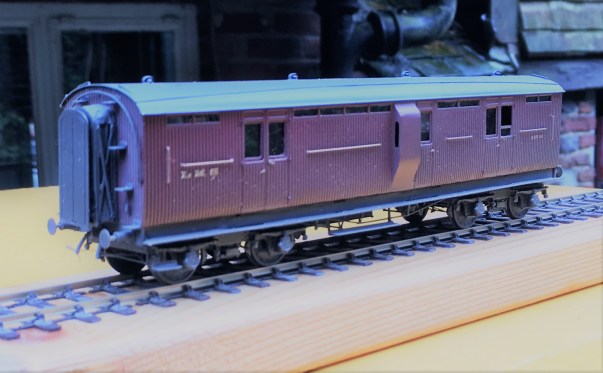
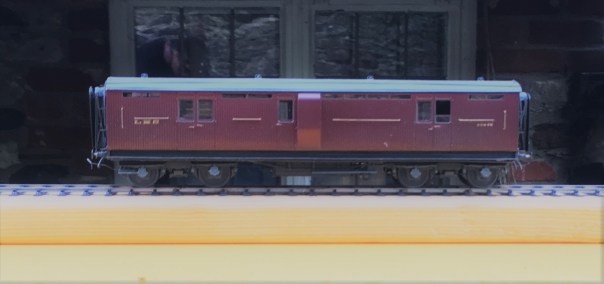
Second we have the sliding door version, this being modelled with full step boards and in Highland Olive green.
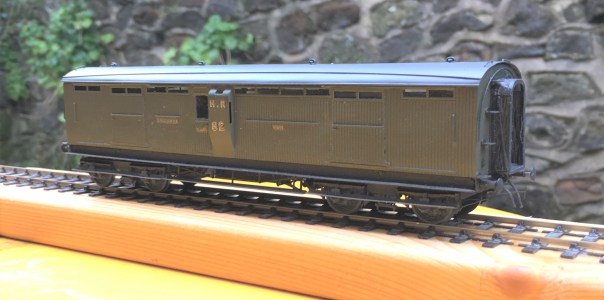
Apologies that the technicolor photos are a bit short on gloriousness; it is fair p*ssing down today and this is the most light that I could get to take any photos!
If you want to recap on the earlier blogs that show the development of the proposed kit, you can find them here:
Part 1 – getting underway with the body
Part 2 – drawing the chassis and roof to a conclusion
Part 3 – the build of the second vehicle (sliding door version)
Part 4 – details of the spring bogies that accompany these (and many other coaches)
I do now have a batch of these back from the etchers and I aim to conclude the instructions on Monday/Tuesday. I will then make a notification that they are available but at present I cannot provide the castings and those to the bogie are rather important. If you can scavenge from a Lochgorm kit some Iracier axleboes/springs, you will be able to complete the kit; if not then I am seeking to either source some of these castings or produce my own. So watch this space.

Damaging Value…..
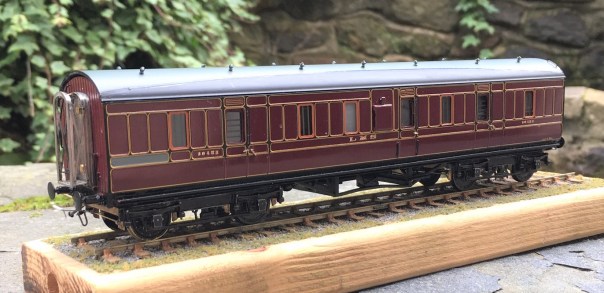
Over the last few years I have acquired a few coaches painted by Larry Goddard. As you can seen below, these are beautifully painted and, particularly, lined coaches. Although he is not really building much any more, Larry’s work comes up from time to time on ebay and I have been nabbing a few of these. They are not particularly cheap, but then there is a fair amount of work in building an etched coach and in reality the price I am paying for them is hardly a fair reflection of this time.
Whilst I have been able to line fairly well in the dim distant past of my teenage years, I don’t think my lining was as good as this and, more importantly, I have misplaced my lining mojo. Although I have plans to try and rediscover the mojo, these coaches do provide a means to get a few very nice coaches to get the layout moving.
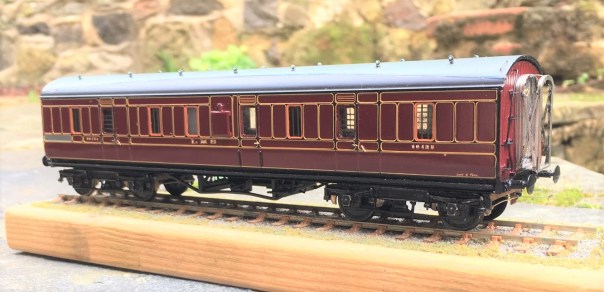
This particular coach is to the LMS’s diagram 1778 and originate from 1925 – 28. They were the first standard design for the LMS and will have been found throughout their system, including on the Highland section. My intent for the layout is to have a pair of through trains to Edinburgh/Glasgow with through coaches to London – this will form part of this.
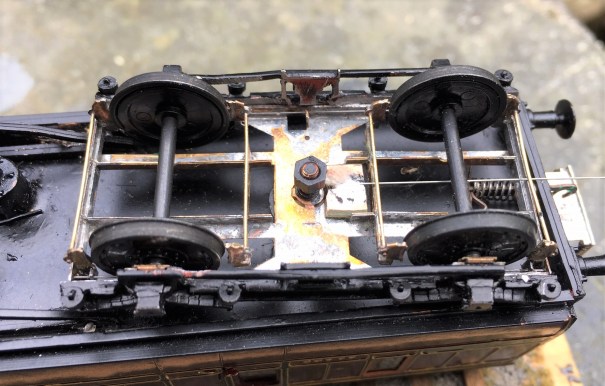
Whilst the basic building and painting/lining of the coach is top notch, there are some issues that I have sought to deal with. First of these is that the bogies are fairly clunky and being assembled from components they are unlikely to be truly square. Thus, I have disassembled these and used them as cosmetic sides to some Bill Bedford sprung bogies.
The coach as built comes with some paper concertina corridor connections – all very 1970s in they look and as they are stretching, they look rather rubbish so off they came. In their place, I have built some of my etched ones – these are a spin off from the dia 51 full brake kit that I am working on. This shows them part built and I will be looking to do a posting on these in their own right once I am fully happy with them.
If mucking about and making the coaches for P4 is not sufficient to undermine the resale value of the coach, the final task to weather down the very glossy paintwork will. These were obviously predominantly aimed at collectors and are finished to showroom standards. The railways of the steam age were amazingly dirty places and a loco or coach in an ex-works condition would be pretty mucky by the end of its first run, let alone its first year.
Thus, it can not stay as clean and glossy as this, no matter how beautiful it looks. I have a weathering day planned for a couple of weeks time, and attacking this will be one of the tasks…………..

Midland Six Wheeled Full Brakes
Although not Highland vehicles, these full brakes have a strong association with the Highland’s branchlines in the post grouping years. Once the LMS took over the Highland’s system in 1923, they seemed to have been horrified by the state of the coaching stock that they inherited! Portions of the Highland’s fleet were speedily retired and large numbers of foreign company’s stock was drafted onto the system (especially the main line from Perth to Inverness, where the trains became fully corridor connected almost overnight).
When it came to the branchlines, the upgrade came primarily by the cascading of the better Highland stock onto these lines but there were exceptions. Although the Highland had full brakes, it was a line that had a lot of parcels/packages traffic, so it seemed that they needed even more and a batch of these Midland six wheeled full brakes were drafted in.

Many photographs of the Highland branchlines of the 1920s had one lurking in the background so I felt one should get to make appearances on Glenmutchkin. Simple, I thought, Slaters do a plastic kit for one and whilst it is no longer available, it is easy to pick up second hand and it should be a nice quick build. Unfortunately, I had not realised what a rubbish kit it was! It is too short and too narrow, most of the mastering is really crude and the panelling in particular would be a scale 6 inches deep. So the Slaters kit made it back on ebay only marginally quicker than it came off and I set about designing my own kit.
It has taken a couple of iterations and about three years, but finally I have got to the stage where I am happy with it but you can form your own view!
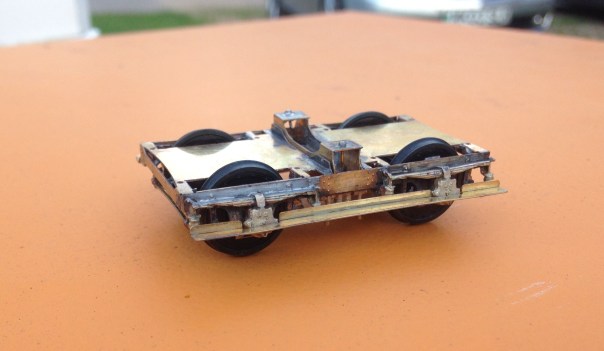
The first iteration used a cleminson chassis but in the light of the success I had with sliding axles on some of my other 6 wheeled stock, I redesigned it to include these and some sprung W-irons in the style of Bill Bedford’s.
This proved similarly successful and as you can see in the video, it trundles along quite nicely!
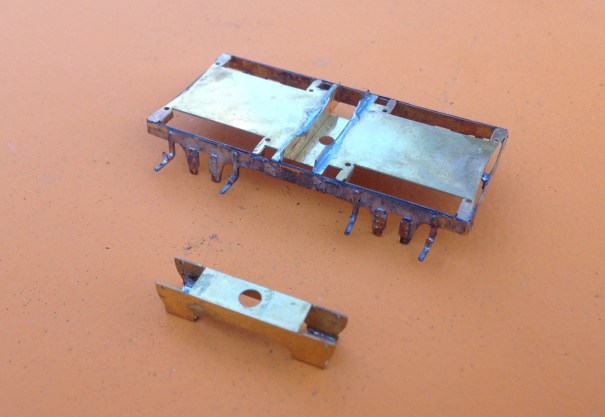
Other than the use of these sliding axles, the main unusual feature of the model is the arrangement of securing the roof. I have found that it is essential to bolt these in place to prevent the roof becoming adrift at some point in the future (which has happened to half my stock over time). Therefore, I designed a set of legs that allow the roof to be bolted through the floor from below and in the process also securing the separate chassis tight too. Broken down, the components look like this and having them separated does make painting a lot easier. It is definitely the route I will take in the future.

It is intended that this kit will be made available for sale as a 4mm/1ft model – albeit you will need to source the fittings/castings yourself. I have prepared some fairly extensive instructions (see link below) and this includes the details of what is required and where to get it from. I am waiting for a quote from the etching company to be able to work out the sensible cost for these; so an update post will follow when I list it on the Miscellany Models site.
Miscellany Models Rolling Stock 2 – Midland dia 530 Full Brake v2
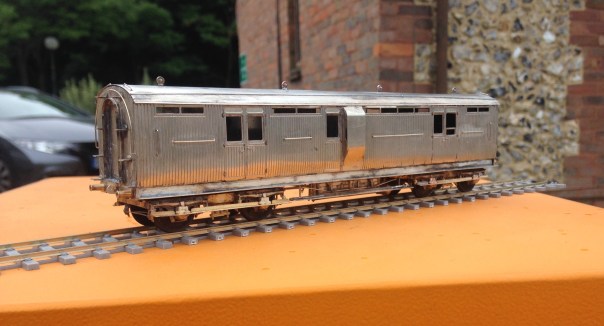
In the meantime, here are a couple of additional views of the completed vehicle, awaiting its turn in the paintshop!

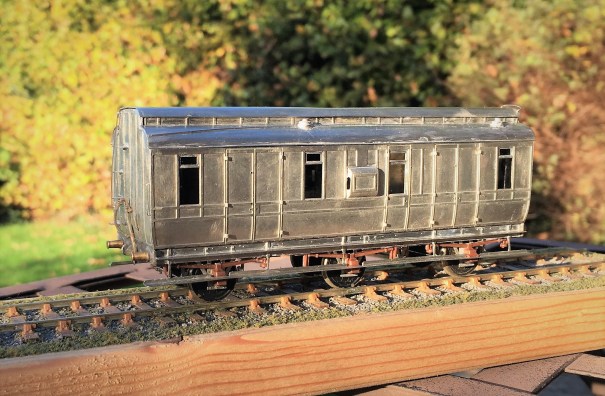
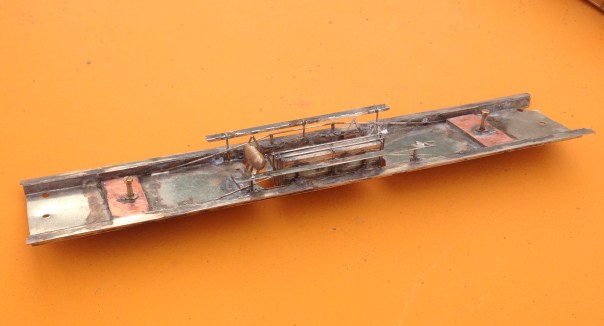
Dia 51 Test Build Part 3 – and then there were two…..!
Following the first test build of the dia 51, I took account of what I had learnt from this and completed various amendments to the artwork. There was nothing truly major, so I was fairly confident that the corrections would get the model to the point where the artwork was done. But of course, to prove this, another test build was required and this is where we got to………..
And this is what it looks like……..quite handsom I think and certainly quite differnt from all the pother stock I presently have.
The eagle eyed will spot that the vehicle is slightly different in that this one has sliding doors, whereas the previous had cupboard doors. The kit is intended to cover both options and does successfully do so.
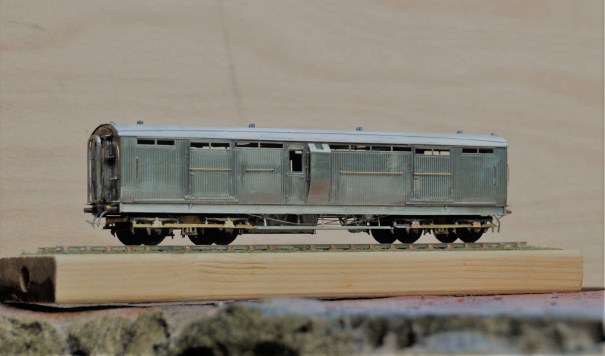
The ducket also has cut outs for a lamp at its head (a feature of Highland duckets). This proved quite challenging to model and I will avoid doing it again because it seemed to fall out of favour prior to the end of the Highland era so having only one or two would be right for my timeframe.
There remains a bit more work on the bogie to do; they can be made up to work very well but are a little more difficult to build than I had hoped. Once this is cracked, I will be making the dia 51 available for sale.

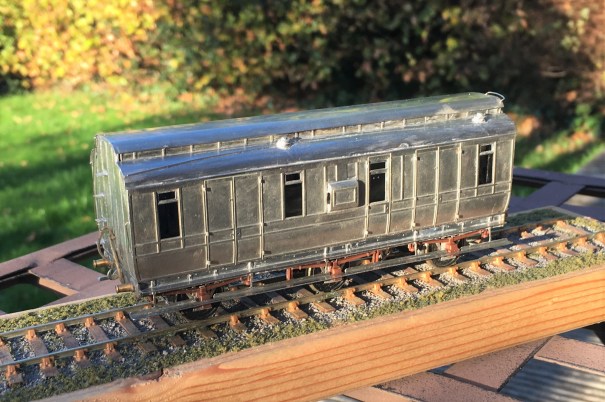
Dia 51 Test Build – Part 2: Nearly There
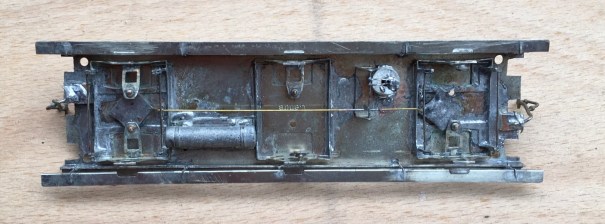
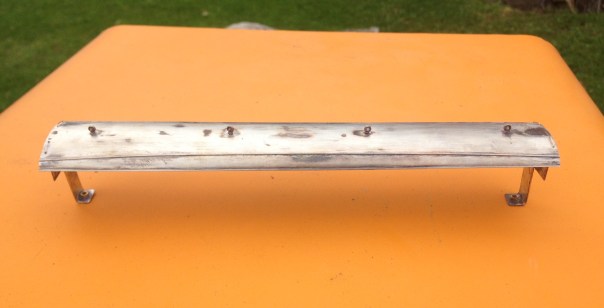
I no longer affix roofs firmly to the body of my coaches as makes both the building and the painting much easier. The downside of this is that there is the challenge of keeping the roof on tight without there being any visible joint between the two as this looks terrible. The solution I now use is to clamp this to the floor with 10BA bolts by way of brackets as can be seen in the photograph below.
As built, these coaches had full length step boards but they lost most of these through their life. They were electric fitted from the outset. The chassis below is close to finished except I have run out of vacuum cylinders so these will need to be added, along with the vacuum pipes.
The bogies are also a key part of the proposed kit and are something that I have been working on with Justin Newitt of Rumney Models – the idea being to combine the sprung bogie design that he has prepared with cosmetic etches for the sides and then the castings from Lochgorm Models or perhaps our own in due course. The bogie is quite sophisticated with both primary and secondary springing – the latter is on the bolster and is as below.
The primary springing is on the axleboxes and has bearing carriers, much like the Bill Bedford sprung W-irons. There are still some wrinkles to iron out so it is not there yet but they do make up into some pretty neat bogies; don’t you think?
The only area of the first test build that truly did not work was the corridor connections and it is going to be a case of back to the drawing board for these but other than the final few bits to be completed, the build is finished and I think the vehicle is handsome.
So, off to the paint shops soon, but there is a bit of a holiday to squeeze in first!

Goodies – time for some more test building….
I had a delivery at work which was rather more interesting than the average box of lease documents I usually get…………it looked like this.
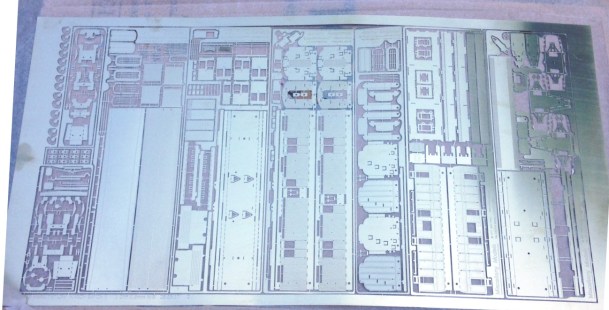
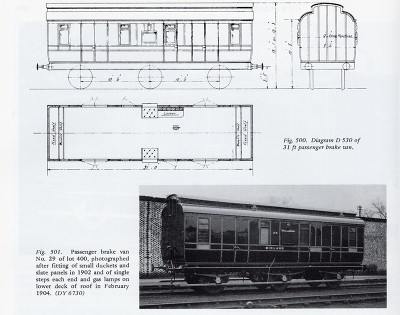
There are a number of items in this, some parts for some locos I have underway and an attempt to adjust the ECJS 6 wheeled bogies but the key goodies in this are a MR 6 wheeled full brake (to dia 530) and an HR bogie full brake (to dia 51).
The MR full brake should look like this:
and the Highland’s full brake here
So all I need is some time to do some more testing building…………..
