Blog Archives

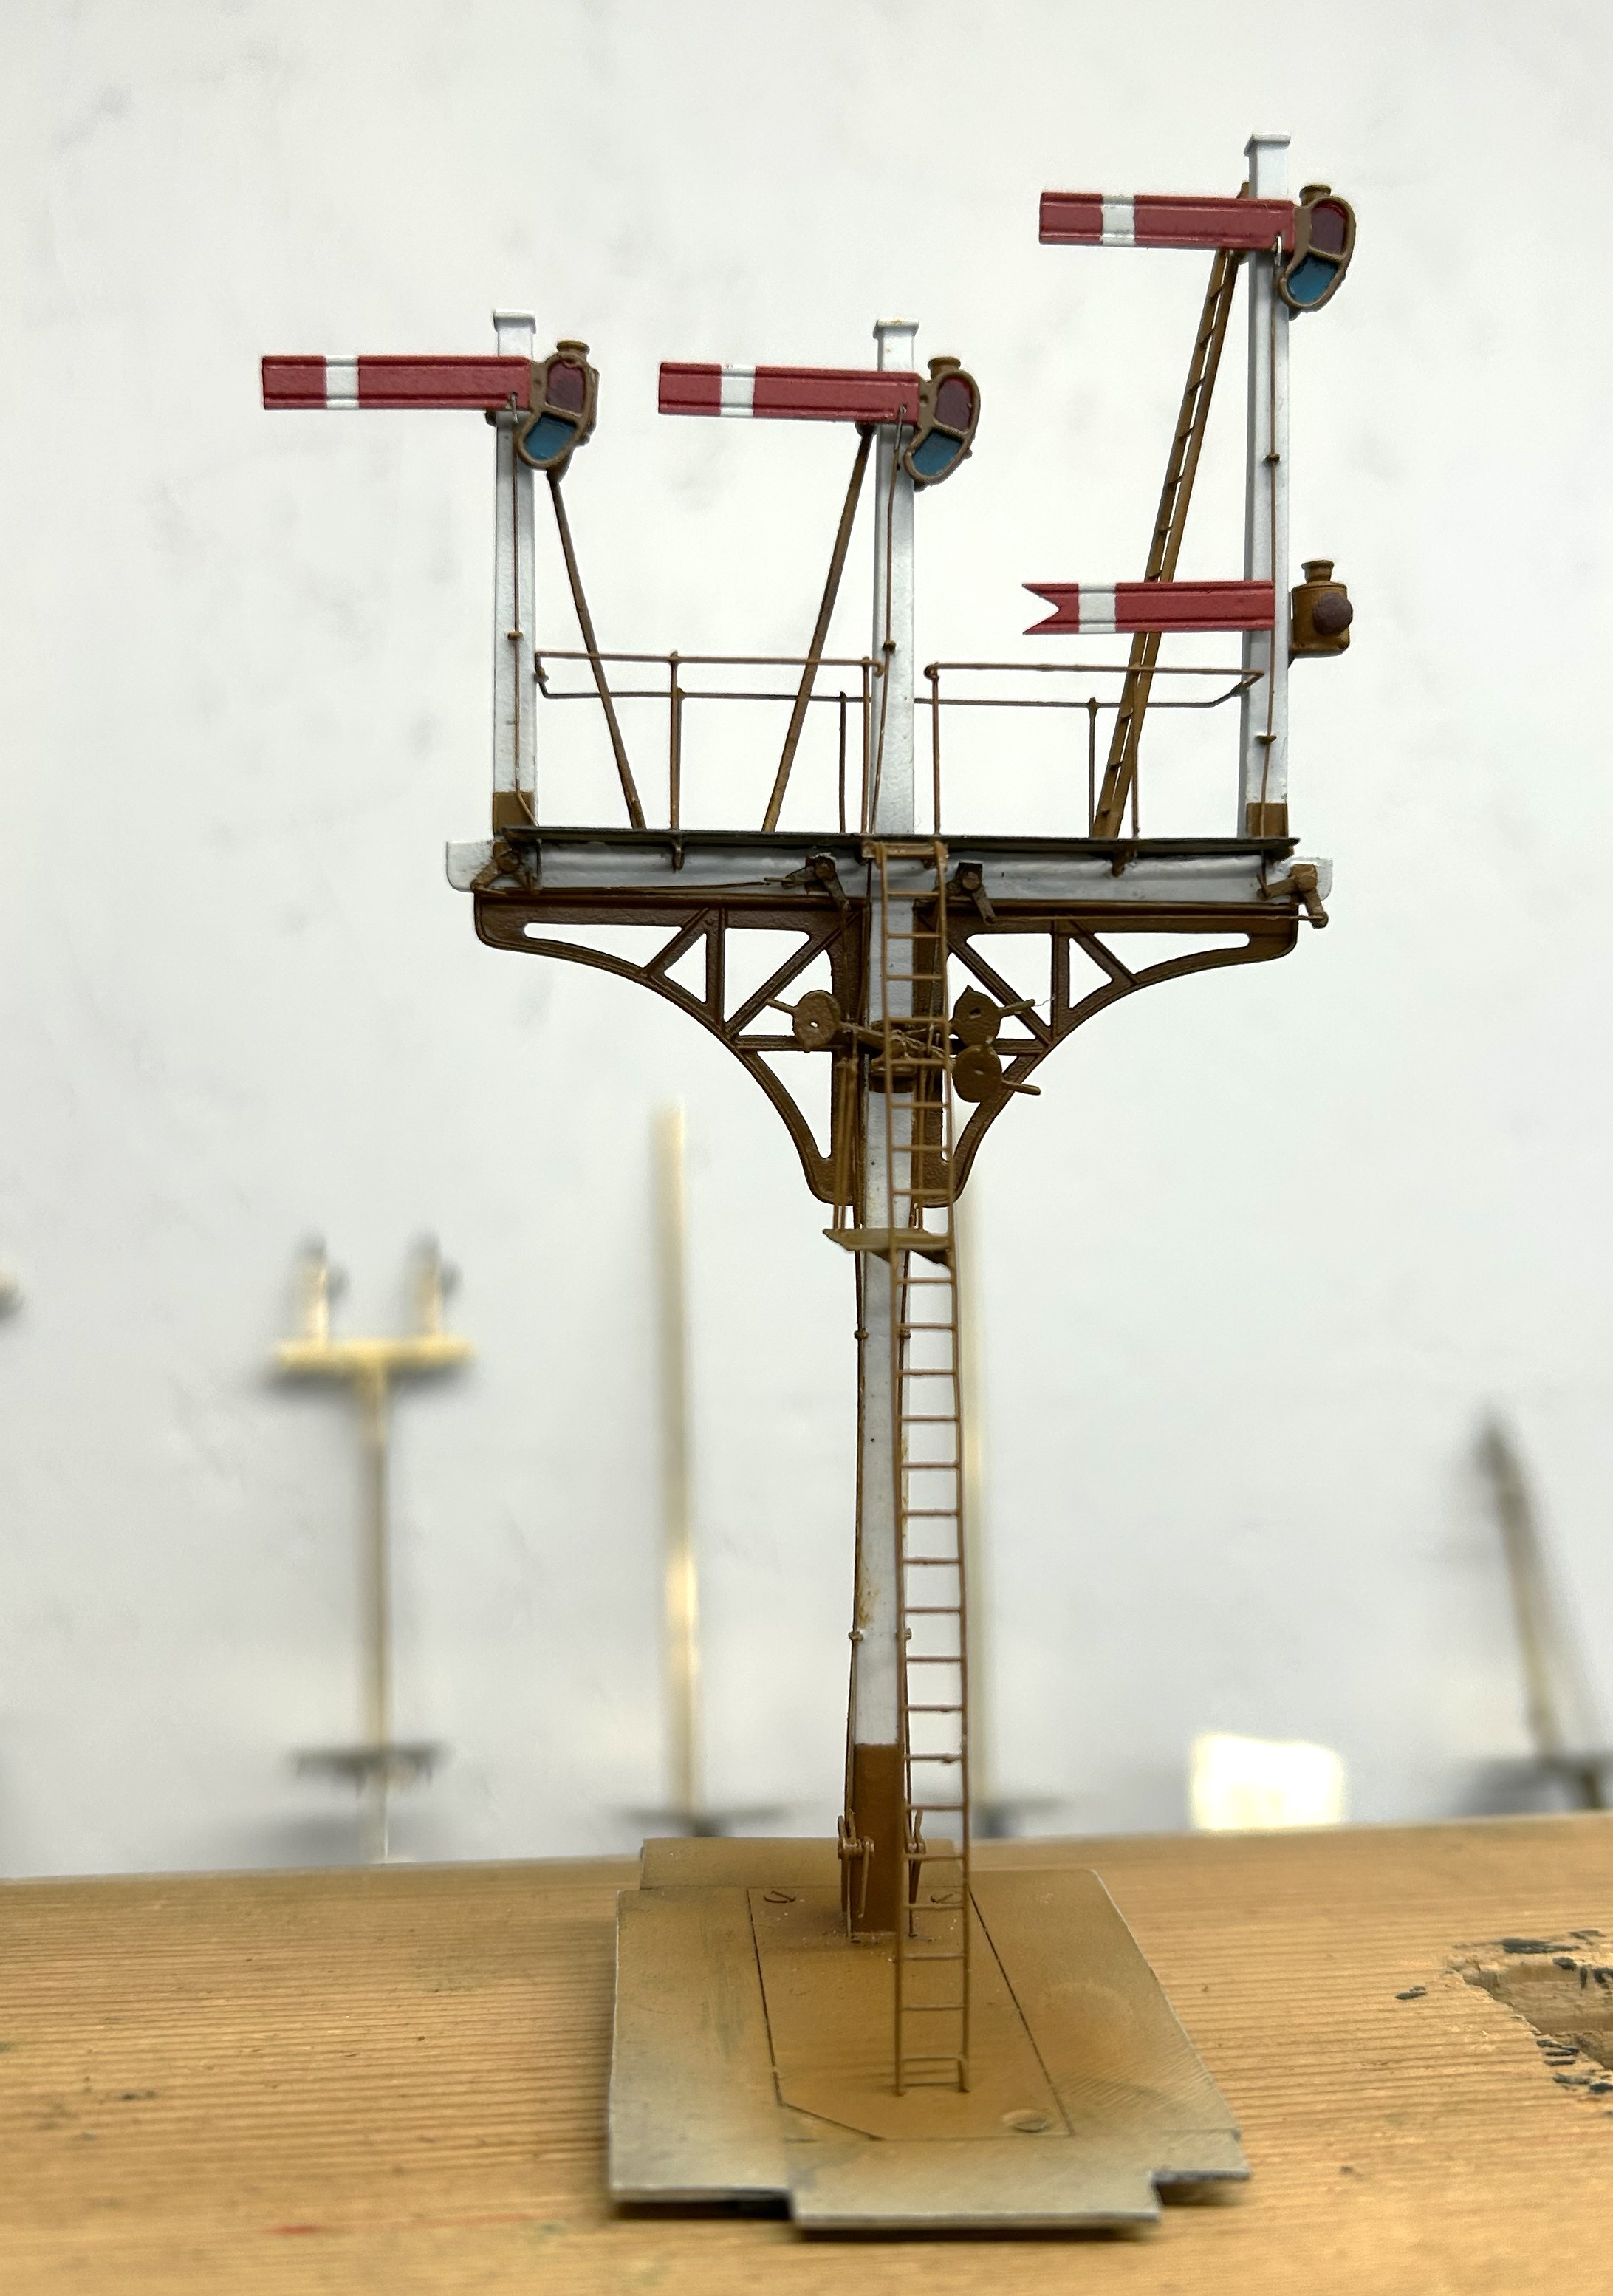
At last, a Finished Signal!
Well, that took a while longer to make than I had hoped! Not least because it is not the only signal I am working on at the moment.
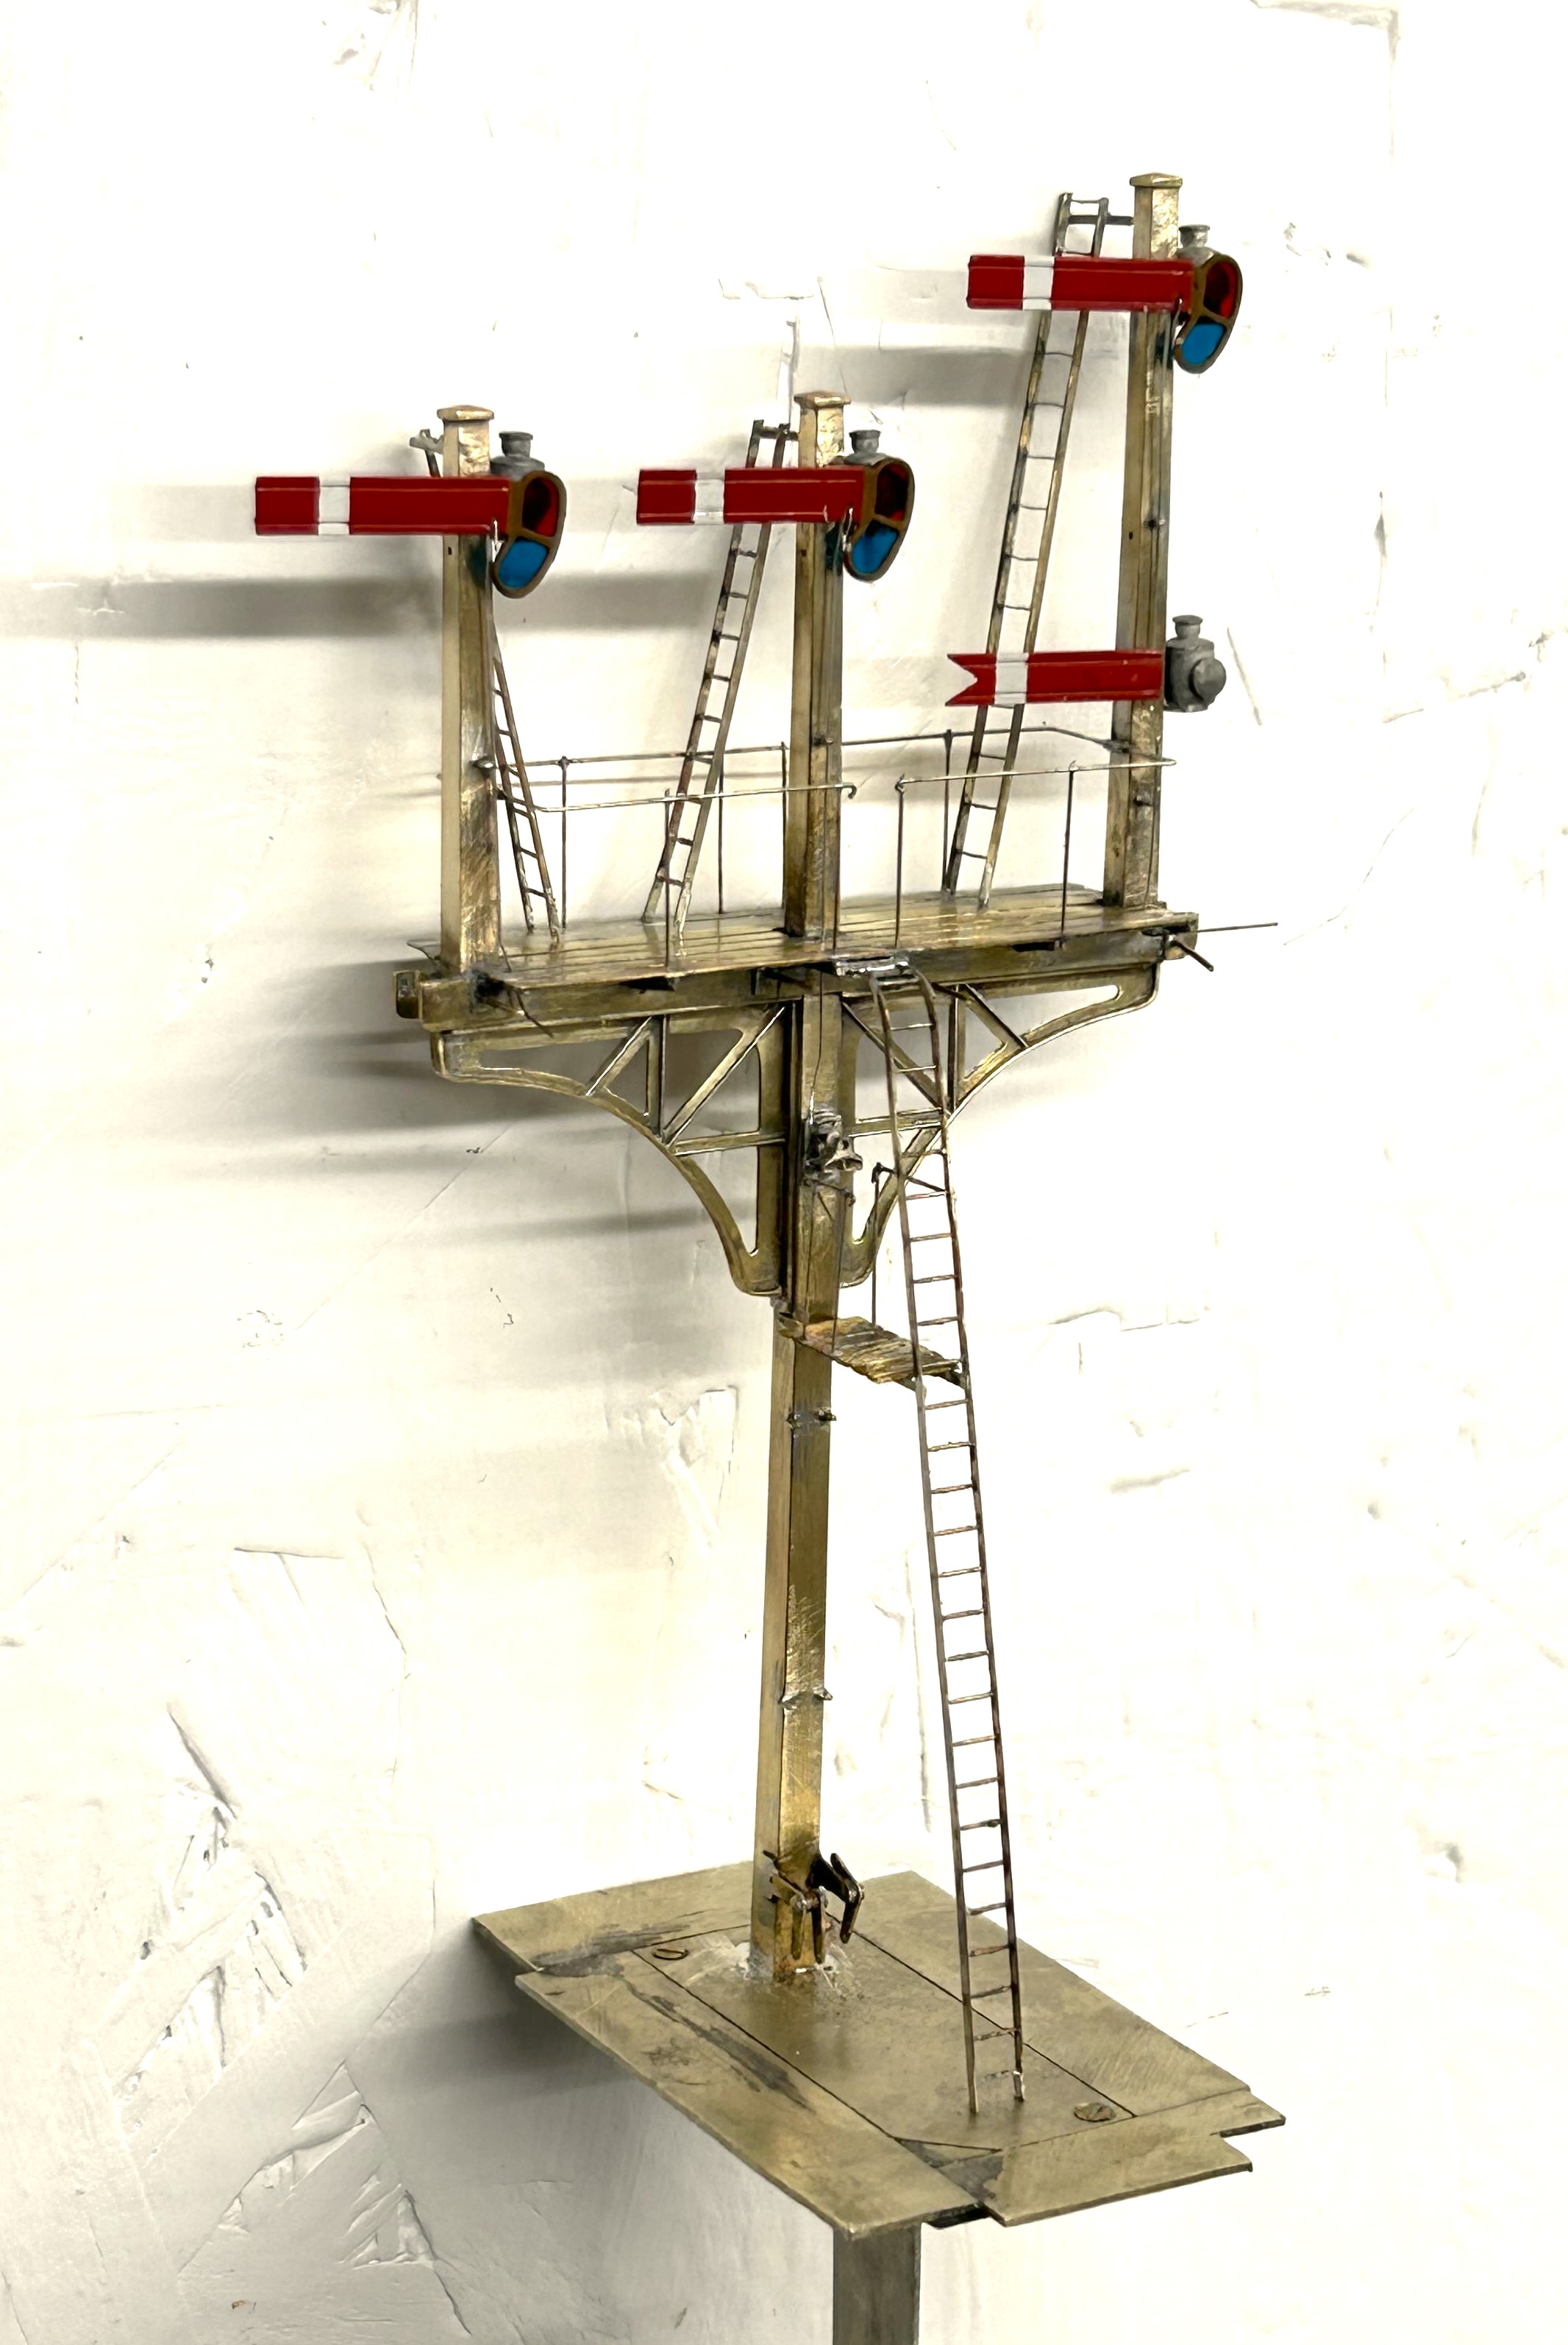
Although the drawing did not show a landing in front of the balance weights, i felt that it was likely one would be provided given that these need maintenance at times. Hence this was formed from some L section and an etched slats and provides a useful point to secure the ladder too.
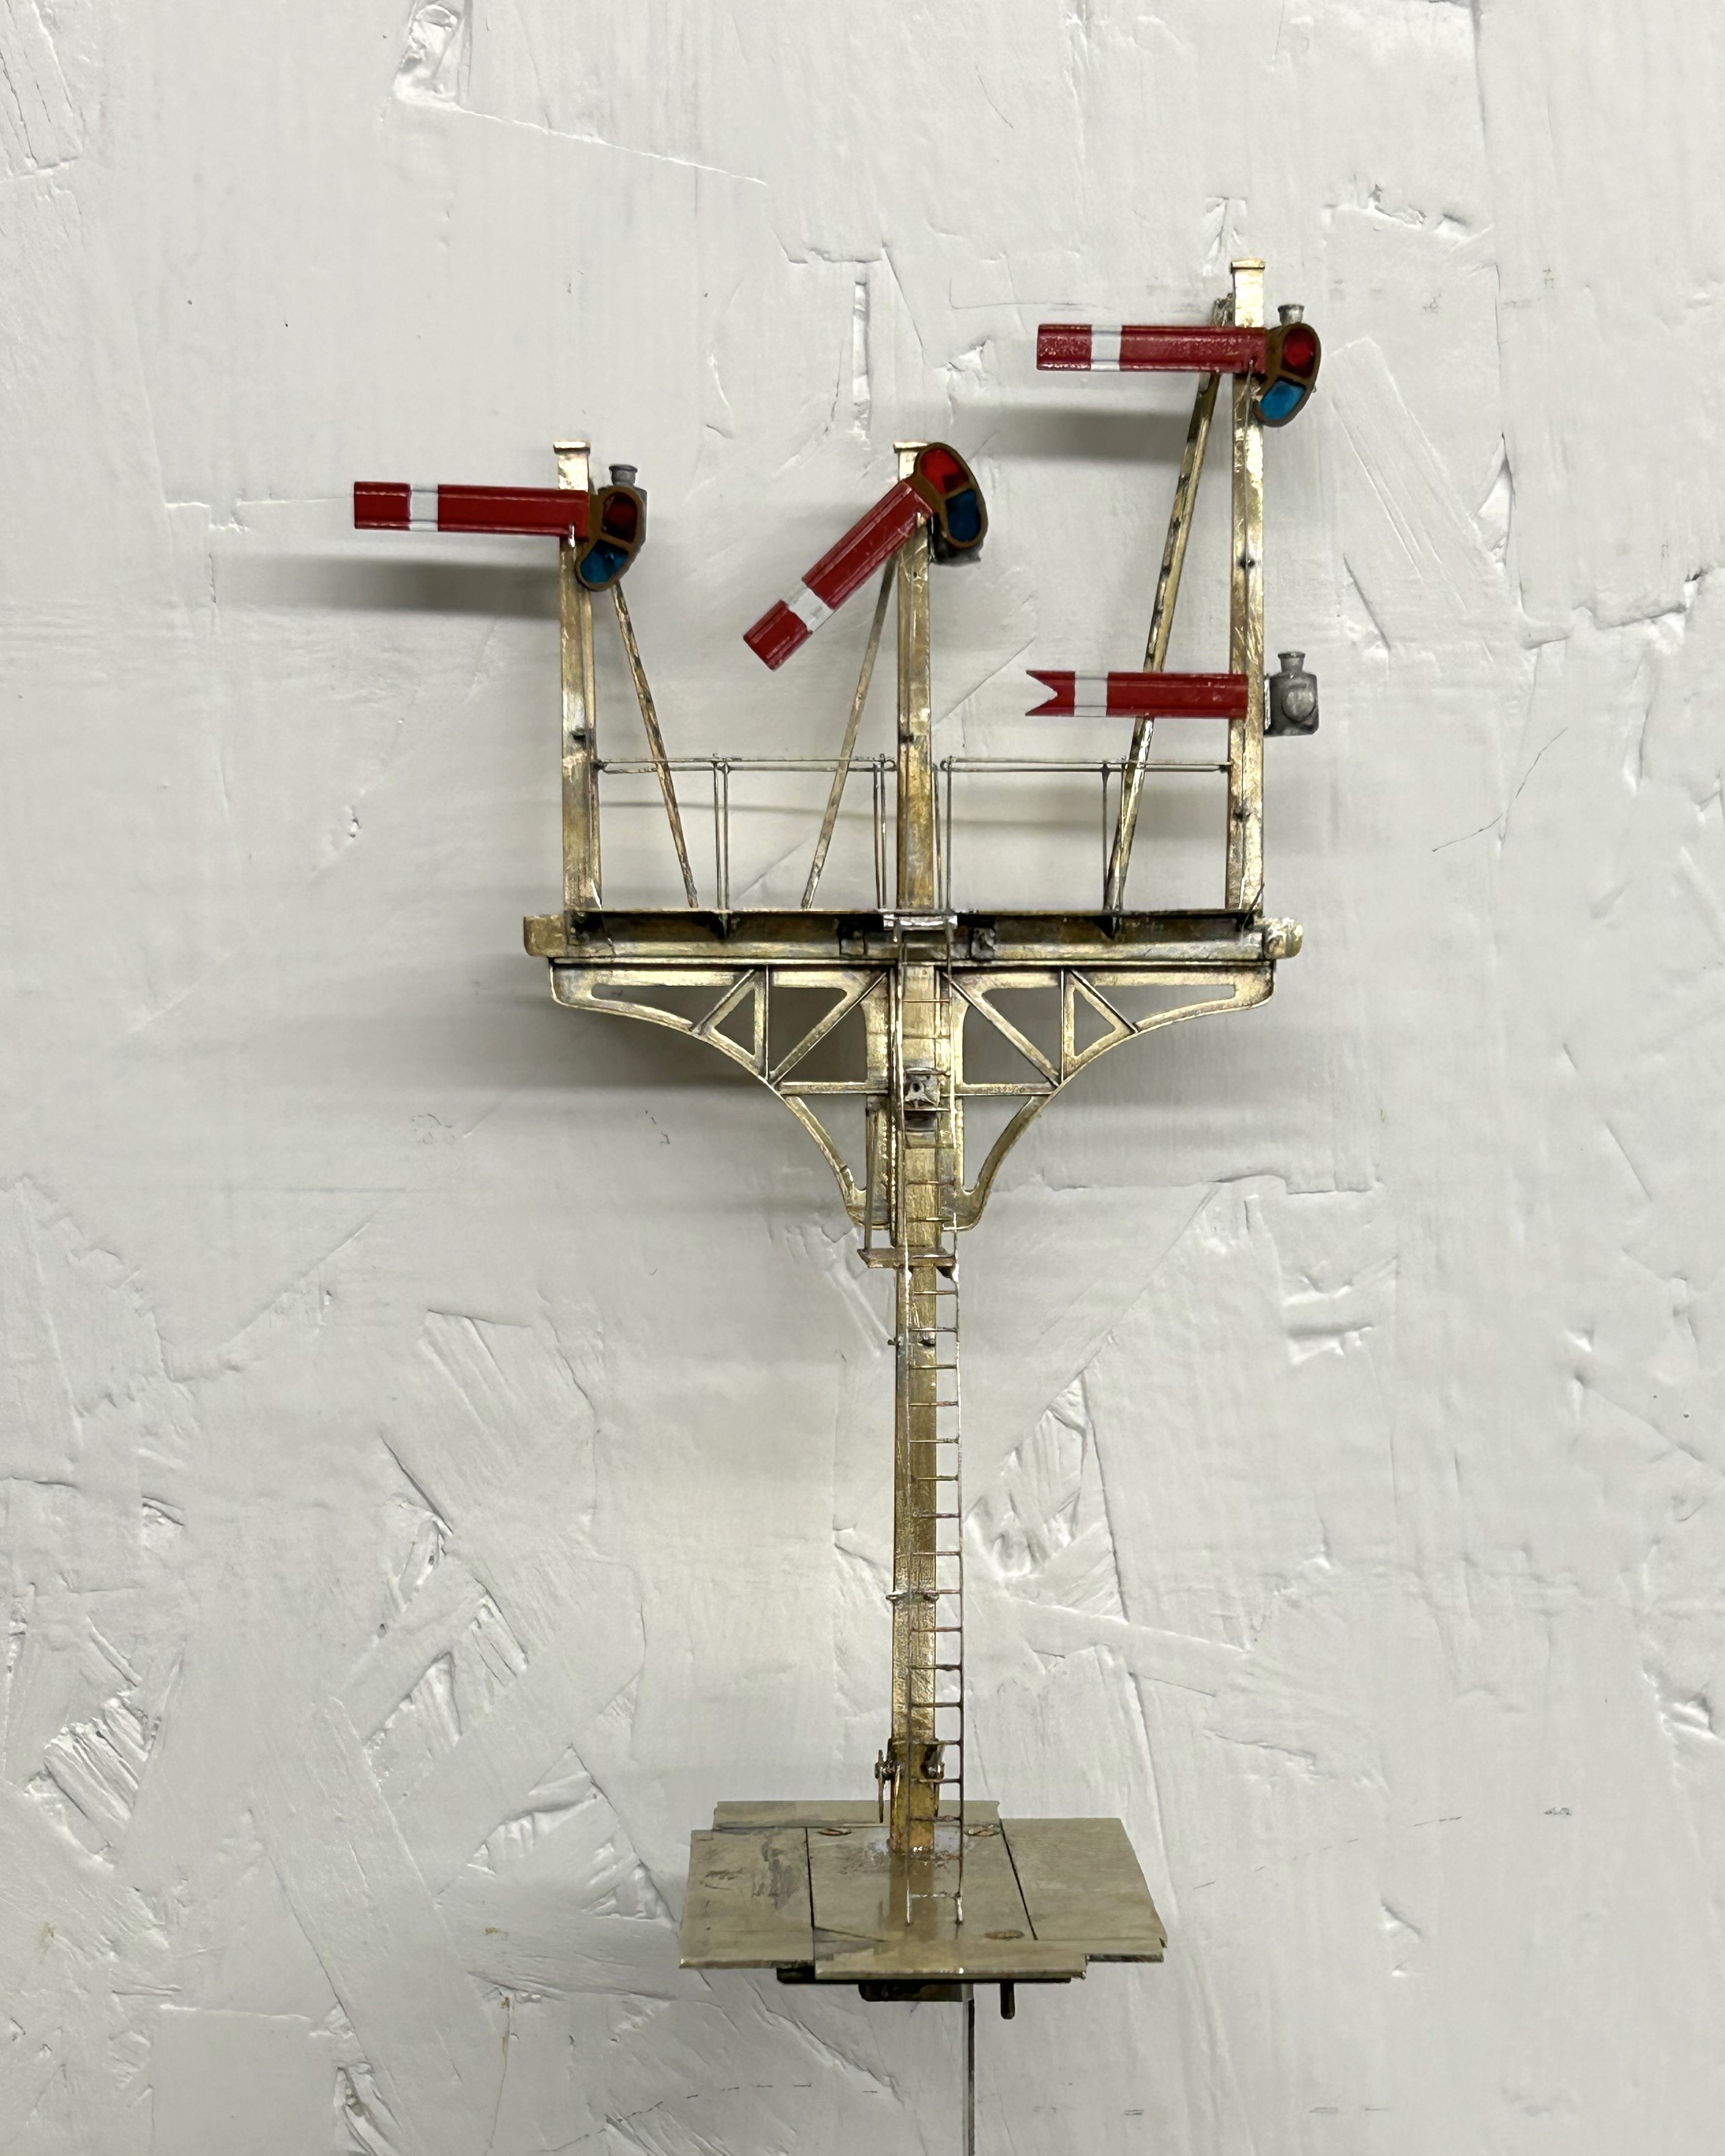
The issue with signals with dolls is that each doll is in effect its own signal; it has a ladder, arm and lamp assembly. But worse than this is that it is also necessary to get the movement to transfer over to the doll so there is even more than a seperate signal per doll. There are a number of ways the prototype used to get the movement to transfer and in this case the signal uses L shaped elbows. Sadly these are more challenging to make as there are more working components and to be prototypical they out to be little more than a couple of mm in size.
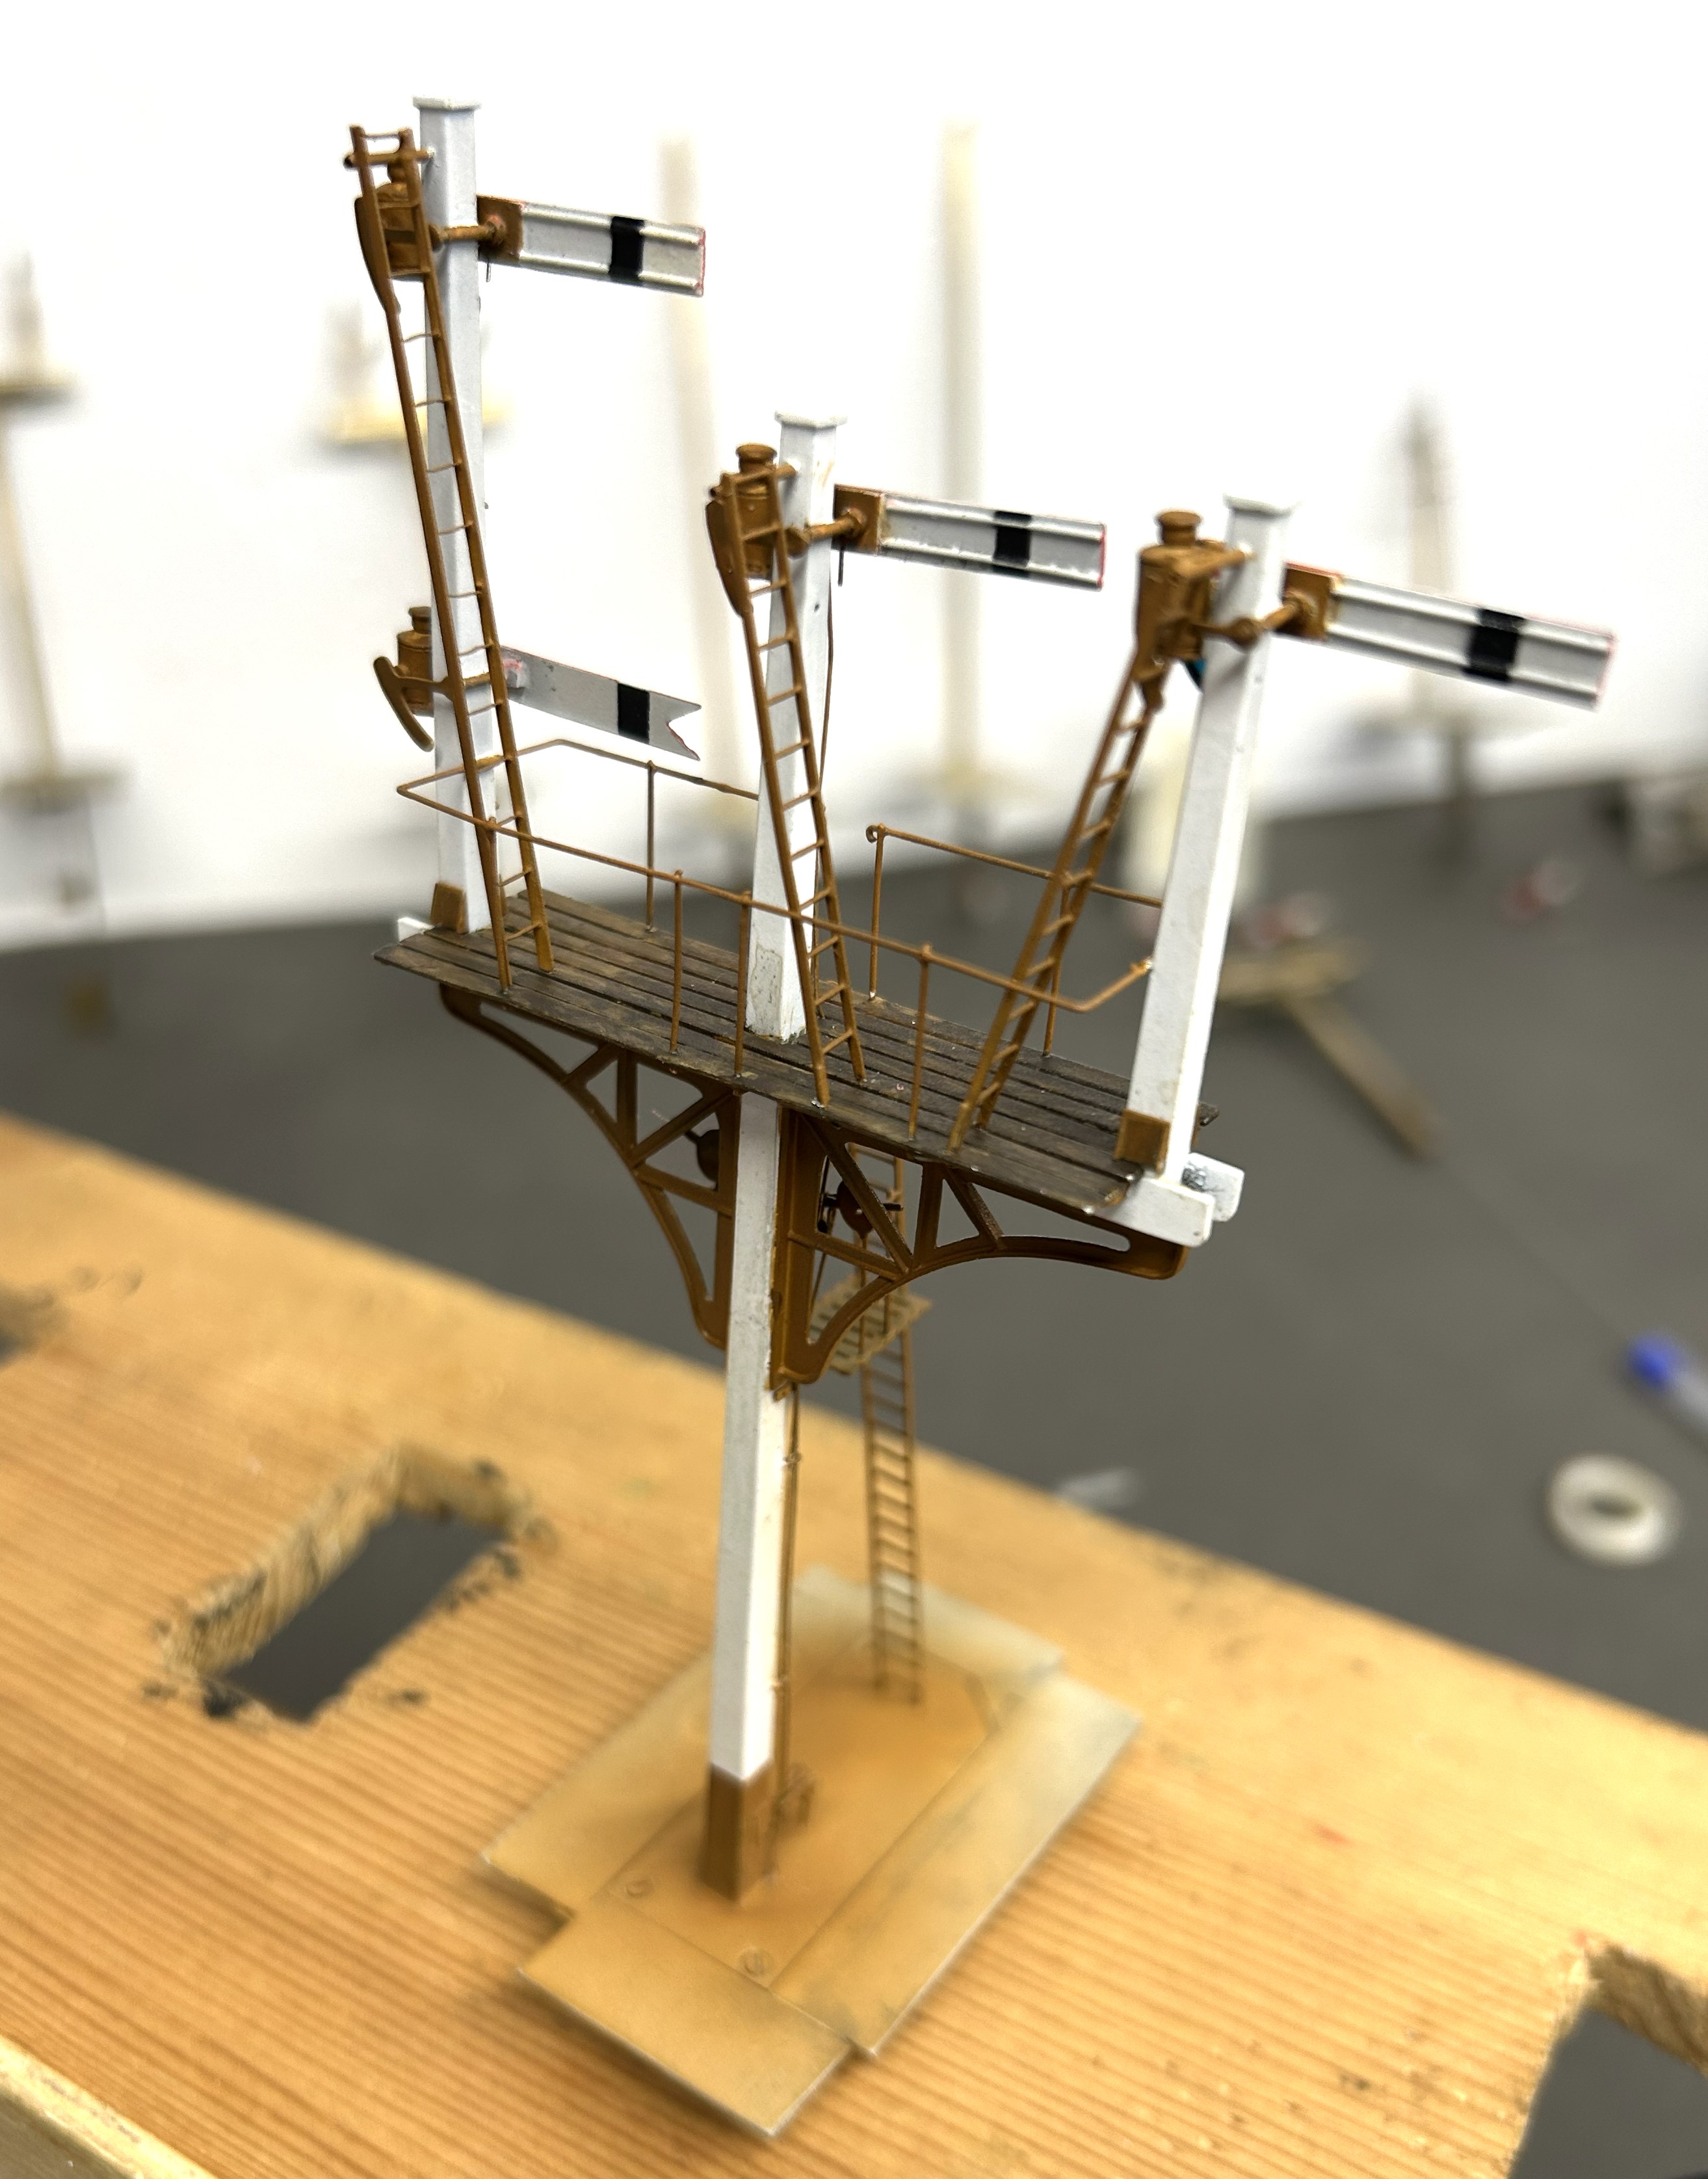
A key trick in making signals is to spray paint as much of the signal as possible. Because the components are generally fine any excess thickness of paint will quickly make the modelling crude. As a result of this, I now generally try to make the ladders detachable. In this case there is a rod attached to the top of the doll that a tube at the top of the ladder slips over, with prongs at the base.
So here it is a finished (except for a tie rod which I fortgot to paint so is to be fitted shortly).
And as is de rigeur for a blog post on the building of signals, here is a video of it in operation.
The Other Benfieldside
To date, the images and details I have shown on Benfieldside have related to the main and original station. However, there is more!
Benfieldside’s original builder, John Wright, constructed a significant extension a few years after completing the core layout. This was shown at the time in the Model Railway Journal (issue 57, 1992) and has not really be seen since.
When John’s interests moved on, he disposed of both parts of the layout and in turn the new owner decided he did not wish to retain the whole. However, he elected to retain the extension in order to convert it to P4 as his home layout (Benfieldside was all constructed as an EM layout). We all know what life is like – jobs, family life and other priorities get in the way but progress is now being made. The two main lines are now operational, as these two videos show.
The new layout will be NER as a core, but with also a Midland presence. It appears that the Midland has provided the motive power for the test train!
As you can see, Benfieldside’s extension was centred around a substantial viaduct with a degree of siding to one end. Its owner is proposing to make a small MPD here, the beginnings of which are visible in the videos.
There is still a way to go both in the adjustments around the MPD but also in refreshing the scenery. But never the less, as you can see it is another impressive layout.

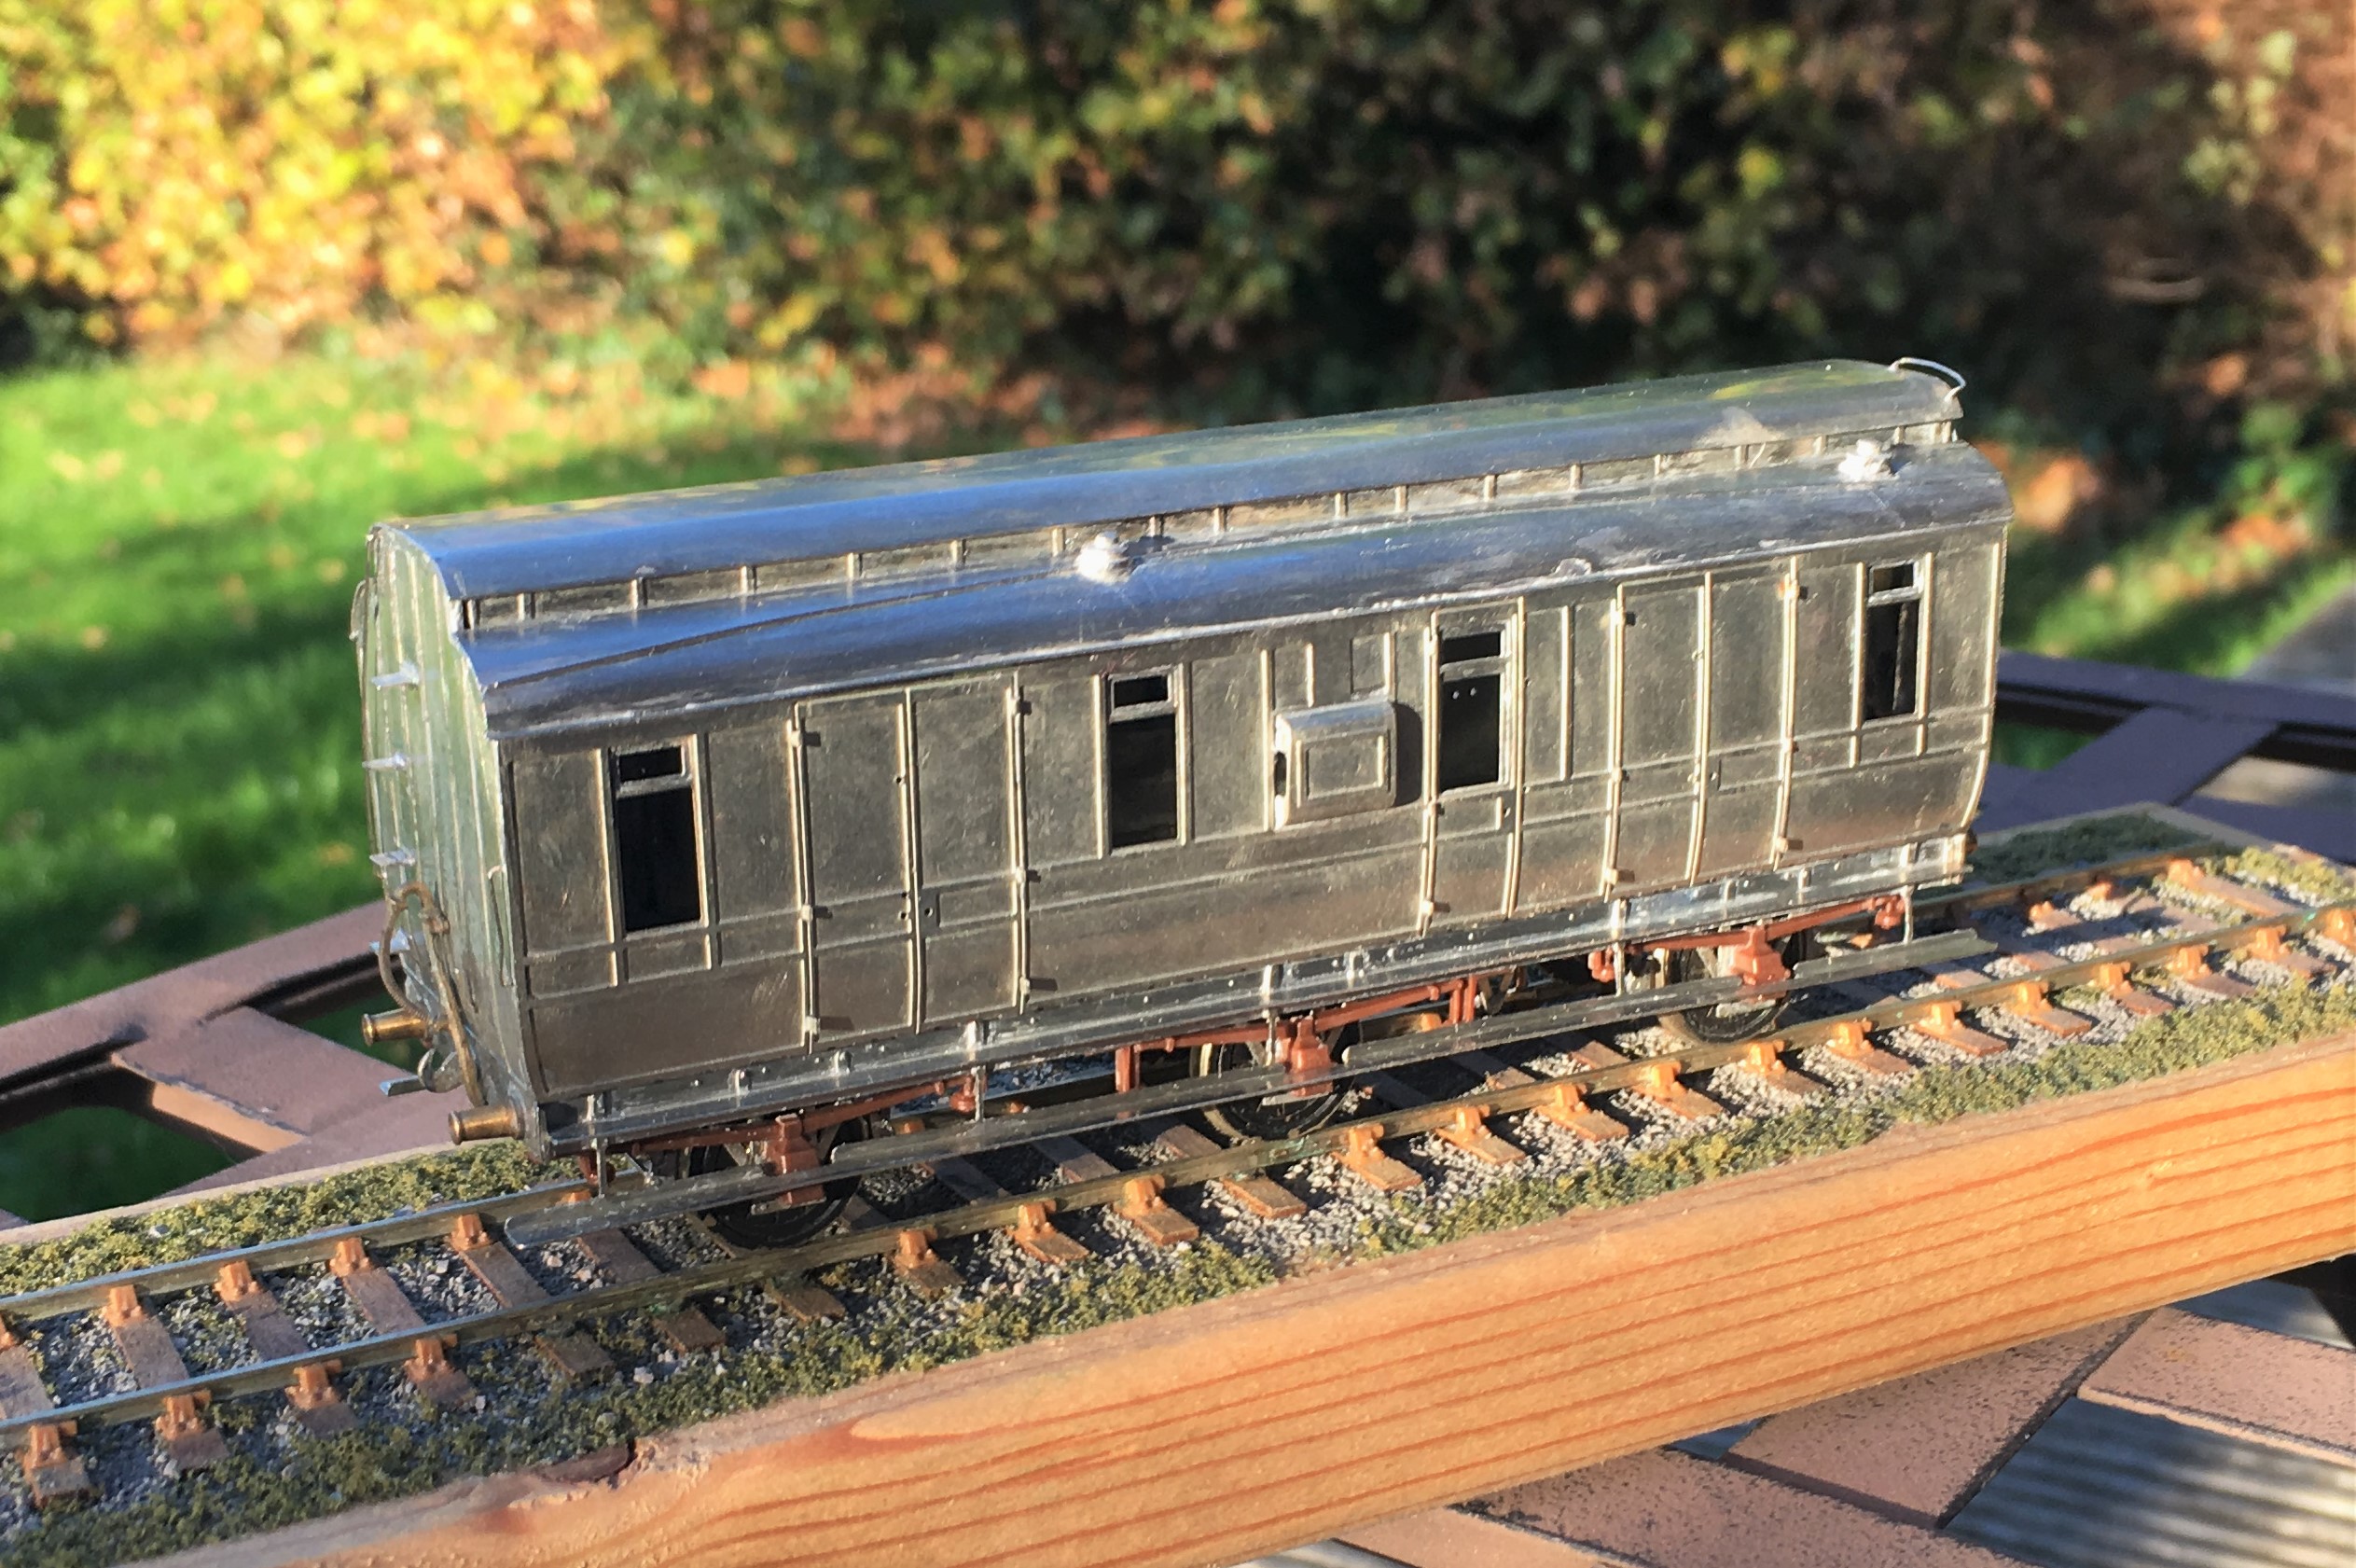
Midland Six Wheeled Full Brakes
Although not Highland vehicles, these full brakes have a strong association with the Highland’s branchlines in the post grouping years. Once the LMS took over the Highland’s system in 1923, they seemed to have been horrified by the state of the coaching stock that they inherited! Portions of the Highland’s fleet were speedily retired and large numbers of foreign company’s stock was drafted onto the system (especially the main line from Perth to Inverness, where the trains became fully corridor connected almost overnight).
When it came to the branchlines, the upgrade came primarily by the cascading of the better Highland stock onto these lines but there were exceptions. Although the Highland had full brakes, it was a line that had a lot of parcels/packages traffic, so it seemed that they needed even more and a batch of these Midland six wheeled full brakes were drafted in.
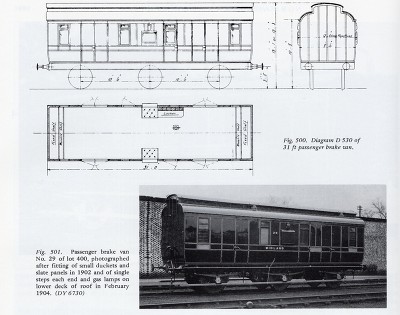
Many photographs of the Highland branchlines of the 1920s had one lurking in the background so I felt one should get to make appearances on Glenmutchkin. Simple, I thought, Slaters do a plastic kit for one and whilst it is no longer available, it is easy to pick up second hand and it should be a nice quick build. Unfortunately, I had not realised what a rubbish kit it was! It is too short and too narrow, most of the mastering is really crude and the panelling in particular would be a scale 6 inches deep. So the Slaters kit made it back on ebay only marginally quicker than it came off and I set about designing my own kit.
It has taken a couple of iterations and about three years, but finally I have got to the stage where I am happy with it but you can form your own view!
The first iteration used a cleminson chassis but in the light of the success I had with sliding axles on some of my other 6 wheeled stock, I redesigned it to include these and some sprung W-irons in the style of Bill Bedford’s.
This proved similarly successful and as you can see in the video, it trundles along quite nicely!
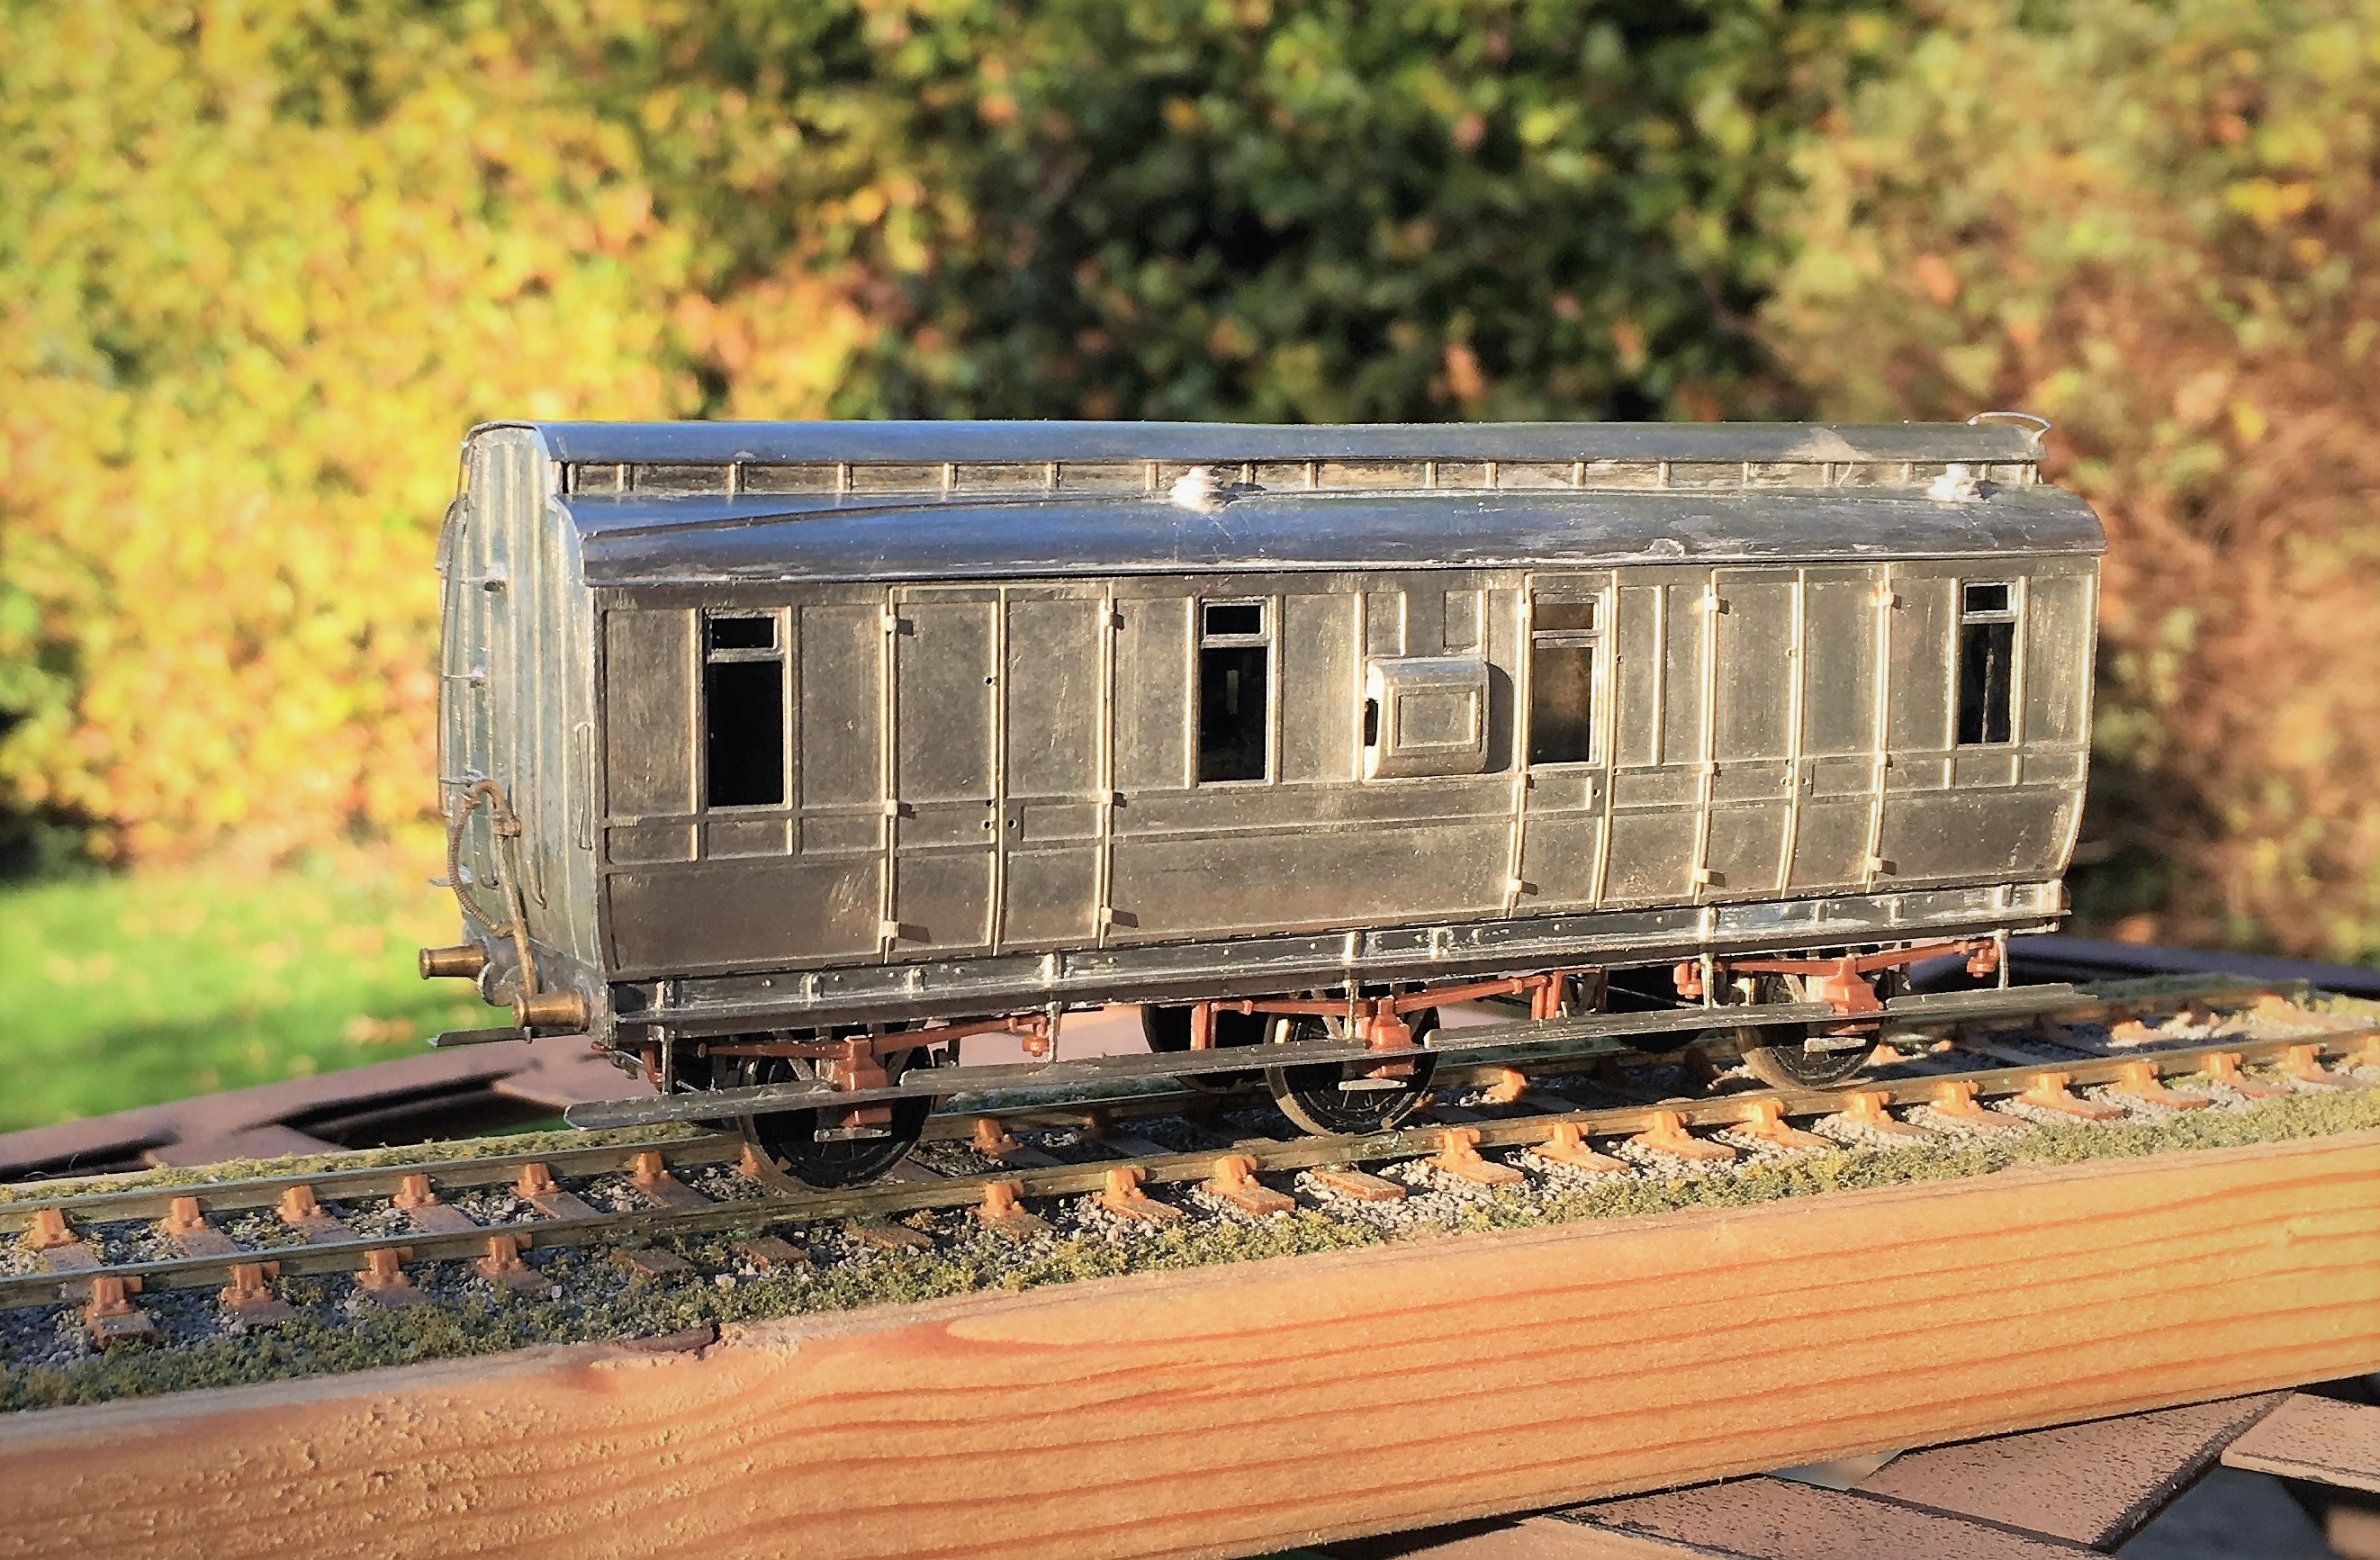
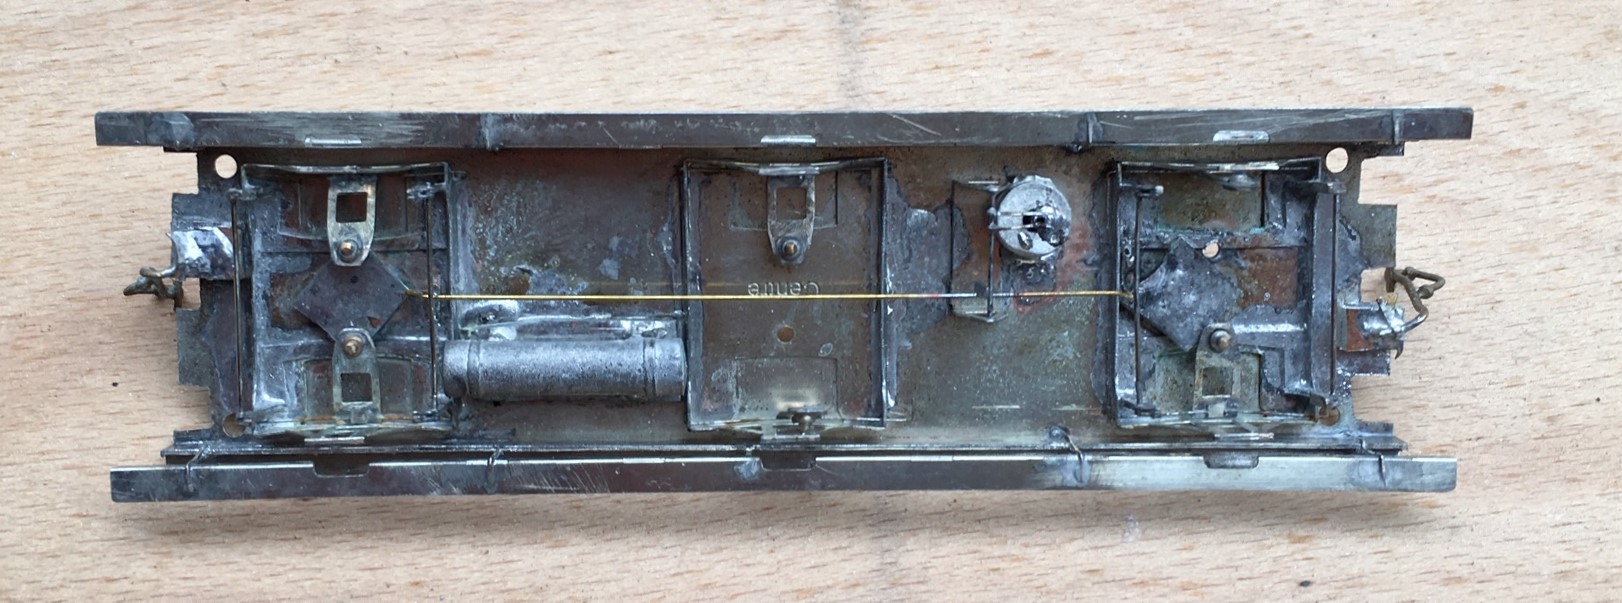
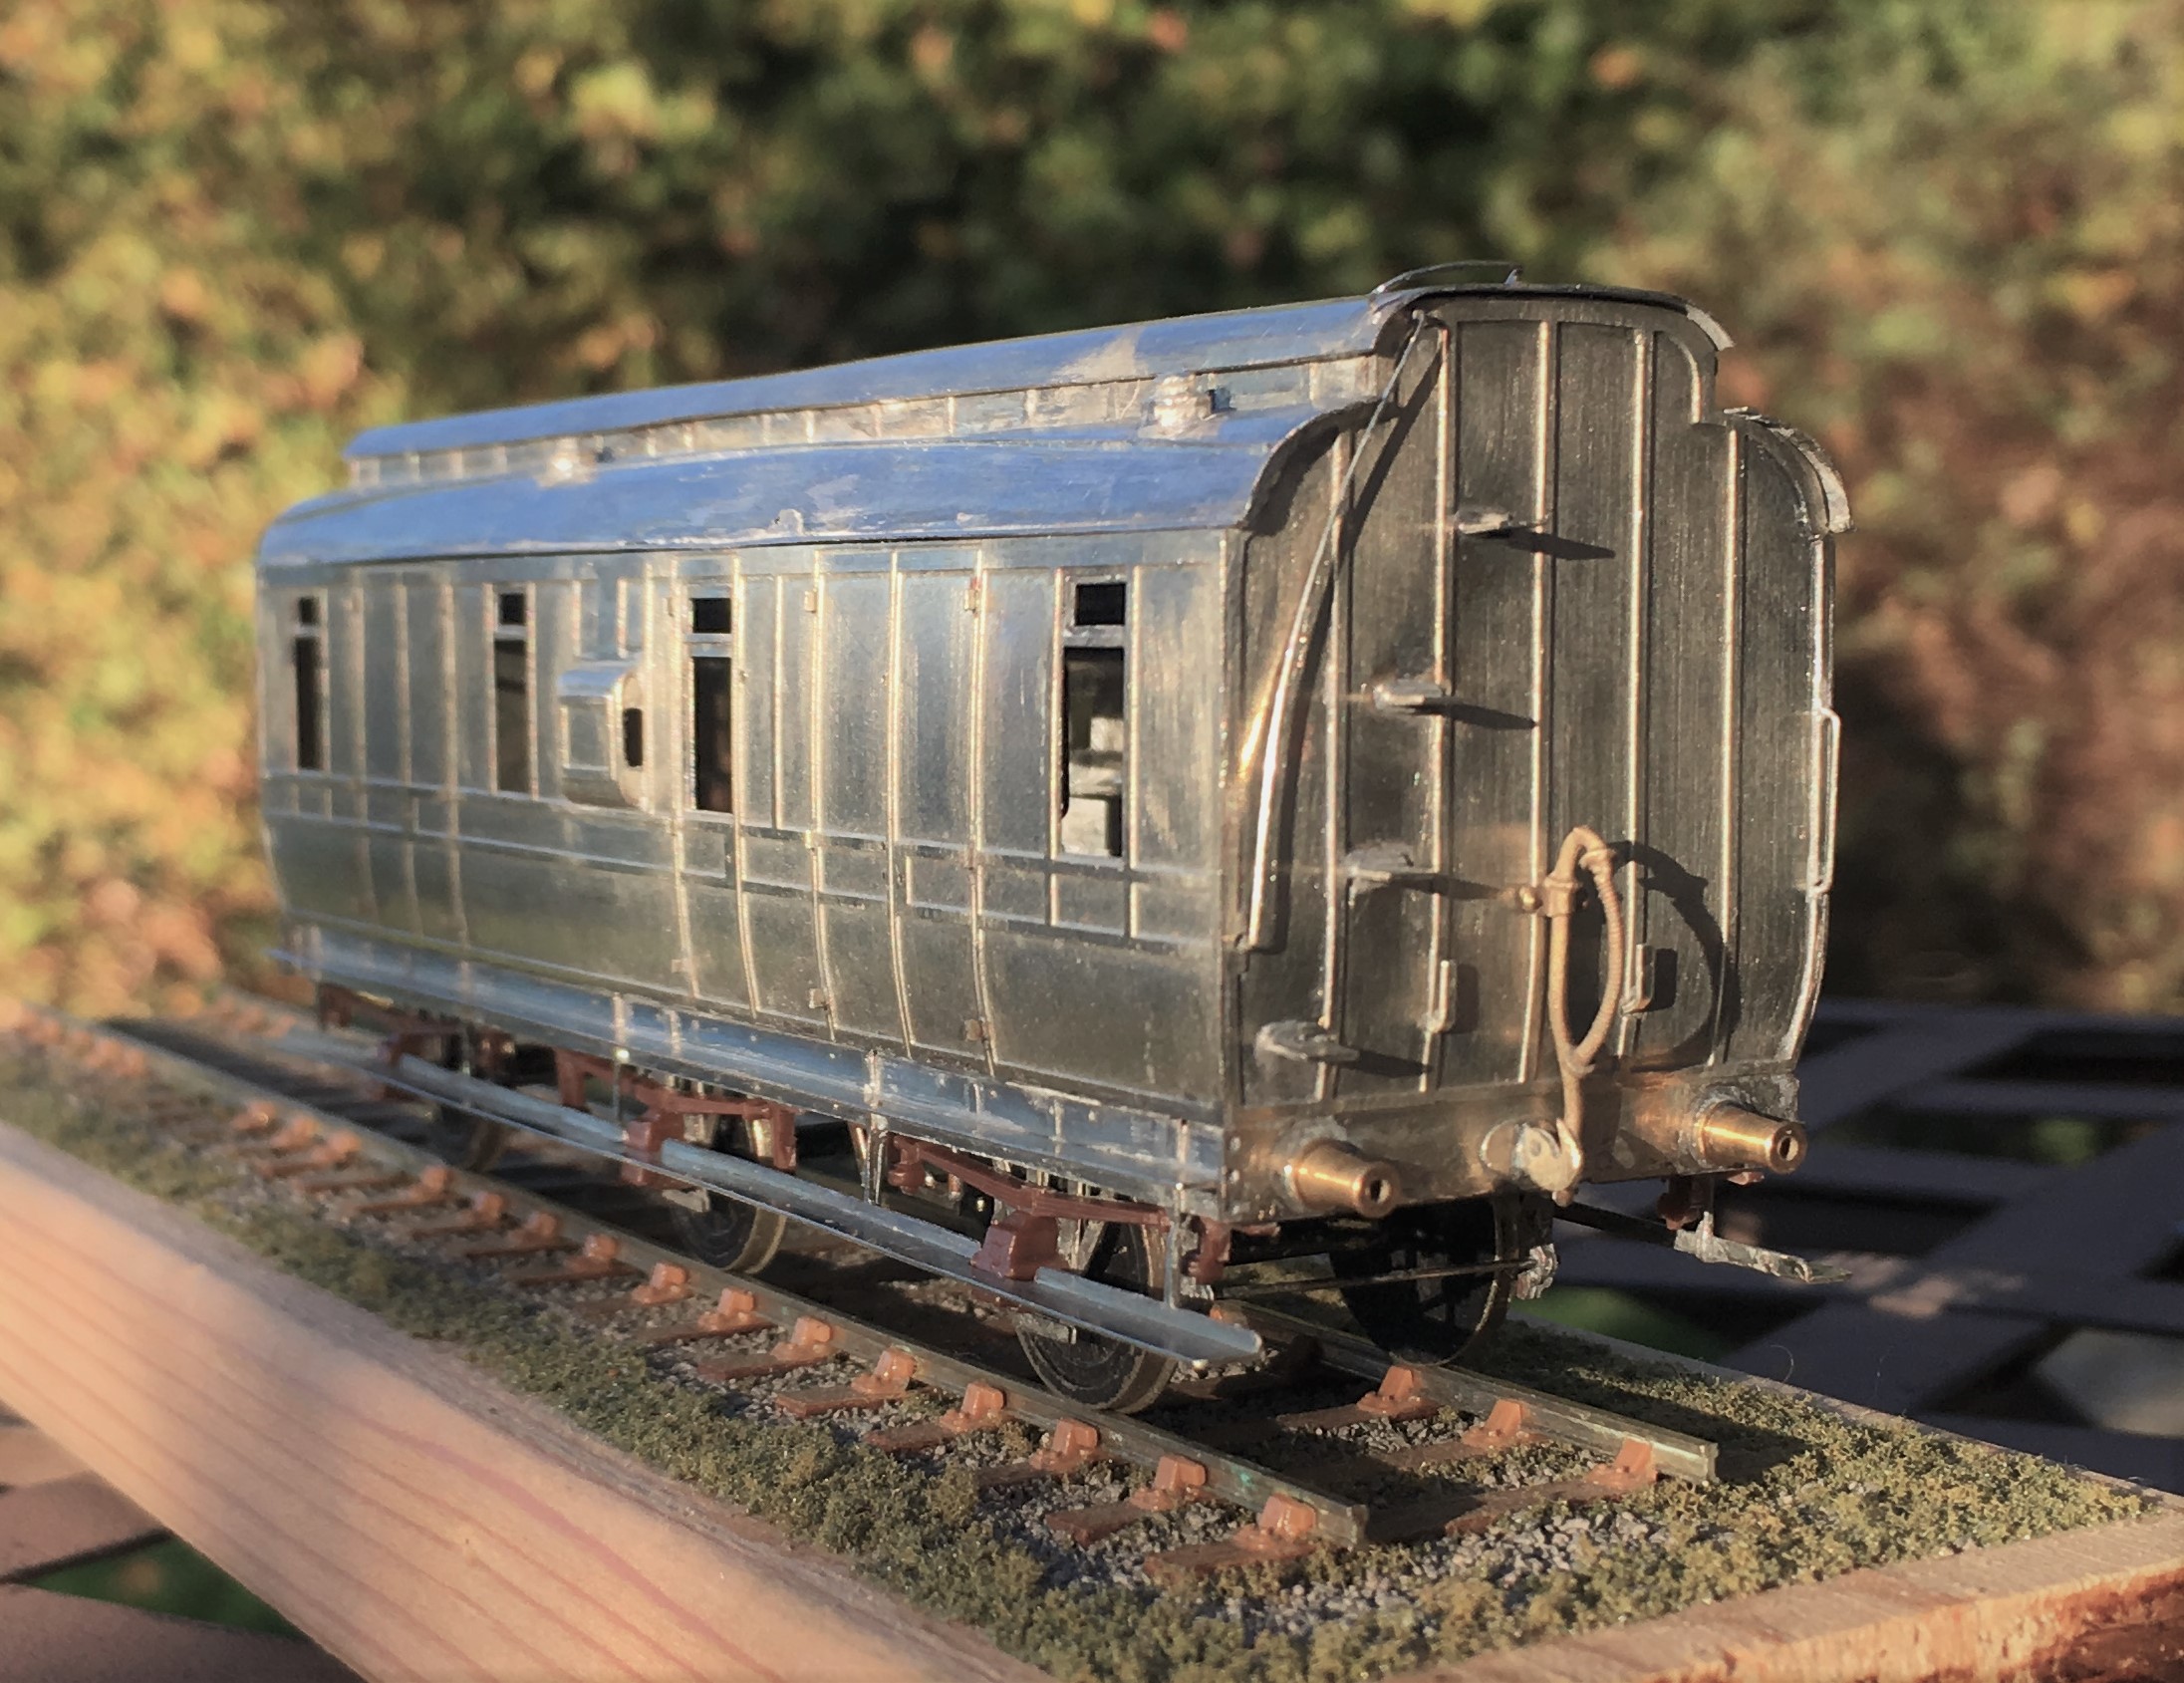
Other than the use of these sliding axles, the main unusual feature of the model is the arrangement of securing the roof. I have found that it is essential to bolt these in place to prevent the roof becoming adrift at some point in the future (which has happened to half my stock over time). Therefore, I designed a set of legs that allow the roof to be bolted through the floor from below and in the process also securing the separate chassis tight too. Broken down, the components look like this and having them separated does make painting a lot easier. It is definitely the route I will take in the future.
It is intended that this kit will be made available for sale as a 4mm/1ft model – albeit you will need to source the fittings/castings yourself. I have prepared some fairly extensive instructions (see link below) and this includes the details of what is required and where to get it from. I am waiting for a quote from the etching company to be able to work out the sensible cost for these; so an update post will follow when I list it on the Miscellany Models site.
Miscellany Models Rolling Stock 2 – Midland dia 530 Full Brake v2
In the meantime, here are a couple of additional views of the completed vehicle, awaiting its turn in the paintshop!
The Glenmutchkin Pharmacy – Part 2; Beware Roofers!
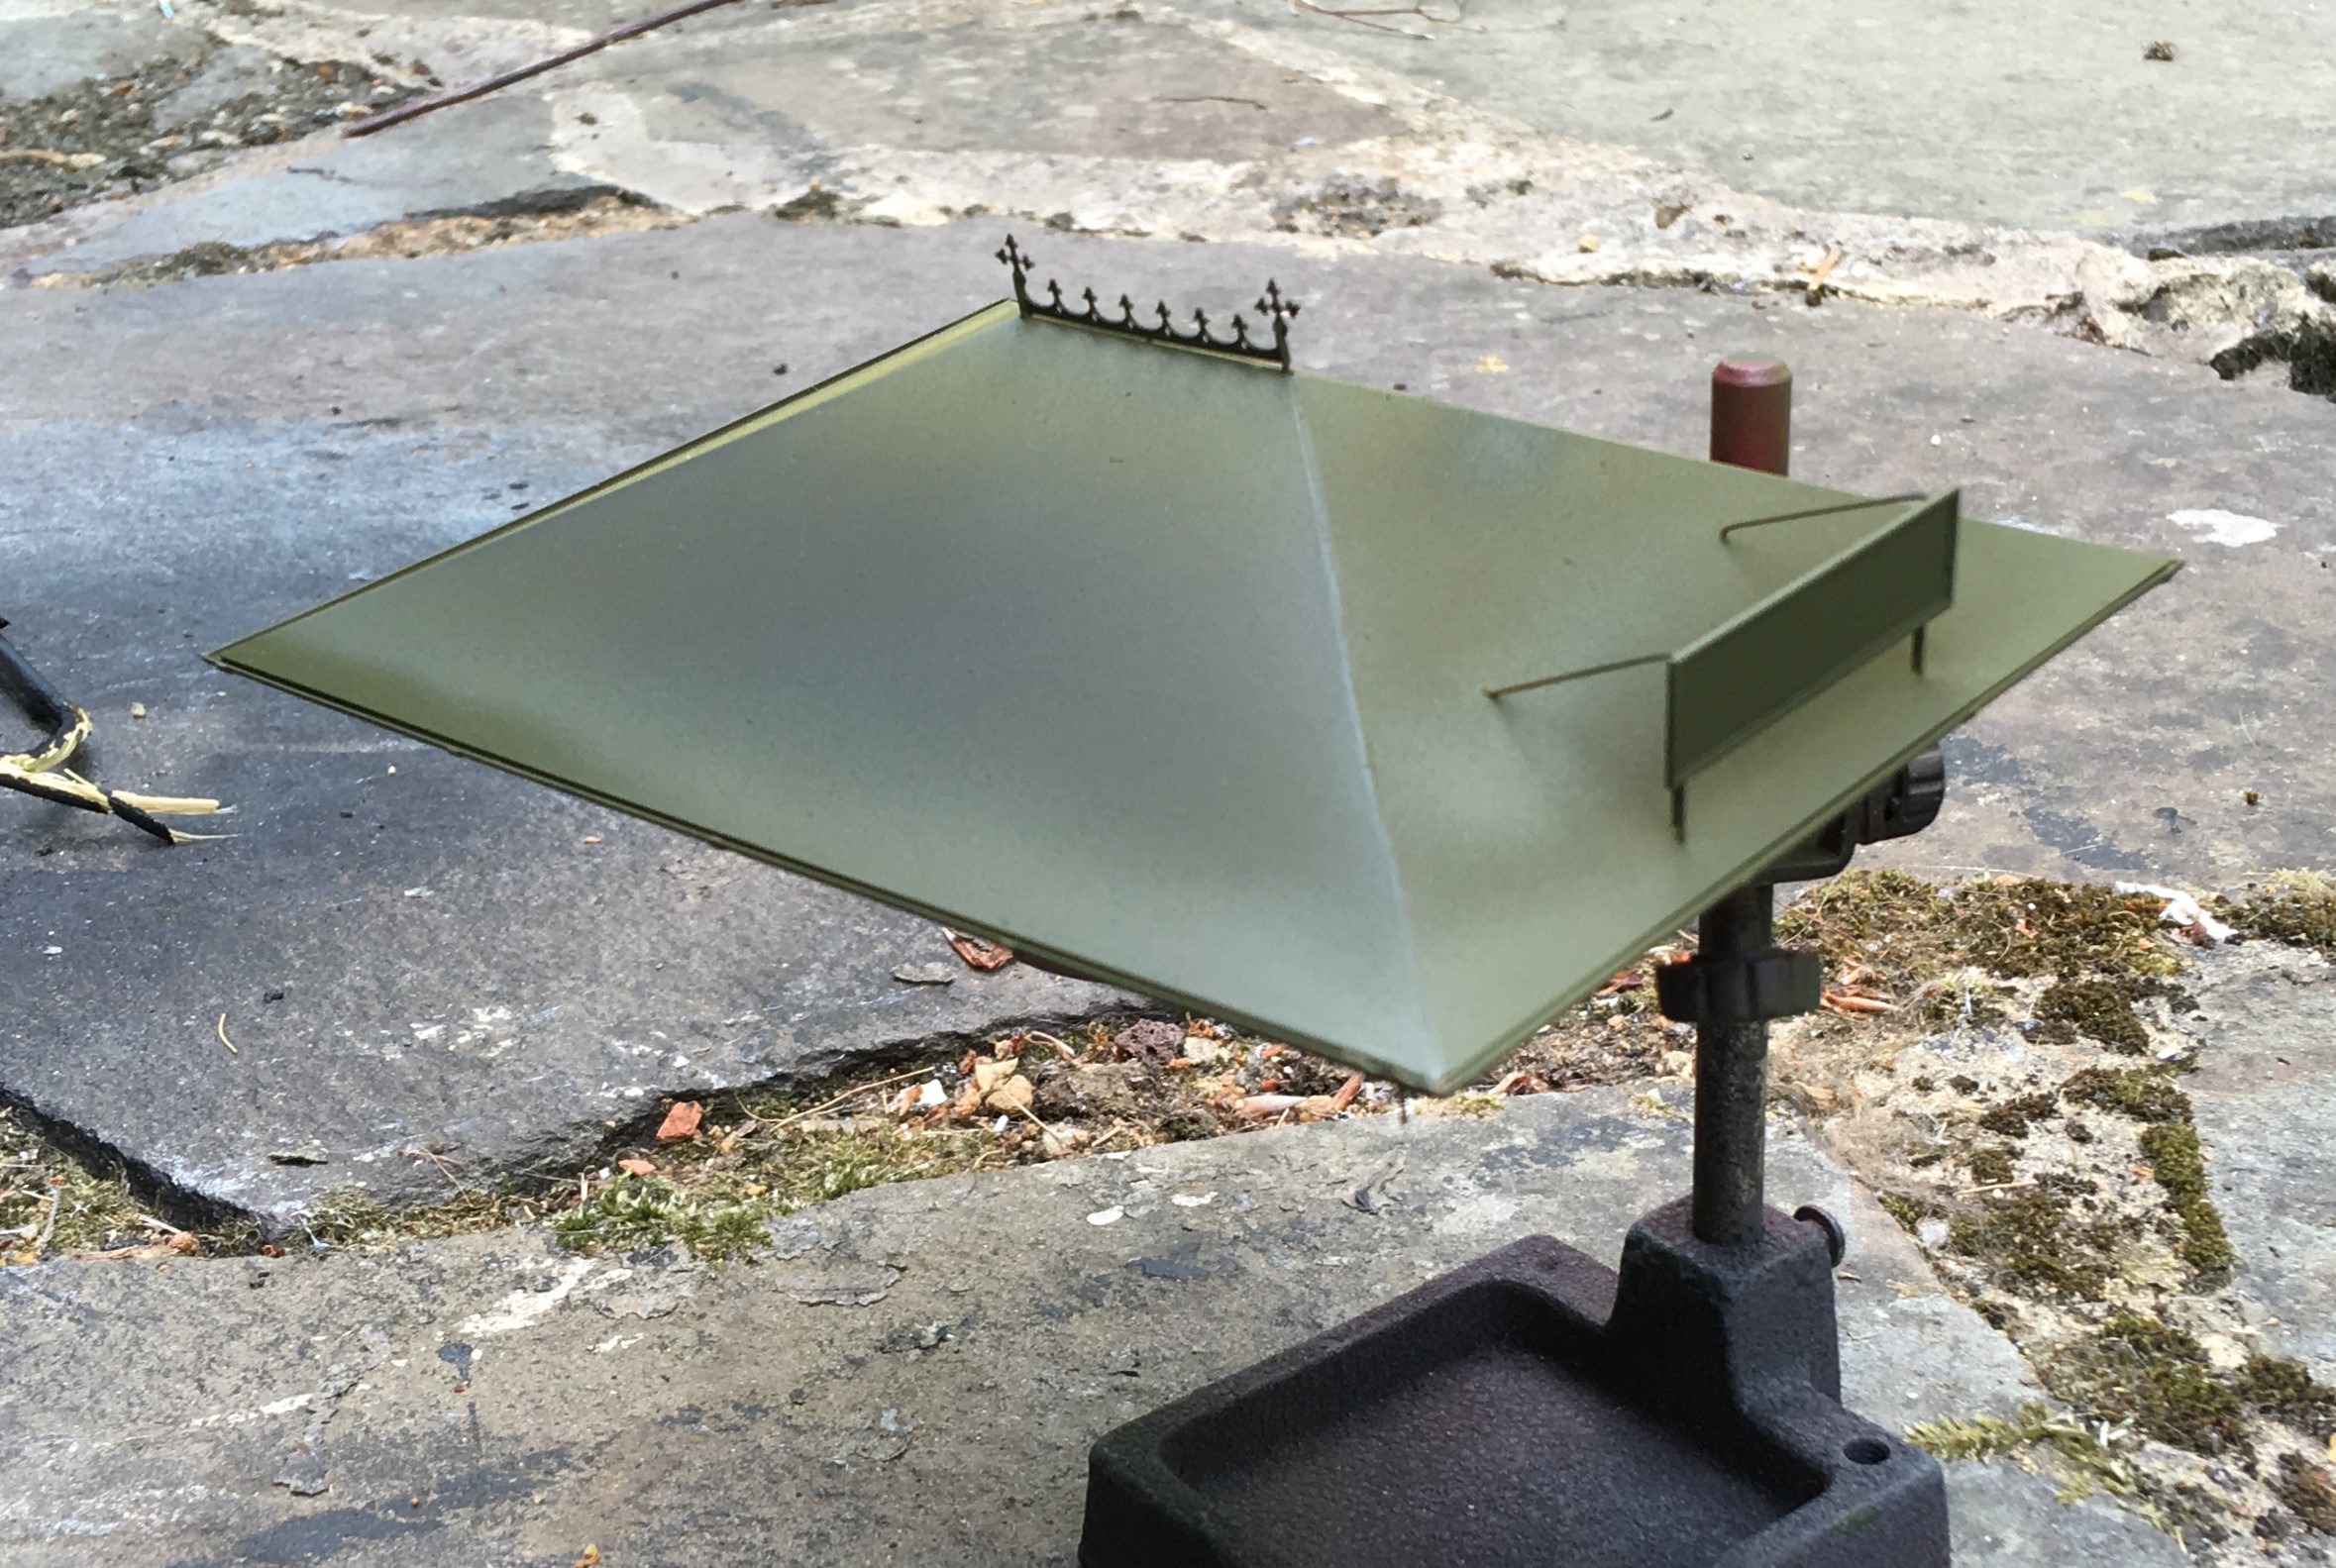
Progress with the Pharmacy building has continued and the roof is now nearing completion. I preferred using sheet metal (in this case nickle silver) for roofs as I find it is the easiest was to then include gutters. In this case, I designed the roof as a simple fold up etch and subsequently the gutters were formed by half round section from Eileen’s Emporium.
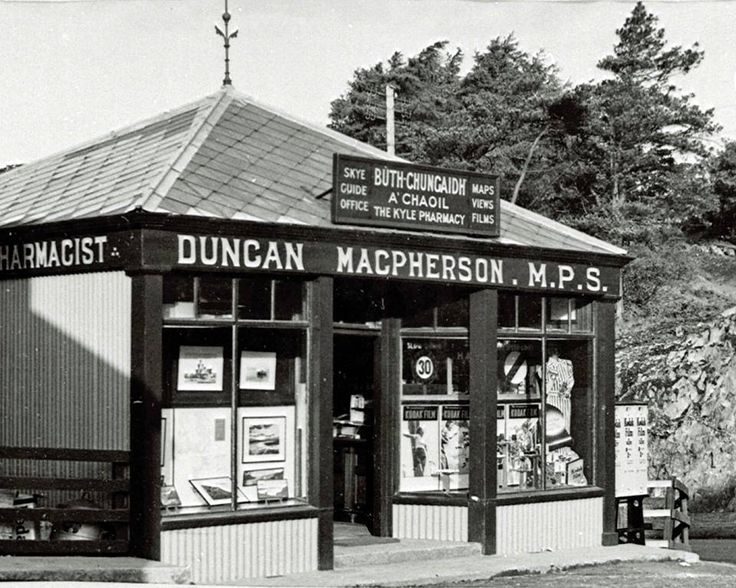
One of the pieces of artistic licence I went for relative to the real Kyle Pharmacy was to elongate the building slightly. This was partly because the prototype was a bit square and squat but also because I fancied including a decorative ridge piece. The Victorians and Edwardians did love a bit of decoration and this included the details to their buildings. There were numerous contemporary catalogues of architectural bits and pieces from which to choose from and I liked the idea of something pretty – especially given that this model will be right at the front of the layout. So I created a design of my own and etched it; along also with the characteristic sign that is so prominent in the photo in my last post.
Those that looked carefully at the prototype photograph in the last post will have noted that the roof slates were diamond shaped. These were, in fact, asbestos slates and were quite a common material for pre-fabricated and simple buildings such as the Kyle Pharmacy. Clearly they needed to be modelled but I did no fancy my chances of cutting the odd couple of thousand slates consistently. I toyed with getting some laser cut or cut on a silhouette machine but then had a brainwave – pinking shears.
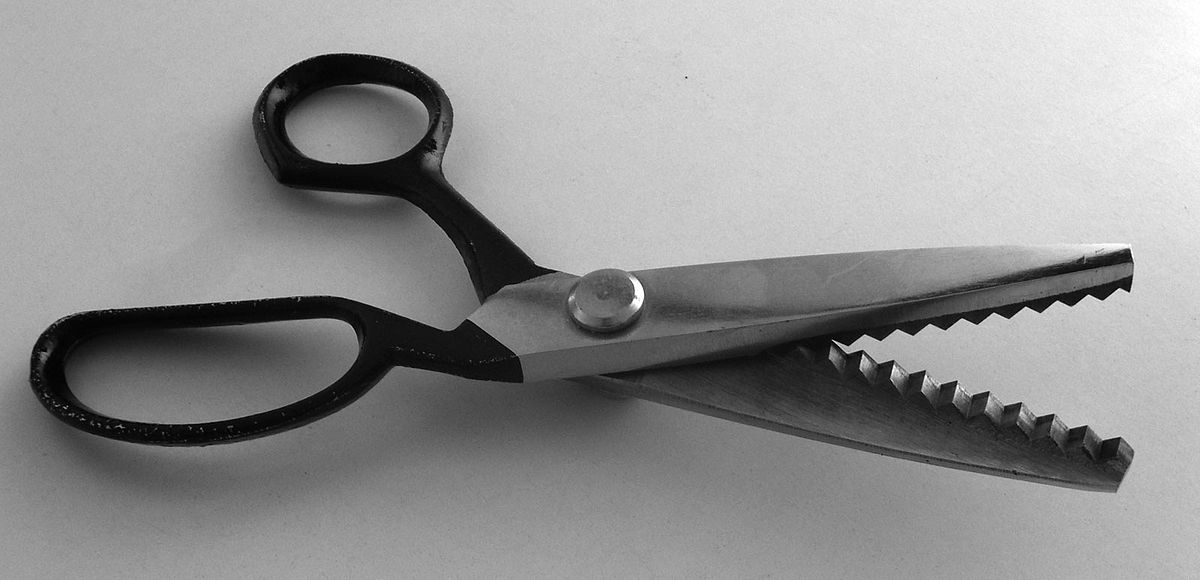
For reasons I don’t quite know, dressmakers use these to create zigzag cuts and even better, my wife had a set. However, she spotted me taking a look at them which meant I had a very firm talking too and was immediately banned from using them!! Researching them on the internet showed that they come in a variety of pitches but be warned not all of them have 90º serrations. I did find a set with a 4mm pitch which was a bit less than the 5mm that I thought was scale for the Kyle Pharmacy but as this equates to a 12 inch slate, I thought it was plausible and not a bodge too far. As you can see below, they produce a neat and consistent serration.
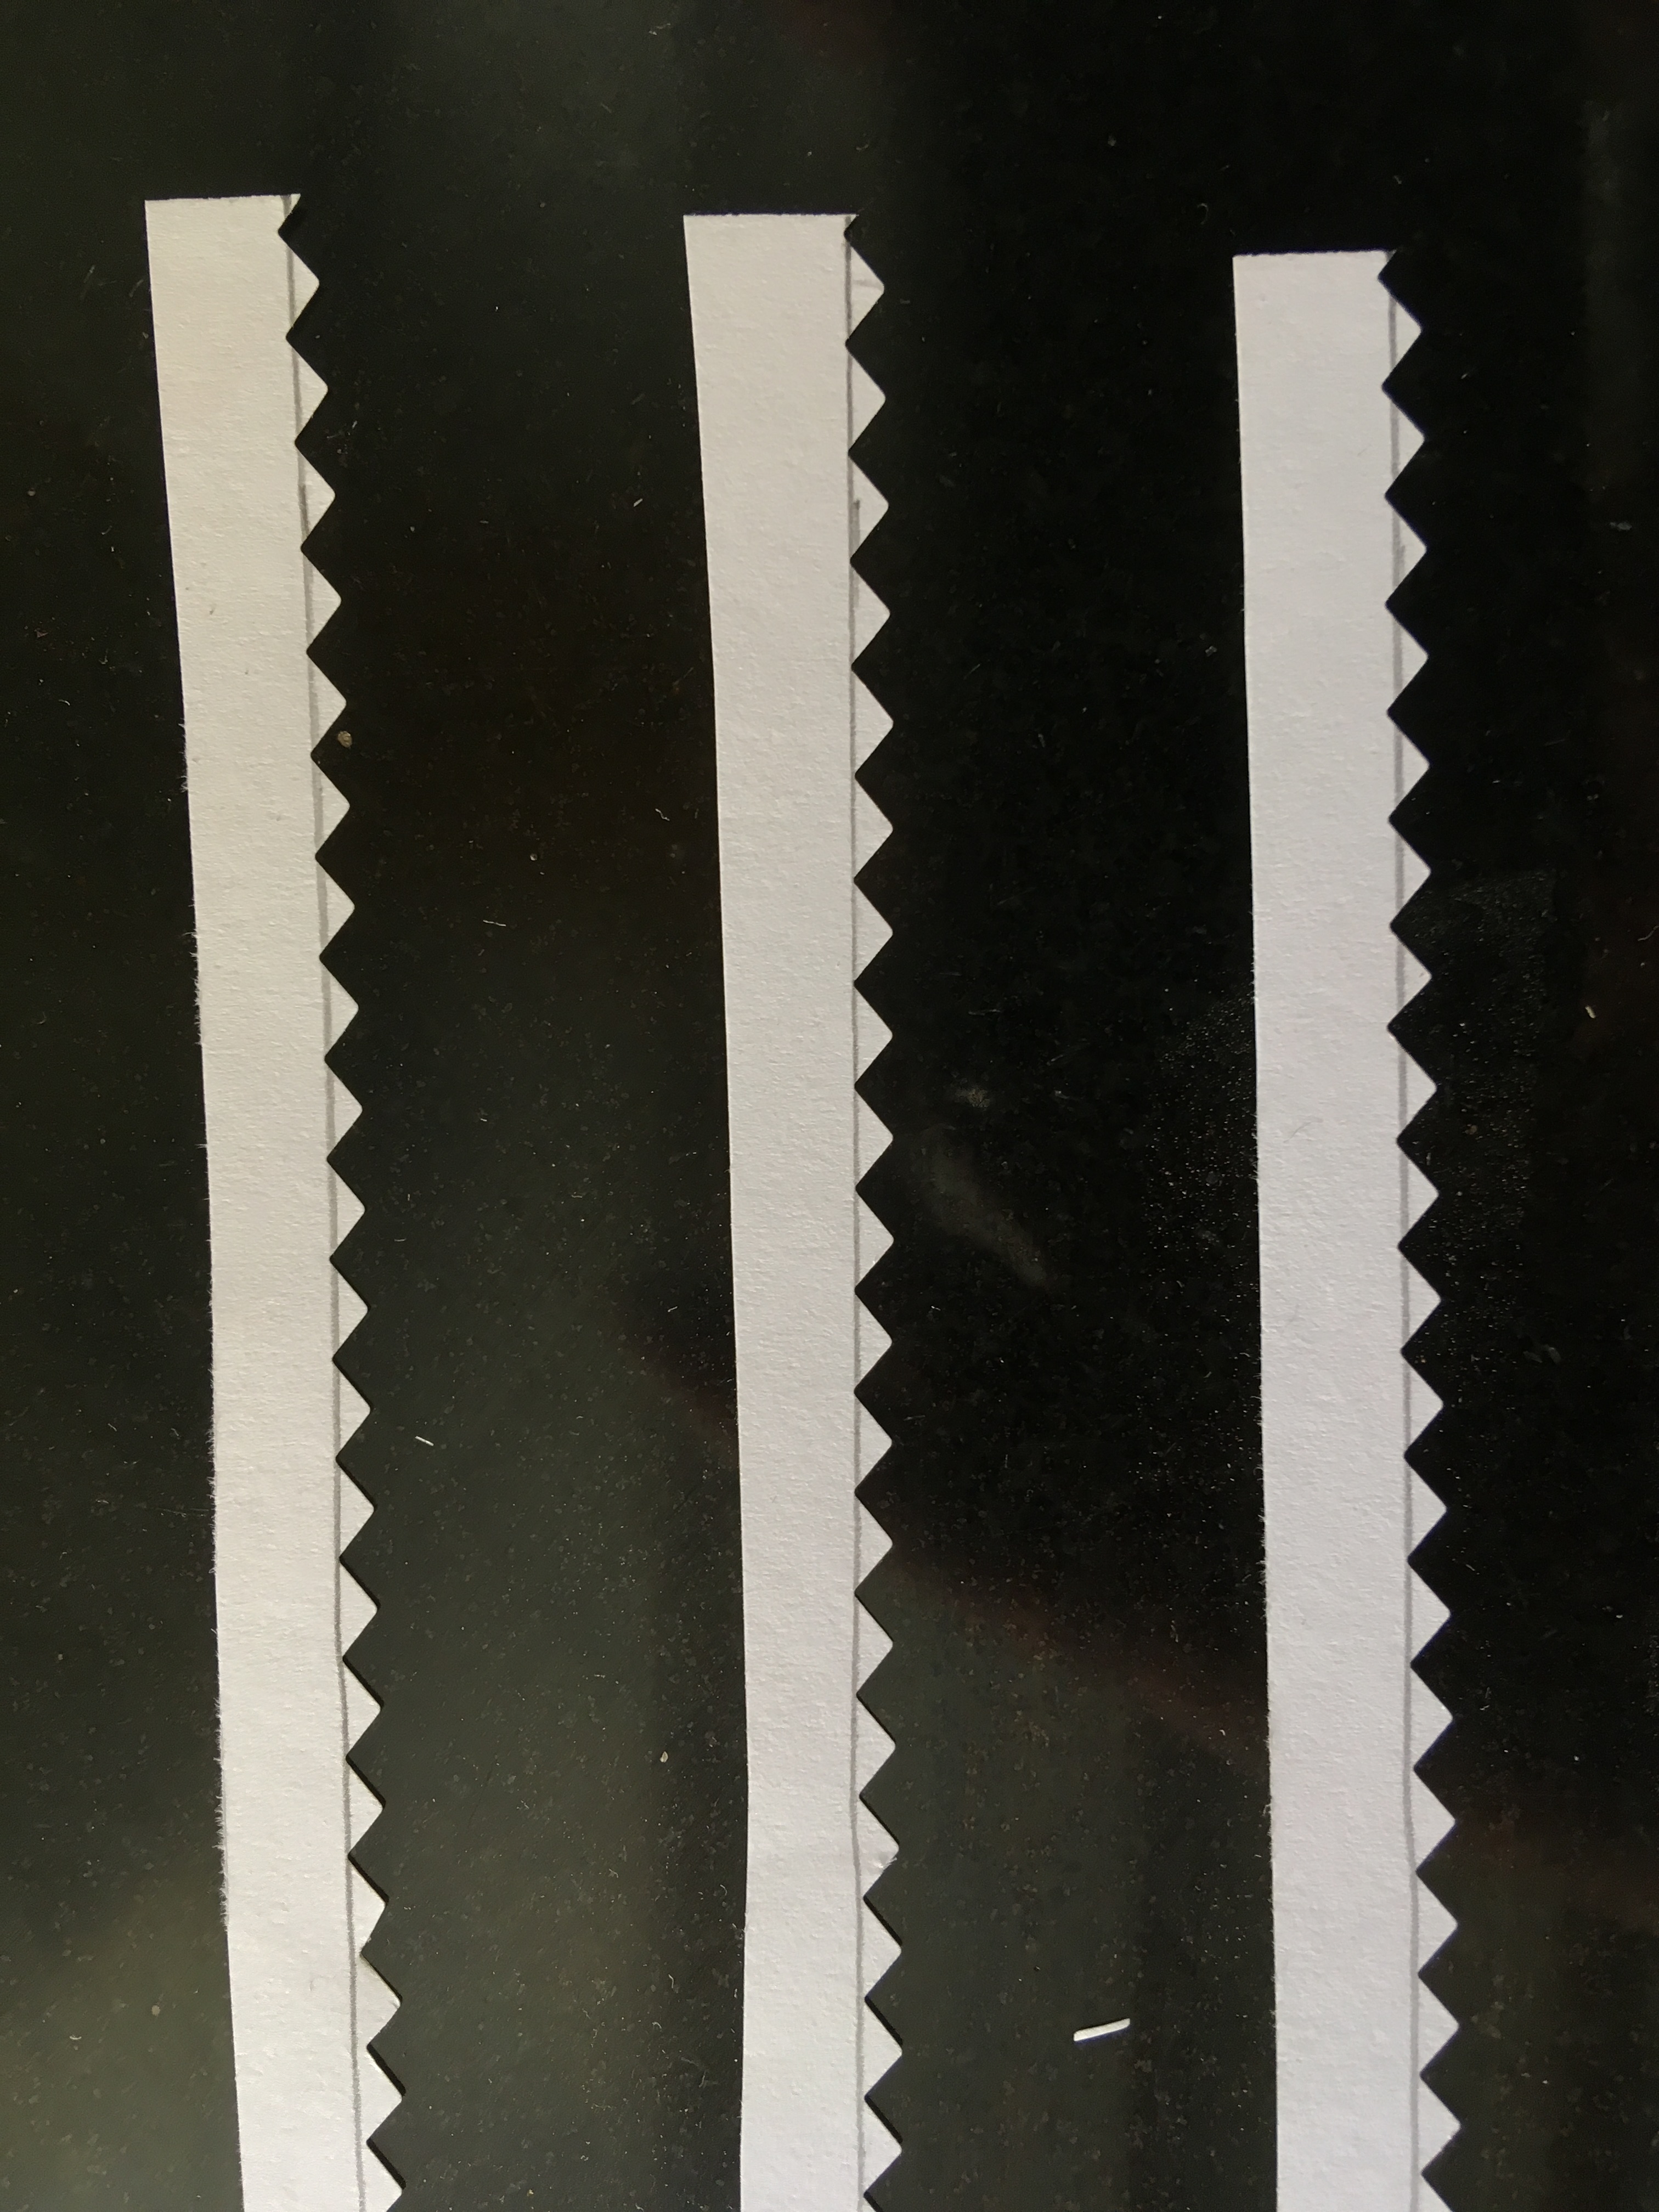
I cut the slates from plain paper in strips which I then sprayed a mid-grey colour because I felt that asbestos tiles might be a bit lighter than normal welsh slates. I deliberately allowed a tiny bit of inconsistency of colour to creep in, to provide a little texture to the roof. However, painting them was not easy as the air of the airbrush sent them flying – so I had to create a cradle to mount them in for spraying.
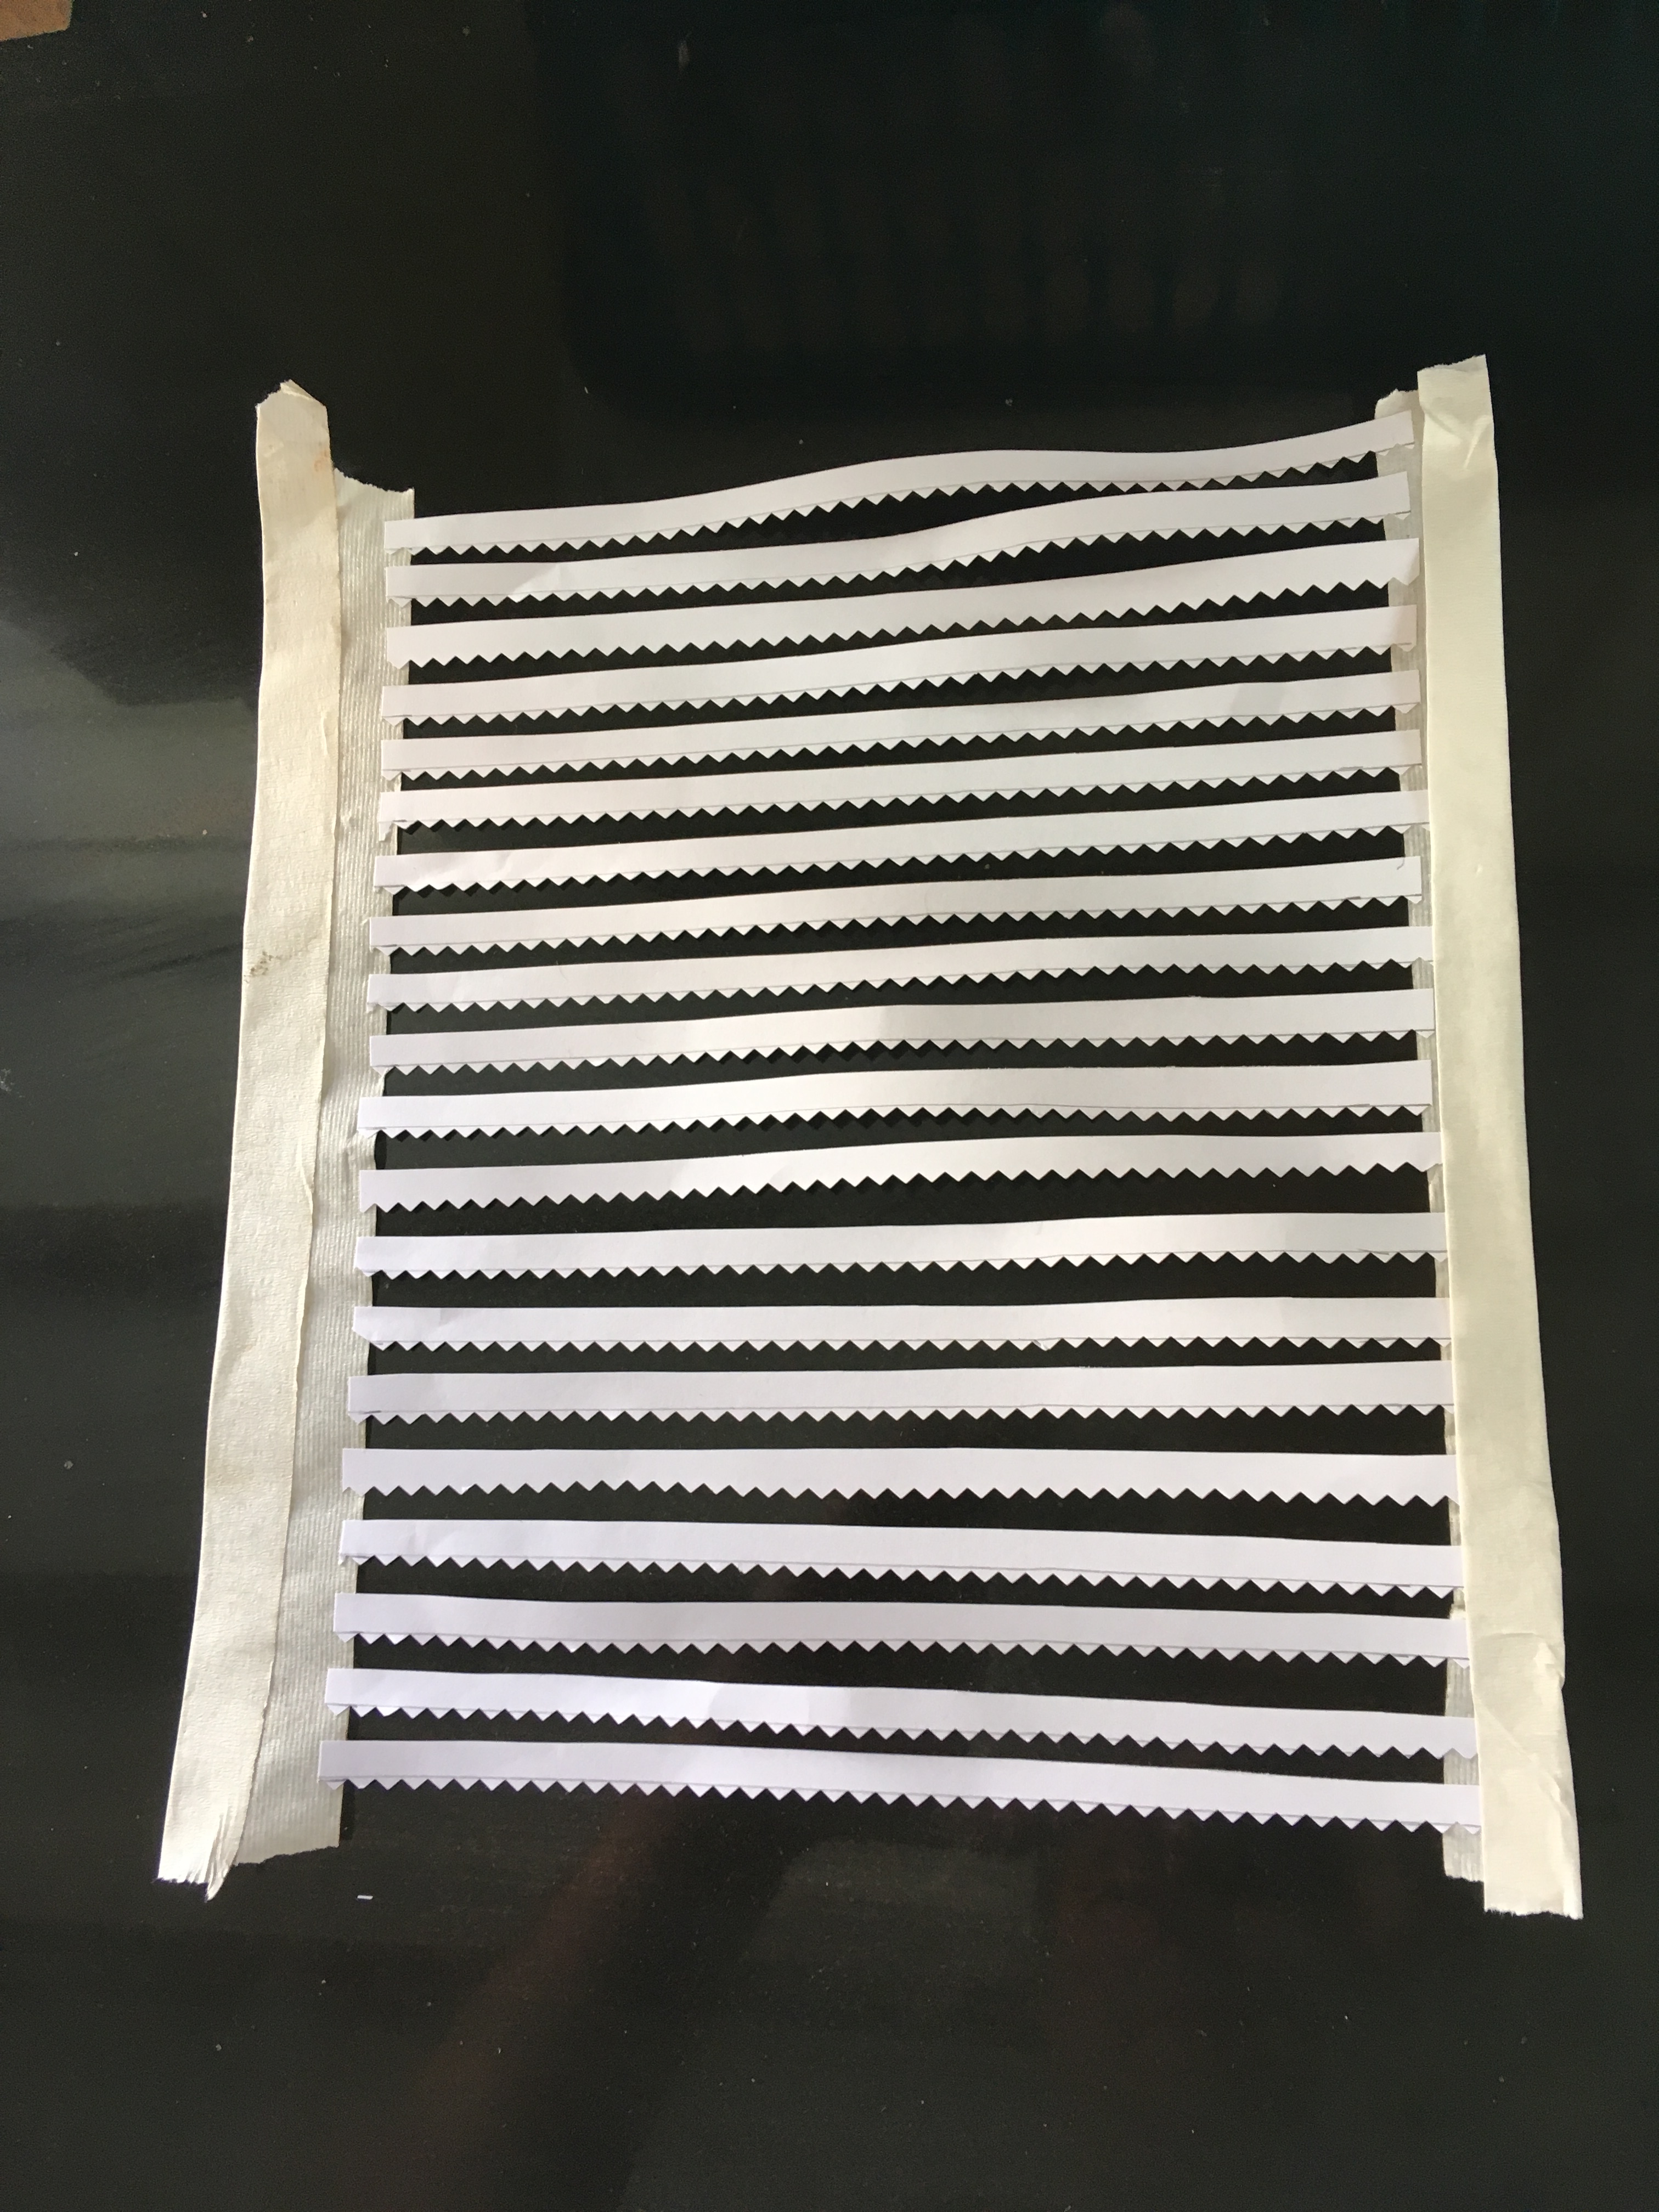
Once painted, I secured them with spraymount and carefully set them out, with the point of the diamond to the row above meeting the apex of the one below.
It takes some time (around 2 hours for a fairly small roof!) but I think the effect is quite convincing. I find the the best effect to make it look natural is to lay the slates as consistently as possible – you don’t achieve perfect consistency and these small imperfections end up making it that little bit more. Deliberately introducing inconsistencies tends to look a little contrived; including in this case my slightly differing shades, however, this was expected and can be overcome.
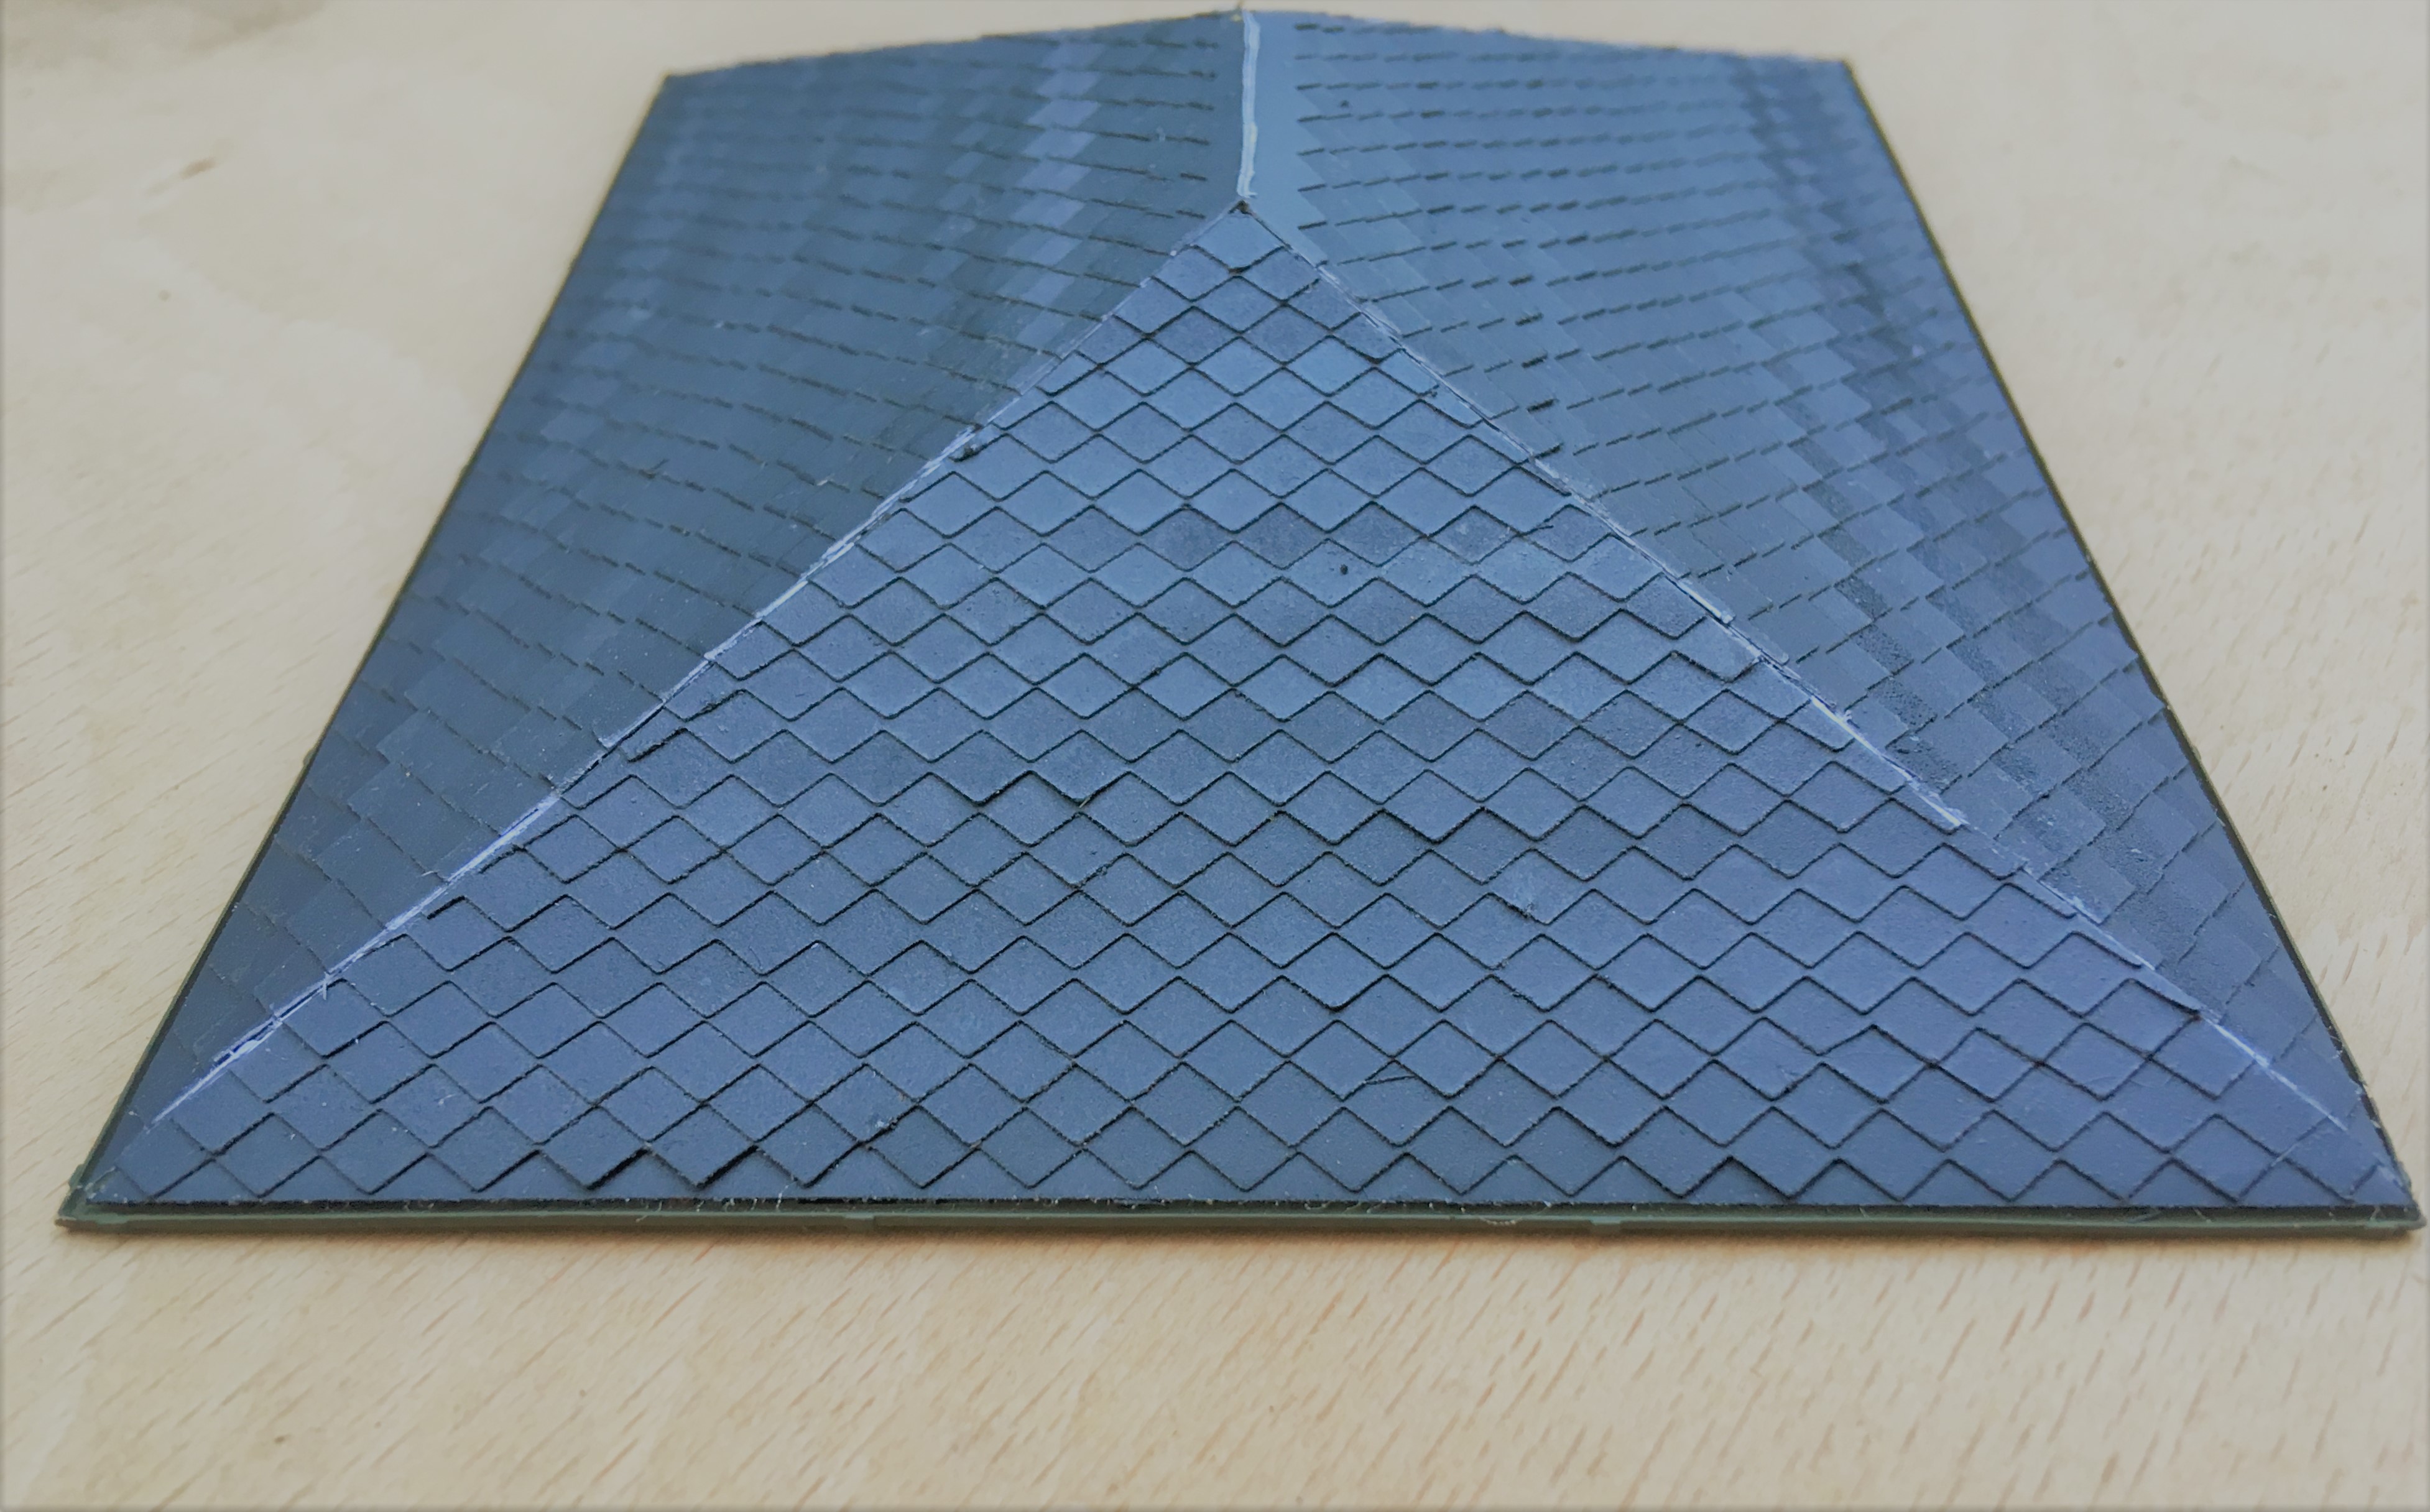
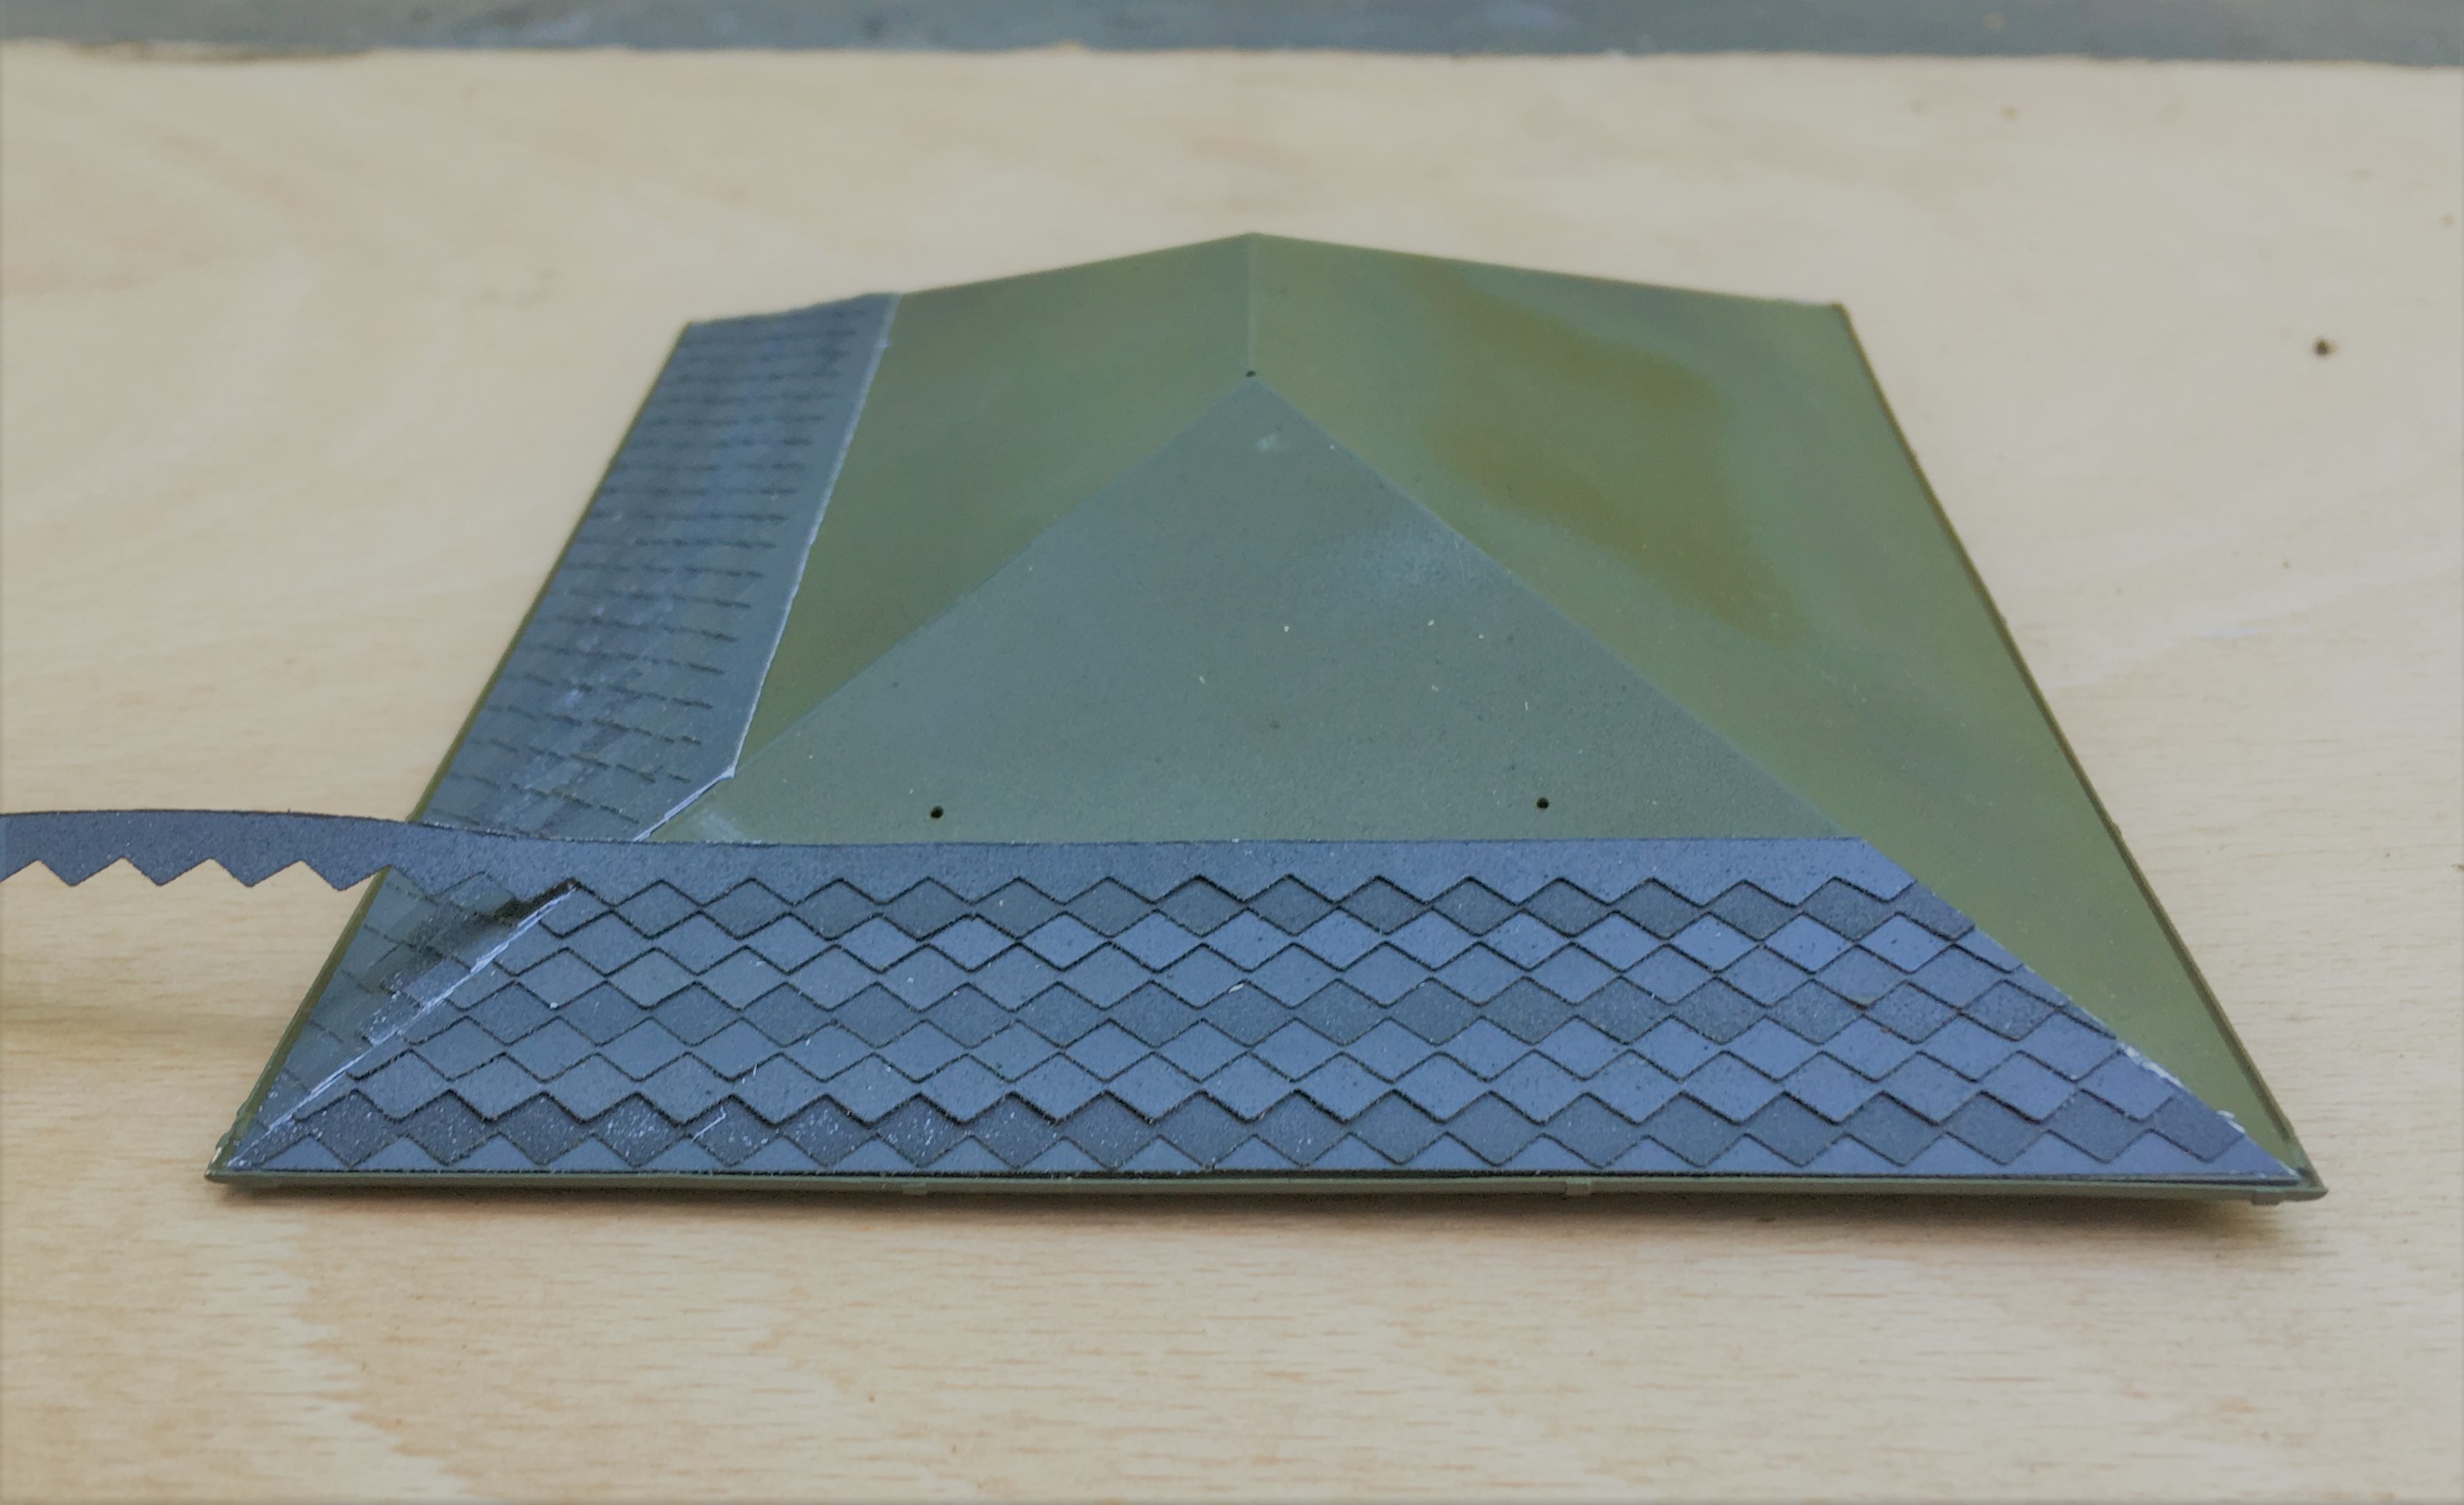
The blend the colours together, I washed the slates with artist’s acrylic always ensuring that the brush stroke was down the roof to mimic the flow of the weather.
I also formed the ridge and hip flashings with cigarette paper which I had first sprayed with grey primer and then secured with more spraymount. This was laid over 0.6mm brass rod to give the central lead roll effect – this was secured in place with superglue. I initially tried to make the lead flashings in sections so that the correct laps between one piece and the other was achieved but I never got close to a neat or believable finish. Thus I ended up doing this in one piece per run.
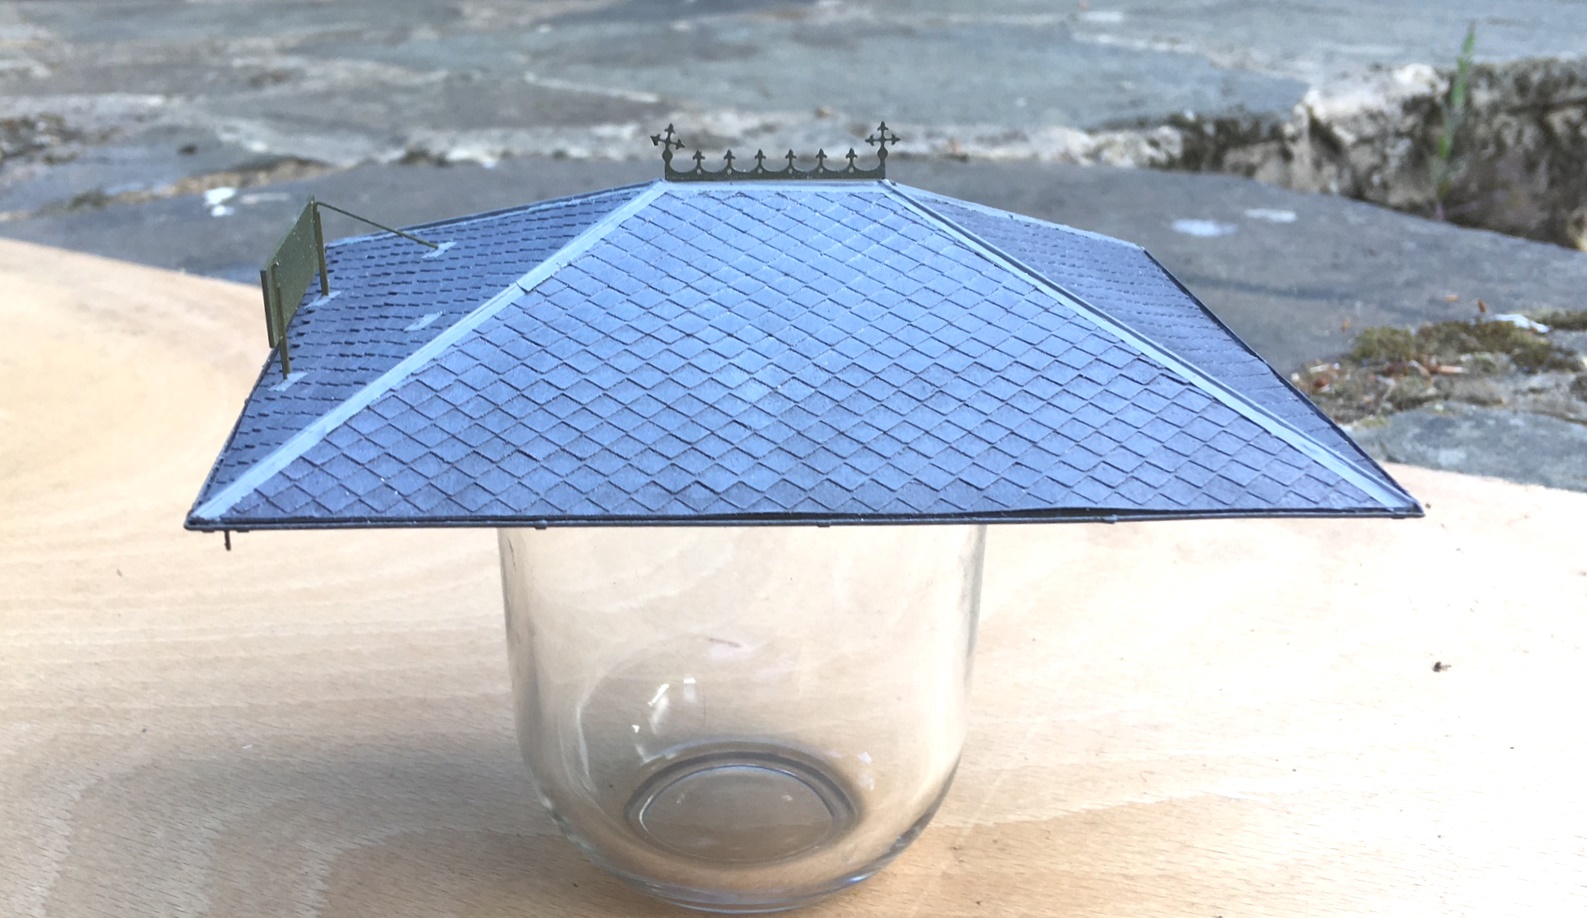
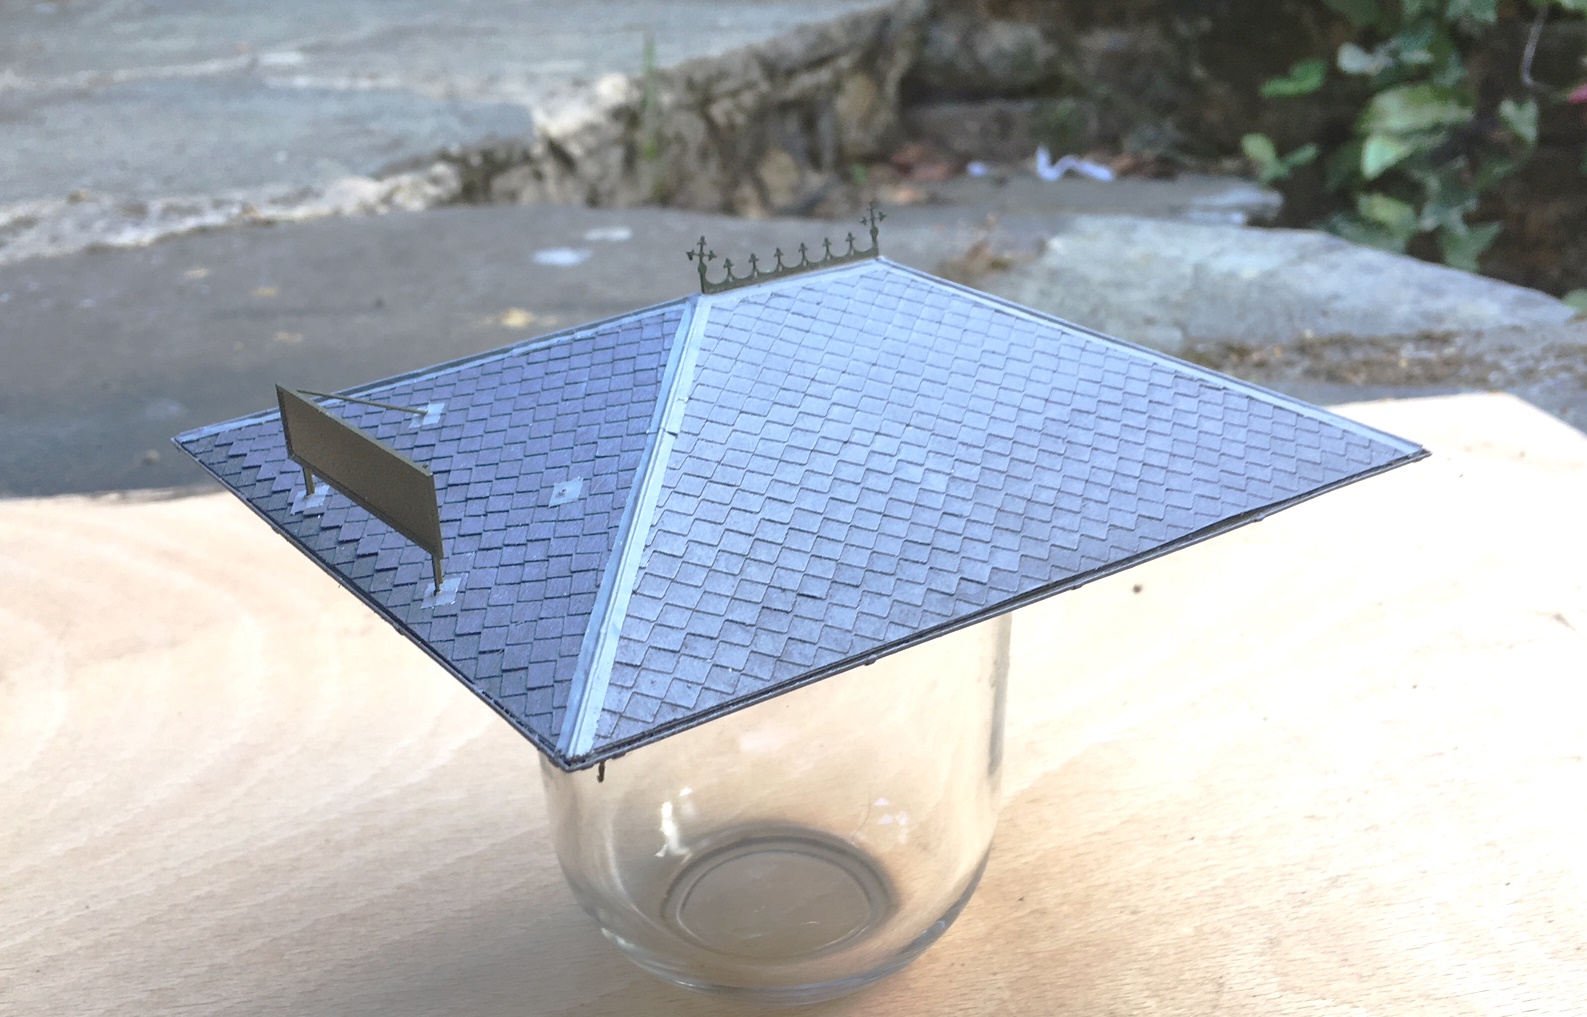
The front signboard will need some more work yet (partly because I have damaged it!), which will feature in a future post as I am going to have a bash at producing transfers.

The Glenmutchkin Pharmacy – Part 1 The Etchings
It is a fair time since I built my last building, so feeling that it was time that I rediscovered my mojo for architectural things I have made a crack at a building that will be a fairly key feature on Glenmutchkin – its pharmacy .
This is inspired, and largely a facsimile of, The Kyle Pharmacy that could be found on the approach to the ferry pier. Or at least it could until the 1970s when it was swept away to make a larger car holding pool for the ferry. In addition to being a characterful building, as you can see below, the real pharmacy at Kyle was a key part of the local community and I wanted to capture this feature in Glenmutchkin.
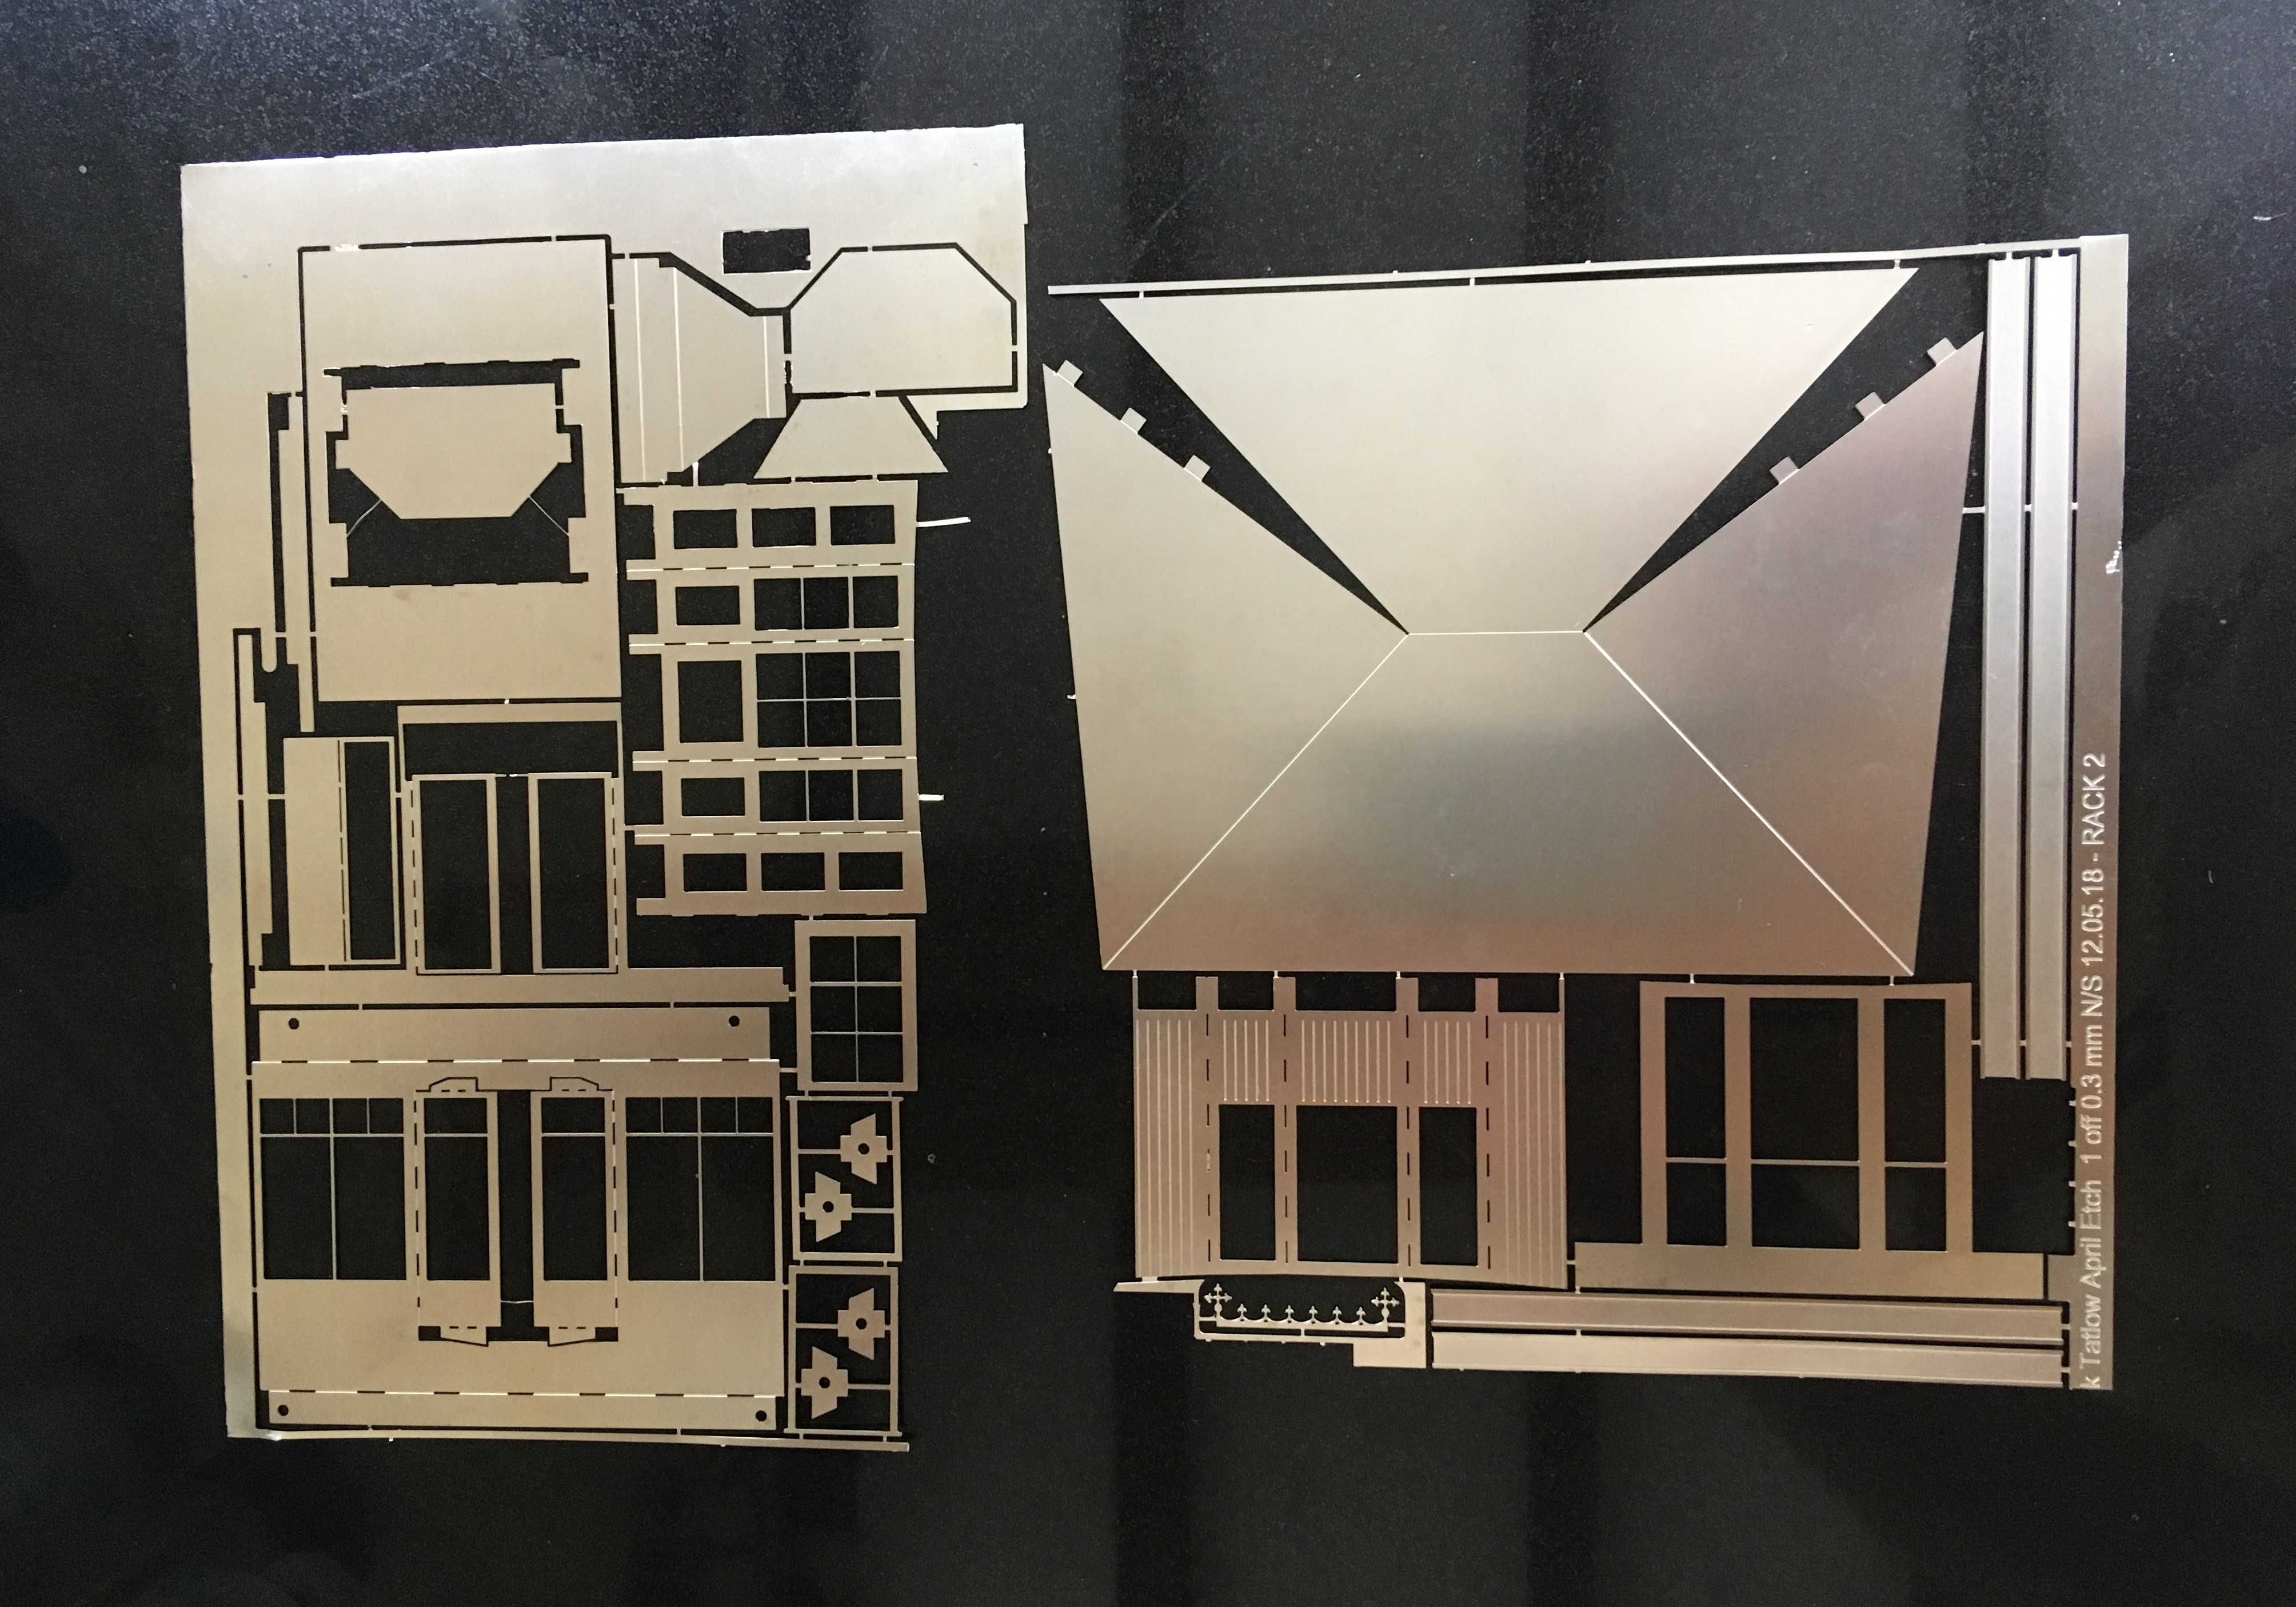
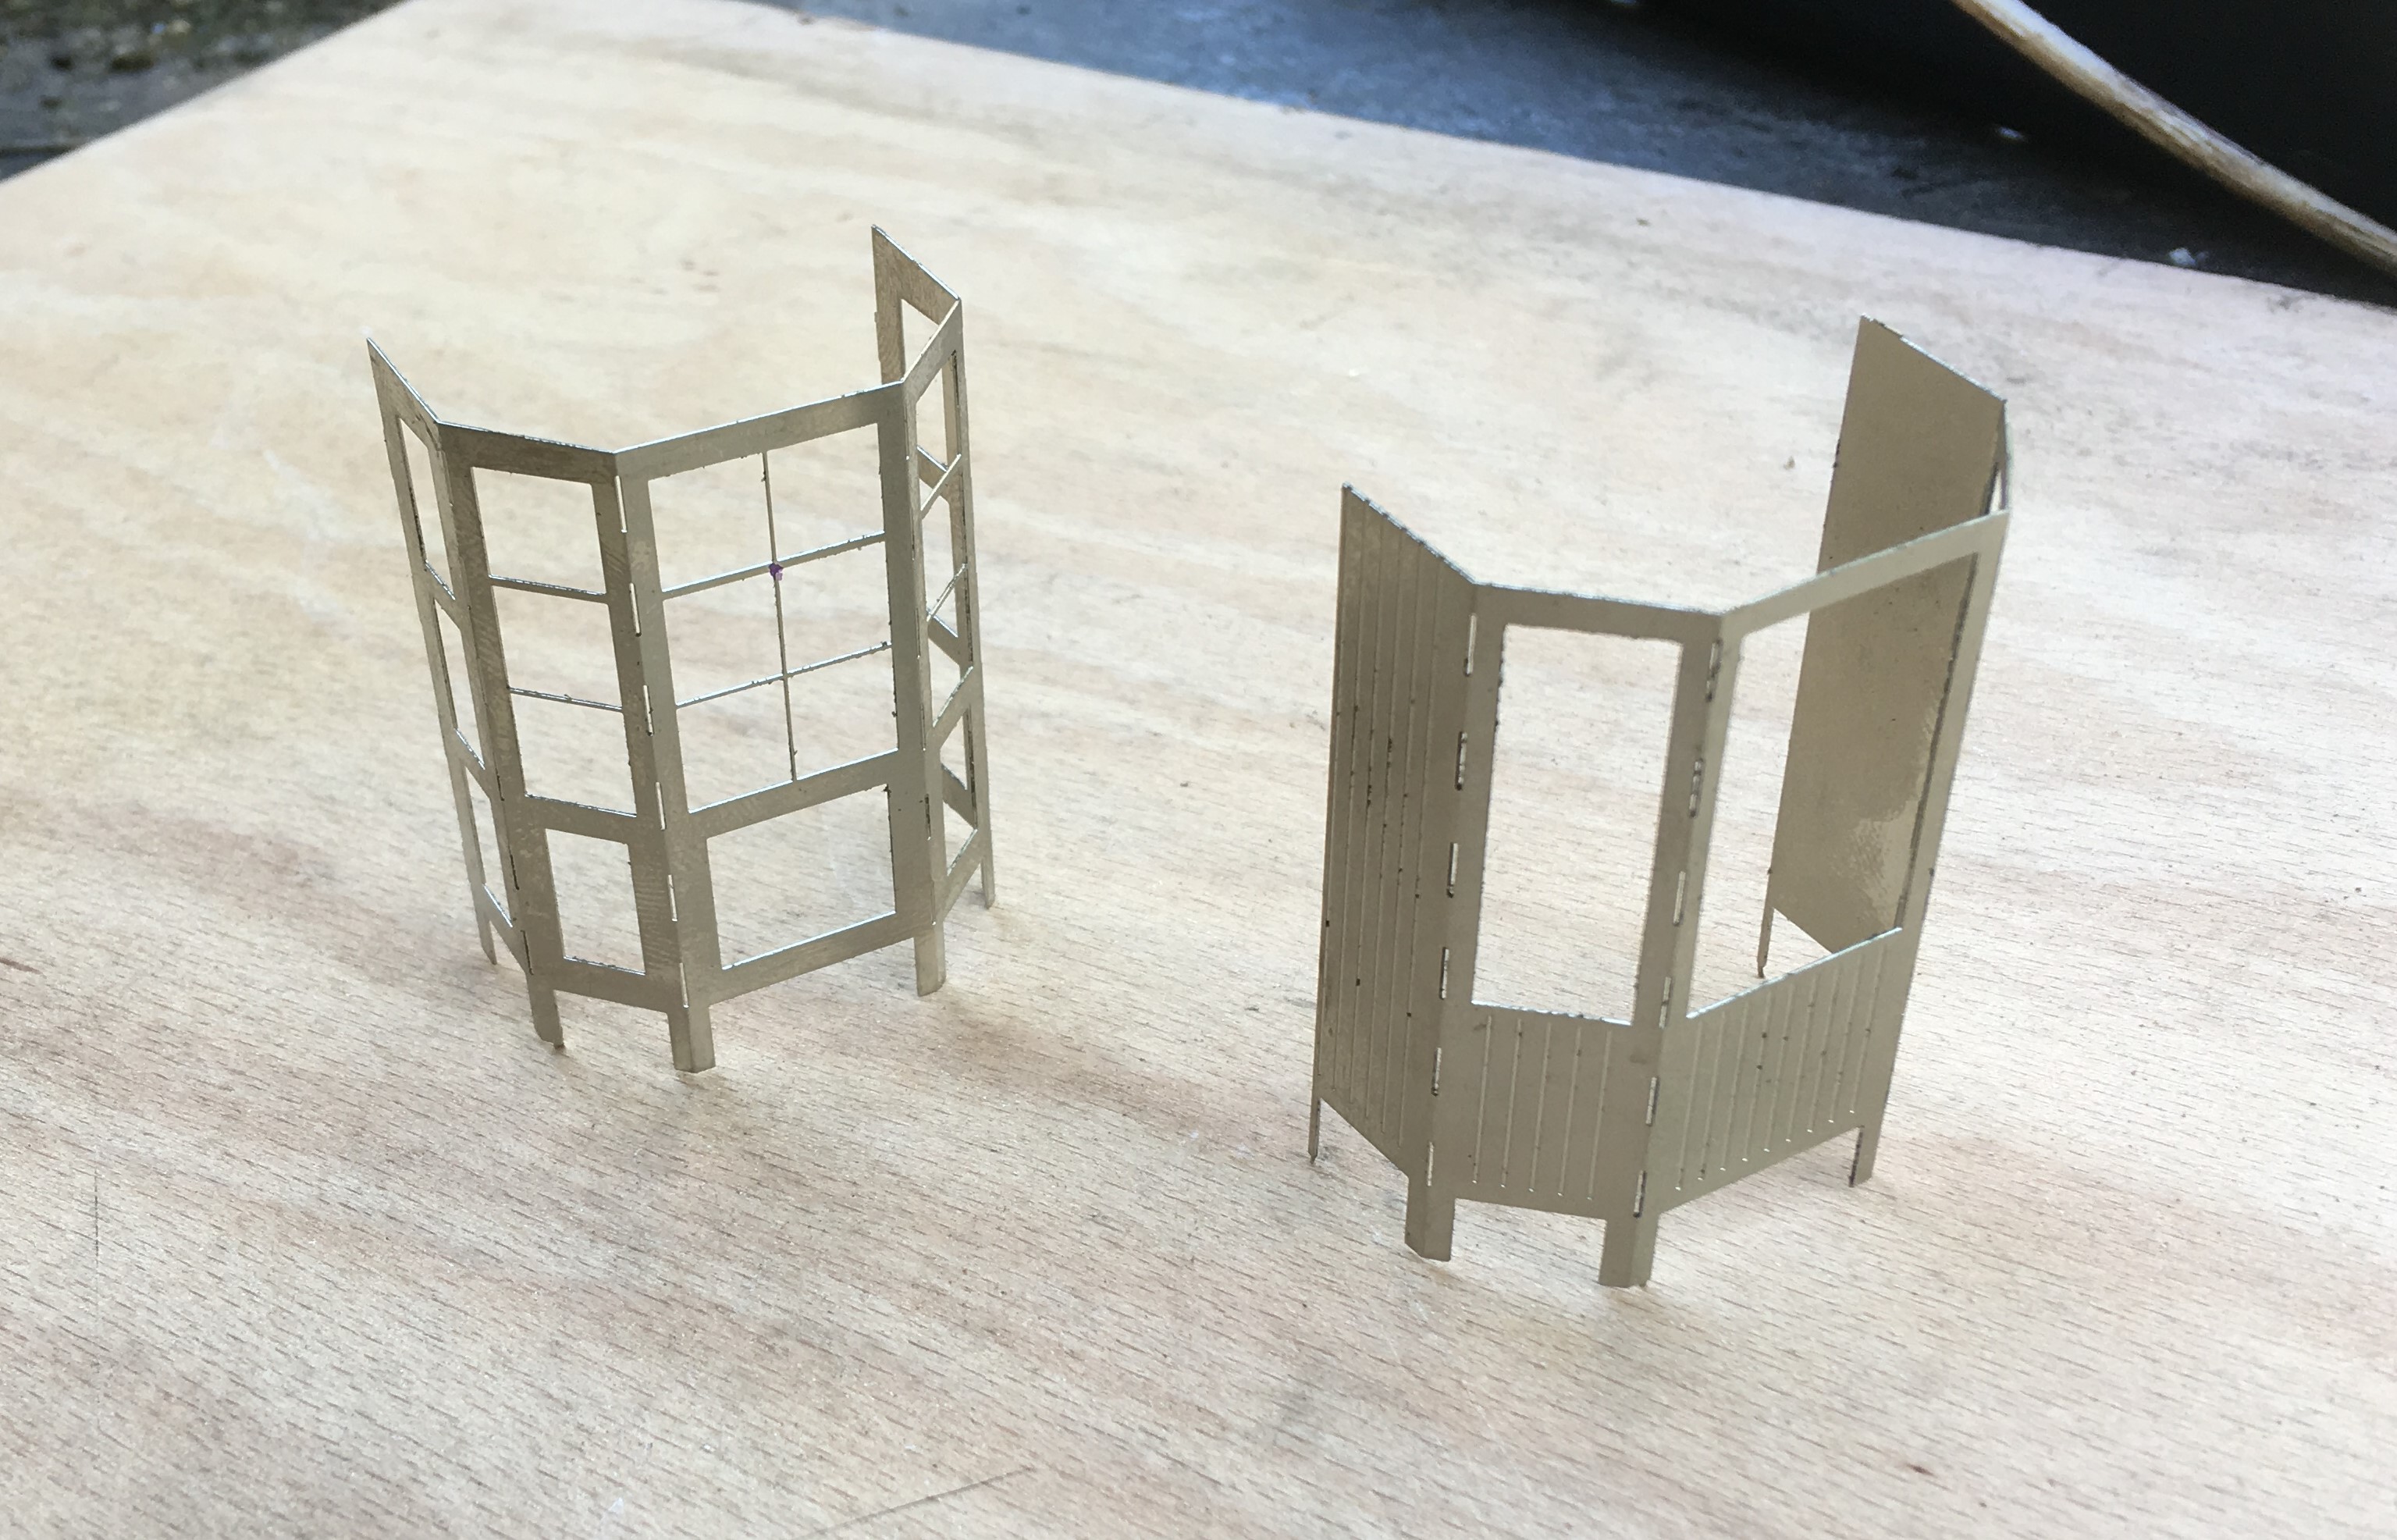
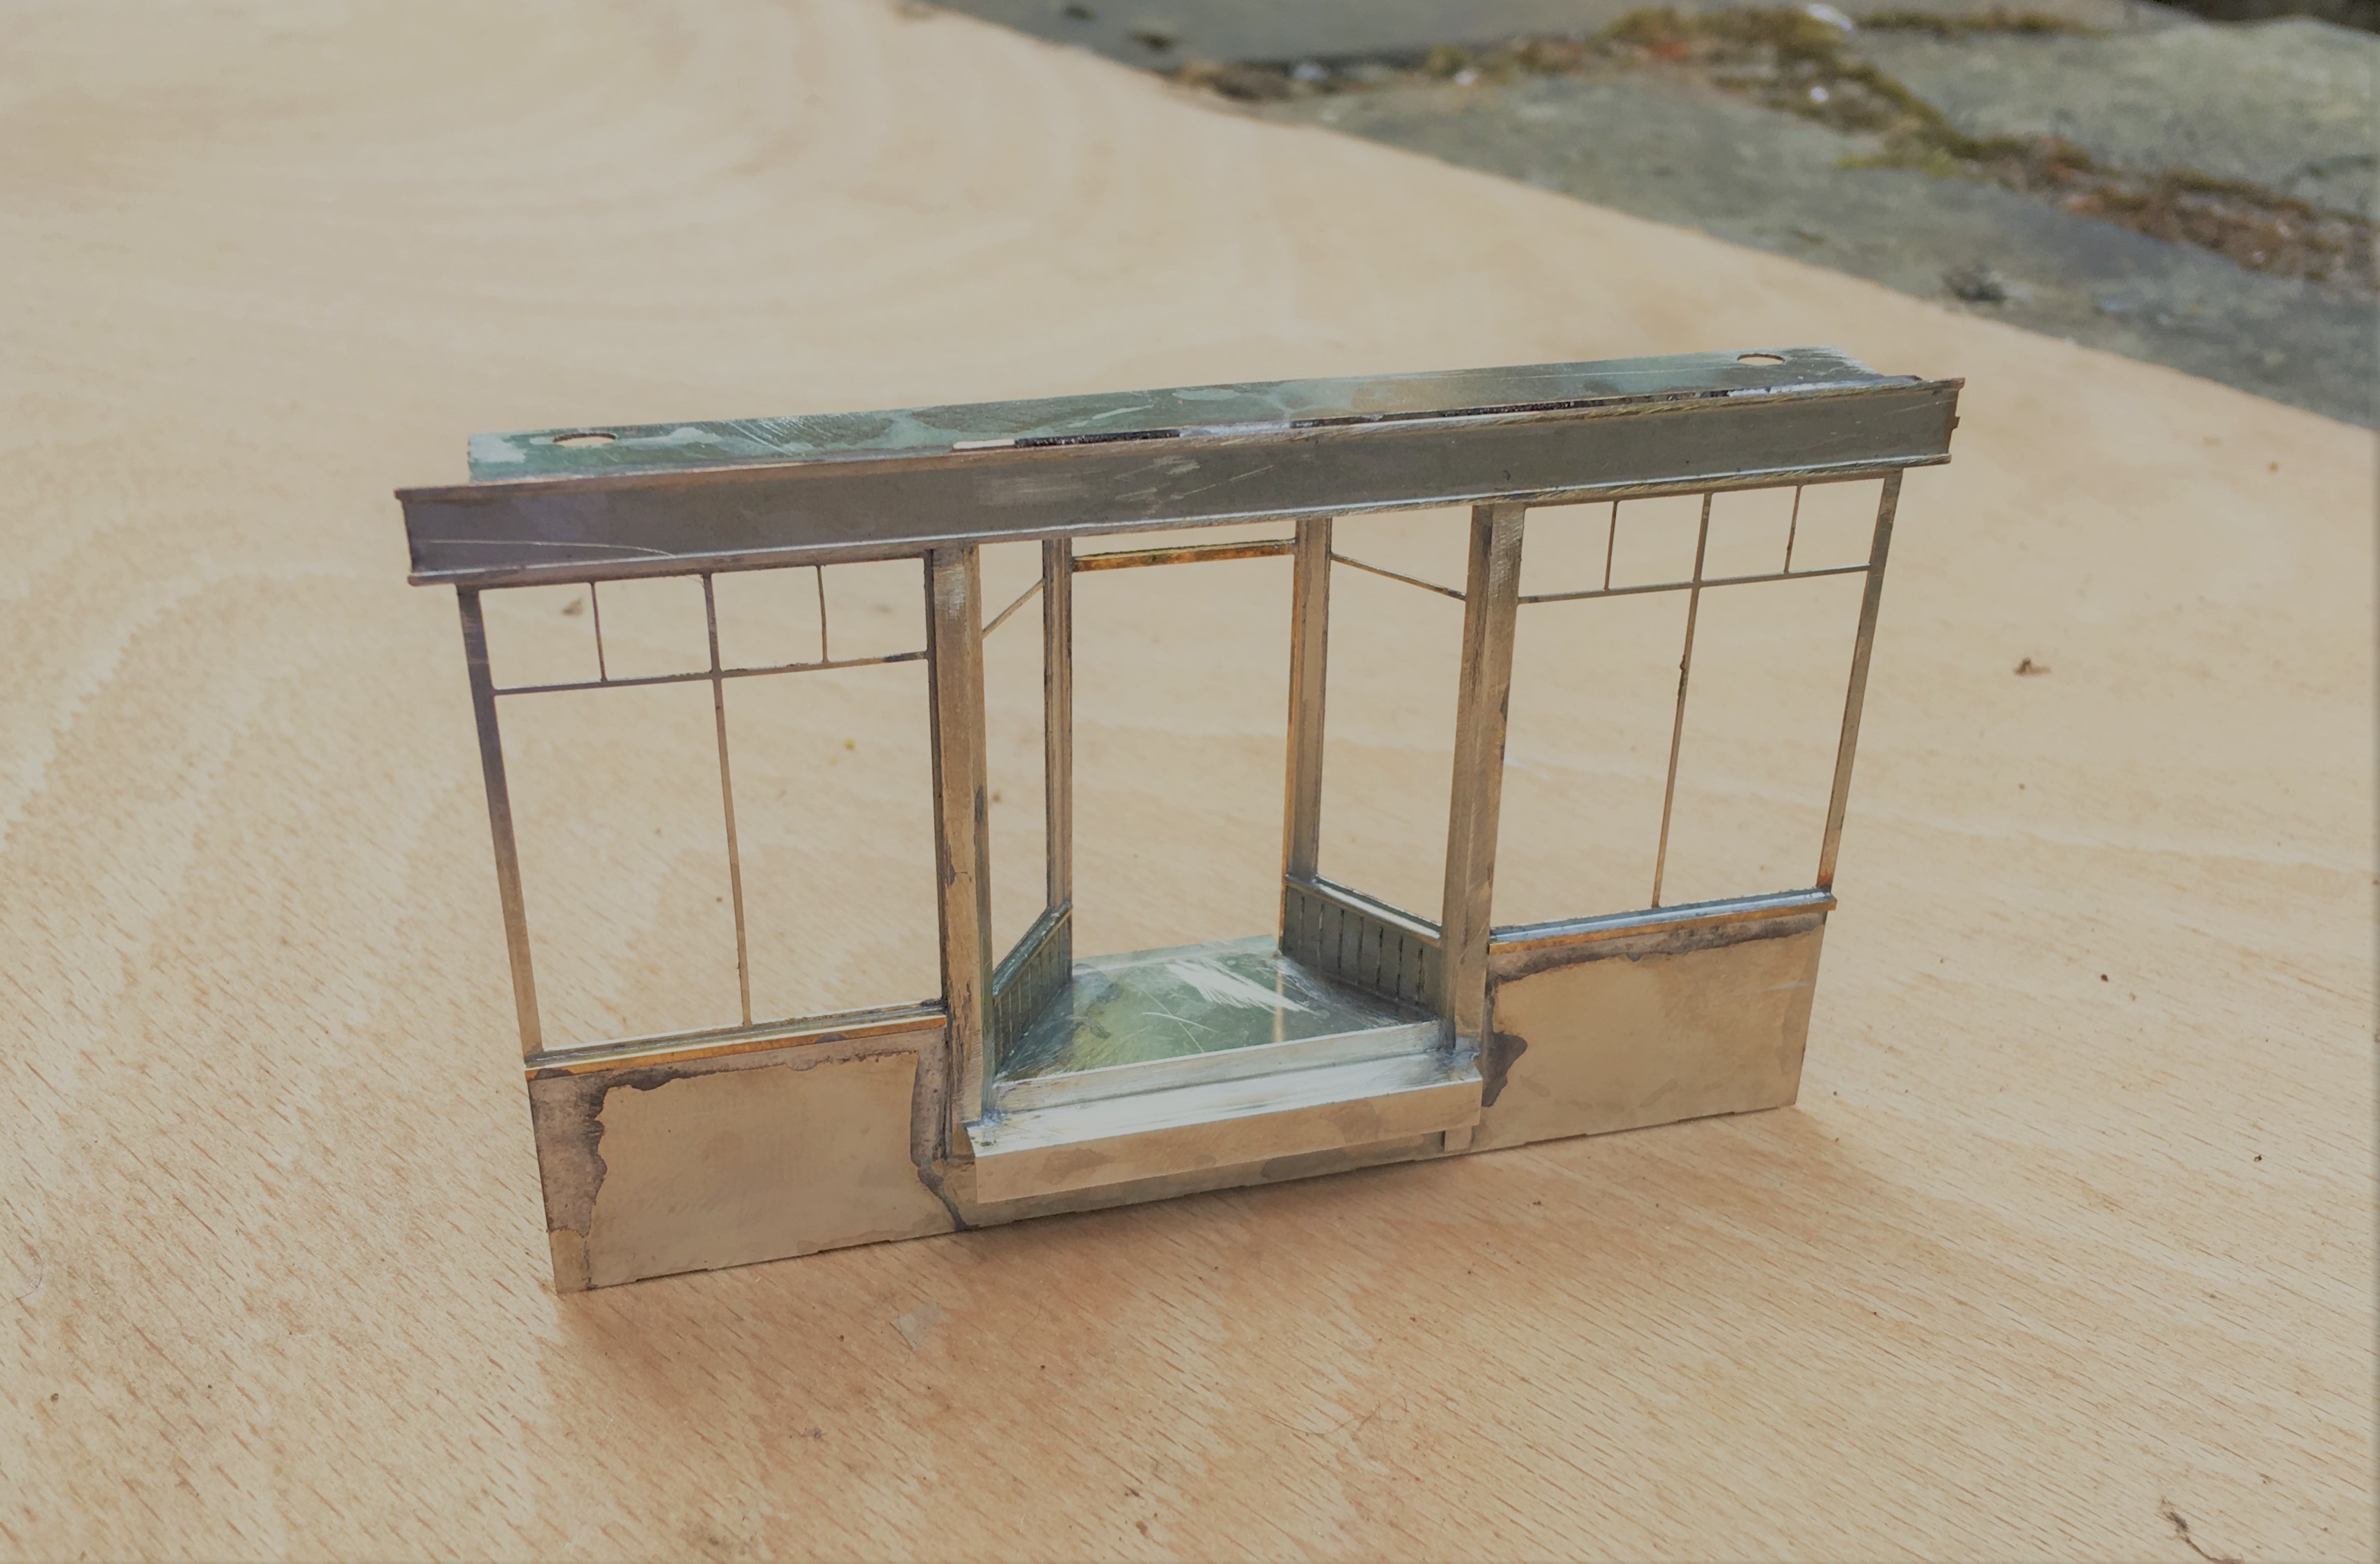
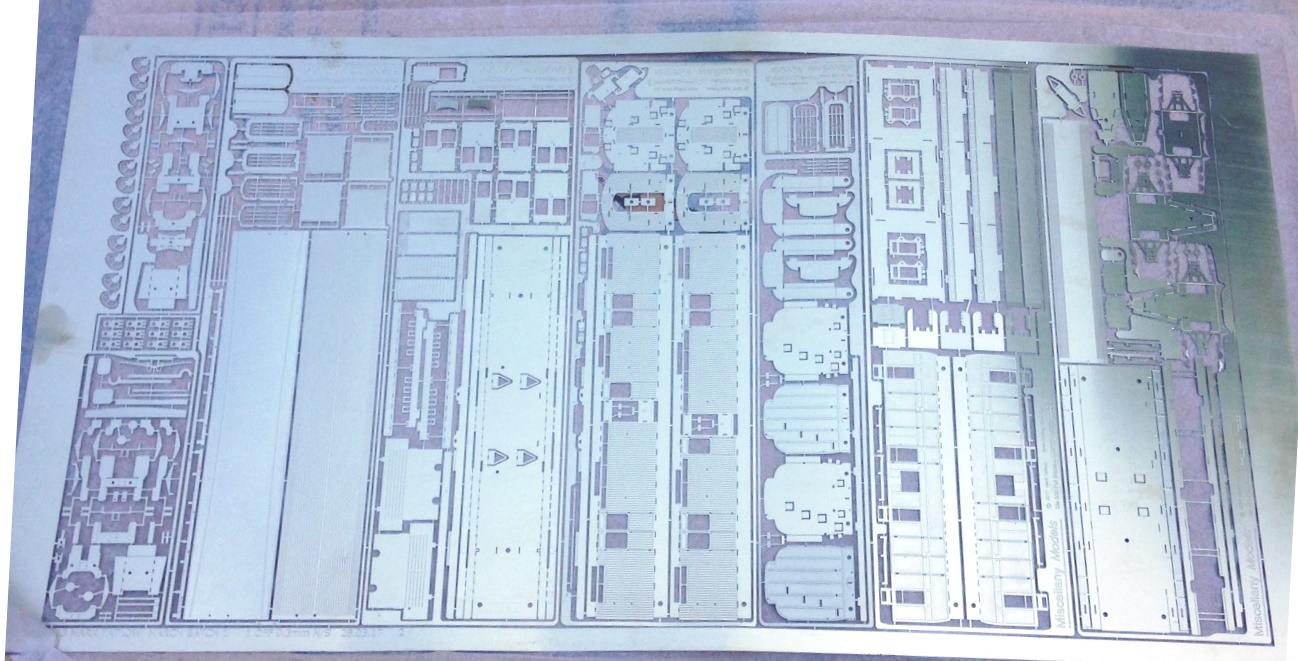
The pharmacy building is going to be located on the most prominent position at the front of the layout, so it definitely deserved some time being spent on it. Taking Peter Bond’s advice, it is going to be assembled in components which will make painting a great deal easier but rather than using plasticard throughout as he would have done, I have arranged to have the shop front and bay etched. I did so as I concluded that getting the slenderness and crispness of these was going to be key to get the feel of the model convincing. Peter is a professional architectural modeller and bending plasticard to his will is therefore his stock in trade – not quite so me!
So these are the basic etches back from PPD:
Some of the bay assemblies and the bay largely completed:
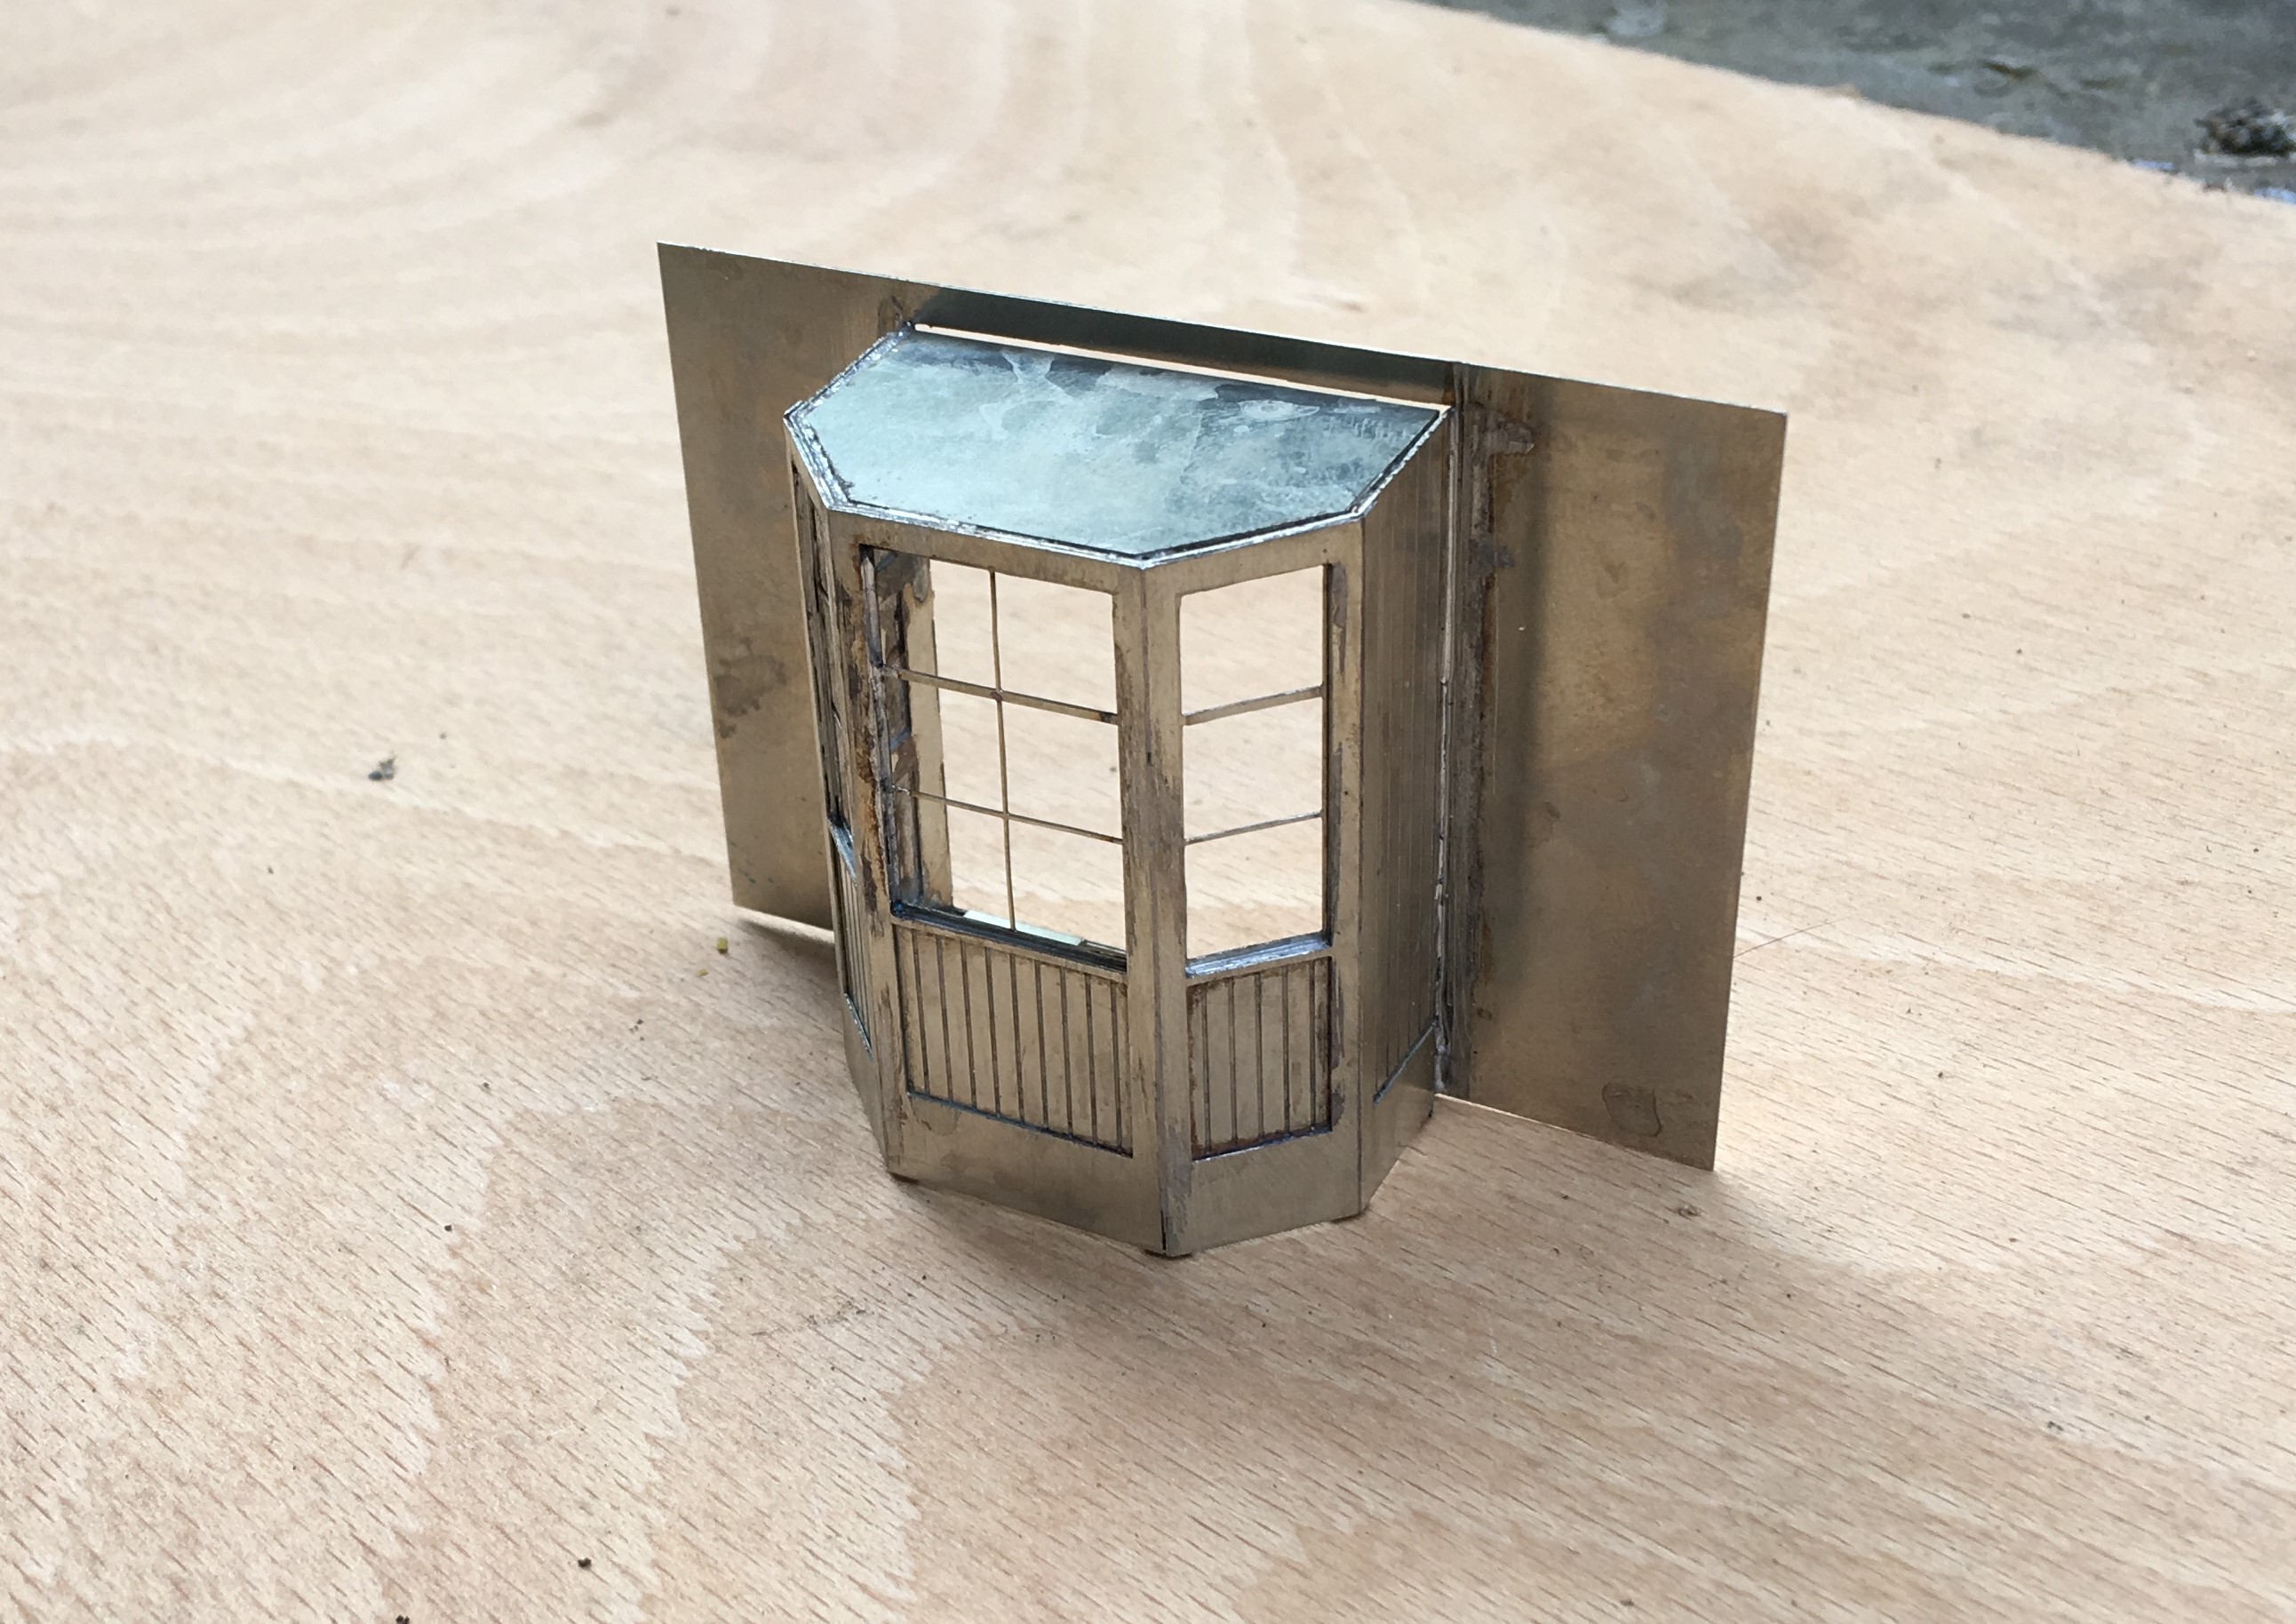
The real value of etching the components can be seen in the shopfront – I at least can’t get plasticard to look like this!
Couldn’t Have Done It Without………….2
I have not managed to get any models to a stage which would make a worthwhile post for a couple of weeks; in a large part due to the disaster I had with the matting agent in my varnish.
This has meant that a number (oh yes, it wasn’t just the one I showed a picture of………) of models have had to get a coating of in nitromors. But nitromors is not enough to to properly clean the model and a lot of attention with a glass fibre scratch pen is required. So I have had an enjoyable weekend plucking glass fibres from my fingers! The models are now at the stage where they have been stripped back and the base coats have been renewed. It is pretty galling to find yourself back to were a month or two back!
It does, however, remind me of another of the tools that I find invaluable in my modelling – a ultrasonic bath. Now they don’t sound like a critical tool to a railway modeller but let me correct you. It is utterly startling how much grot and muck comes off even the most thoroughly cleaned model – you won’t believe me until you have experienced it!

This is the version I have, which is larger than most and is big enough to get a full length coach in it. It also has a heating element in it and the warm water helps the cleaning process. So too does this stuff; Shiny Sinks.

This is a very effective cleaner and does not leave a residual film (which washing up liquid does).
The really handy thing about this set of recommended tools is that they won’t get you in trouble with the domestic authorities. That is because this combination is excellent for cleaning jewellery so you can earn a few brownie points for giving these a spring clean!
I got mine from Maplins and it cost about £60. Given that they are going through their liquidation sale at the moment, you may be able to do better than me but they are available (at a higher cost) via Fleabay or Amazon – such as this one https://www.ebay.co.uk/itm/JPL-ULTRA-8060-Ultrasonic-Cleaner-3-Litre/131291011406?epid=21015637893&hash=item1e918dd94e:g:byYAAOSwgQ9VkUcO

Goodies – time for some more test building….
I had a delivery at work which was rather more interesting than the average box of lease documents I usually get…………it looked like this.
There are a number of items in this, some parts for some locos I have underway and an attempt to adjust the ECJS 6 wheeled bogies but the key goodies in this are a MR 6 wheeled full brake (to dia 530) and an HR bogie full brake (to dia 51).
The MR full brake should look like this:
and the Highland’s full brake here
So all I need is some time to do some more testing building…………..
Couldn’t have done it without……
As tonight is Oscar night and I am sure this phrase will make a few outings, I thought I could get in on the bandwagon……………….well, a more honest answer is that work has been rather too intense in the past few weeks for me to have done any modelling so I need an idea for a blog post!
So I thought I would share with you one of the most important tools in the Tatlow modelling armoury – a Proxxon TBM 220 bench drill. The difference of this to my modelling is a much improved control over the drilling – its great when the hole appears where you want it!
Equally important is the really significant saving in drill bits (don’t laugh, it is true!). There is a world of difference from a DIY store bench dril or even a Dremmel to these Proxxon drills. Their accuracy is stunning and they are very well made so are smooth to use so you can control pressure with ease.. Add to this the chucks are such that they will hold down to a 0.3mm drill and these are so delicate that I really don’t think you cna use hand pin vices for these. Thus, this gives you the ability to drill much smaller holes and without costing a fortune in fine drill bits.

I have not presently got the compound table that I would need to enable this to be converted to a lightweight milling machine, but it is on the shopping list!
Mine was a nearly new model from ebay at just over £100 but they are regularly available from a number of supplies such as Axminster Tools or Proxxon themselves. Well worth the buy, so go on…………
