Blog Archives

Still Swapsie – A Signal for Nampara for Hendrawna Part 2
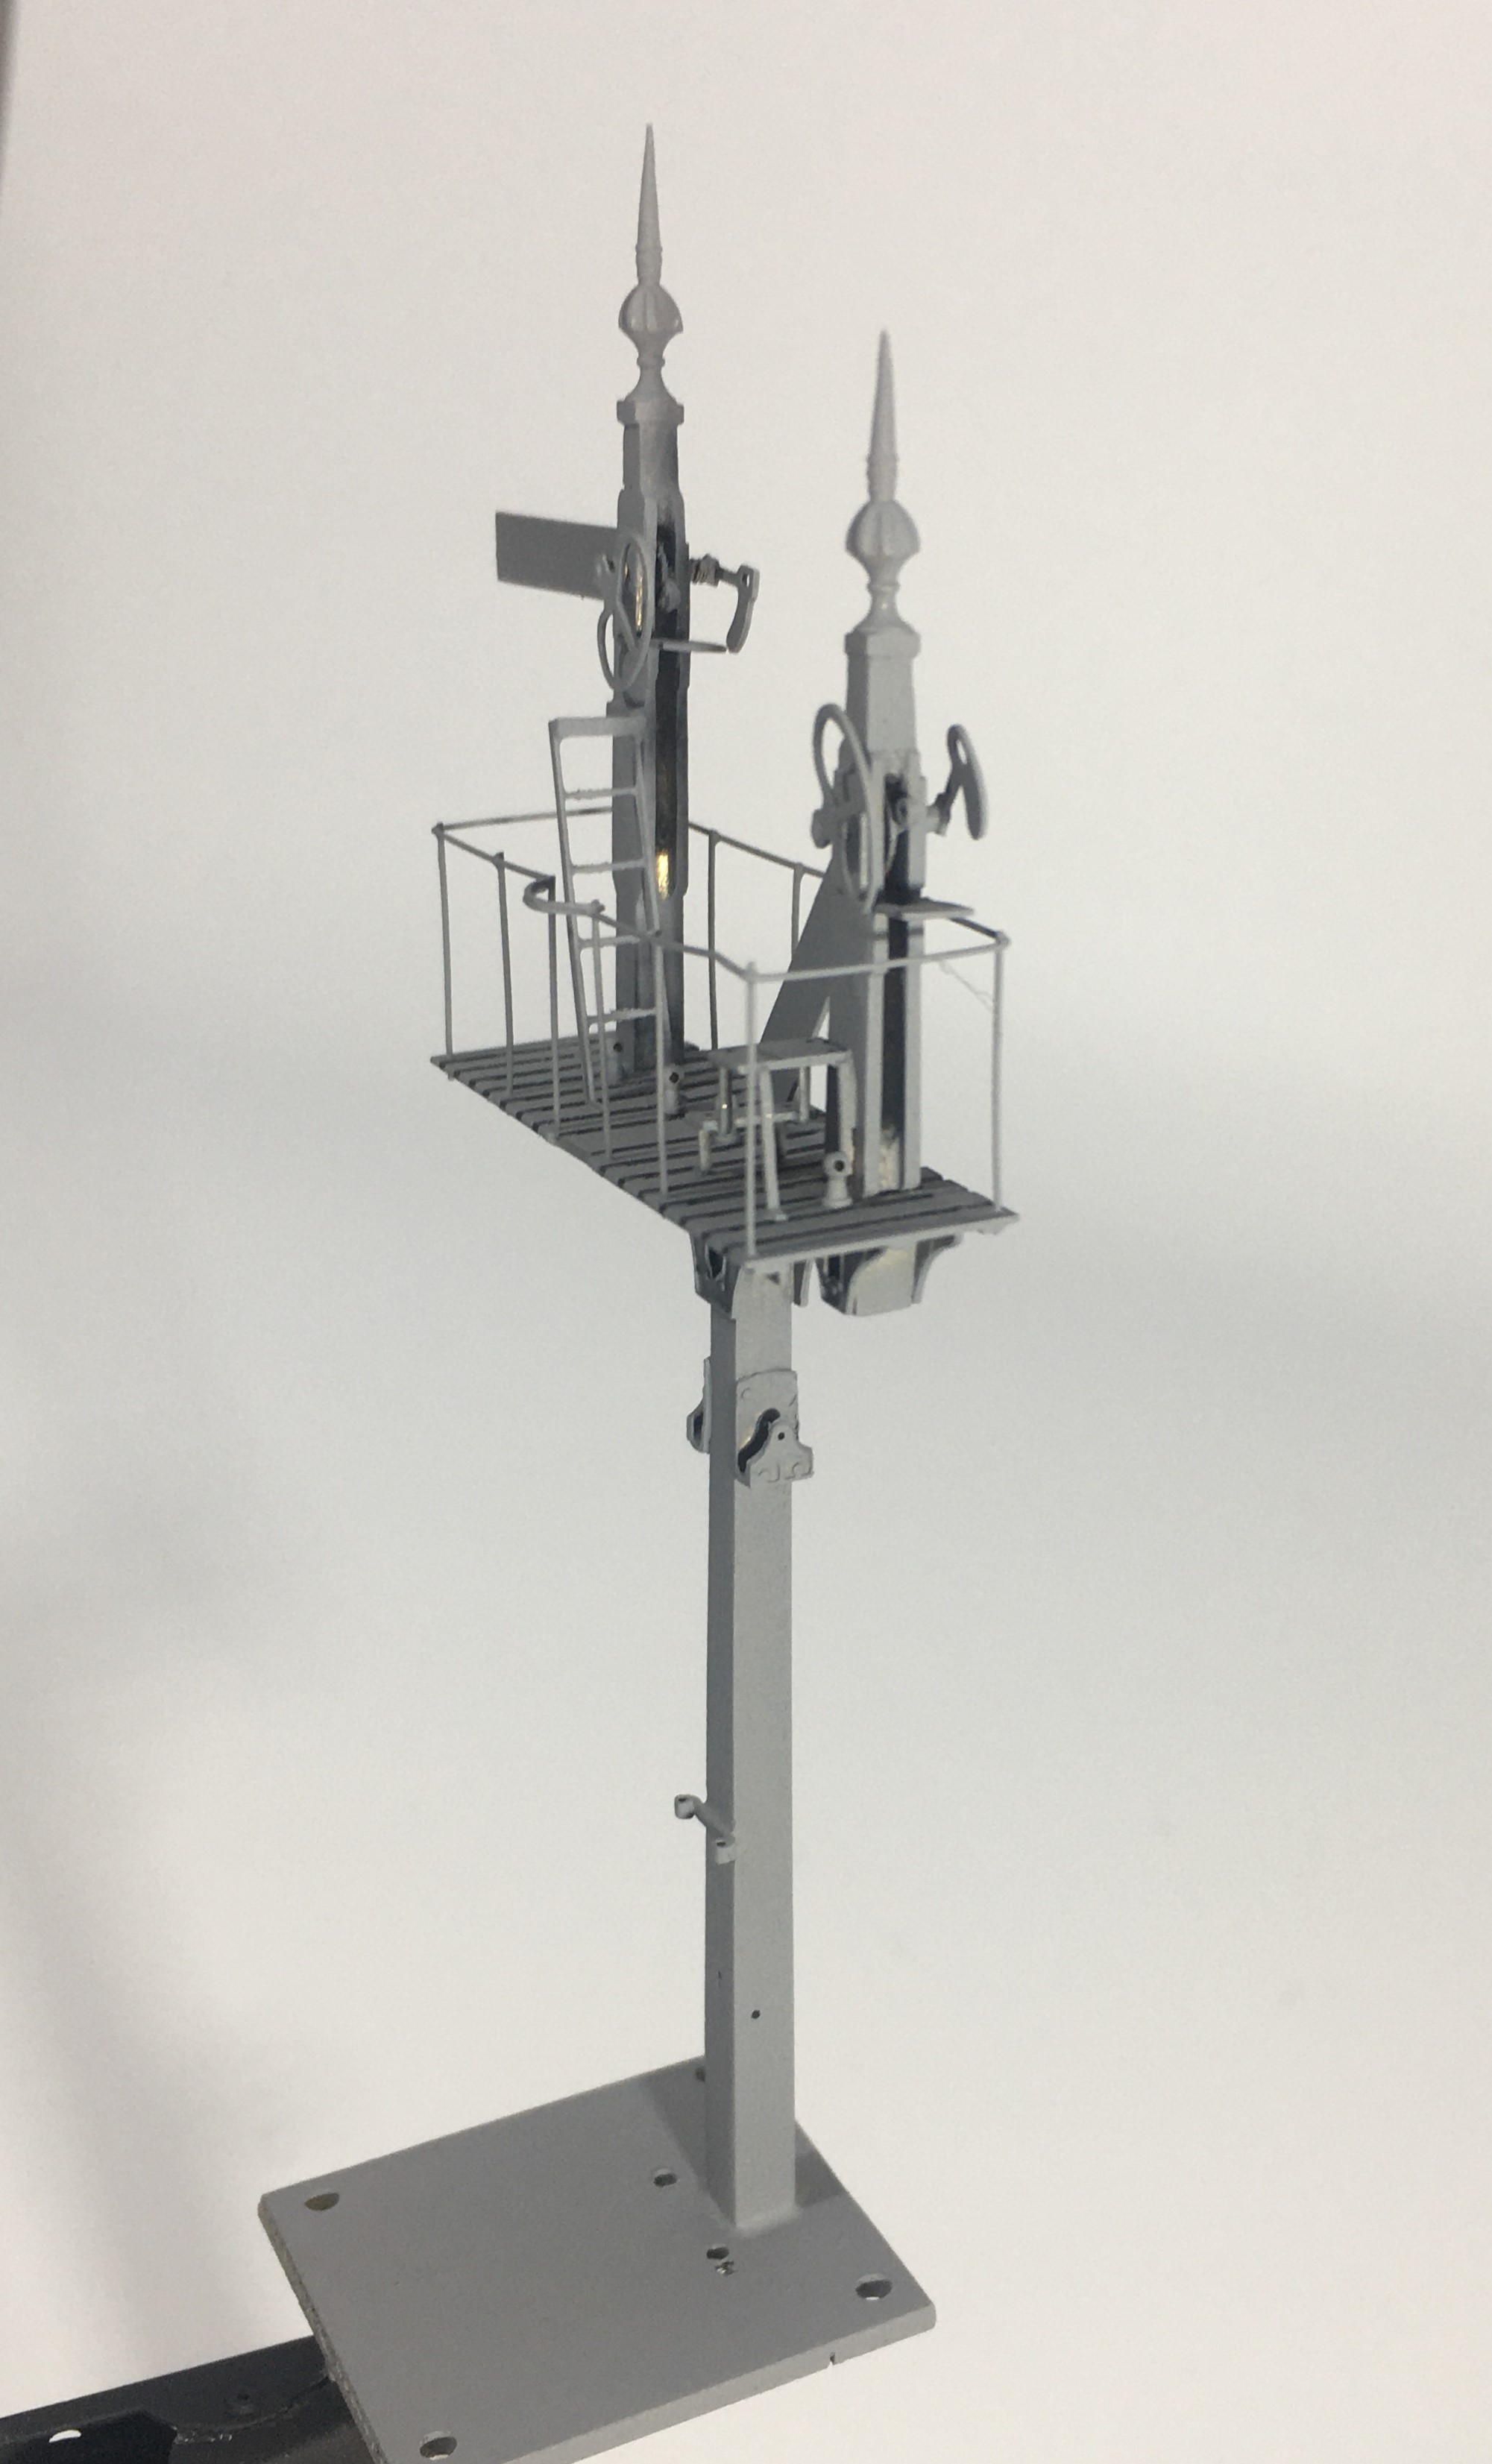
Having assembled the basic post and ensured that it was working, the bolts can be filed away and we get to the following stage.
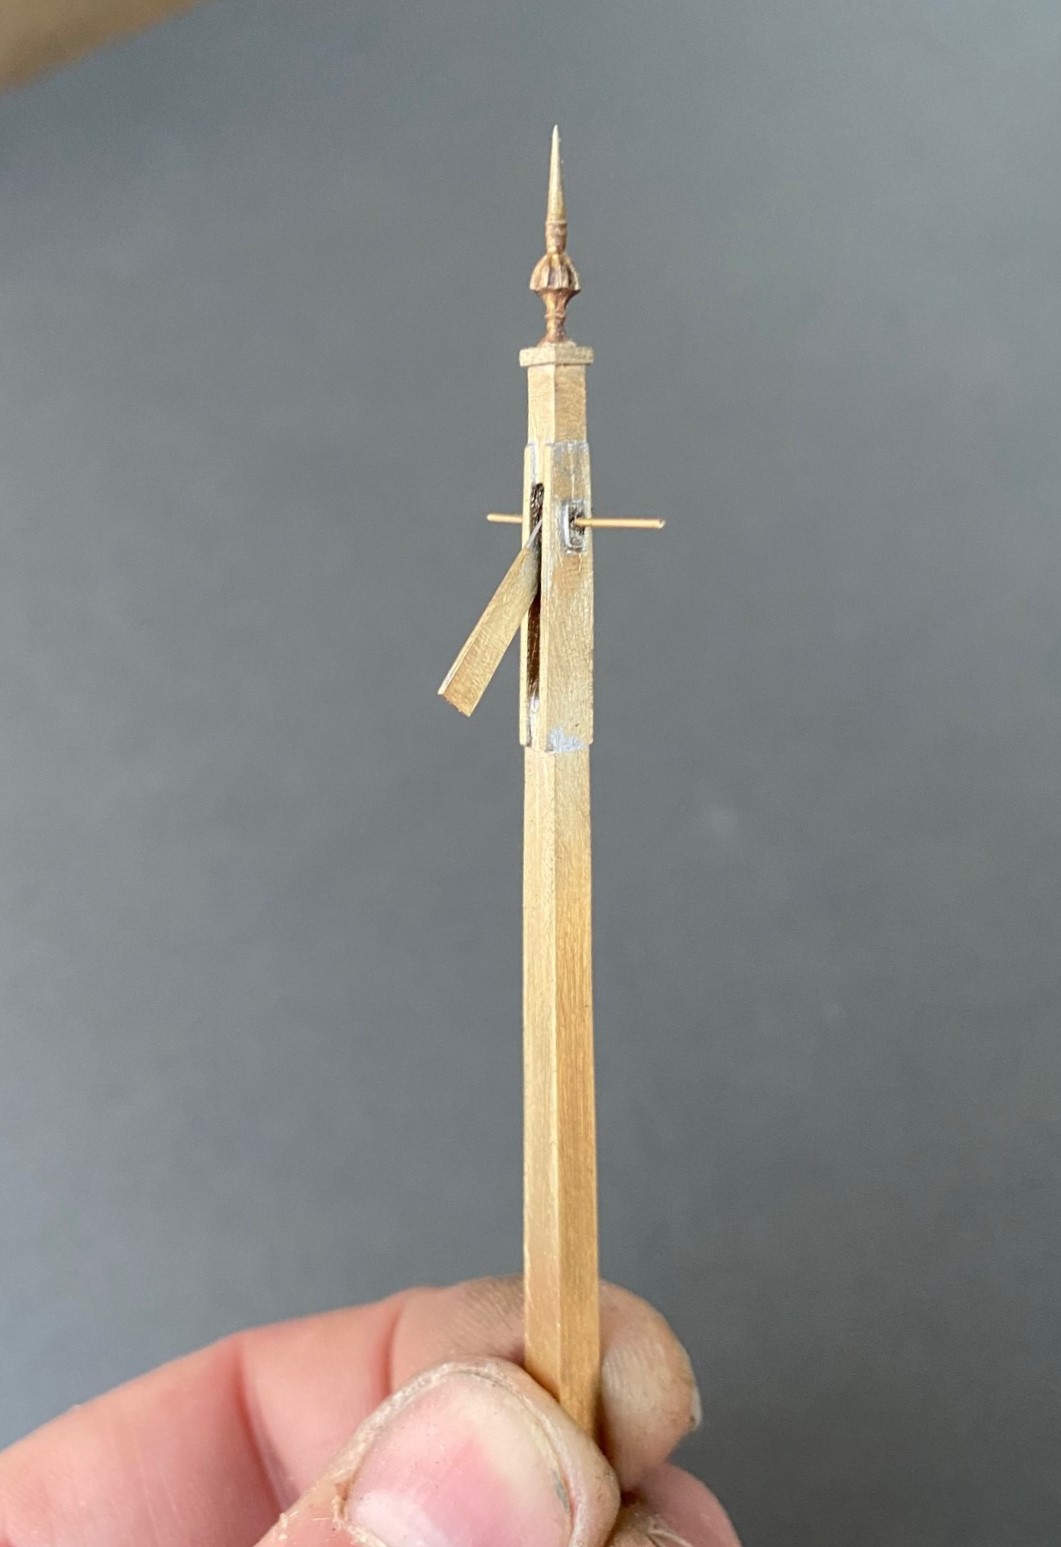
The spectacle plate plate is rather unusual in that it only has one lens which isn’t available via any manufacturer and the arm is notably shorter than I am used to so I had to etch these to suit. Although I could not find a lamp that matched what was on the prototype, I was able to modify a MacKenzie & Holland lamp from MSE to suit. Thereafter, the remaining assembly of the signal was fairly unremarkable.
And then once it had been painted, including the unusual red highlighting on the finial that I rather like:
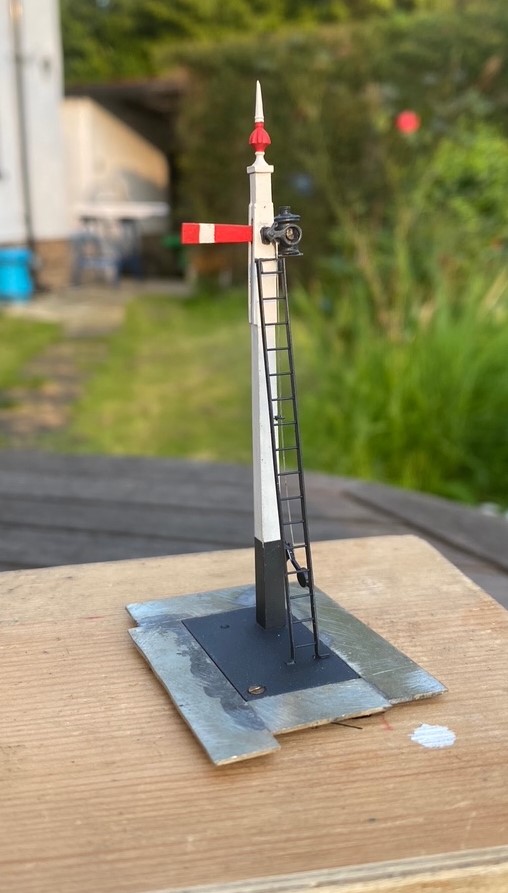

And of course we must have the obligatory video to show that it really does work!
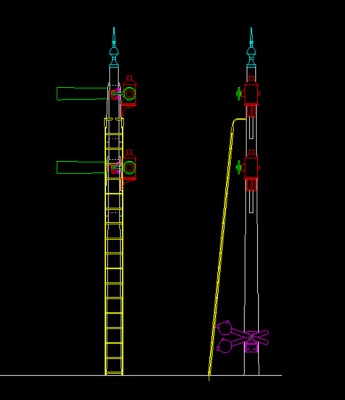
And for those of you that might want it, this is the drawing of the signal, which has two arms, at Didcot.
Swapsie – A Signal for Nampara for Hendrawna (Part 1)
Swapsie – the childish act of swapping things according to Wiktionary.
Do you remember at school swapping a Top Trumps set for a the latest Hot Wheels car or similar? I do! I remember getting roundly b*llocked by my mum for not recognising the value of things I was giving away and (metaphorically I am pleased to say) swapping gold bars for glass beads almost like the Incas and Cortez.
In the world of toy trains, the same happens and is very useful where someone can offer something that you don’t have (or find difficult to make) in return for something you do have. This is one such example. Sitting next to Duncan Redford at an EM Gauge Society/Scalefour Society skills day a few years back demonstrating signal construction a barter was arrived at whereby I would build Duncan a signal in return for him doing some 3D design and printing. I think it is fair to say that neither of us have rushed with our respective shares of the bargain but with the next ExpoEM only a week away, I have shifted into gear to finish the started signal that was my part of the deal.
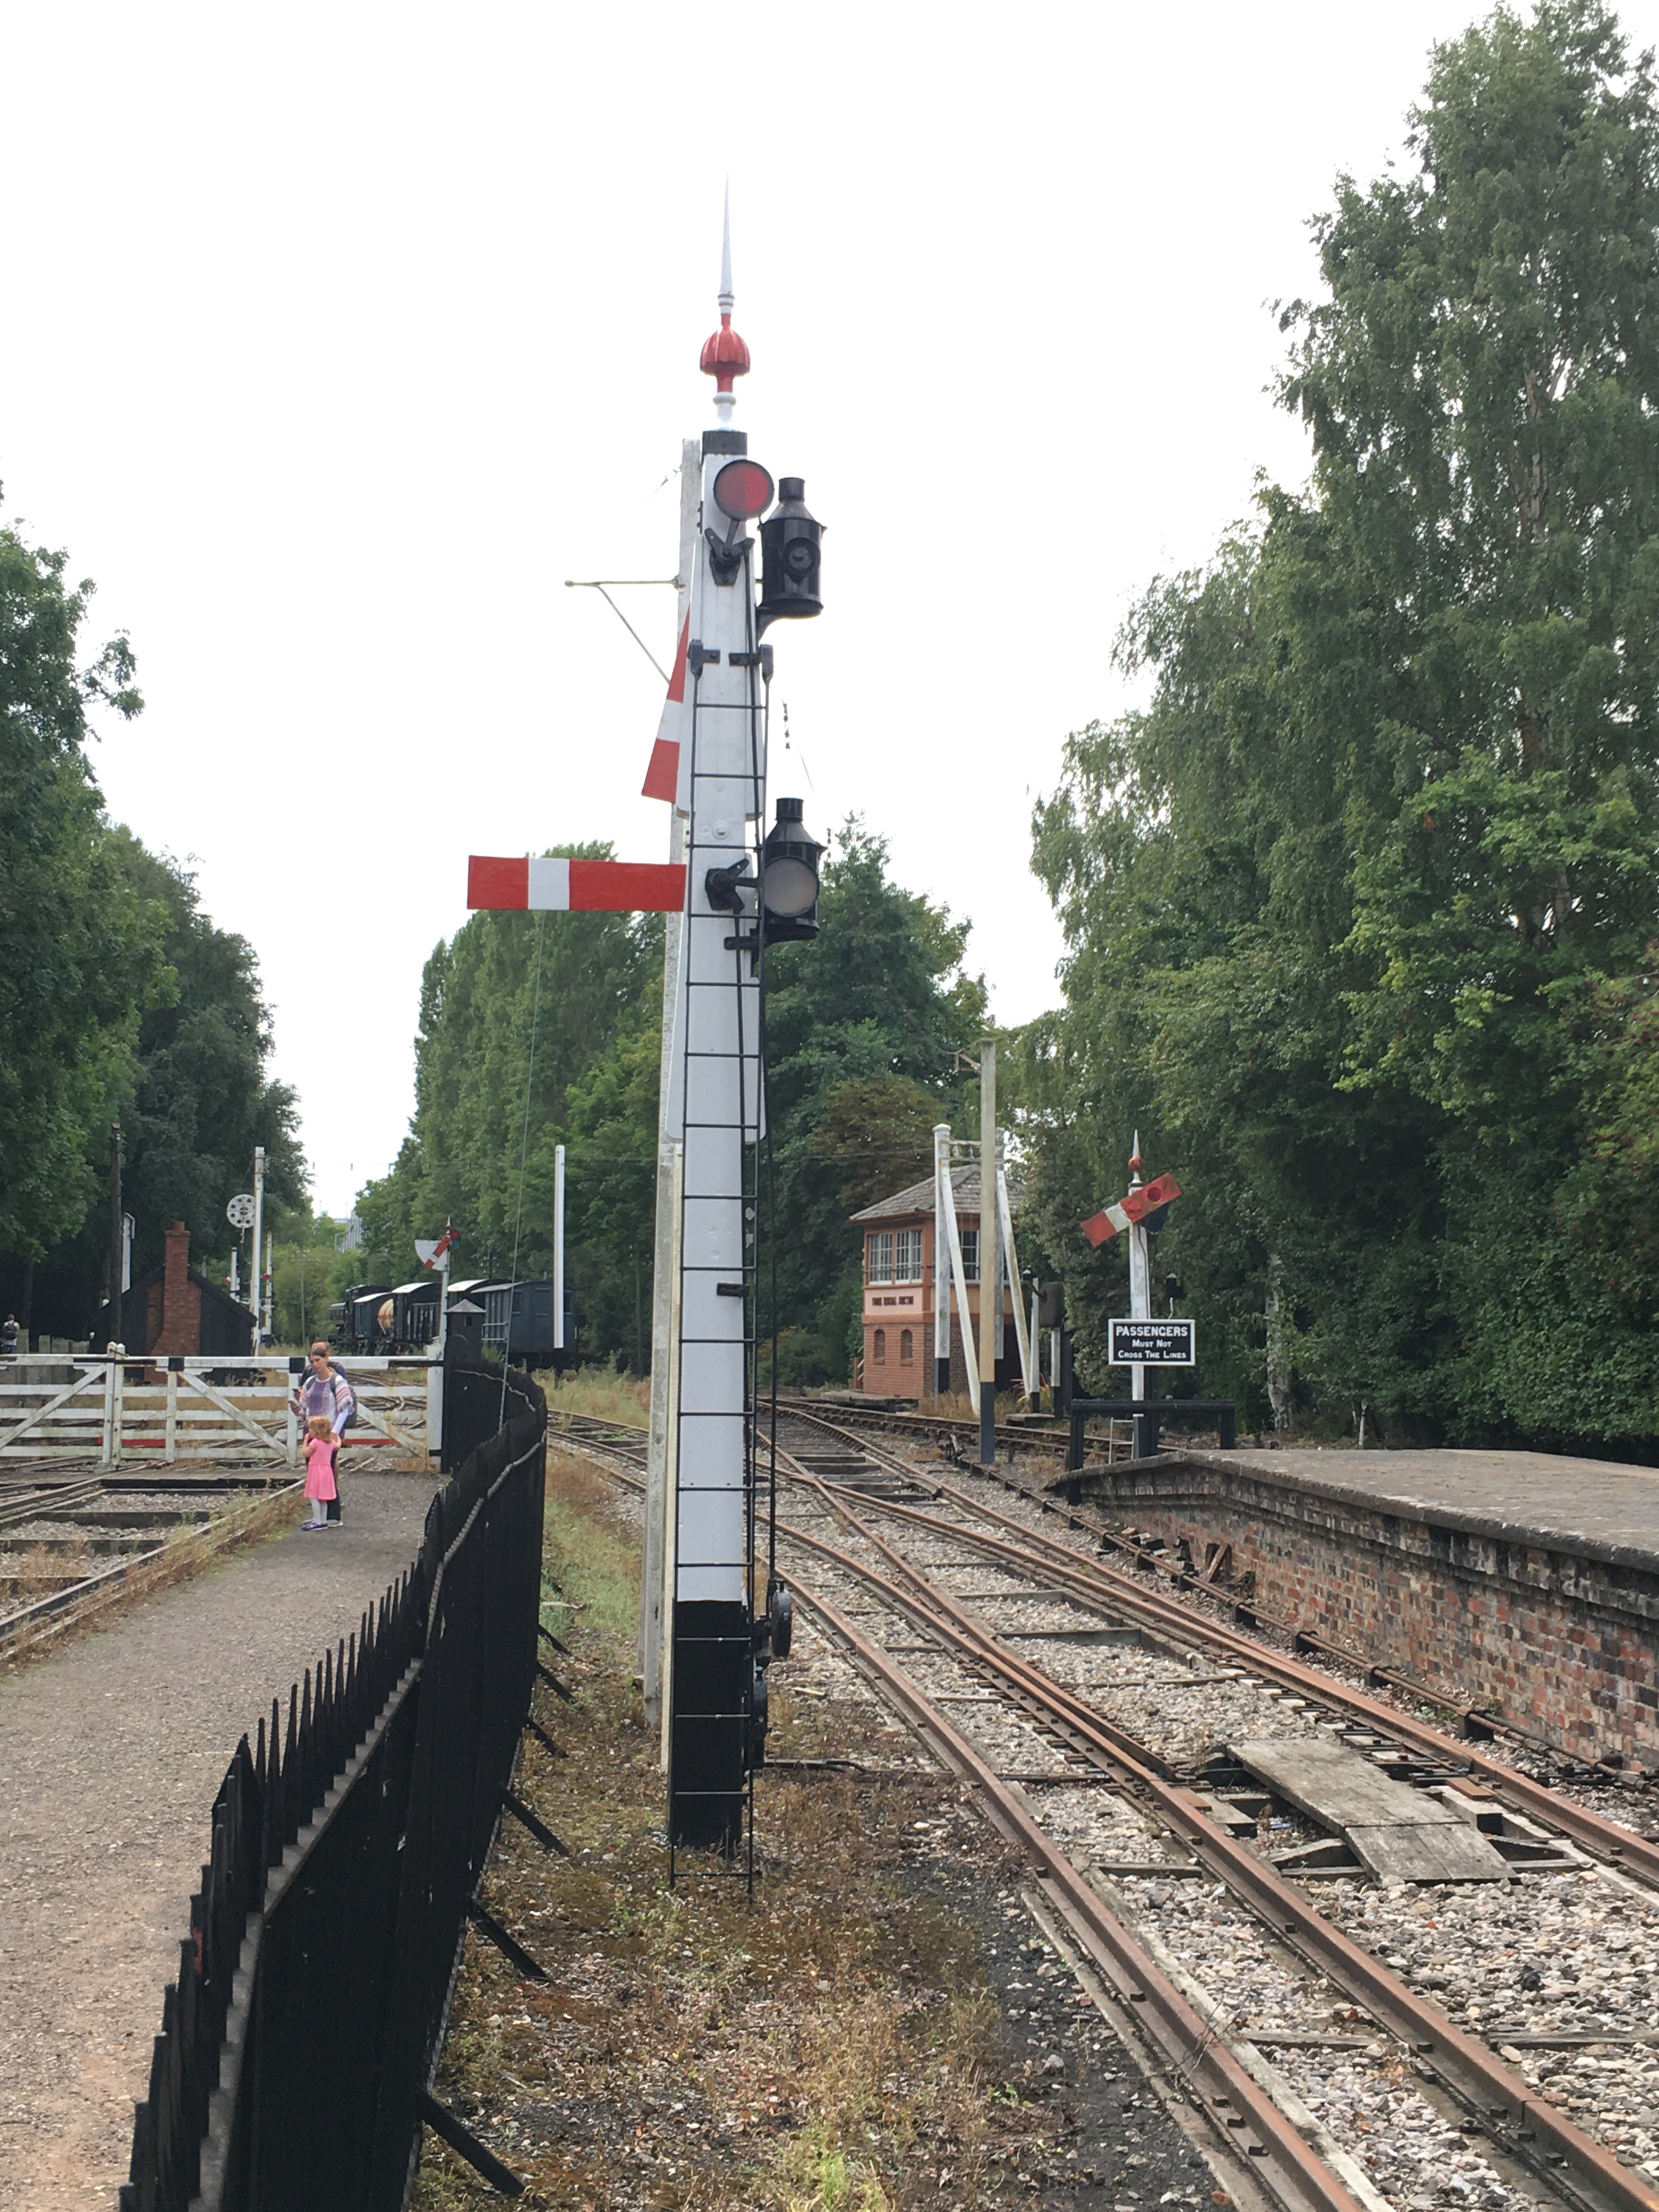
Duncan is building a GWR broad gauge era layout and wanted a close replica of a signal that the GWR Society has recreated at Didcot, but adjusted to have only a single arm. So after coming out in cold sweats about the idea of modelling anything GWR (!!!) I took a look at it. Like many signals, there are differences and similarities with other signals but after a bit of study it became clear that it was sufficiently different that a site visit to Didcot to be required.
Having measured it up including, when no one was looking, a climb to the arm/lamp to measure it, I came home to draw it. I was shocked to find that it was tiny; 3mm/1foot at best and I had a panic attack -had I mucked it up and mis-measured it. Obviously, being a professional surveyor I could not possibly have done that, could I? After a few months, the fear that I had niggled on me and so came about site visit number 2 and a further climb up the signal ladder. Nope, it really is tiny – both the post and the arm are notably smaller than I am used to.

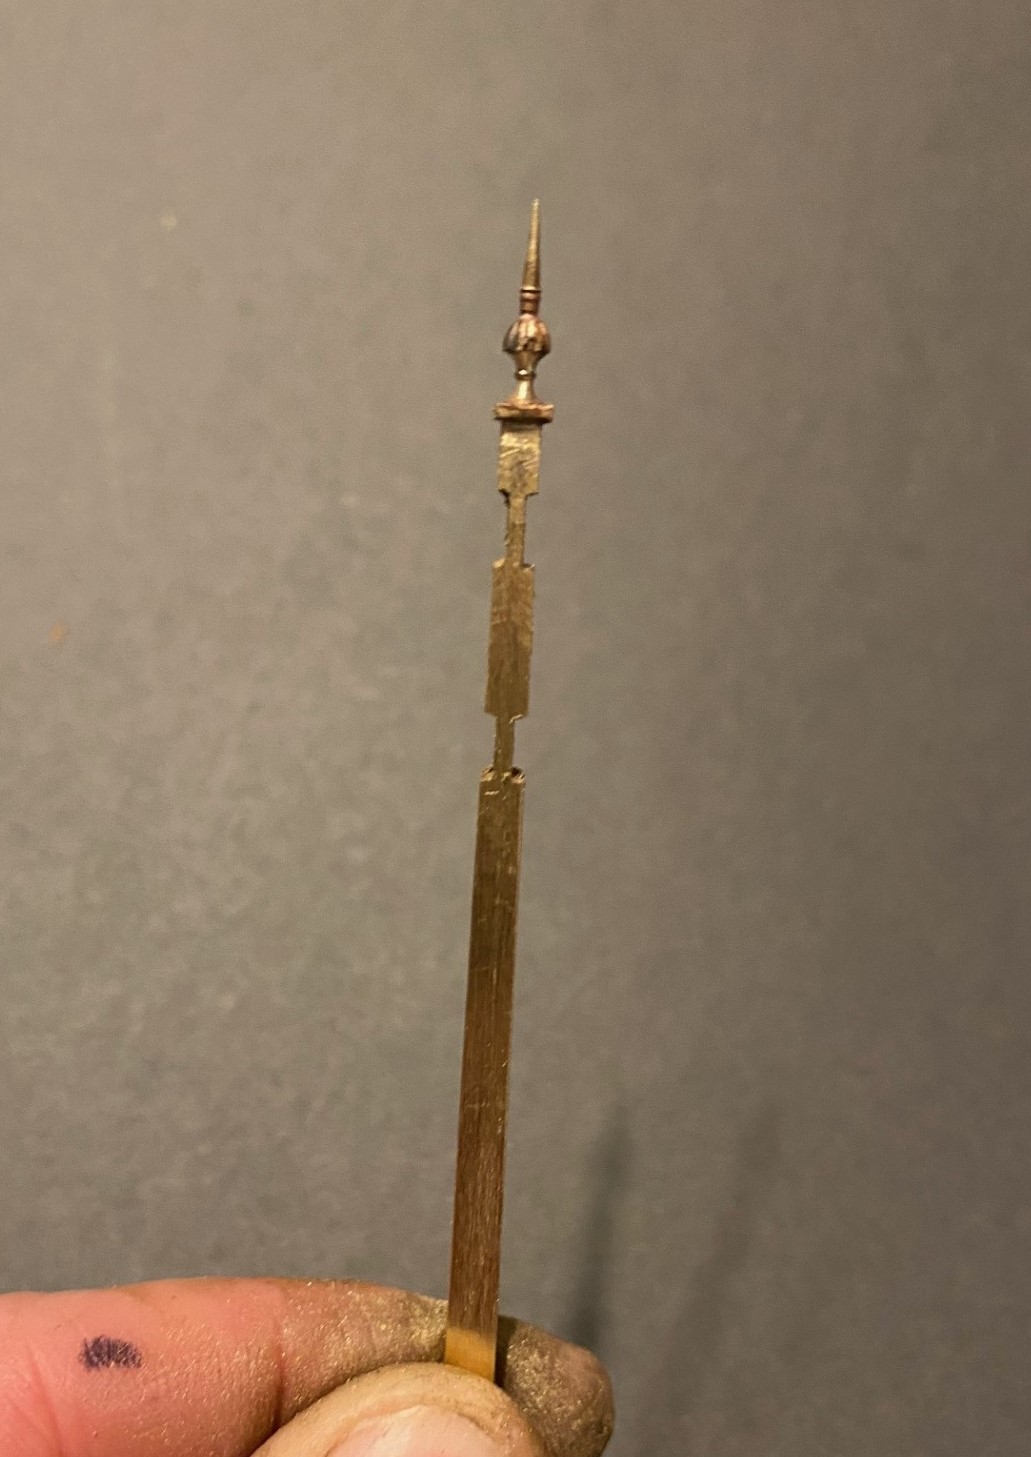
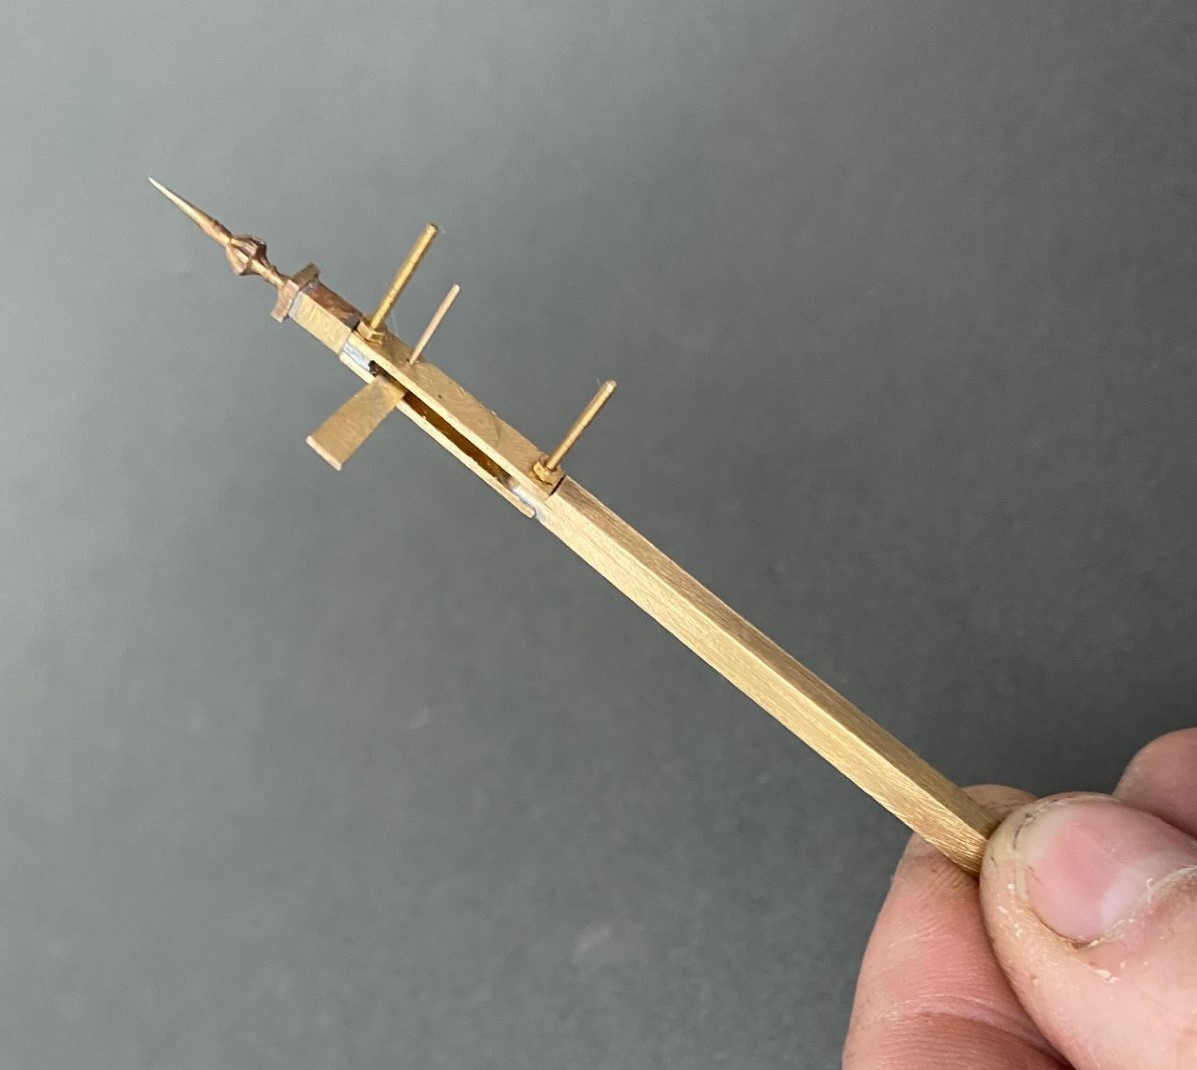
There are several unusual aspects to the signal; the one glass spectacle plate, the tapered arm and the very pronounced stiffening around the slot in the post were all going to be key to capturing the character of the signal. So out came the computer and a small fret was added to an etching order for the arms/spectacle plates. I then formed the basic post from 4mm square section brass which I filed to a taper with a 2.5mm cross section at the top.
Despite having built a few slotted signals already, they are still pretty difficult to get to work well. The difficulty that I have had is to get a soldered joint onto the arm spindle when it is encased in the brass post around it that acts as a heat sink. On a number of occassions the joint has broken and the arm no longer operate. I was determined this was not going to happen this time and have adotped a different approach, by assembling the arm first and then mounting it within the post whilst this was being assembled.
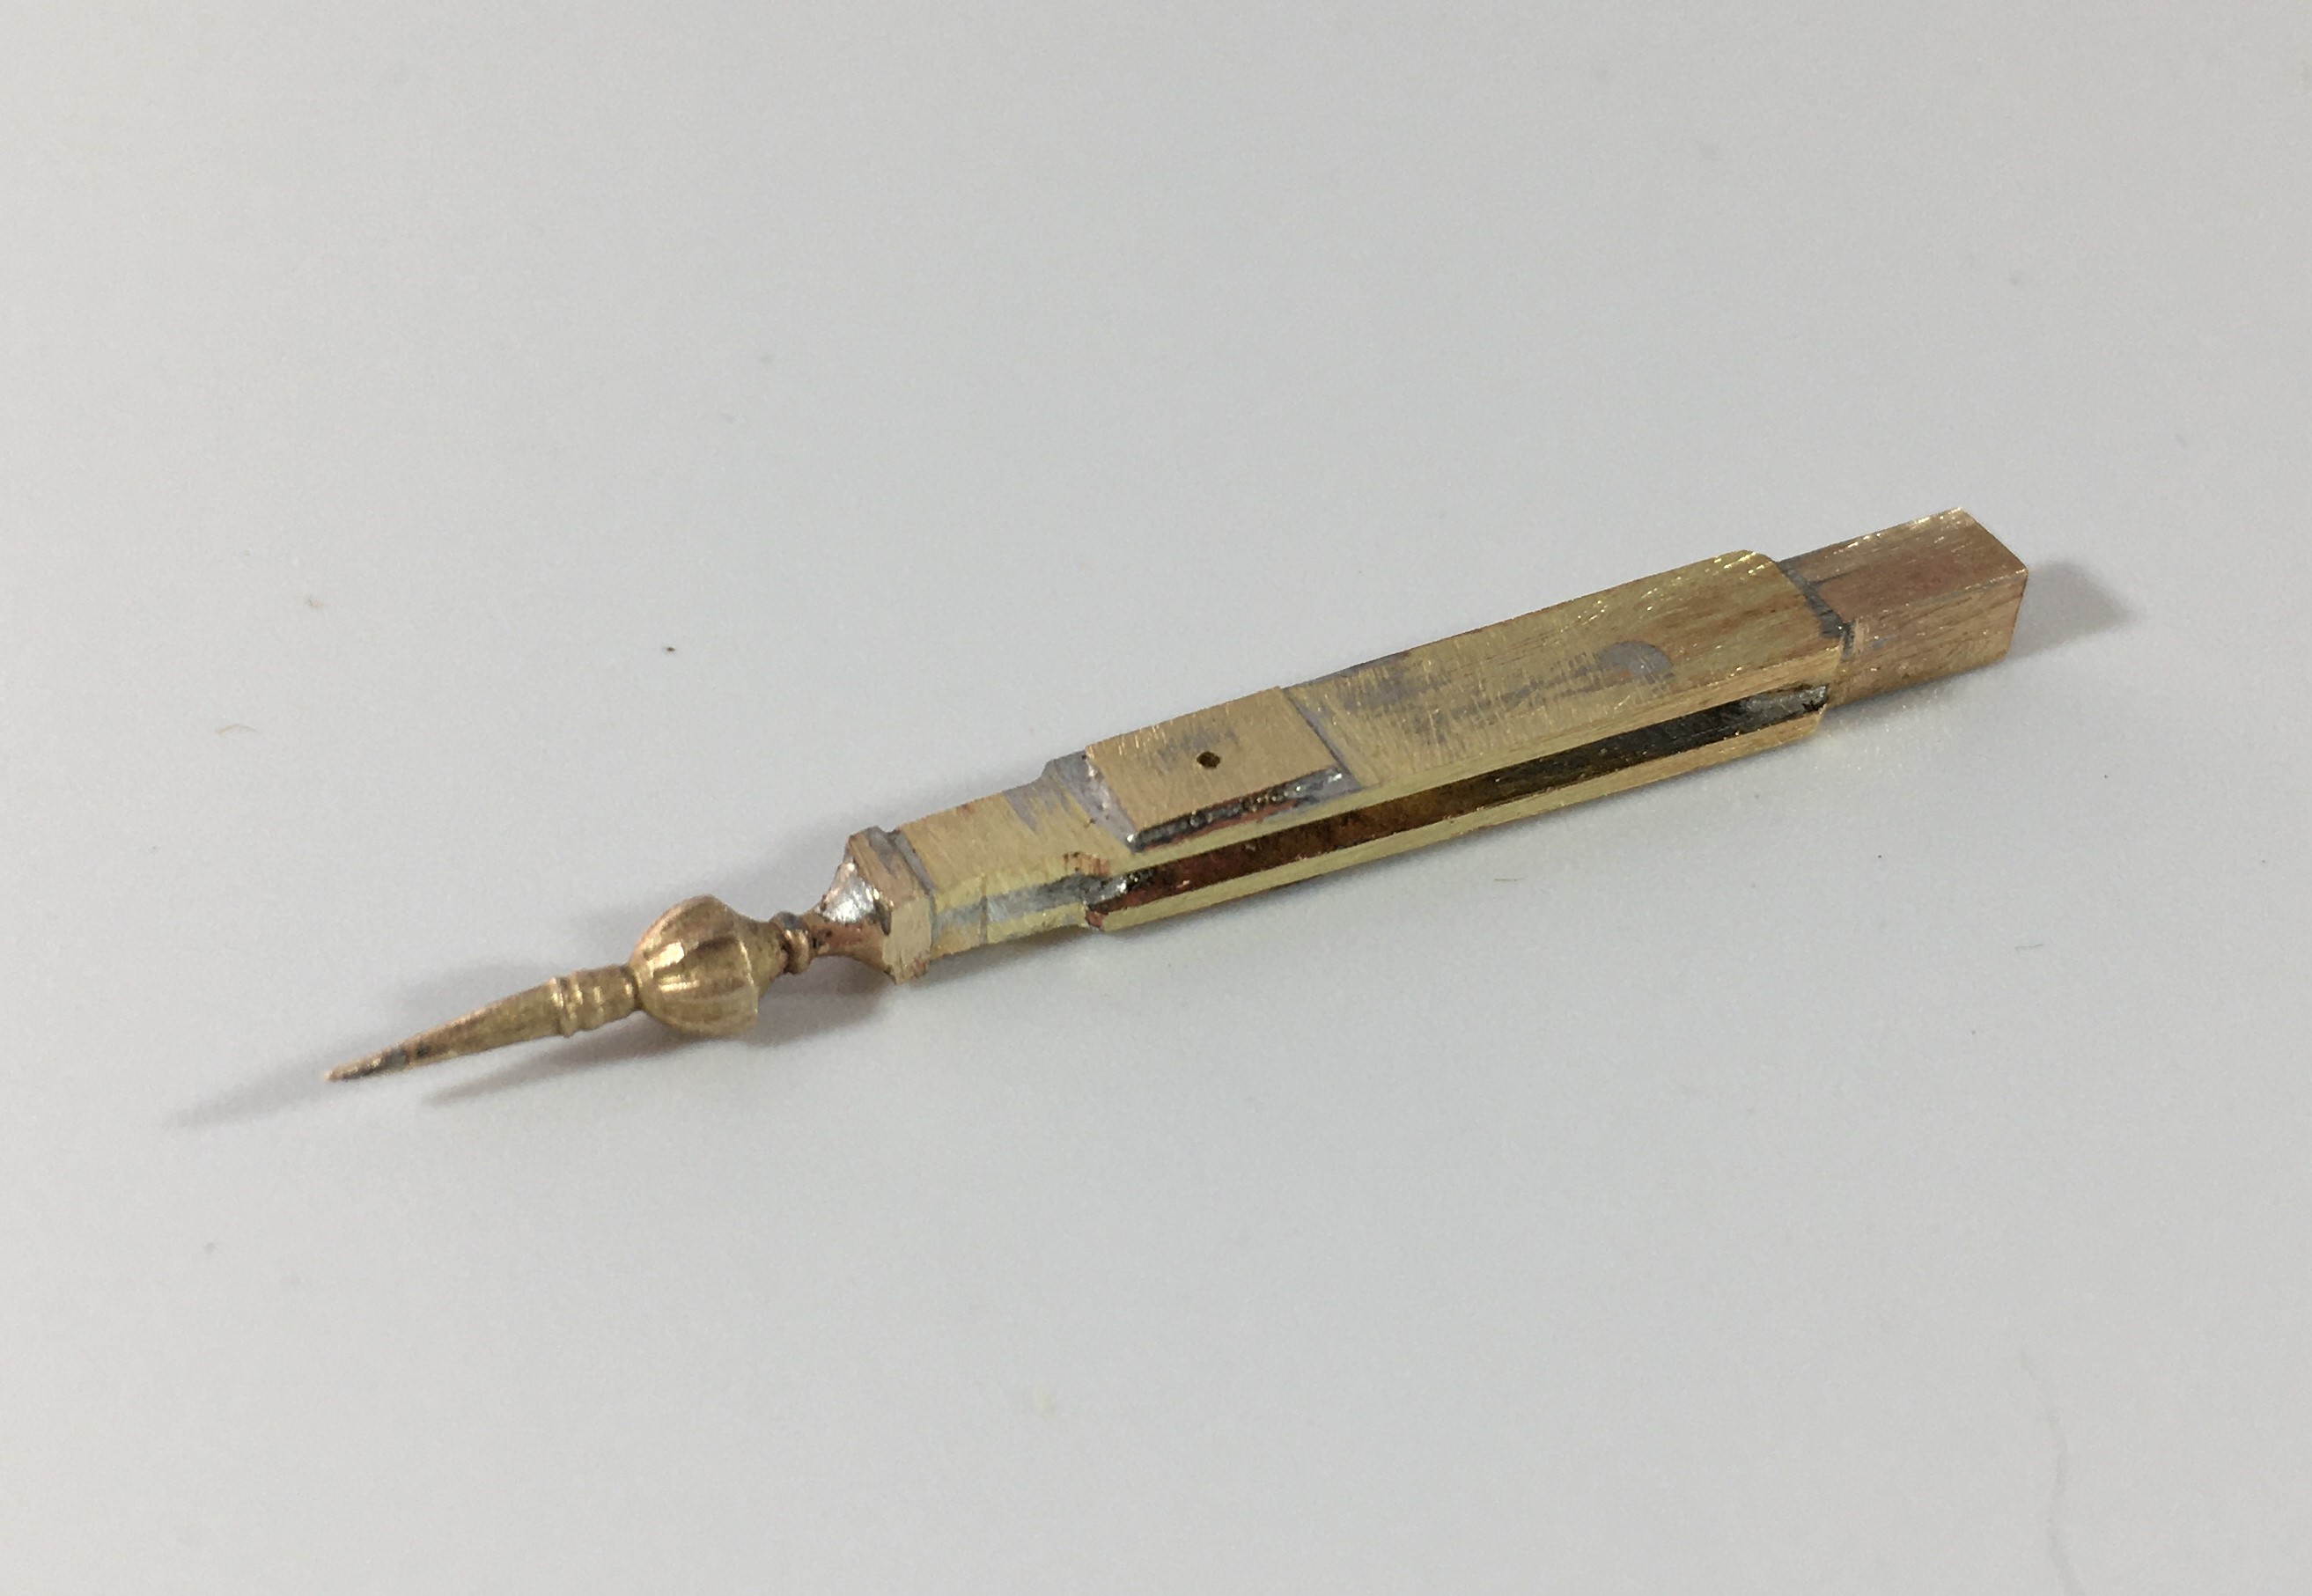
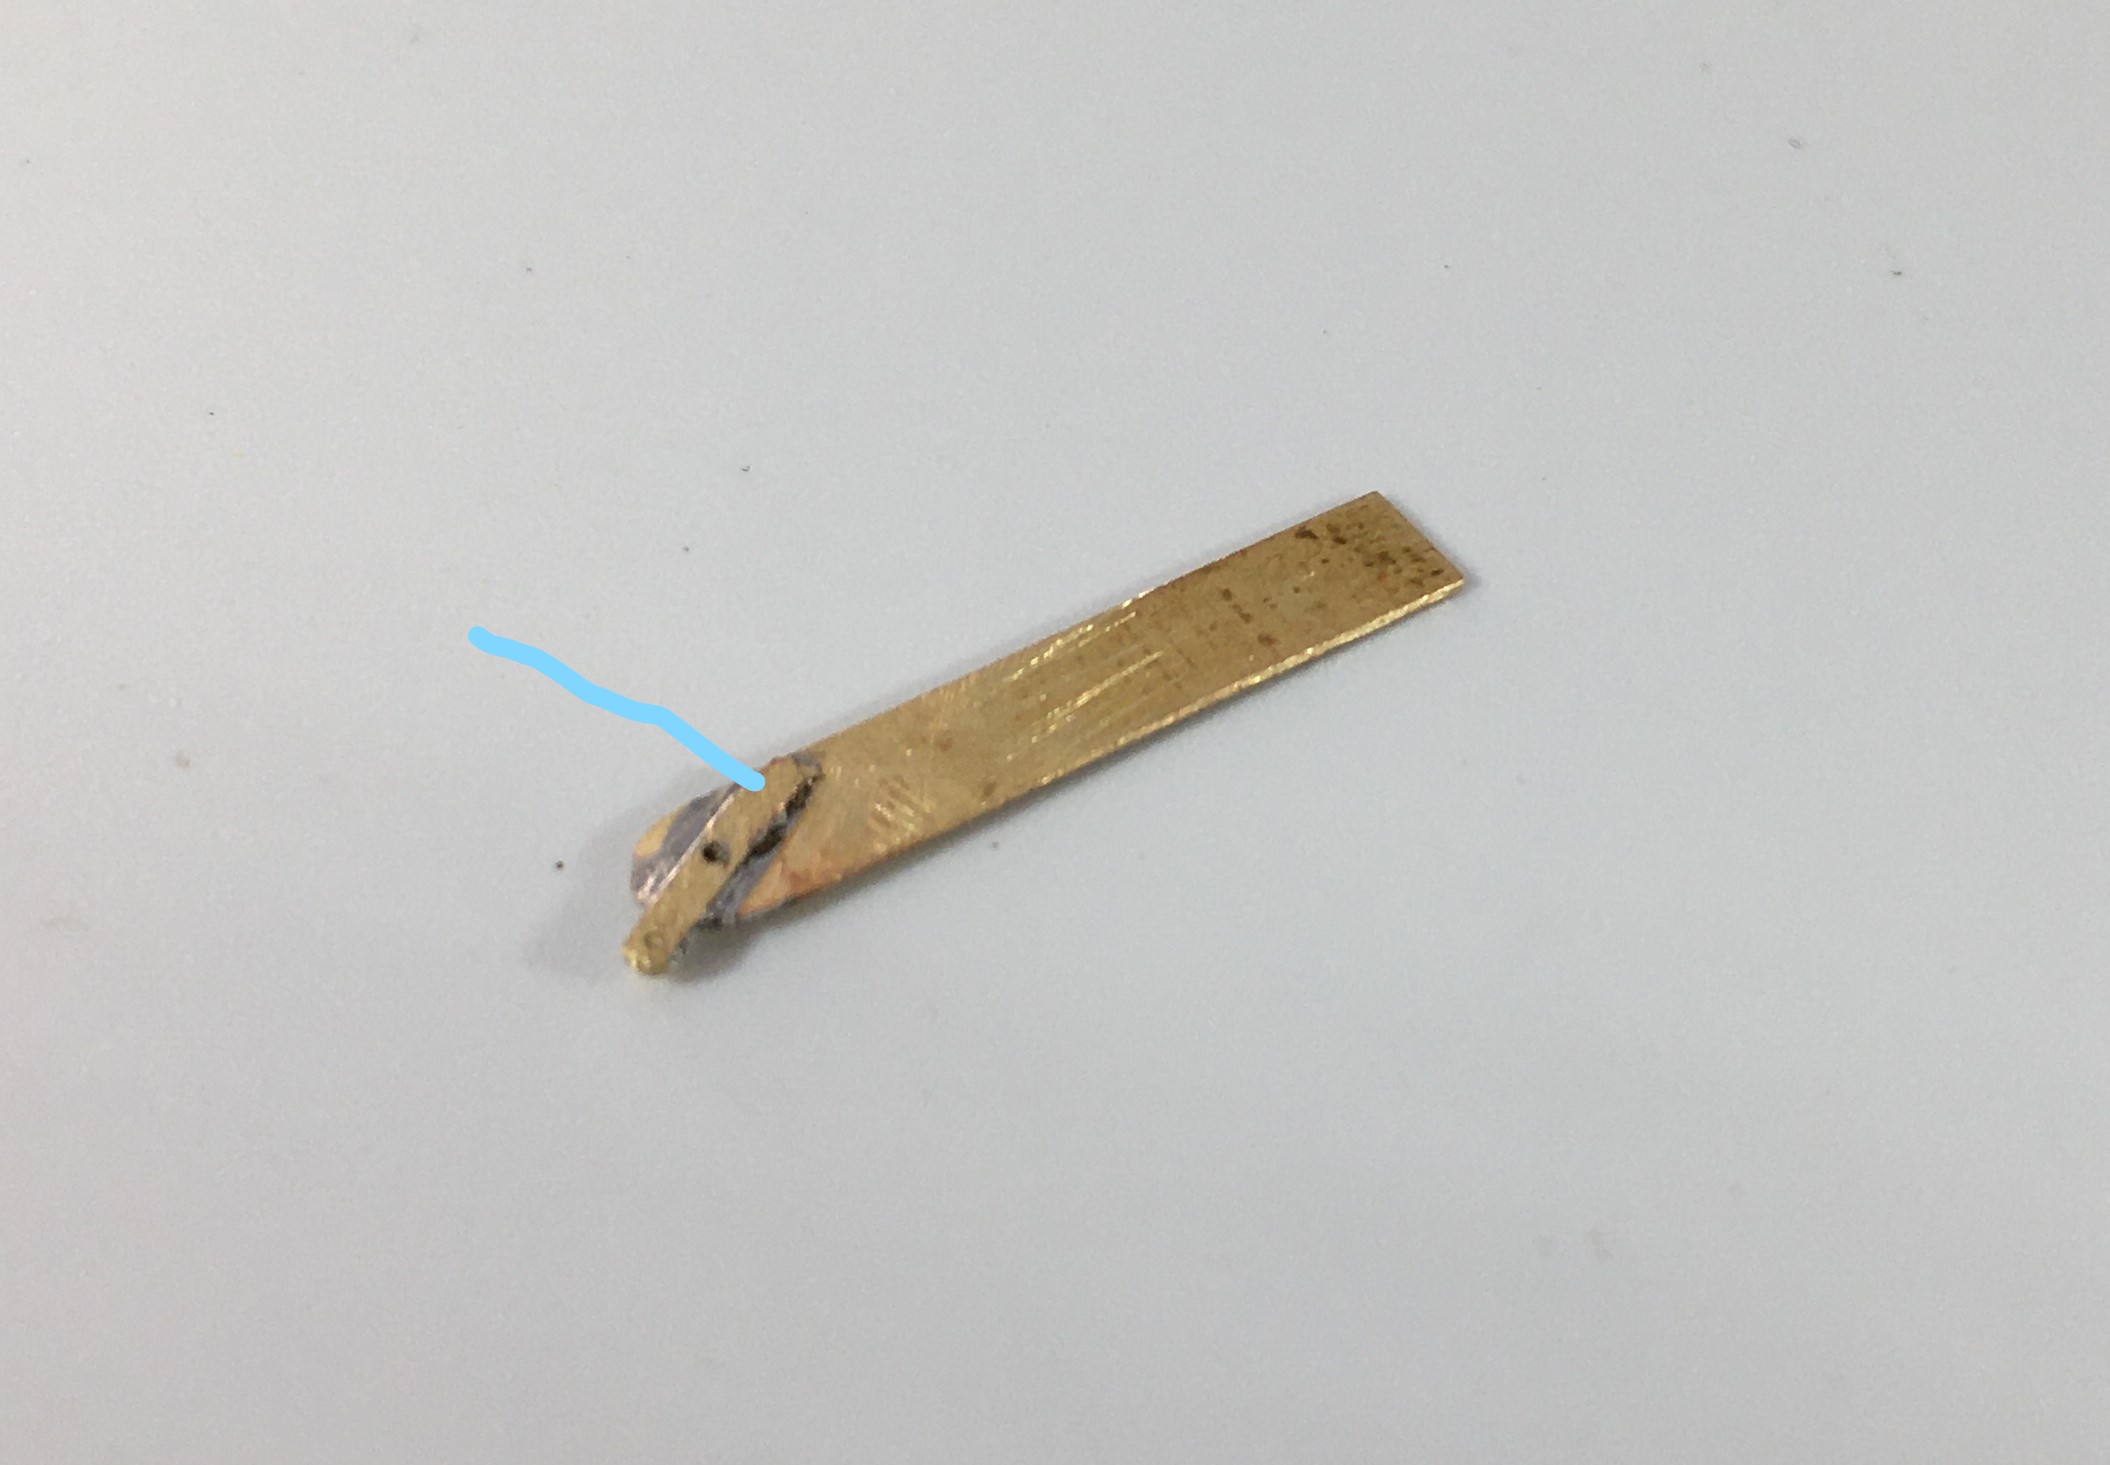
I had filed some 4mm square section into a taper to form the full length of the post. Even though I was about to cut a section of this out, it is necessary to form the full length of the taper so that it is consistent across its full length. Once I was happy with this, i filed two pairs of slots in the outside of the post on oppposing faces. The depth of these was such that the tongue between them was the correct size for the slot in the post. I chose to mount the finial at this stage, with some 296o solder and a lot of heat (from a minature blow torch). This is what it then looked like:
Next, I cut away the block of post that sits between the two filed sections to create a hole in my post. As there is around 2 hours of work to get the post to this point, it is a bit nerve racking chopping it like this! I then cut a pair of 1*4mm brass plate lengths to sit on the tongues and drilled both to receive a 14BA bolt. This was threaded through the first of the plates and adjusted until this a continuation of the taper of the post – this entails some filing of the metal to make the outside face match the post and plate match. It was then soldered in place, again using the 296o solder and a blow torch, to look like this:

The photograph above shows that these plates were wider than the post, in practice the prototype acheived this by planting timbers across these sections but it is easier to do this by way of using the sider plate material.
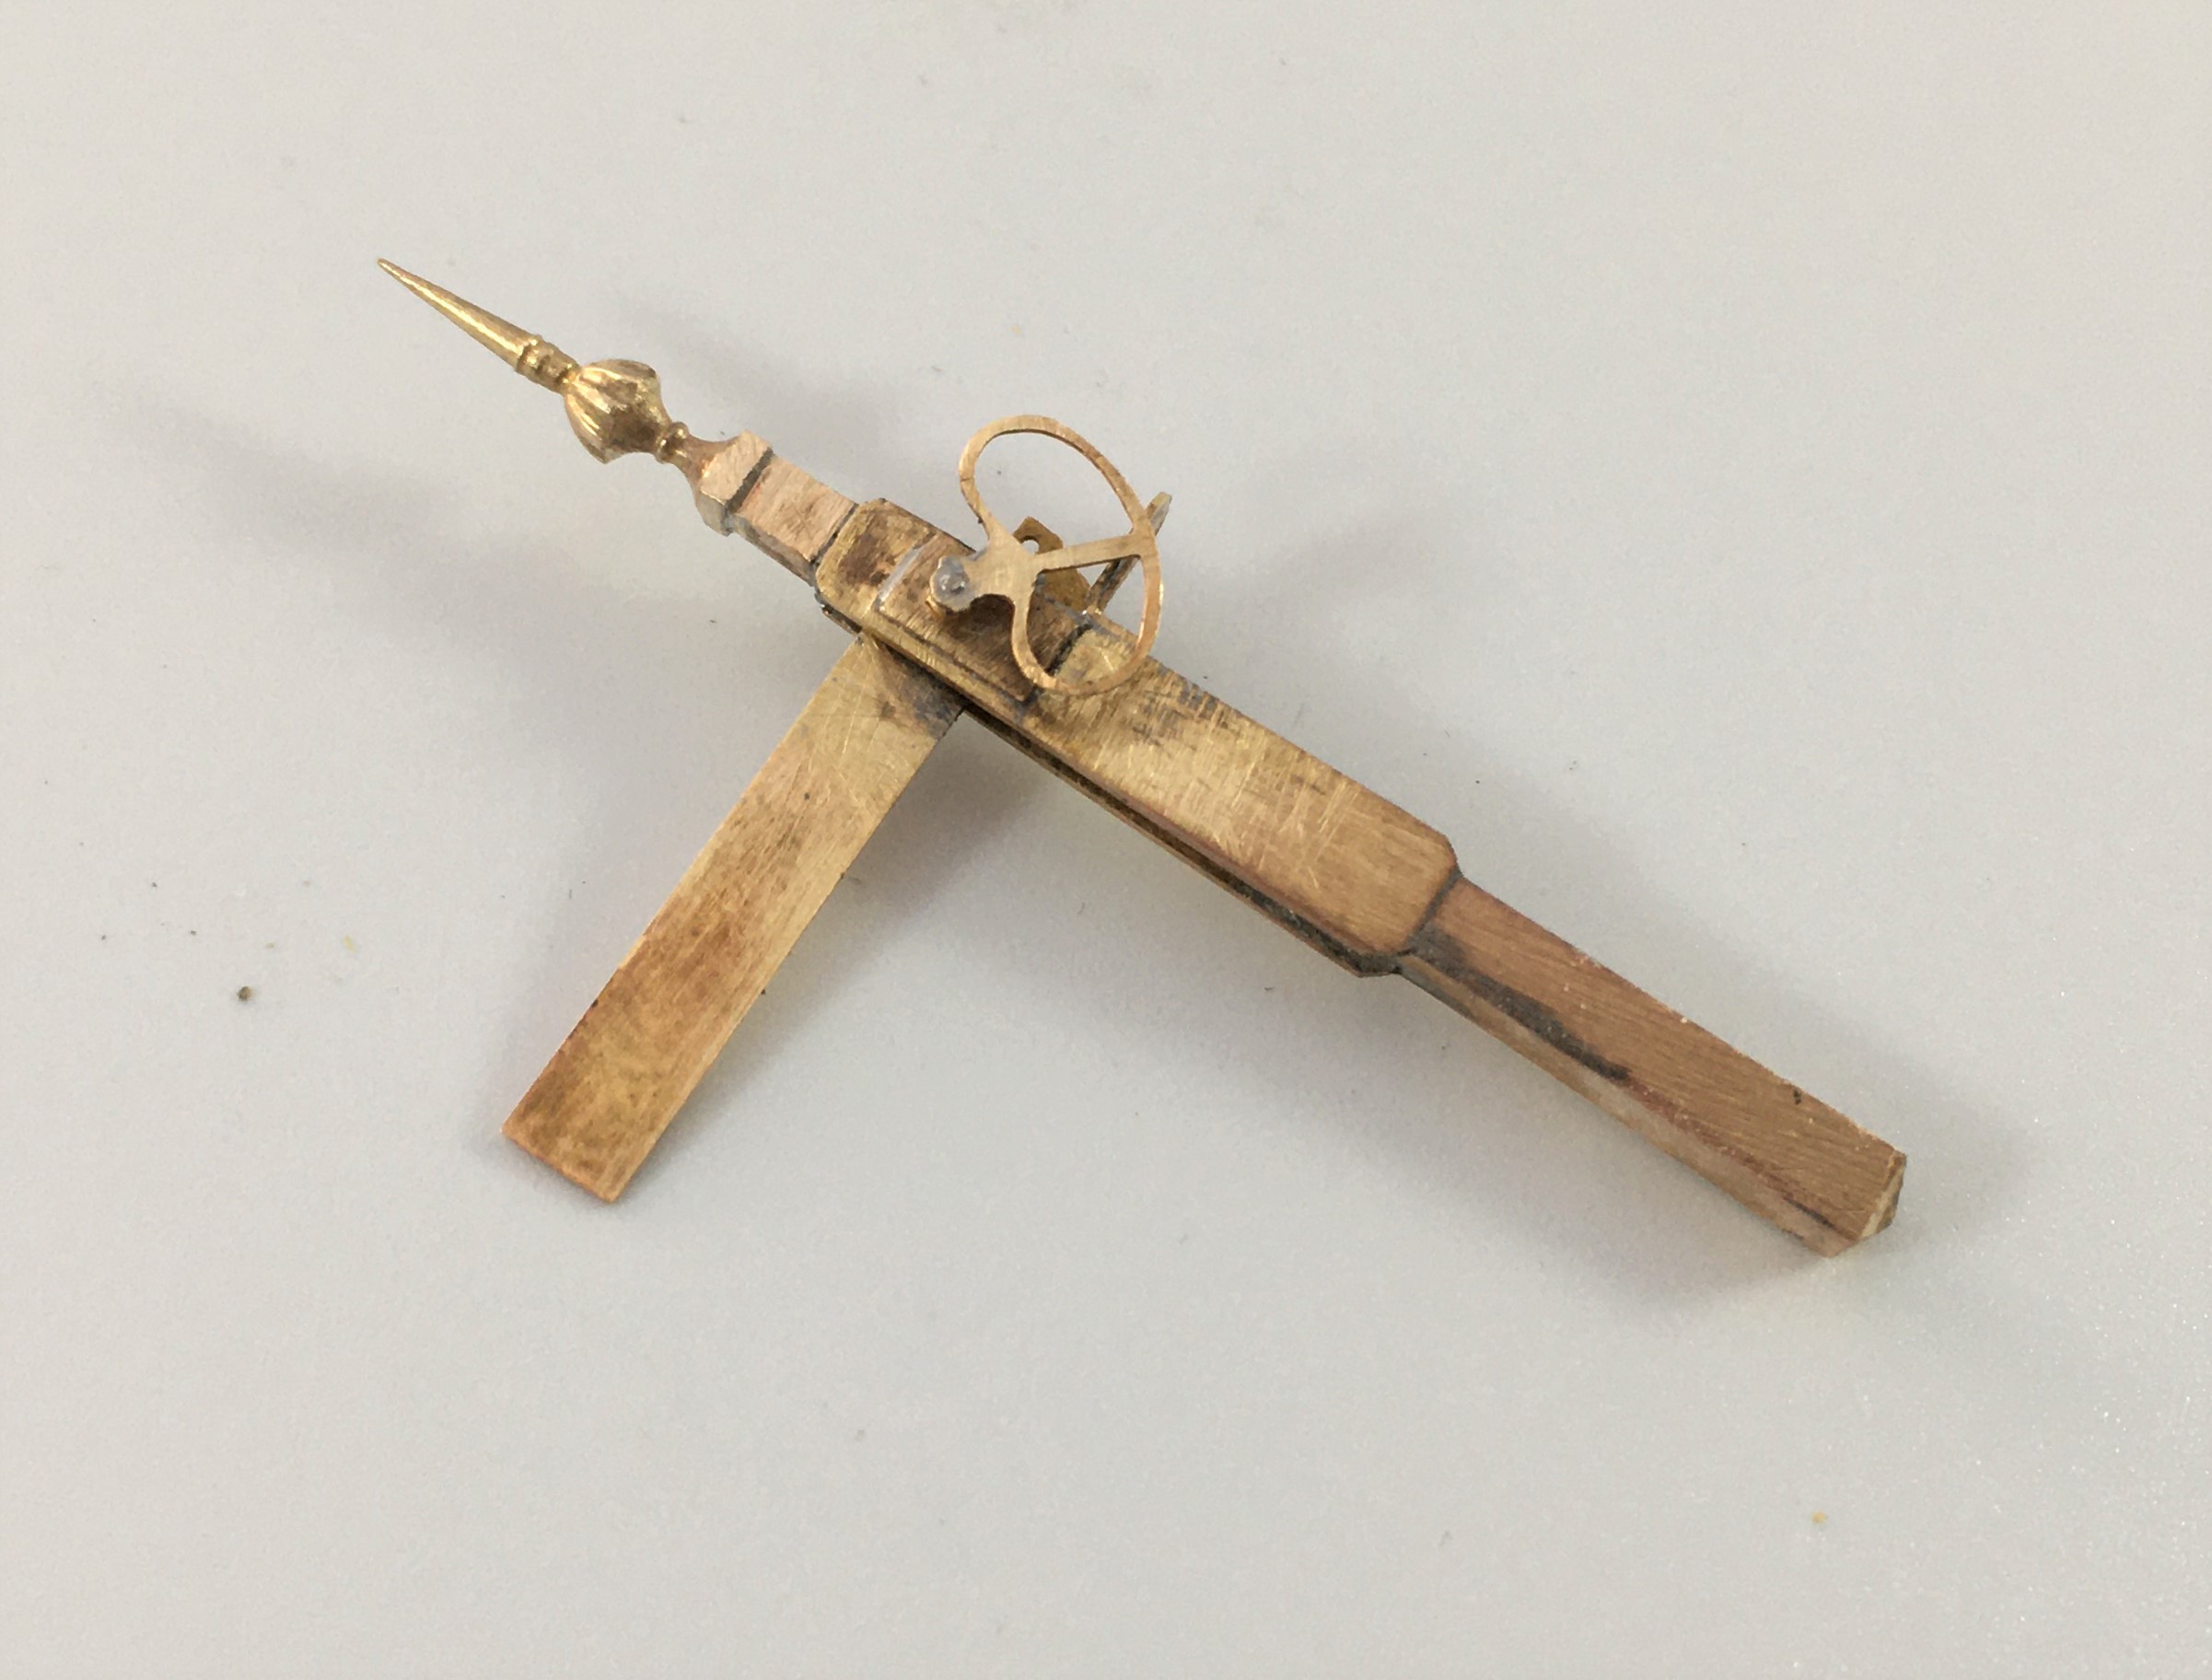
Temporarily mounting the second plate enables the hole for the arm spindle to be formed through both parts of the arm. The arm was now attached to the spindle with more use of the 296o solder and the use of a couple of minature washers either side of the arm so that I could be confident that the joint would hold.
Releasing the second plate now allows the arm/spindle assembly to be inserted and any adjustments made to ensure that it can move freely in the slot by securing the second plate in place with a 14 BA nut. The nuts and bolts are scarificed in the build by leaving them in place for the next step because once I was happy that it was correct I soldered the second plate in place including the nuts and bolts. This time I used 145o solder which meant that it would not disturb the first plate as I was doing this and this is what it then looks like – a slotted post with an arm within that is firmly attached to its spindle!
More to follow; including the second piece of bartering that I know someone is looking out for progress on!

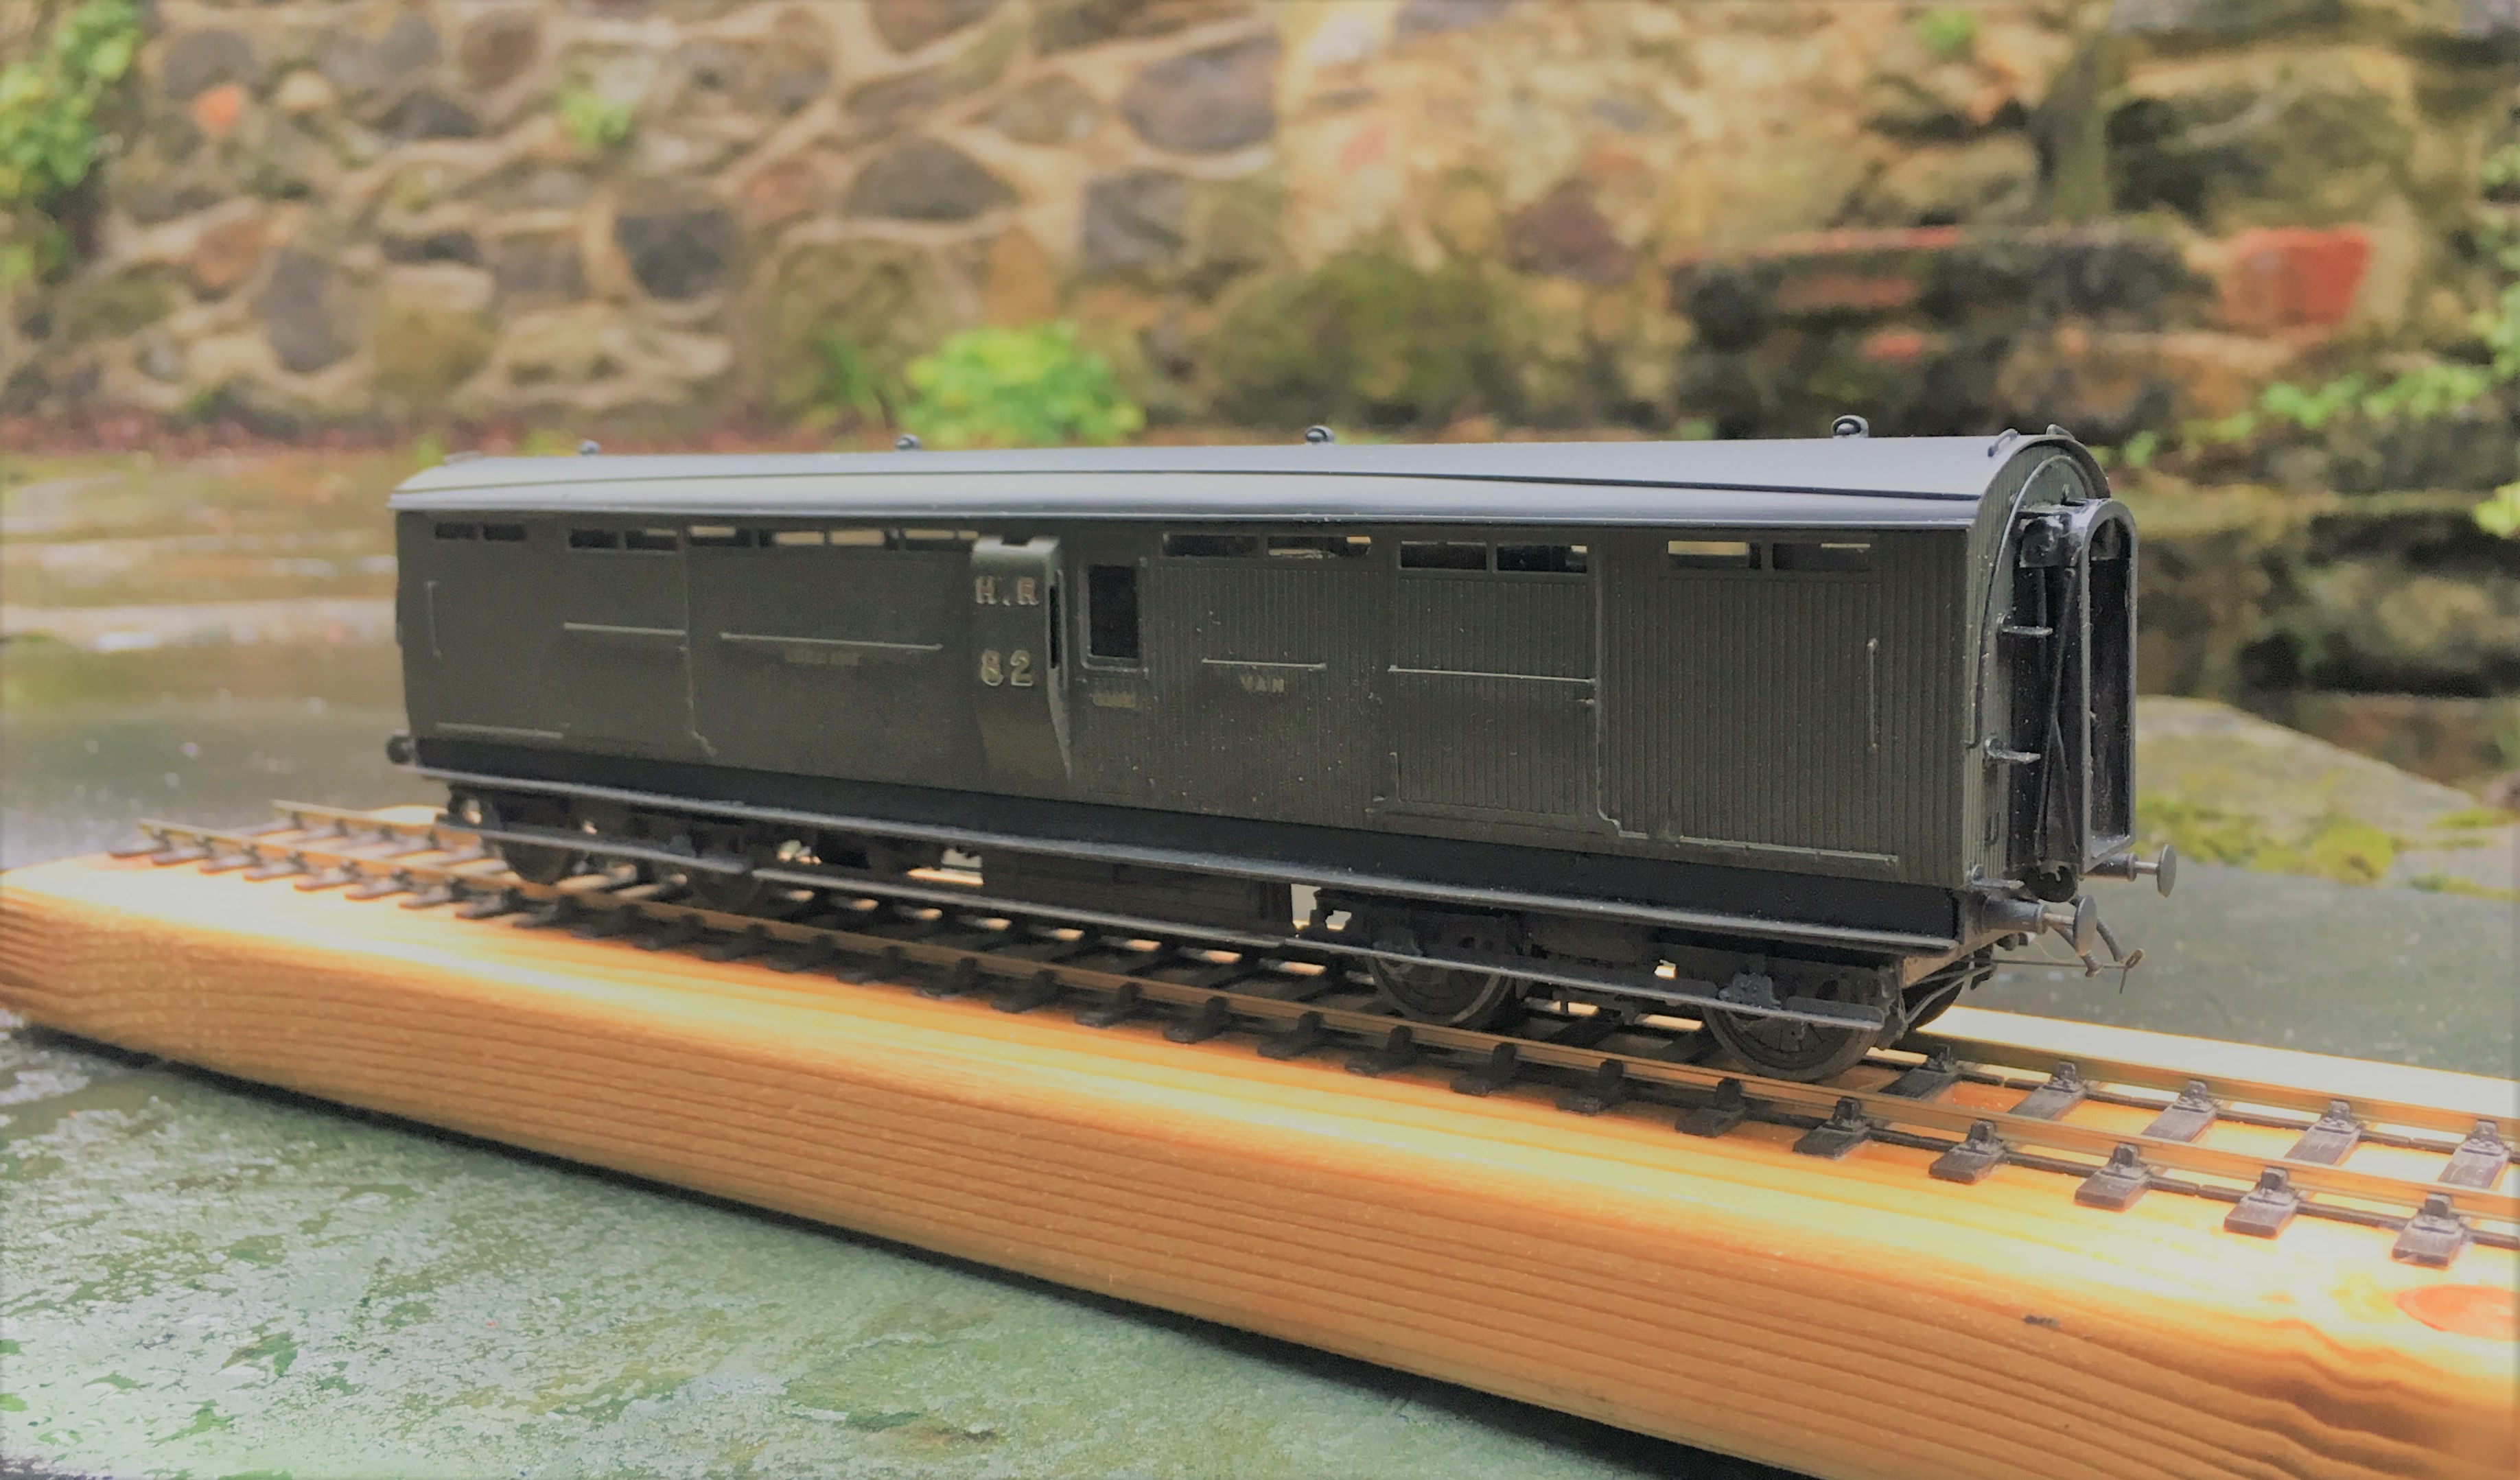
Benfieldside’s Missing Signal
When my friends acquired Benfieldside, it had suffered a bit of damage, notably to its signals – in essence it was this that got me volunteered for their restoration! One signal that puzzled us, however, was the up starter which was missing altogether and we could not unearth any photographs of it. Ultimately, we decided that it should be a two doll signal to also control the adjacent bay (which did have a signal, albeit inoperative) – so I have set to in order to fill this gap.
The line is set in Cumbria and is an imaginary westward extension of the Newcastle & Carlise line. In theory, therefore, it should not have the heavy cast iron brackets that the NER used. However, in reviewing the NERA’s signalling book, it became apparent that there were quite a lot of strays of signal designs, so I had an excuse to build one!

As this particular signal is going to be platform mounted, I did not need to sort out a mount for it and moved straight to the post and bracket, the latter being by MSE which I had in stock.
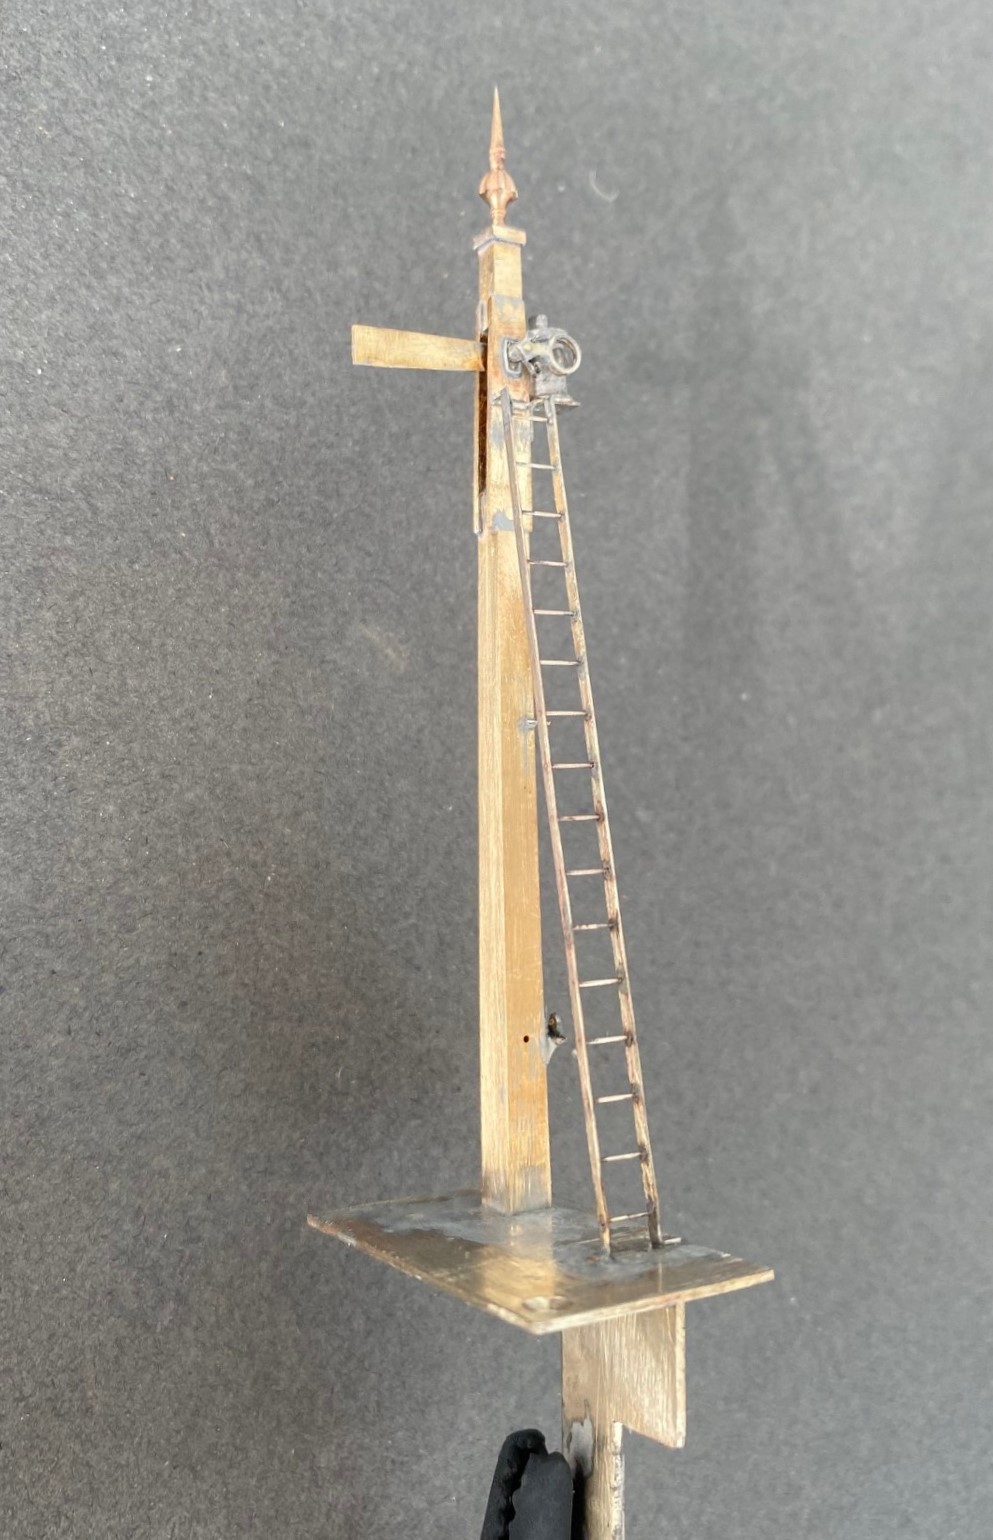
I then moved on to the prefabrication of a pair of dolls, each with slotted posts. This is made up of solid square section filed to a taper which is then cut and each end then has a tongue filed on it onto which flat plate is soldered either side to create the slots. I used a variety of temperature solders to ease this process but it was not easy – I did have one gum solid which resulted in a need to dismantle it and start again! As alluded to in the previous post, as these are slotted posts I had to depart from my usual practise of fitting the arms after painting as it is not otherwise possible to solder them to the spindle for the arm.
As mentioned in the last post, I came up with a bit of a dodge to successfully (well, in two of three cases!) to solder the arm to the spindle without gumming it up. By extending the ear that forms the point at which the operating rod attaches to the arm forward a bit (see the line below), it provides a point at which the soldering iron can be touched. If you use a slight excess of solder this allows the heat to transmit to the spindle and make the soldered joint.
And this is what you get with a prefabricated doll, ready for the next stage of assembly.
And below of the pair of dolls now inserted to the landing.
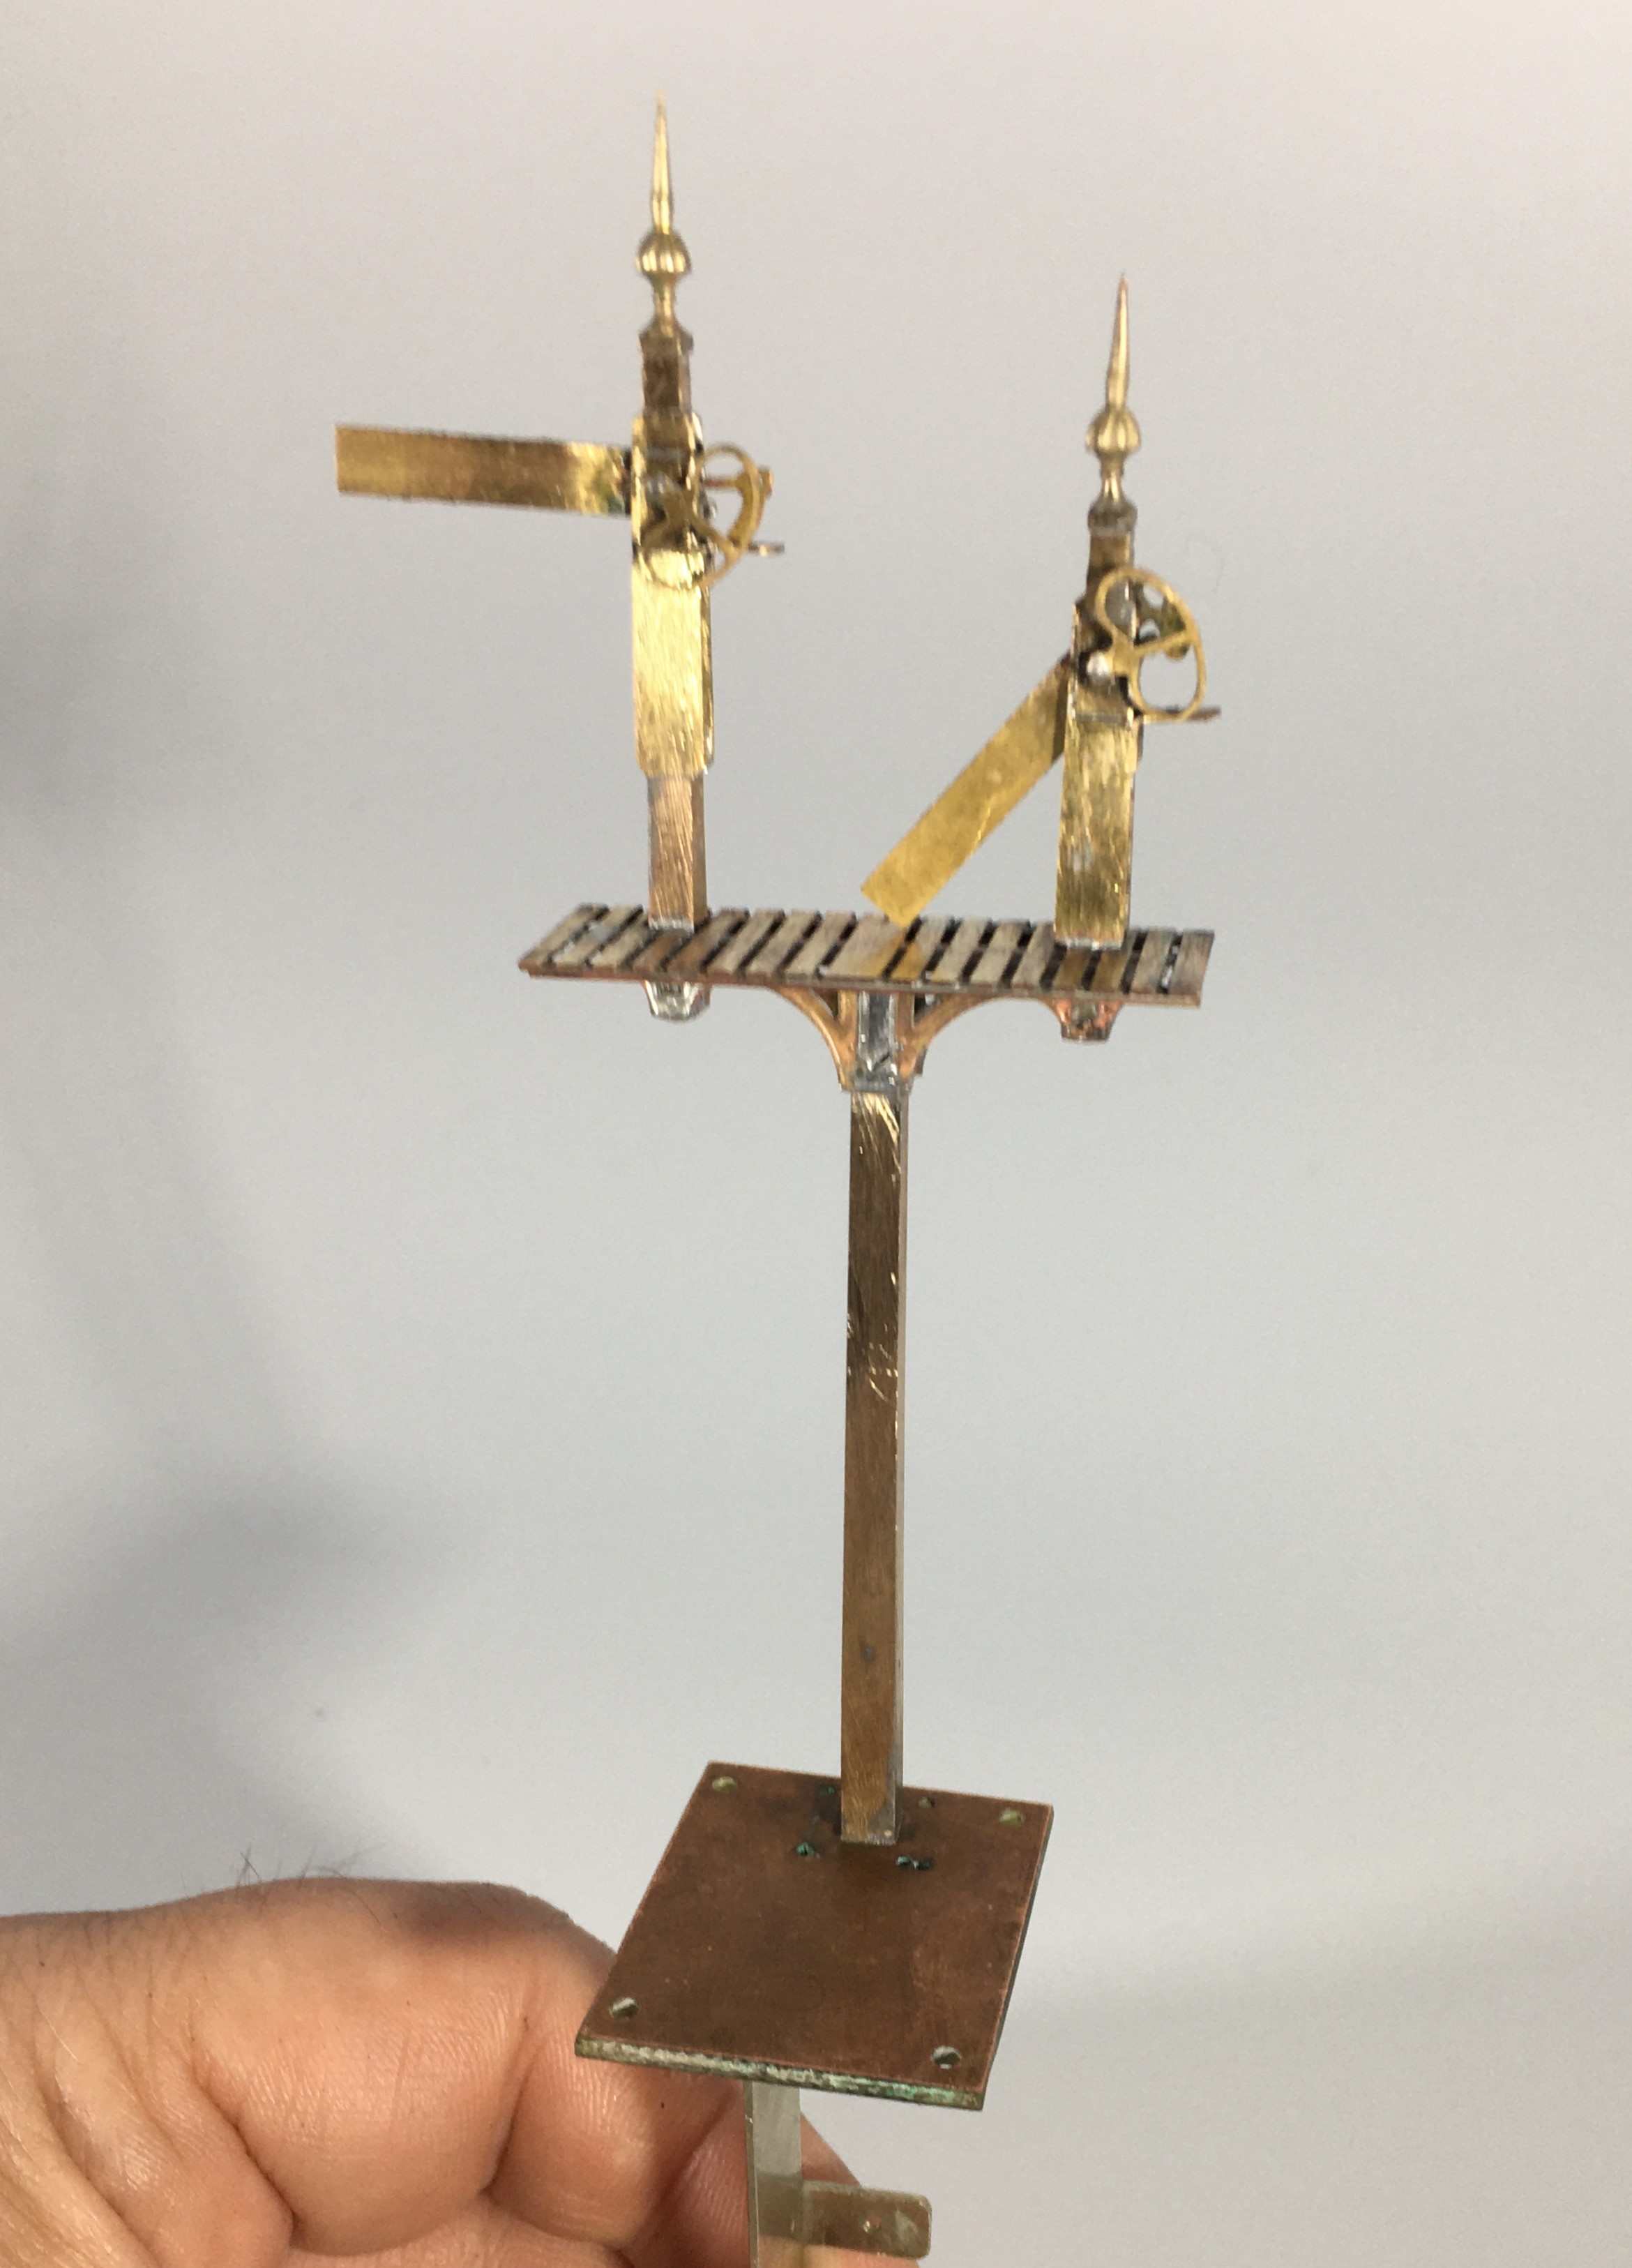
Even at this stage, there is still a lot of building to do as there are handrails, the main ladder, steps and ladders to the dolls, the operating mechanism transferring the movement to the dolls all to do. In respect of the latter(I used rocking cams in this case – you can just see the use of some handrail knobs as the bearings in the photos below, the cams will be fitted after painting.
Slightly peculiarly, the NER built their landings in front of the arms whereas all the other signals I have yet built have these in the rear (excepting gantries, which can be either or both!). This view shows this most clearly.
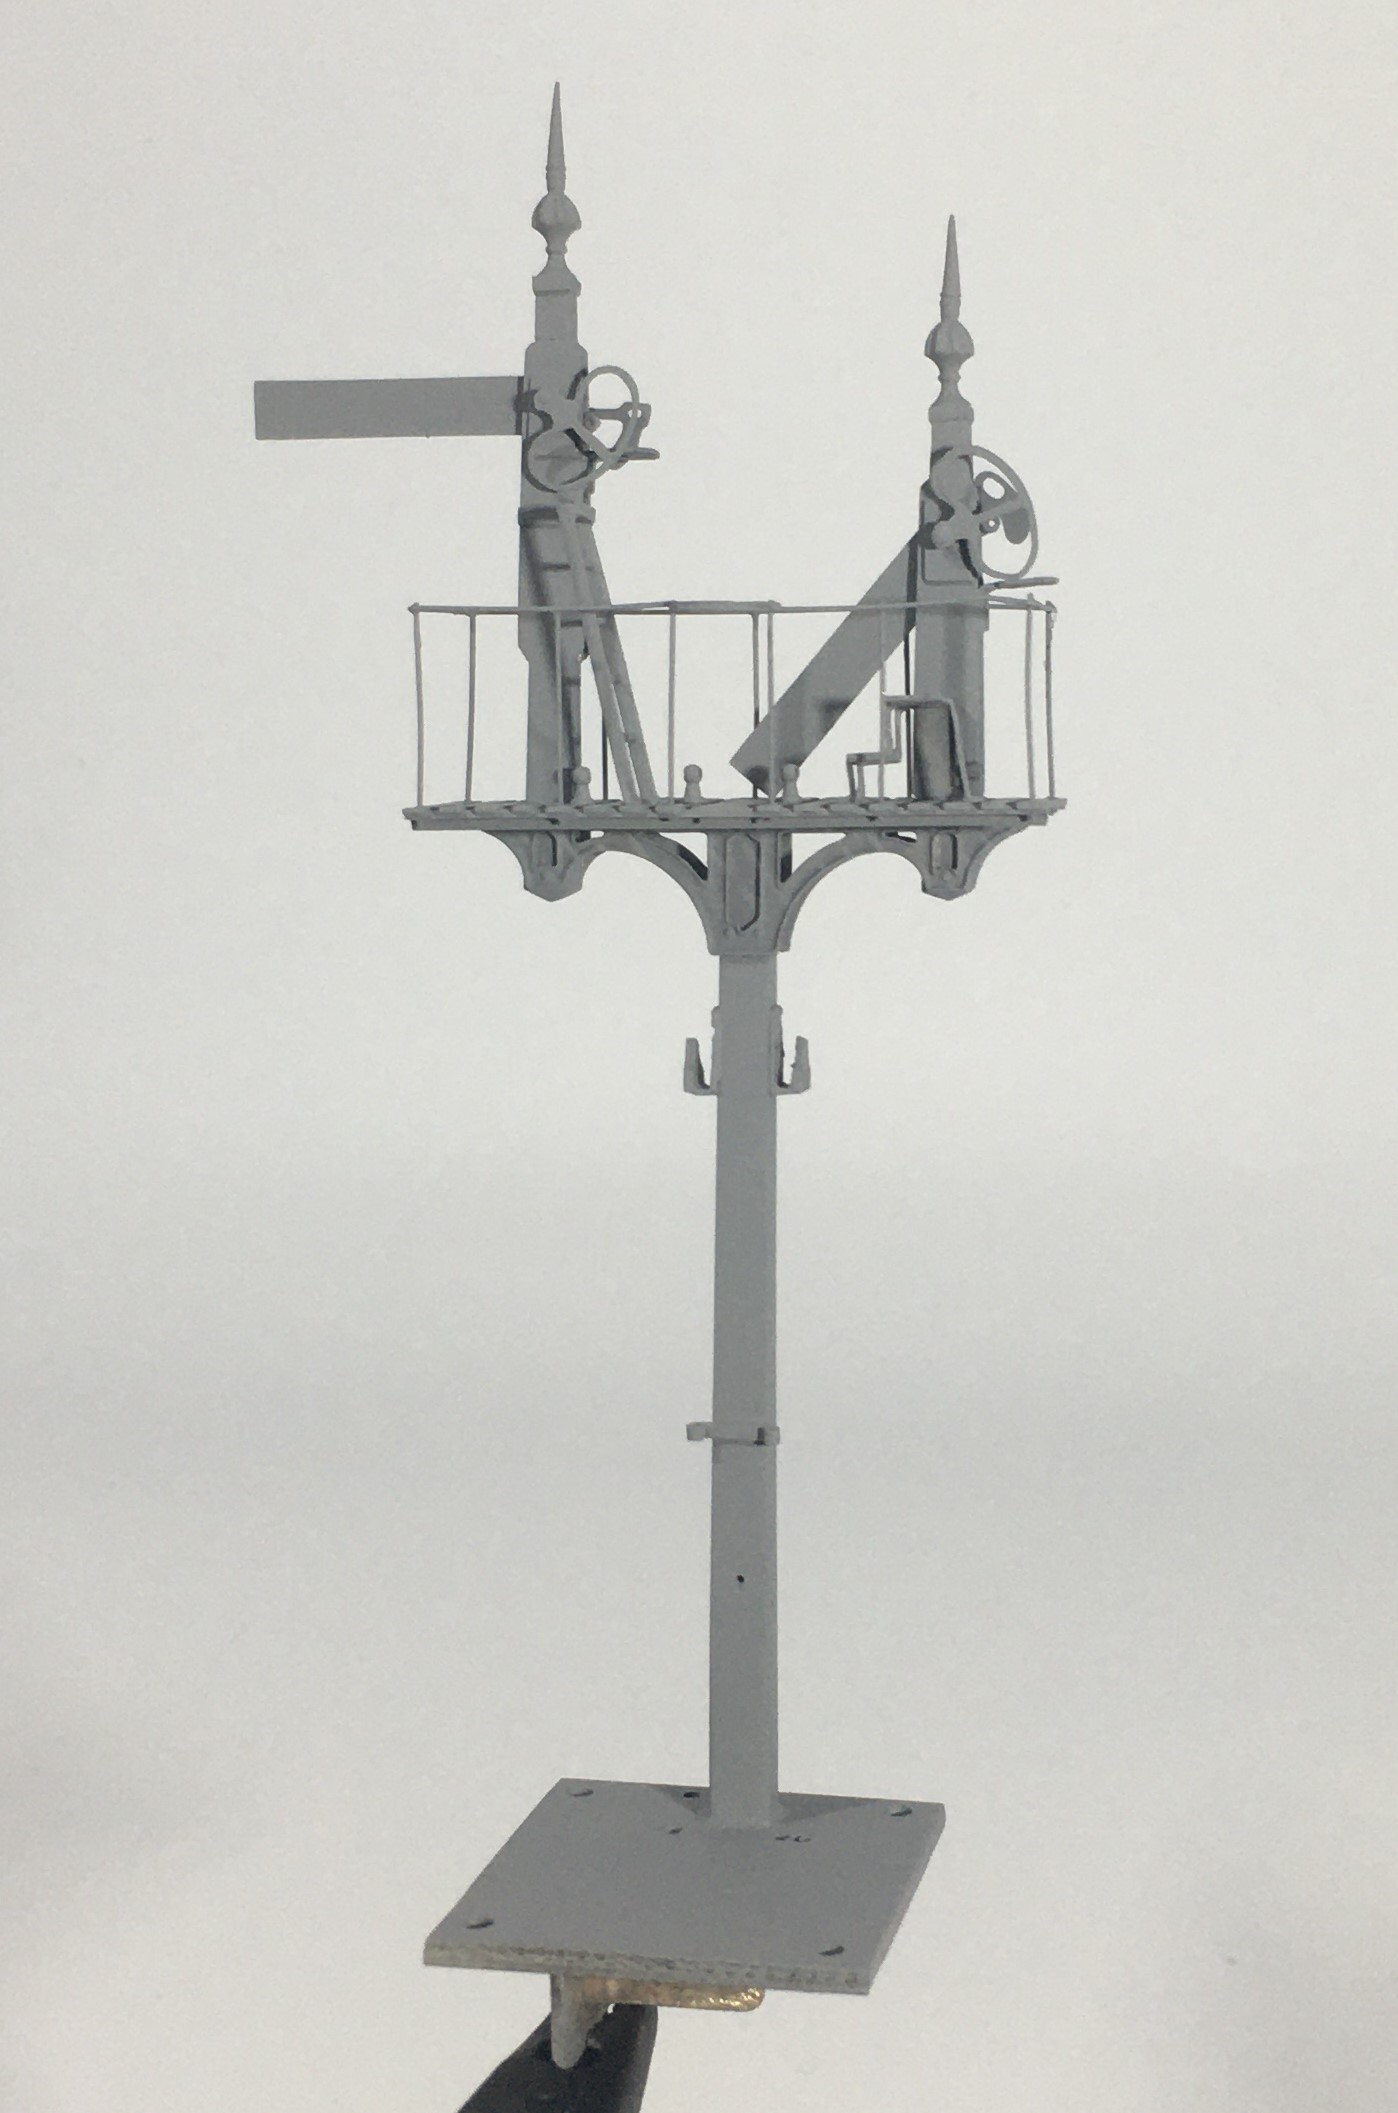
The main ladder is not visible in the views as I have made this detachable because it is much easier to spray paint these (and better, it is not easy to get a thin coat of paint by brush application and it thickens up the fine detail of a ladder too much.

The grey primer is pretty cruel to modelling efforts but on the whole, I am pretty chuffed with this!

Catching up on a Tennant
Way back in the mist of time (well 2016), I made a start on one of Arthur Kimber’s kits for a NER 2-4-0; termed a Tennant. After residing at the back of the cupboard for a bit too long (as is the way with my modelling, I do admire those that start something, see it neatly through to a finish before starting another……..!), I have made some more progress with it.
First up with the tender body which is close to finished except for some detailing around its front.
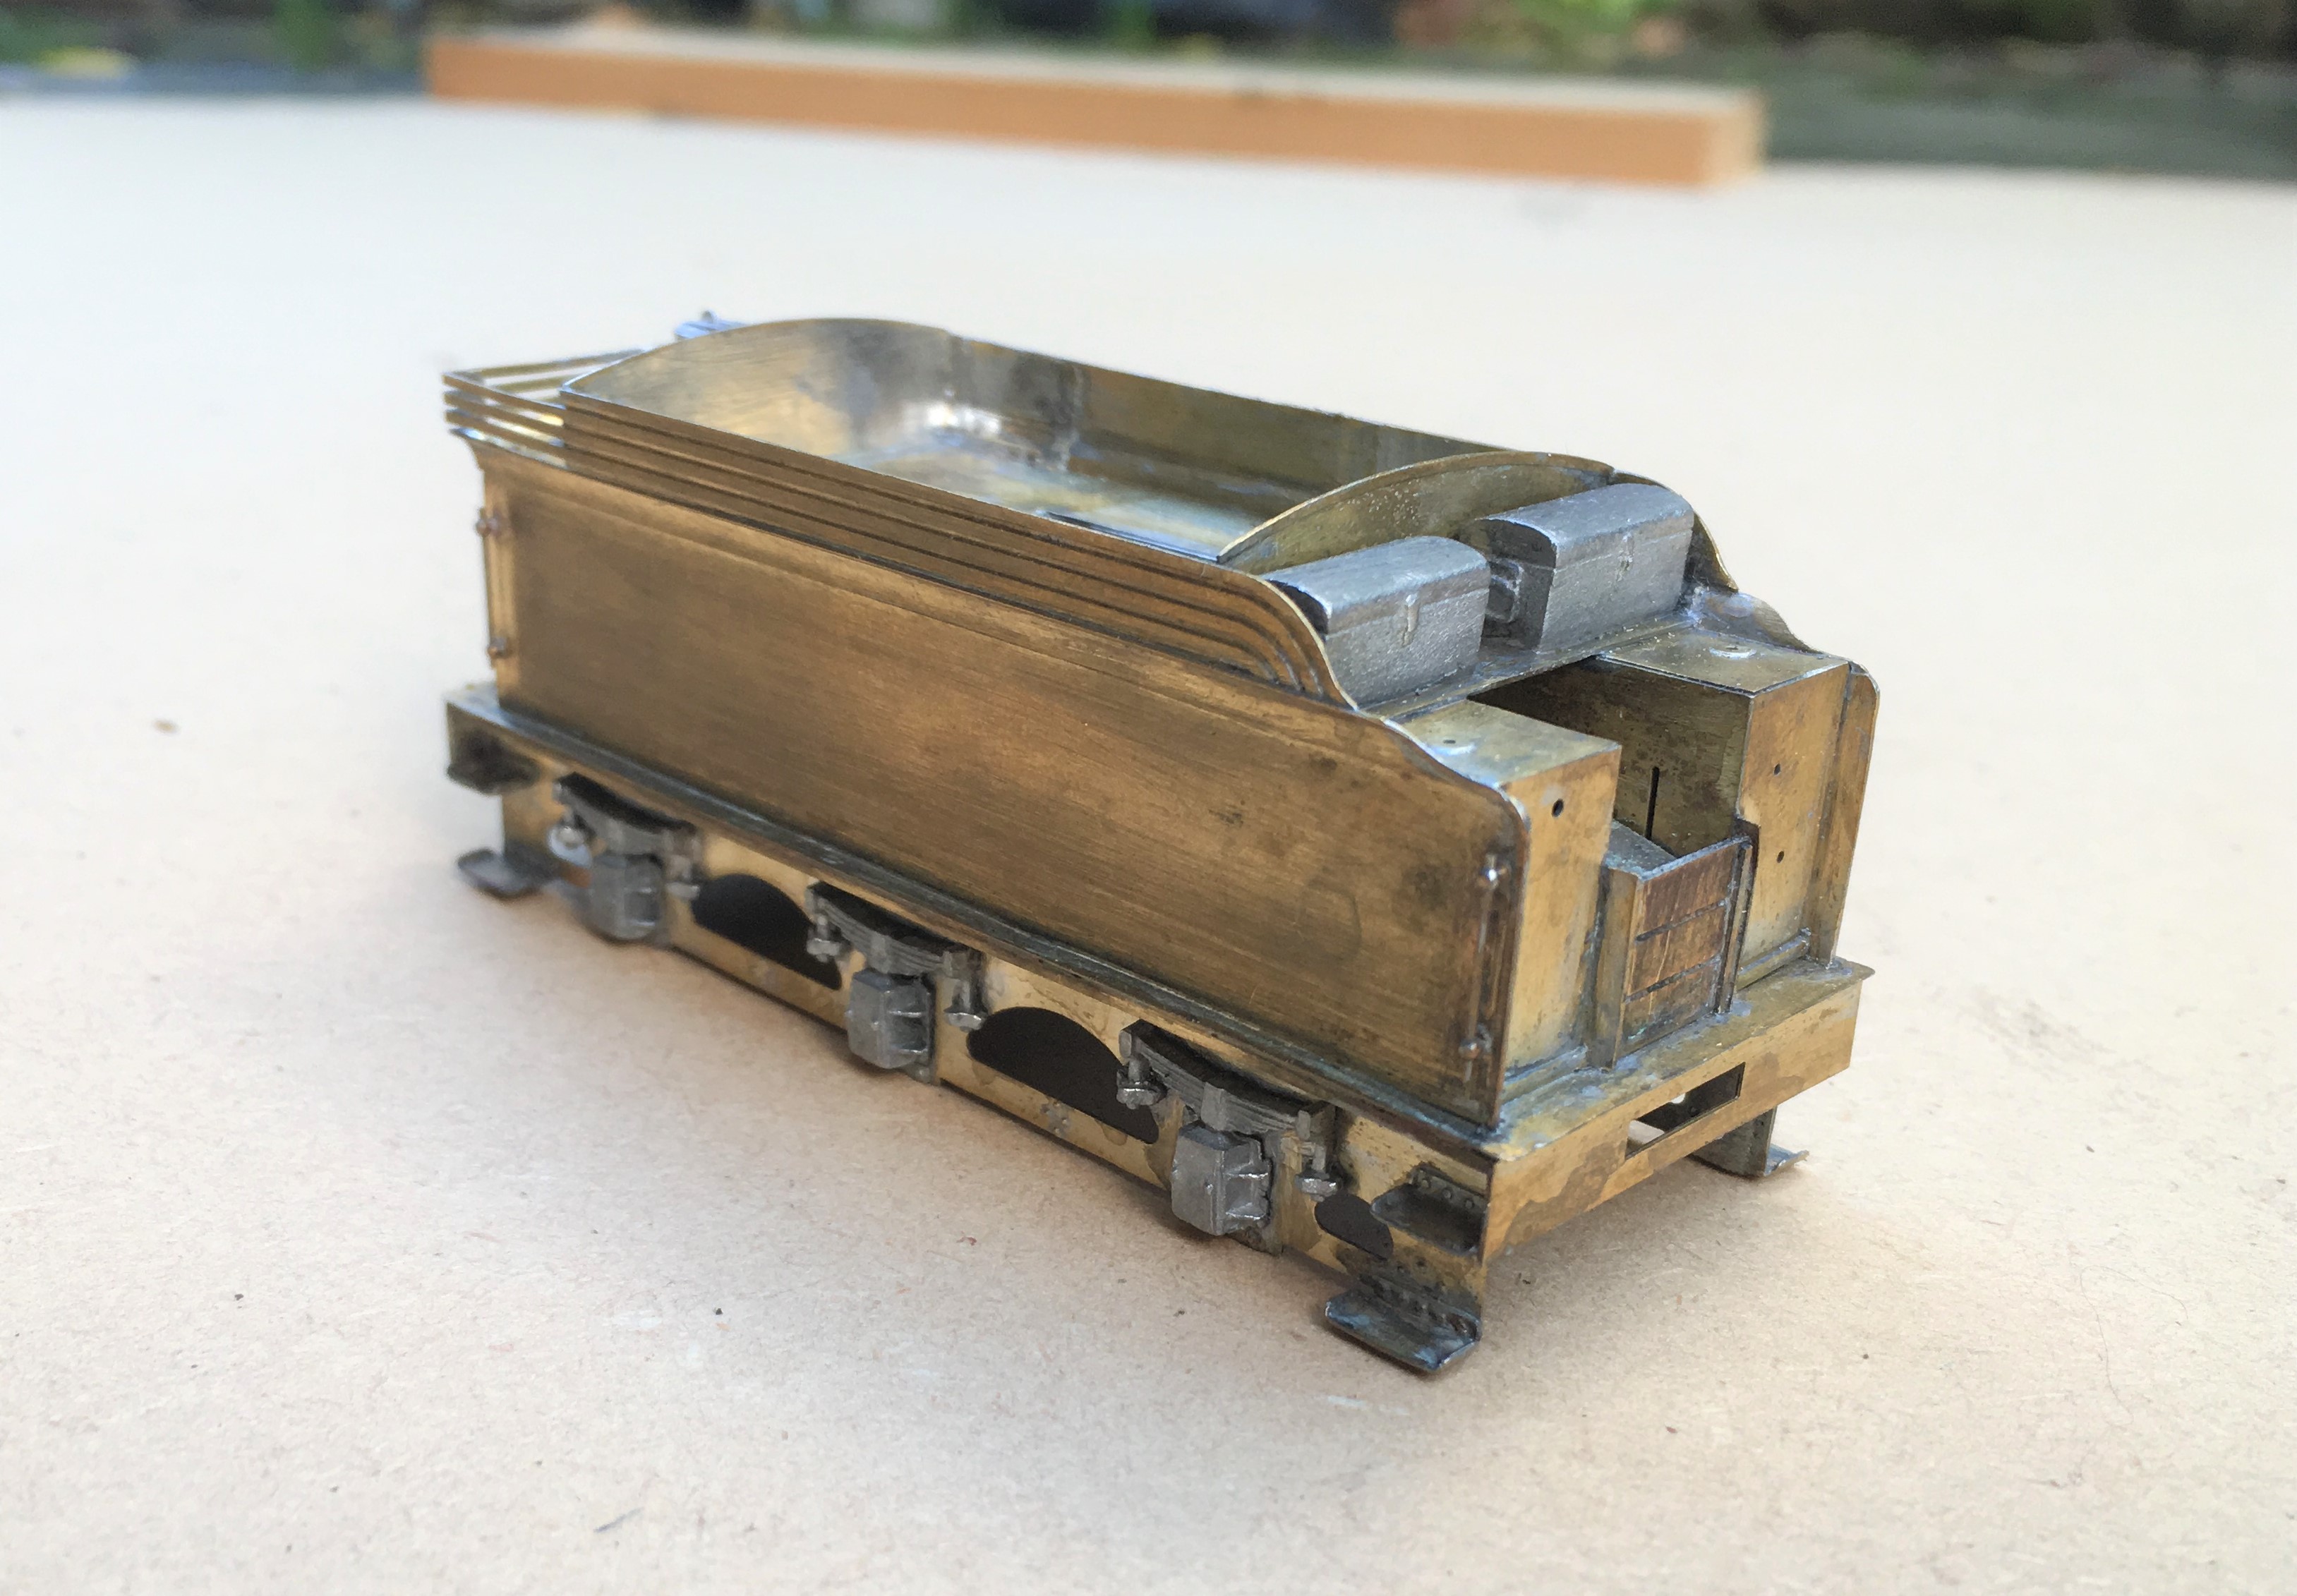
There was a bit of irritation in the building of this; despite being quite a modern kit the rear panel was much to narrow, the buffer beam a bit flimsy and there were some missing details around the front of the tender. Nothing someone raised on Jidenco’s kits can’t sort, but I rather hoped it wouldn’t happen with a modern design!
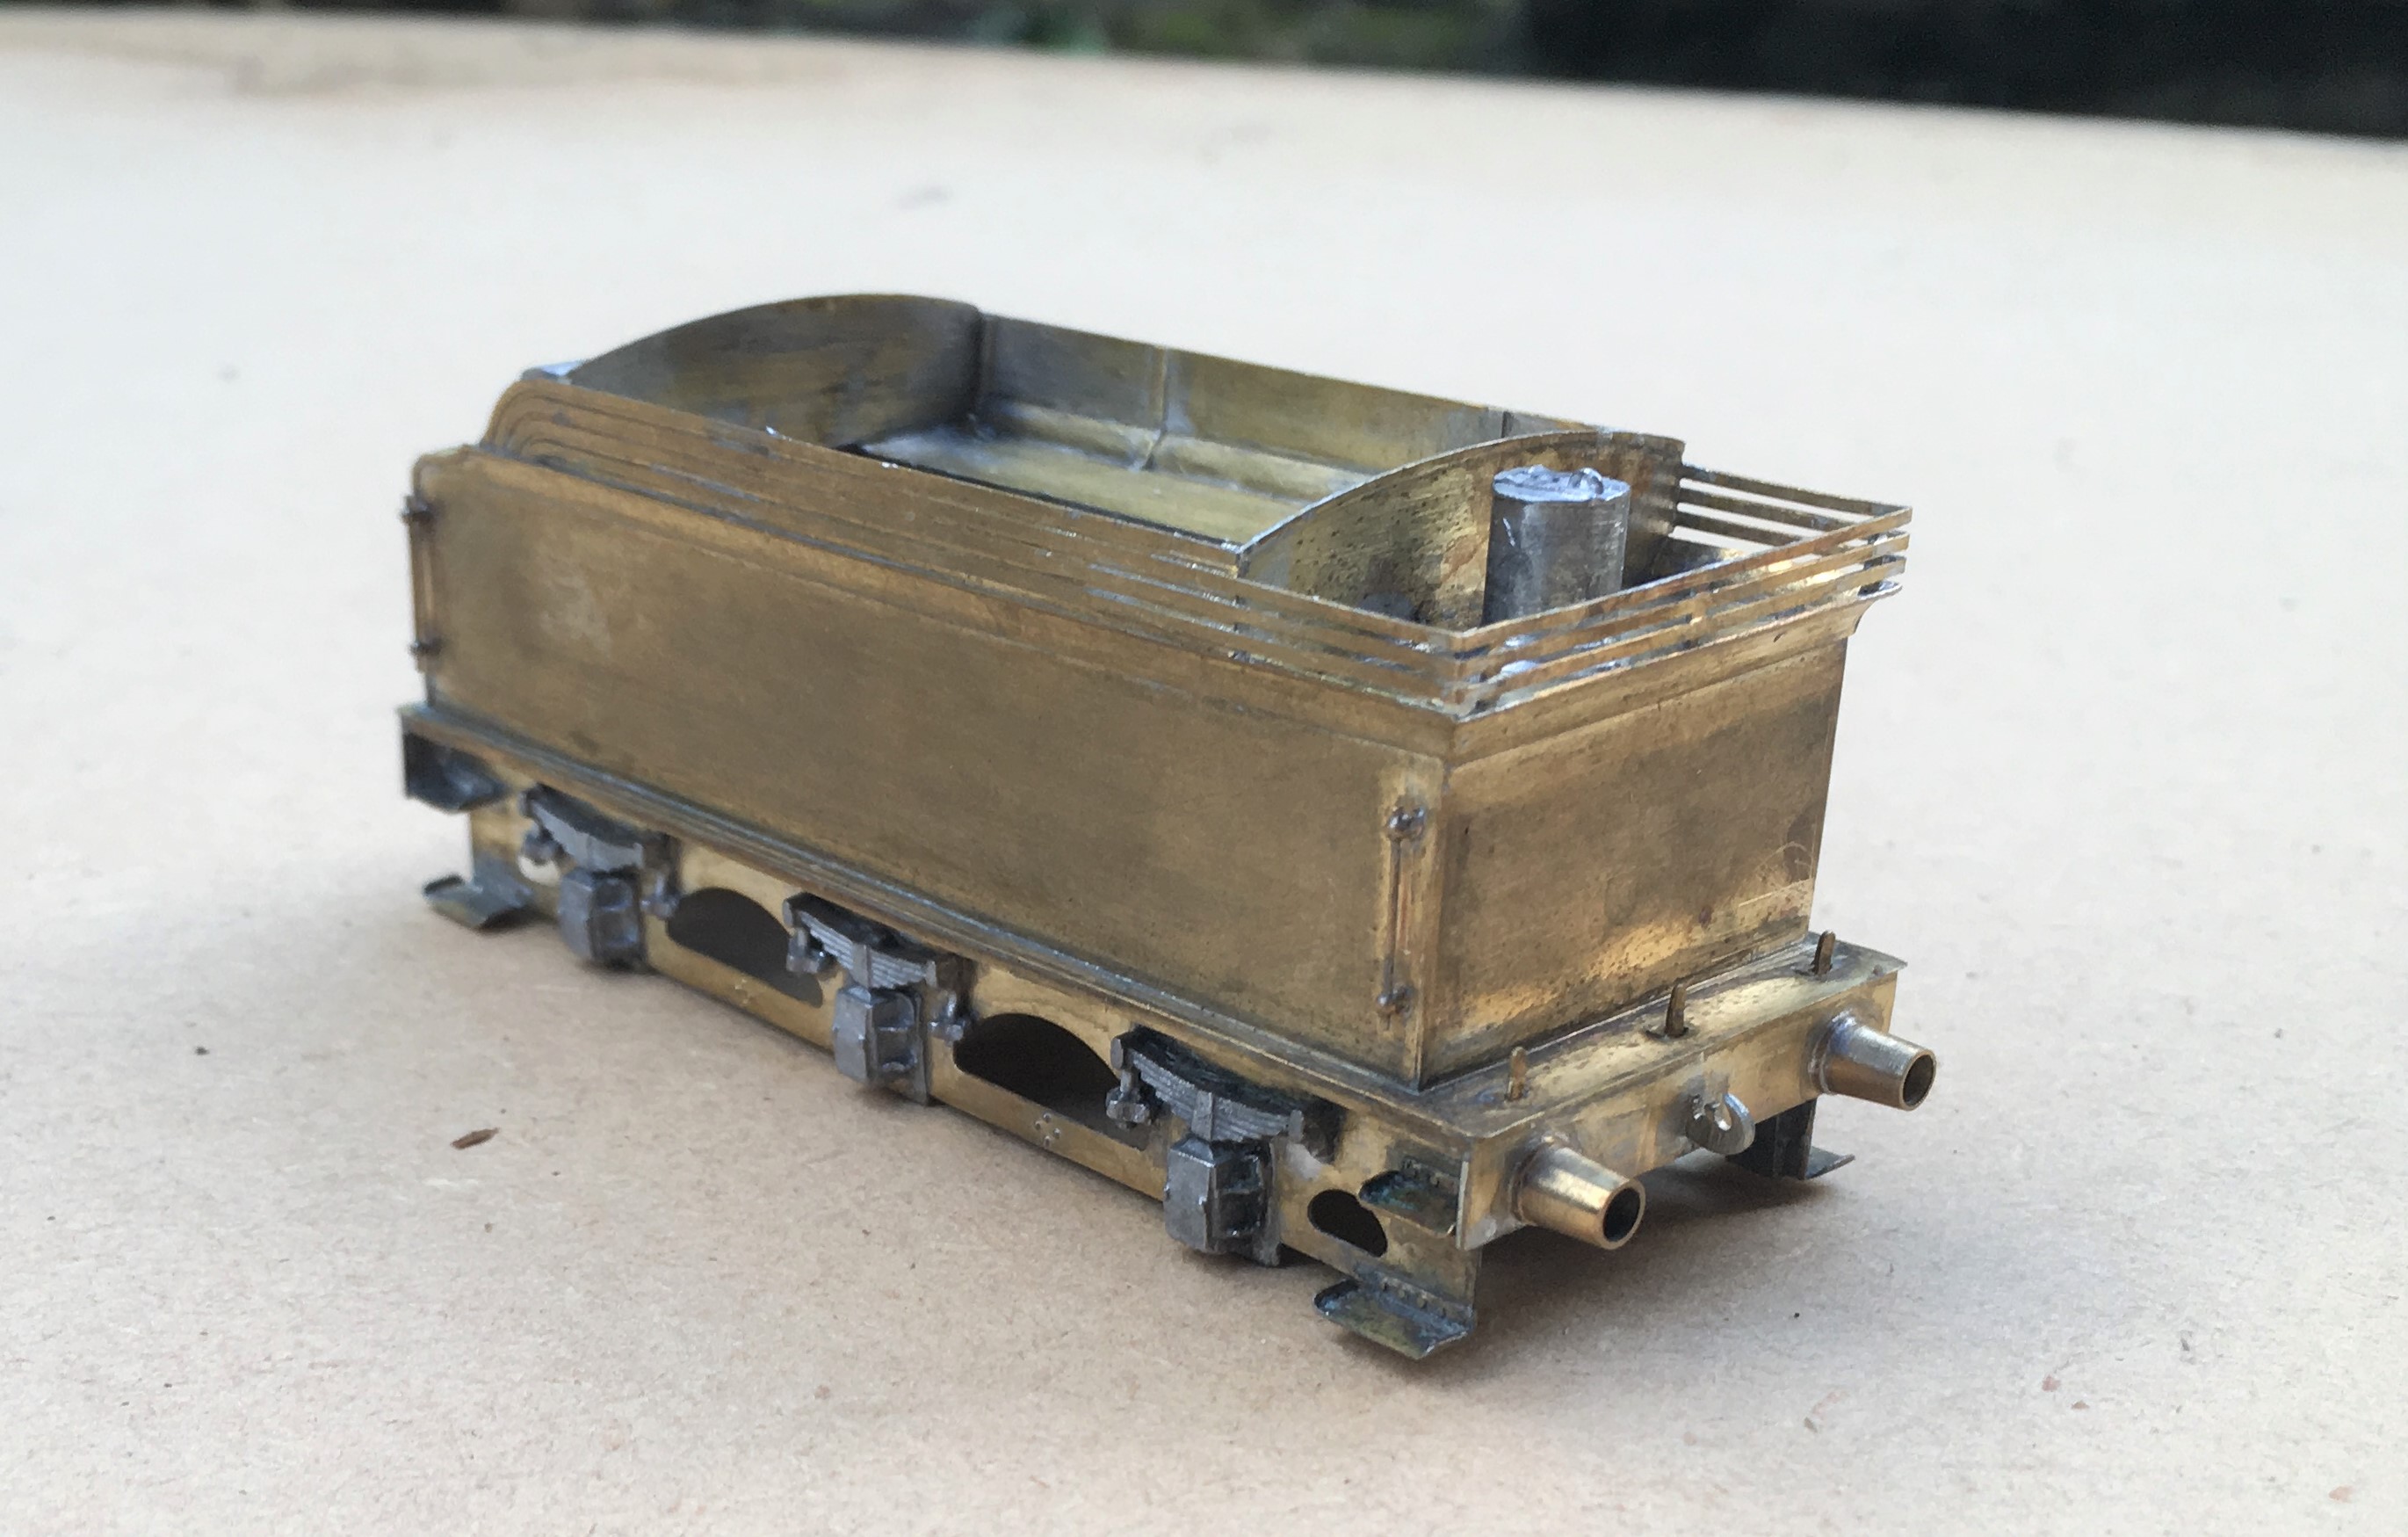
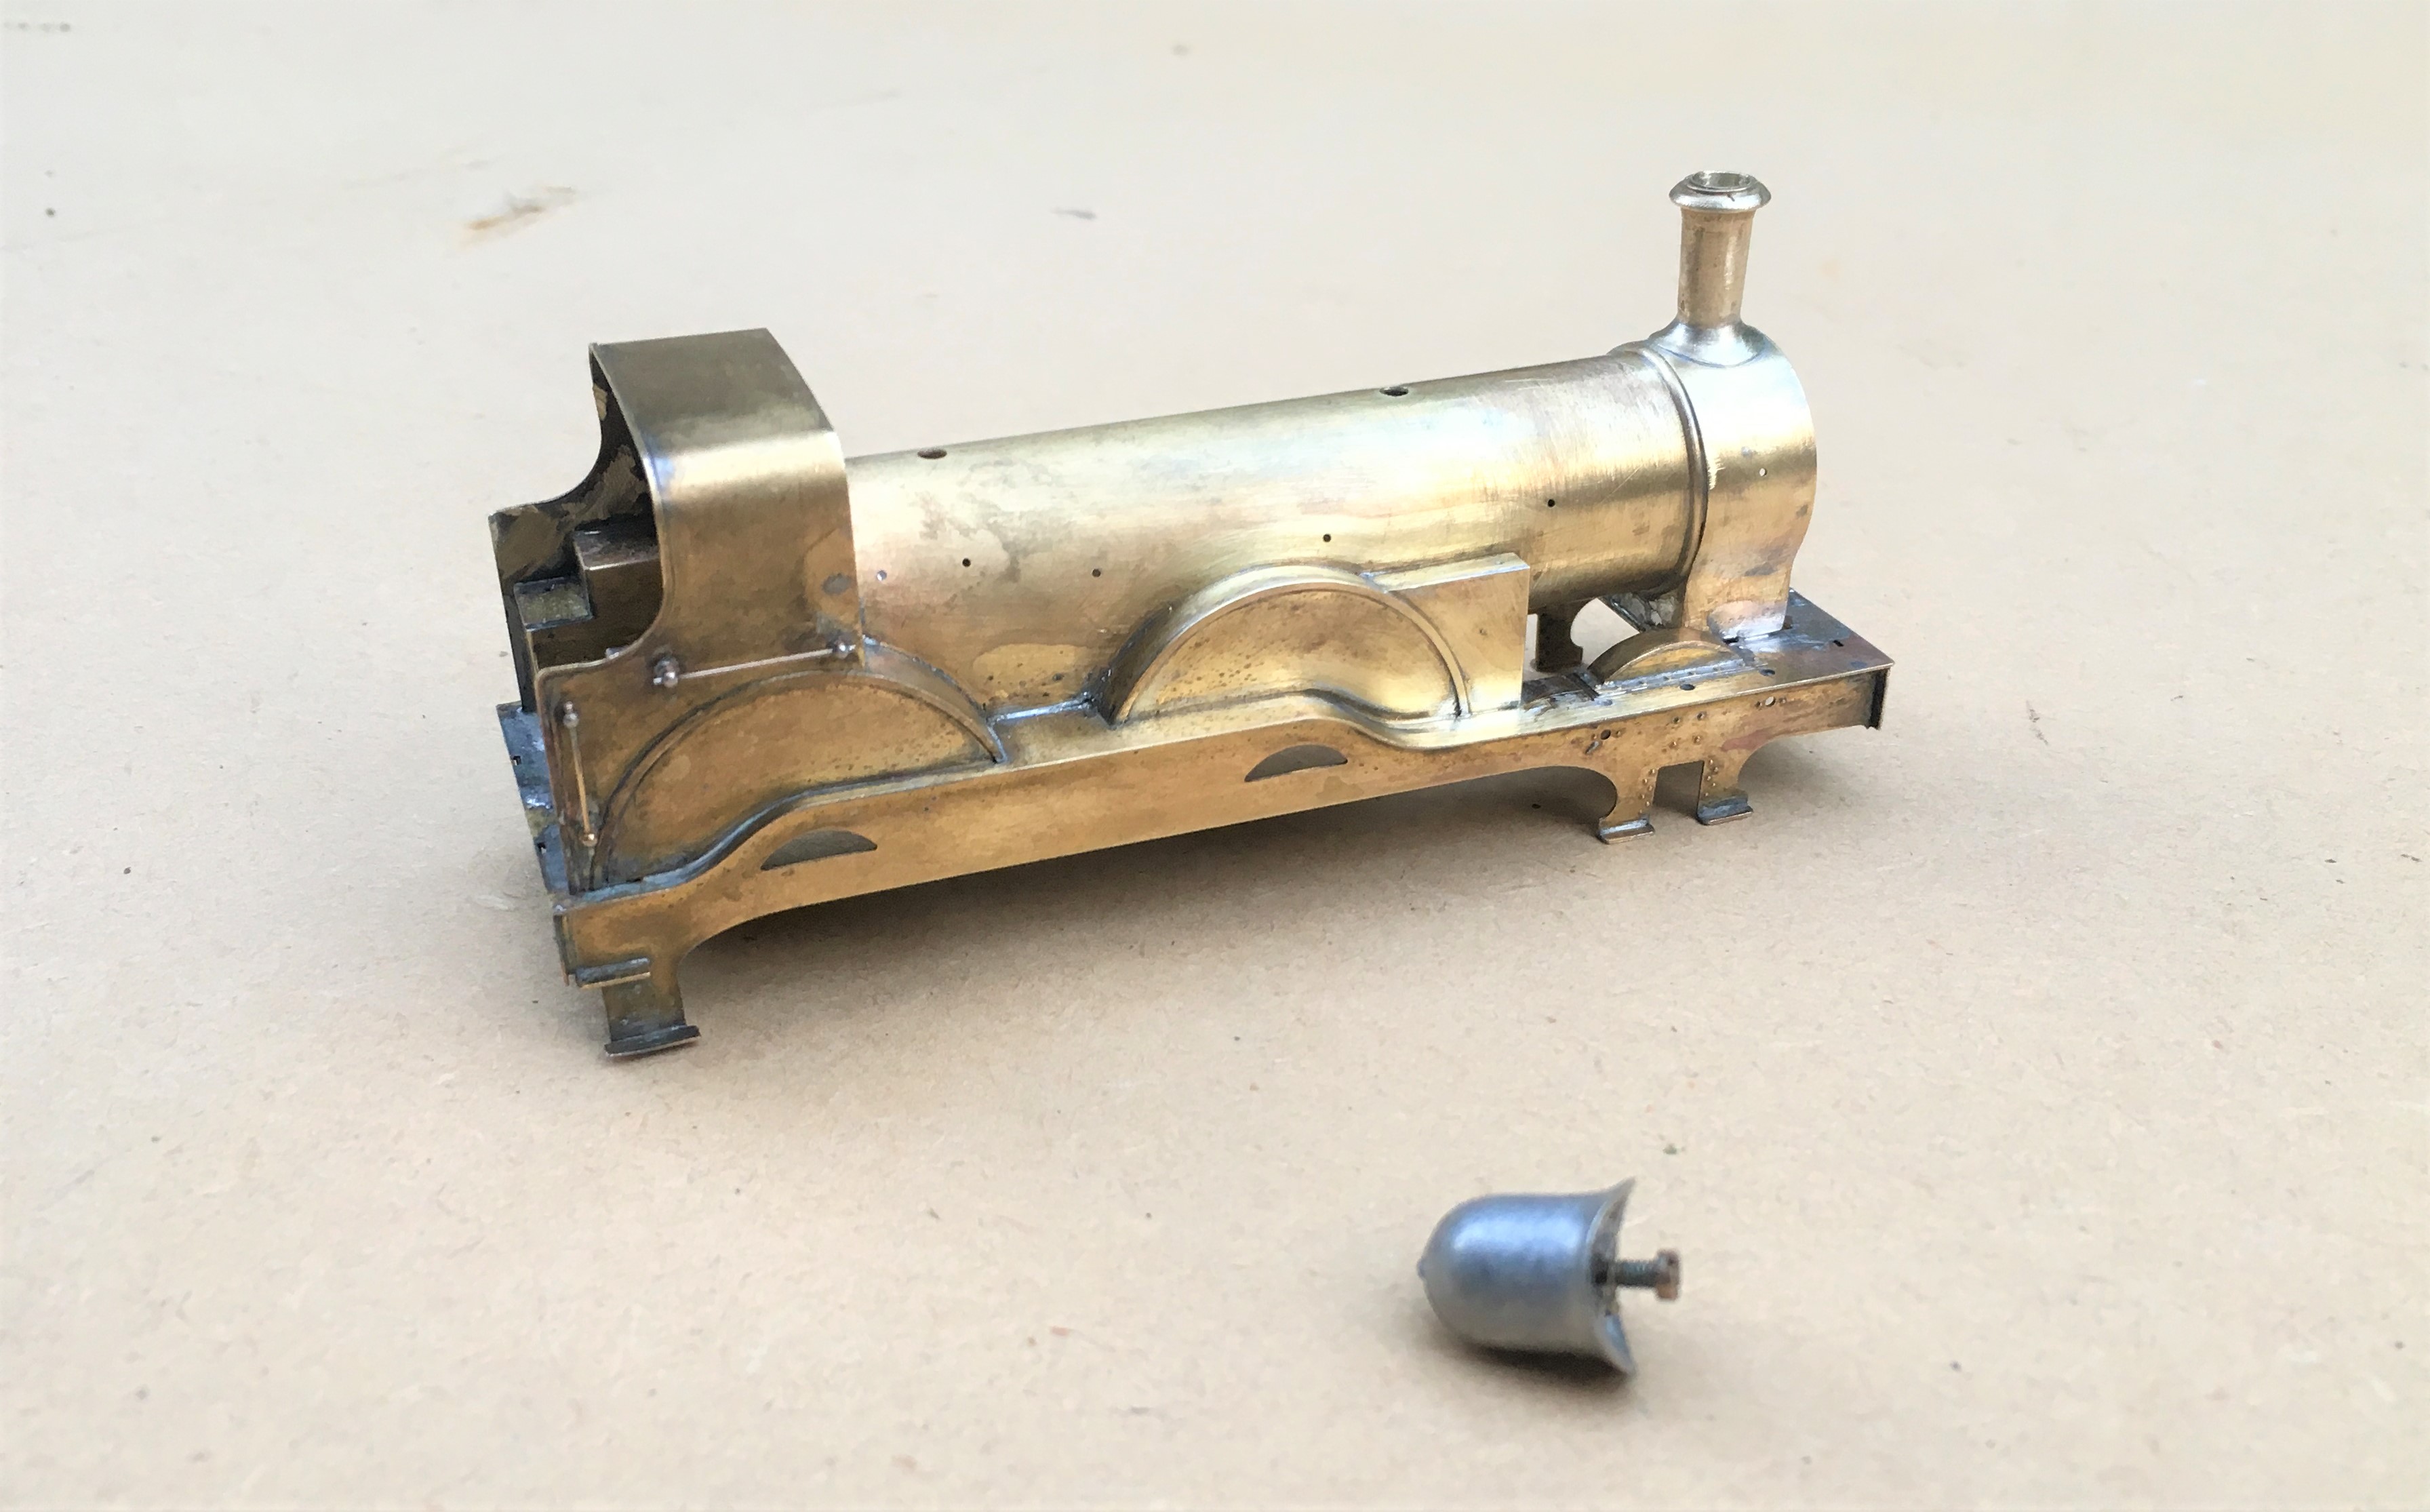
I also found that the boiler was about 0.7mm too long; a degree of filing and fettling has got it fitted. It is fair to say whilst there were these niggles, most of the rest of the kit is well designed and there are a number of neat facets to the kit, the flairs to the tender top for example are pre-rolled and they are very difficult to form without the right presses.

Here she is with the boiler now fitted and the first of the boiler fittings being attached. Something that grates with me on many people’s models is where these do not sit down tightly on the boiler or have overly thick flanges onto the boiler. Given that these are castings, it is understandable that these sometimes happen but they do damage the reality of the model and it pays to address these issues. For this reason, I prefer to solder them in place and am prepared to attack them with a file both before and after they have been fitted.
This does create a problem of soldering the parts in place; they are quite chunky so need a lot of heat to solder them in place and it is difficult to move them about to get them in the right place when they are so hot. I have just started to address this by drilling out the base of the boiler fitting and tapping it to take a 10BA bolt + washer. This allows the the fitting to be moved about until it is in the right place and held tight with the bolt so that it can then be soldered. I am pleased with this little trick; it definitely repays the effort and for the white metal castings, saves the risk of returning them to a blob of metal with too much heat!
One example of a Tennant is preserved, being situated at the Head of Steam Museum at North Road Darlington Station. This has enabled me to take a good number of detailed shots but they are all rather close up they don’t really capture the prototype; so here is one from Neil Dimmer’s collection from the earlish 1920s, at (I think) York. The thin nature of the flanges to the dome and chimney I comment on above can be seen in this.
![[IMG]](https://photos.smugmug.com/LNERSteam/1884-NER-Henry-Tennant/Tennant-E5-NER-1463-2-4-0-Locomotives/i-L5bsMX9/1/794c2272/XL/1463%20Tennant%20E5%20%28NER%20%271463%27%29%202-4-0%20Locomotives-XL.jpg)
This view also illustrates how thin the boiler bands are. Given that this will be painted in NER livery that has lining on the boiler bands I am going to rely on the thickness of the lining transfer to give the impression of the boiler band rather than represent them in metal.

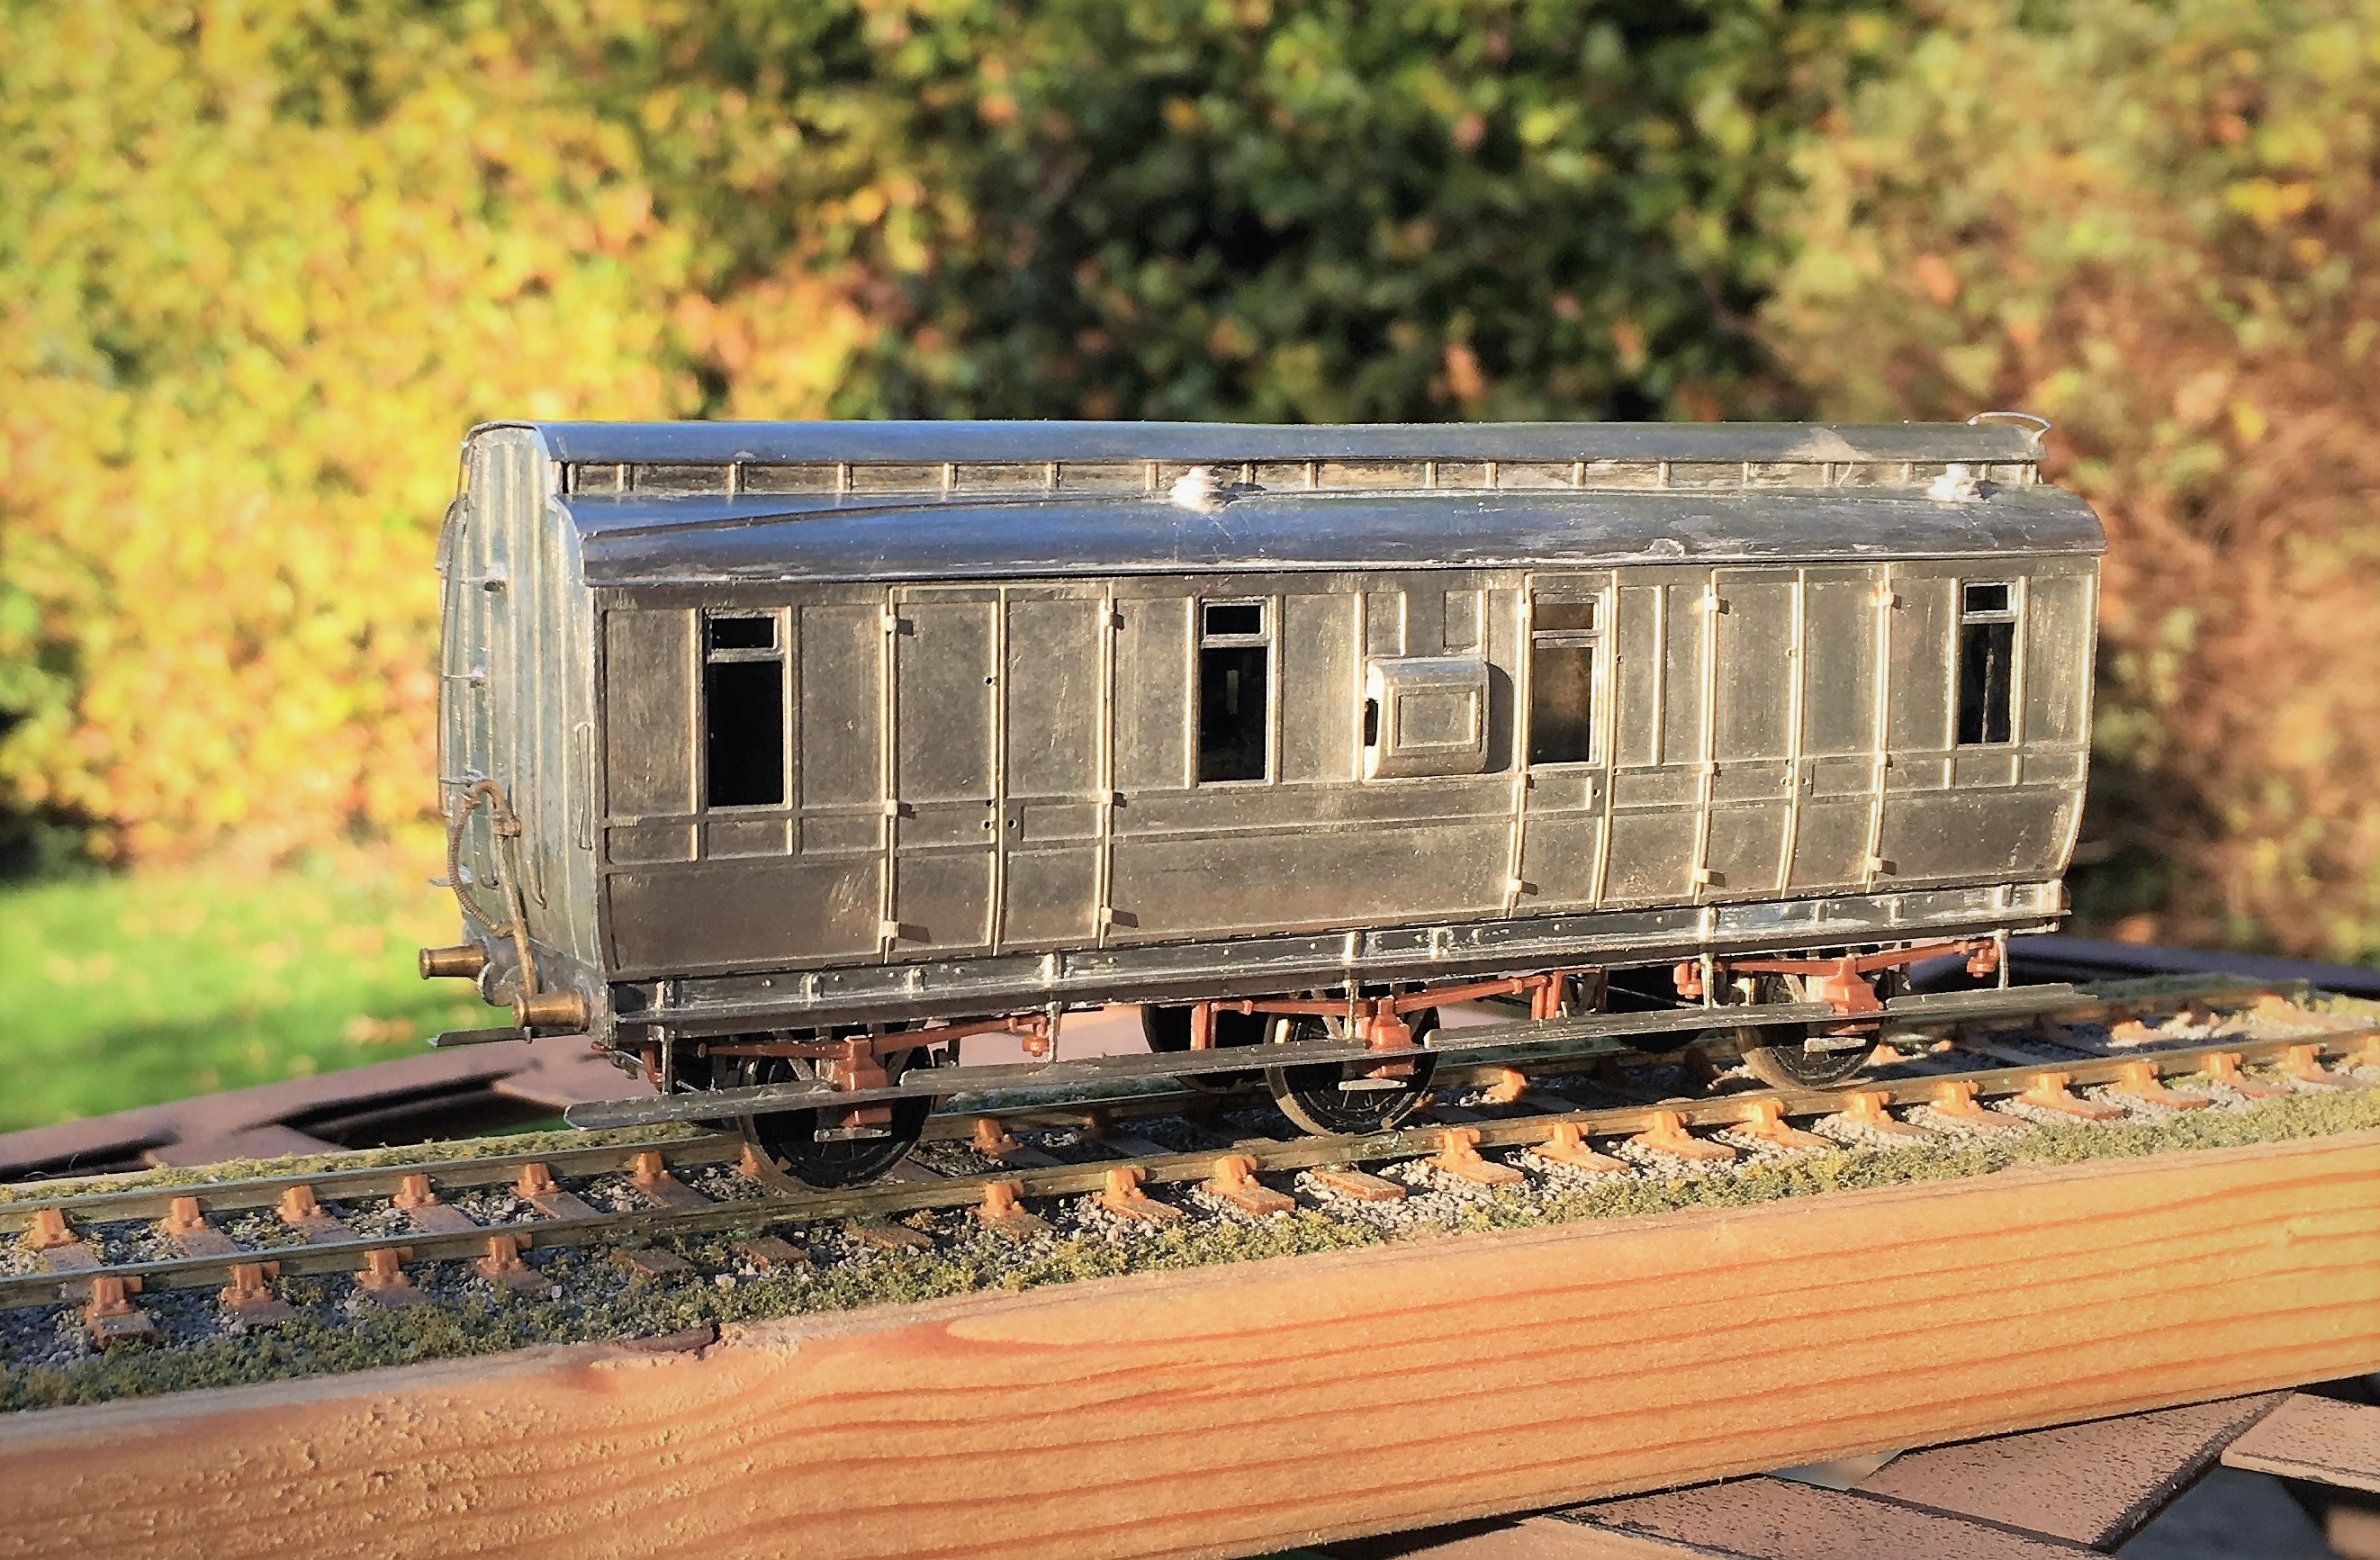
Diagram 51 Full Brakes – Test Build part 5; now in glorious technicolor!
The pages of this blog have charted the development of a proposed kit to build the Highland Railways dia 51 full brake; well finally it is finished and we get to see them in the flesh and painted up.
The kit can produce, with a bit of modification, two variants of door and I have now build both of them. First up the cupboard door version painted in crimson lake and minus full footboards.
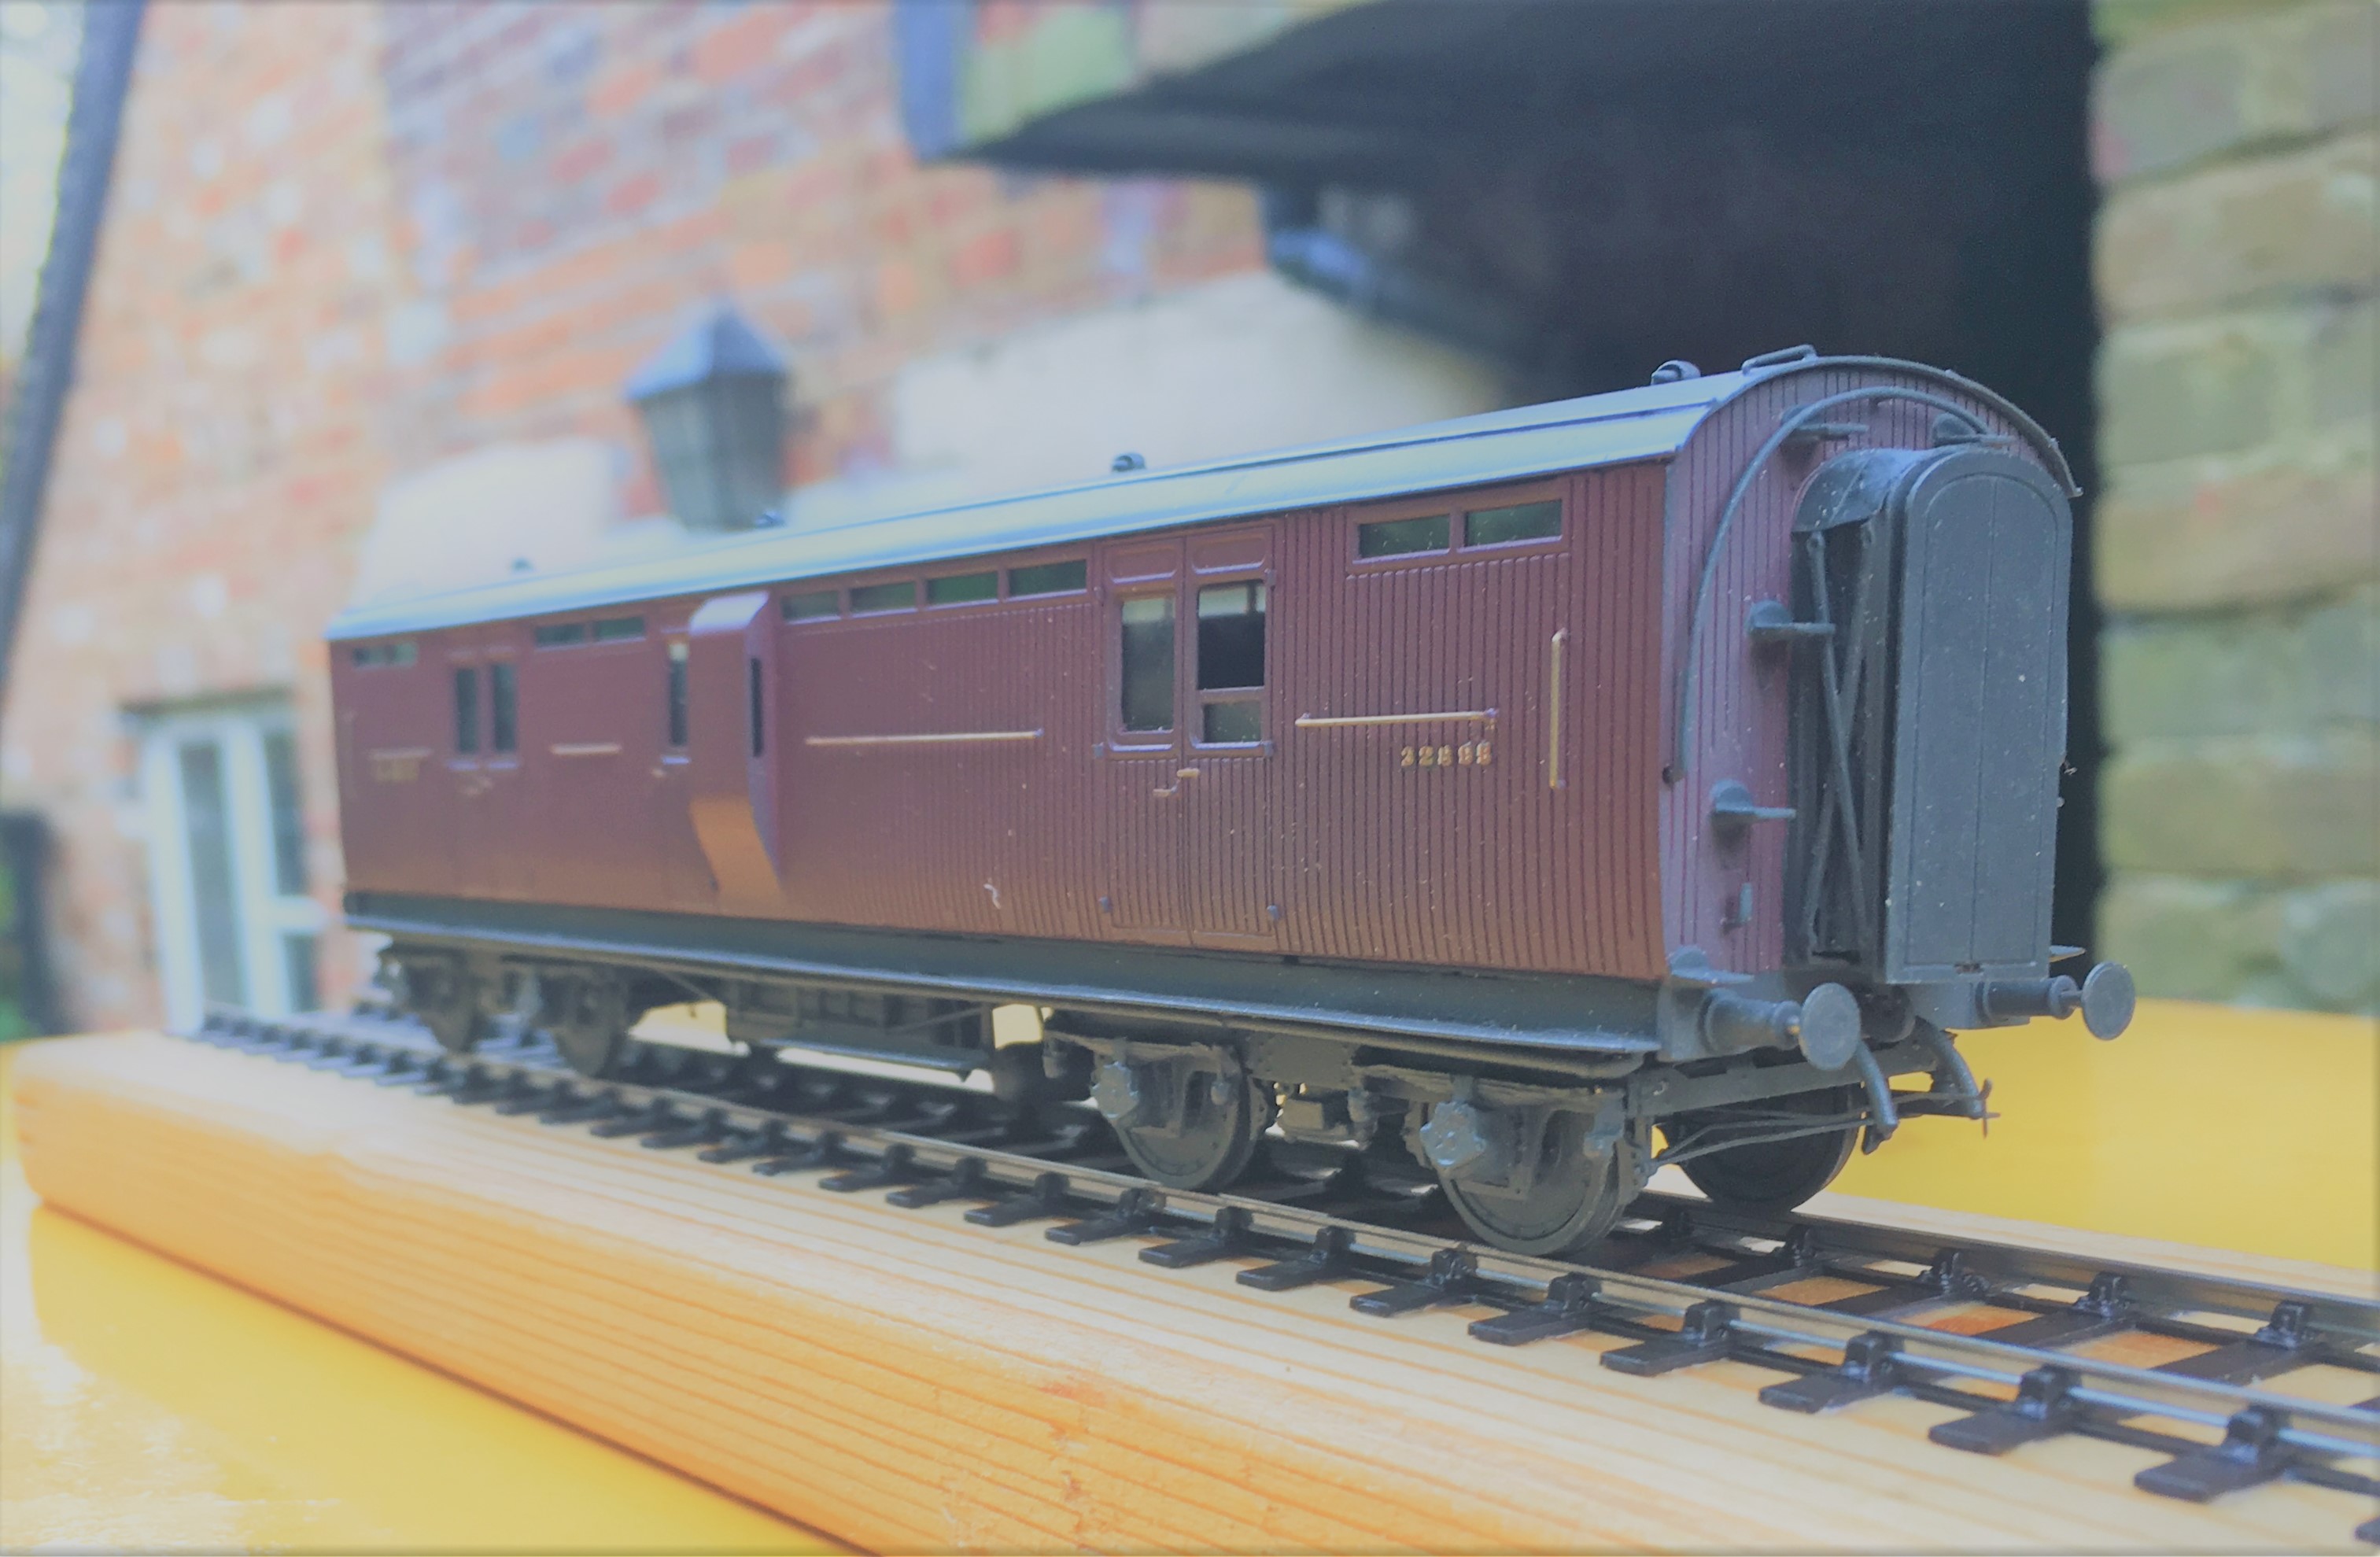
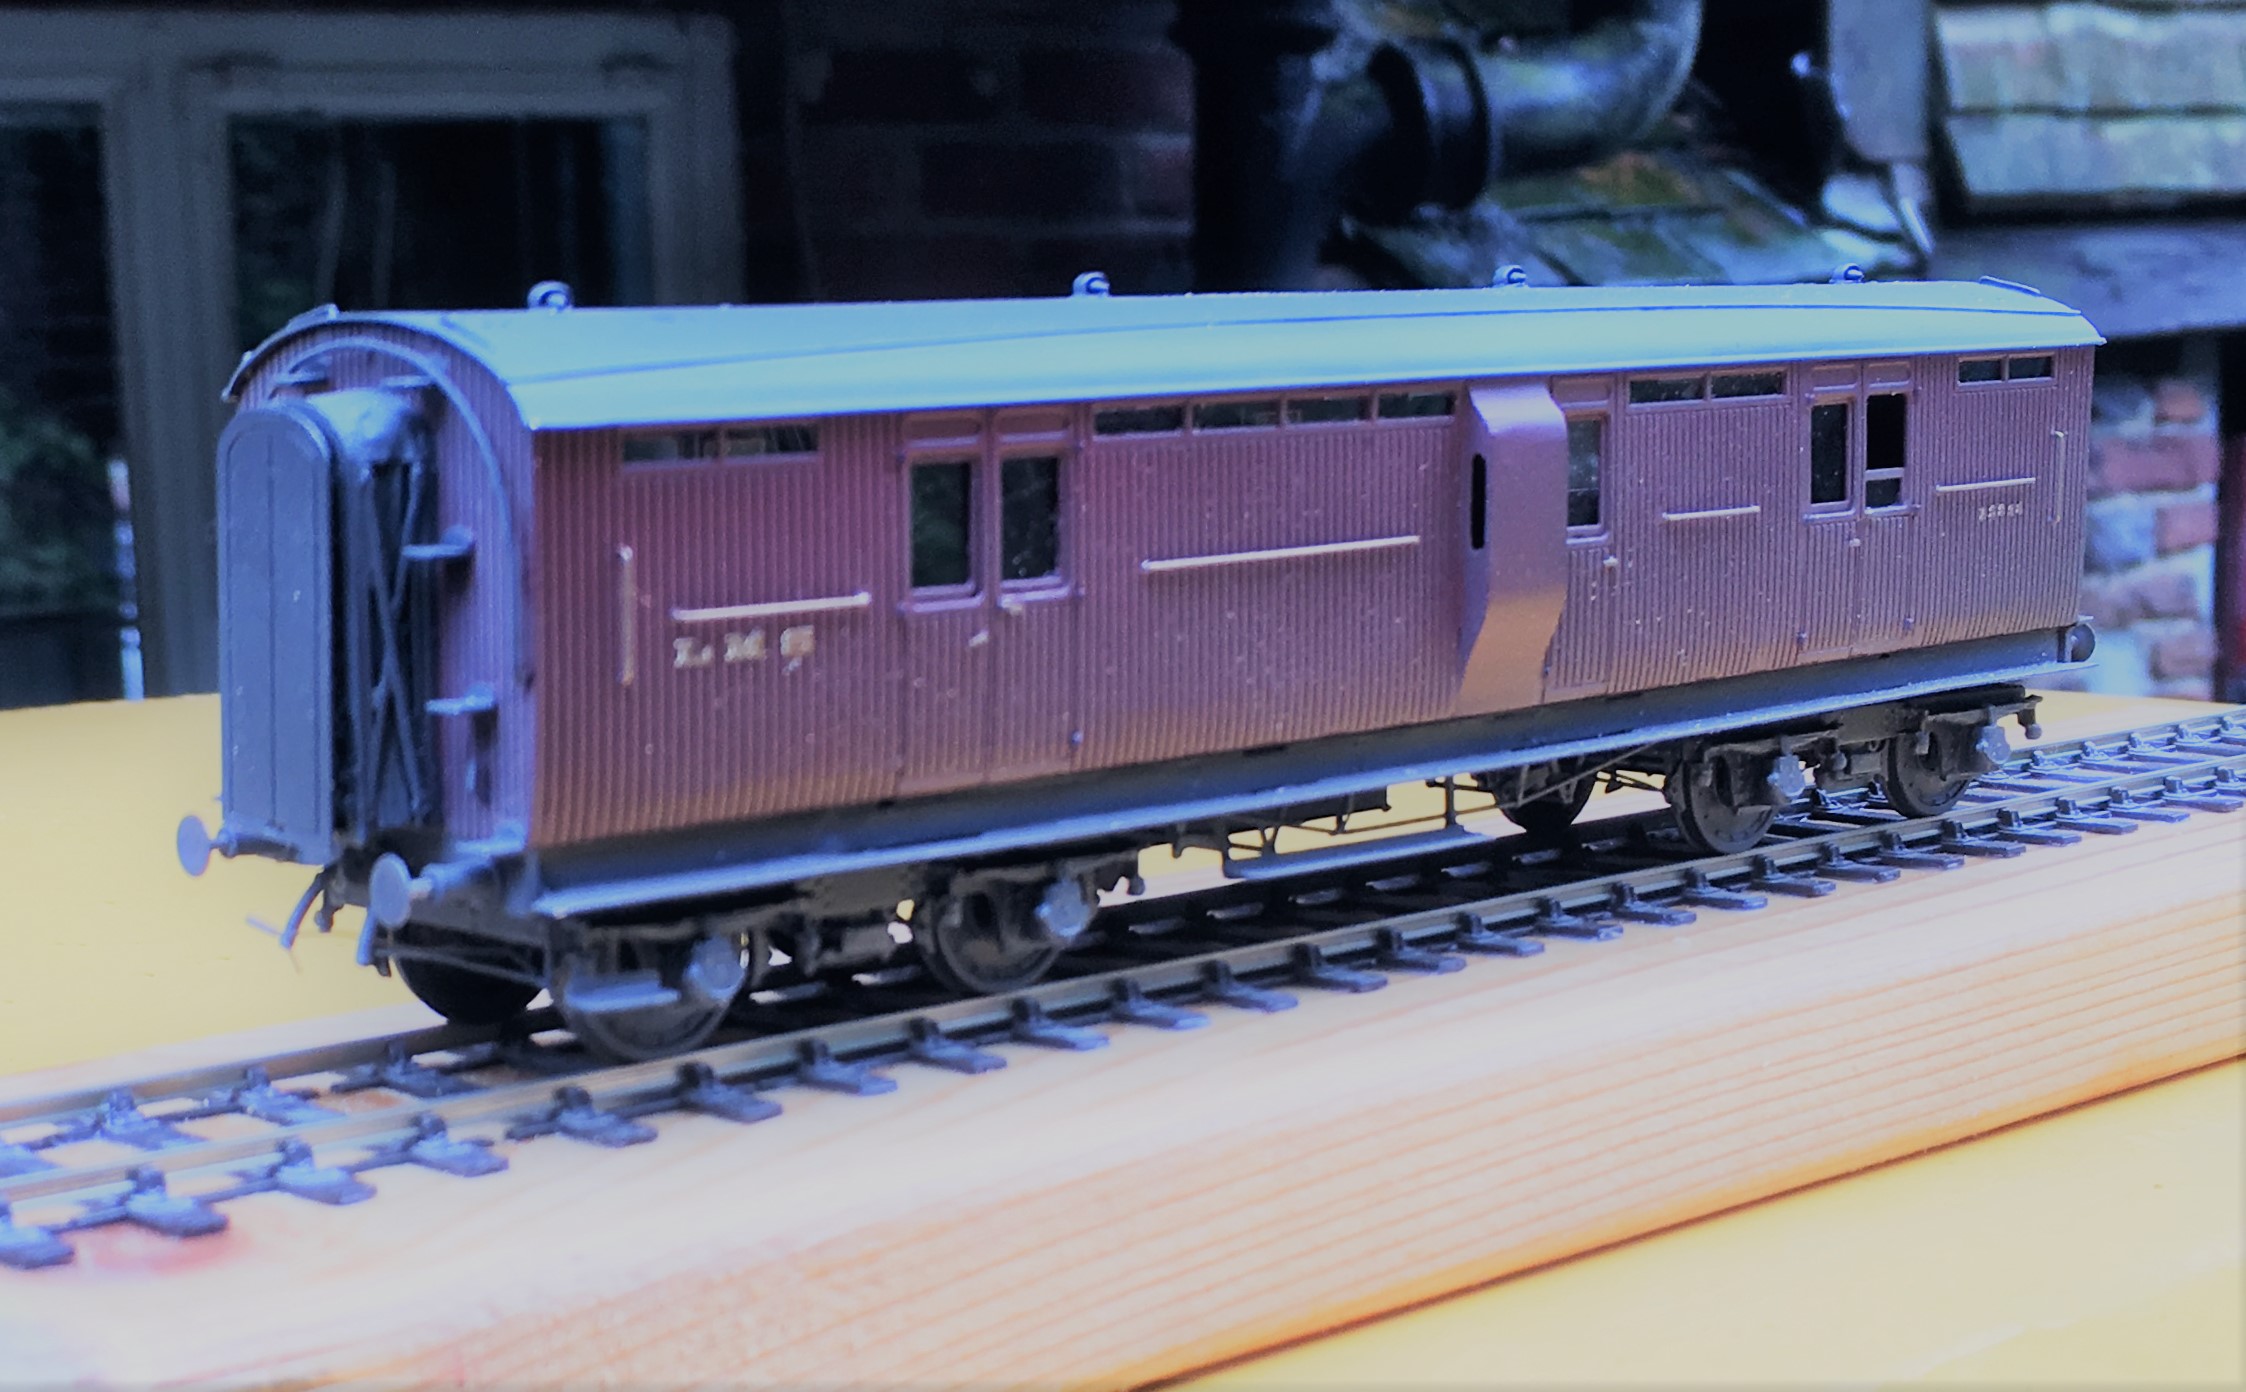
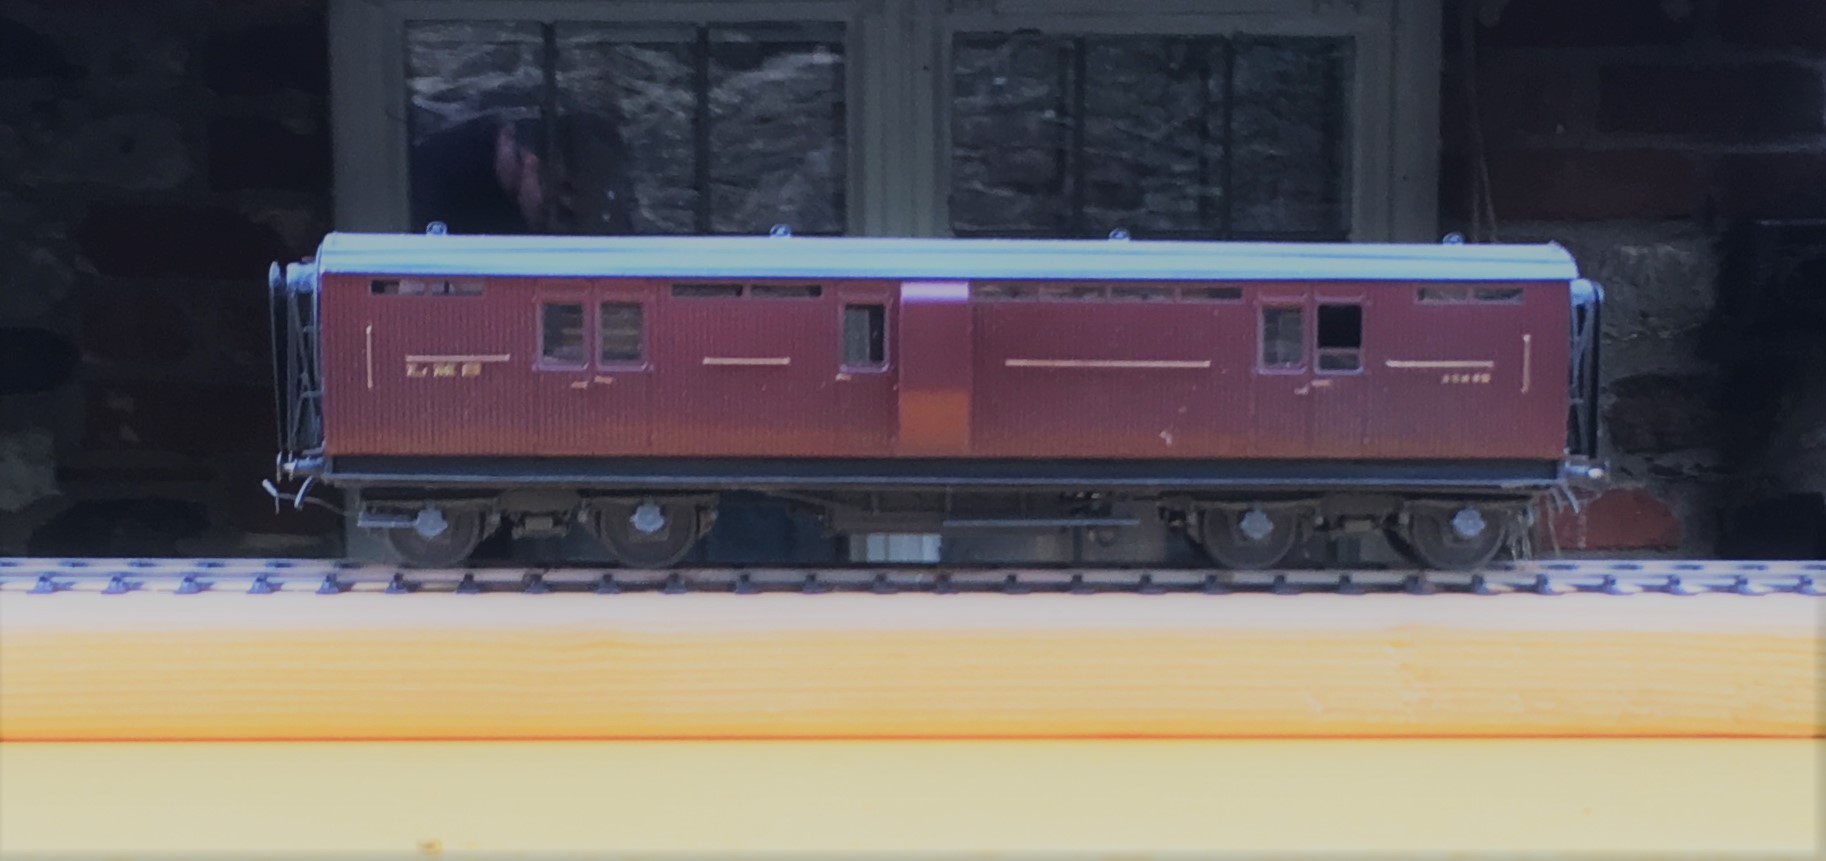
Second we have the sliding door version, this being modelled with full step boards and in Highland Olive green.

Apologies that the technicolor photos are a bit short on gloriousness; it is fair p*ssing down today and this is the most light that I could get to take any photos!
If you want to recap on the earlier blogs that show the development of the proposed kit, you can find them here:
Part 1 – getting underway with the body
Part 2 – drawing the chassis and roof to a conclusion
Part 3 – the build of the second vehicle (sliding door version)
Part 4 – details of the spring bogies that accompany these (and many other coaches)
I do now have a batch of these back from the etchers and I aim to conclude the instructions on Monday/Tuesday. I will then make a notification that they are available but at present I cannot provide the castings and those to the bogie are rather important. If you can scavenge from a Lochgorm kit some Iracier axleboes/springs, you will be able to complete the kit; if not then I am seeking to either source some of these castings or produce my own. So watch this space.

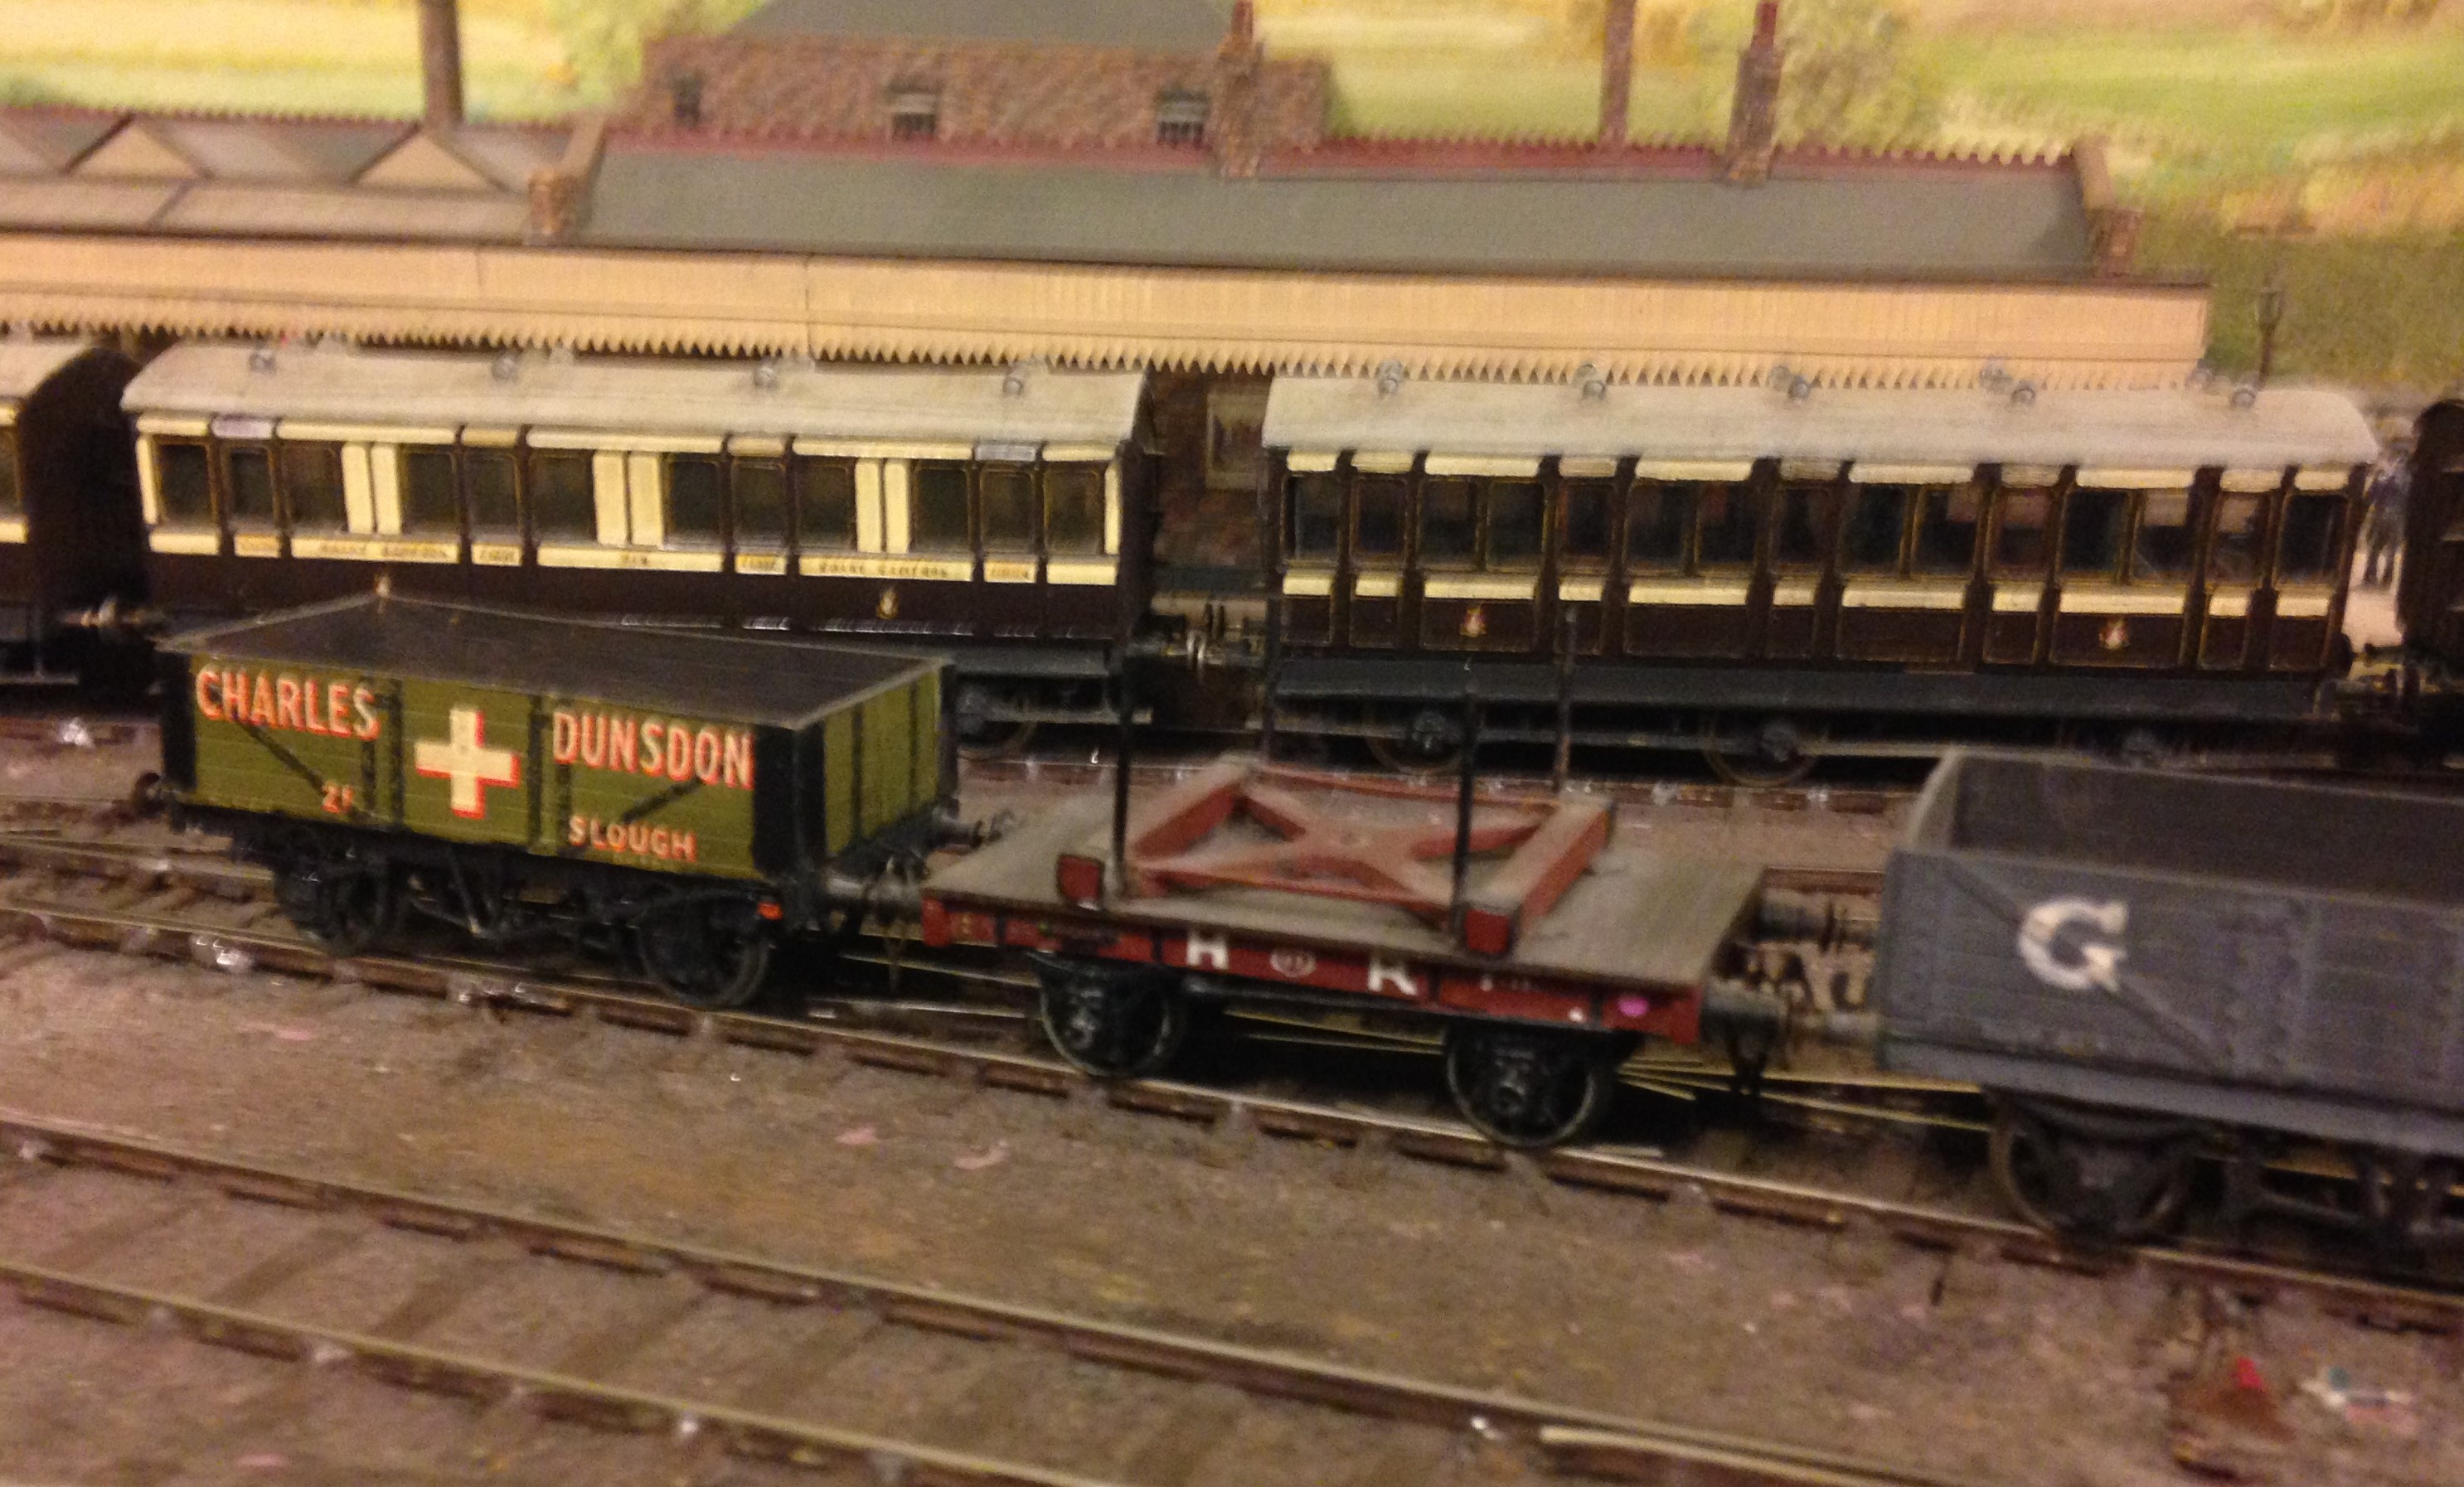
Highland Railway – Cradle Bolster
A long time ago, I showed that I had conceived a design for a pretty unusual vehicle in the Highland’s fleet, a cradle bolster. They gave this diagram no 25 and it has a square cradle that sits on the top of a fairly simple body. The cradle had four bolsters protruding from its corners and I anticipate it was used in conjunction with another bolster with the cradle rotating to allow the load to twist on curves. I presume it was conceived to support long but more flexible loads such as thin sheet steel/iron than a traditional bolster wagons could cater for.
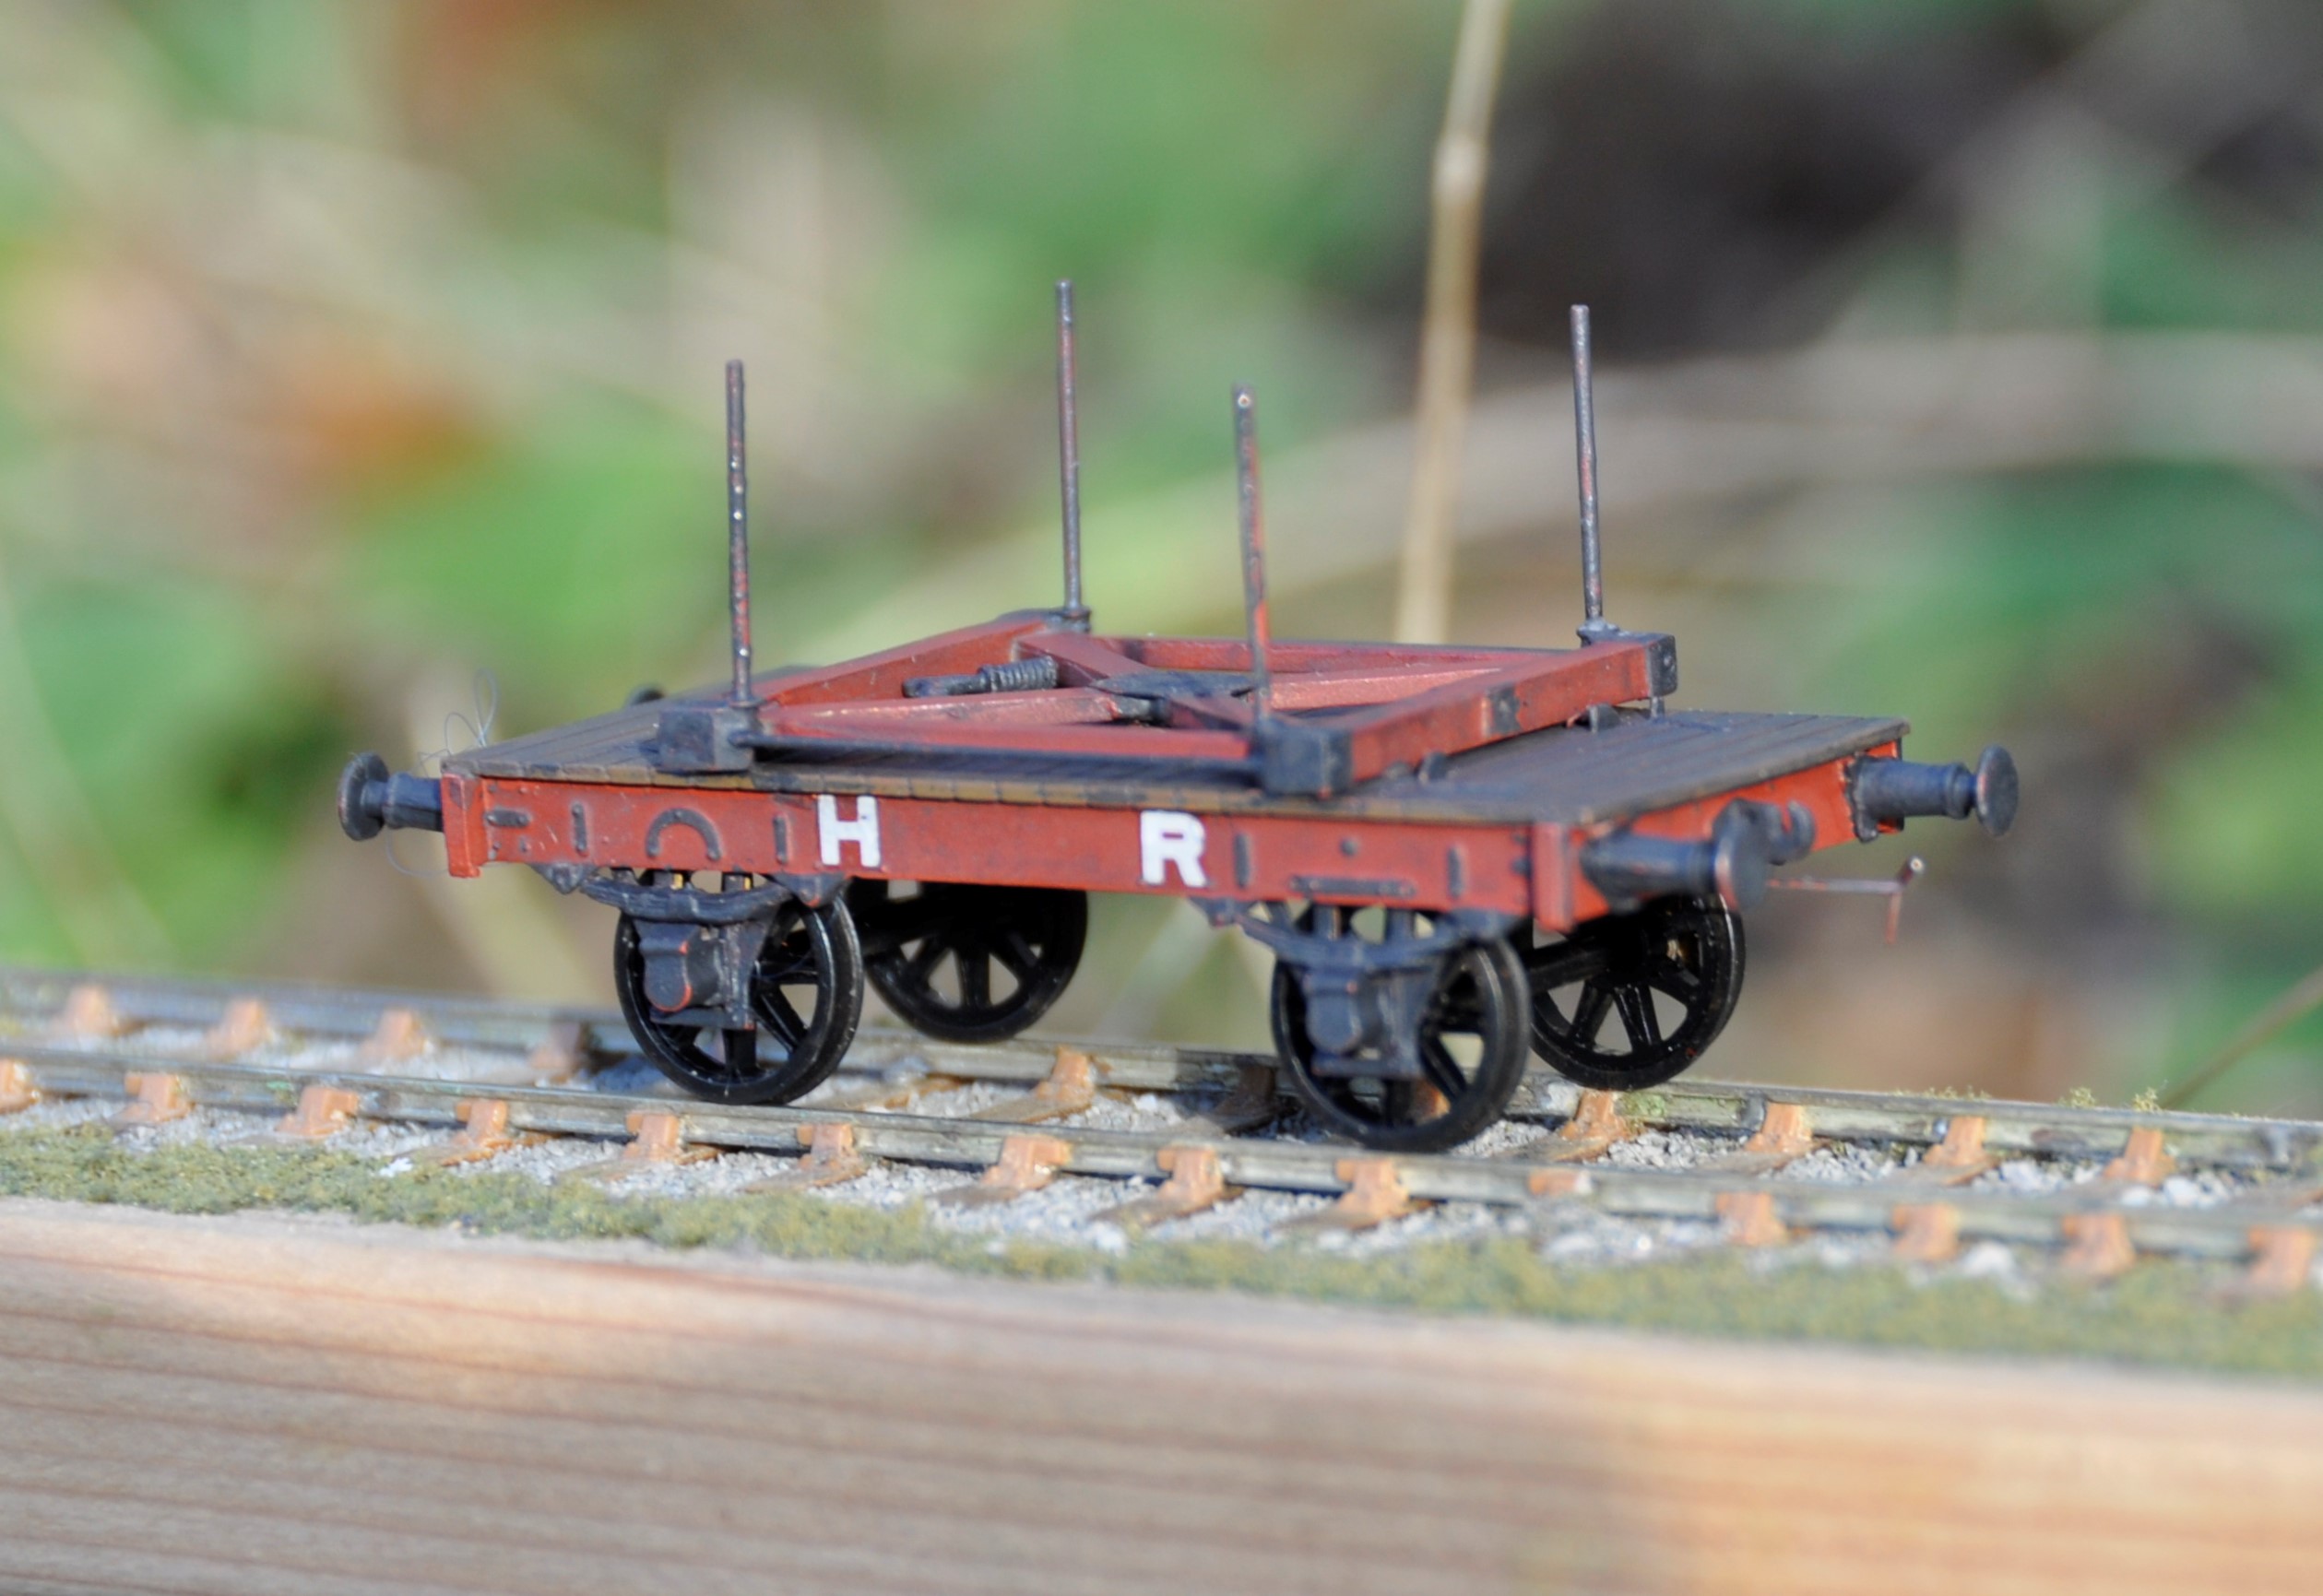
As this was my first attempt at designing vehicles, it is fair to say it went through a fair few iterations (or was that irritations!) which does largely explain why it has taken so long to complete from the first build – but it is now done and it looks pretty smart I reckon! It is really small in reality – being dwarfed by other even relative moderate wagons!
The second main complication has been as a result of the need to source castings for the axlebox/springs. I have used the Highland Railway Society’s but these do not come with attached springs (by design, so that they can be combined with differing springs to suit different situations). They are also not conceived to accommodate bearings sliding up and down within them and need to be ground out from the rear to make a slot for this. This makes them a bu**er to attach and therefore I am in the process of sorting out my own masters to overcome this problem. Once these are complete and I have got some castings done, I will produce a run of these for sale. So watch this space! I am also taking a look at the realities of scaling this up to 7mm, so also watch this space (but probably for longer before you will see anything!).
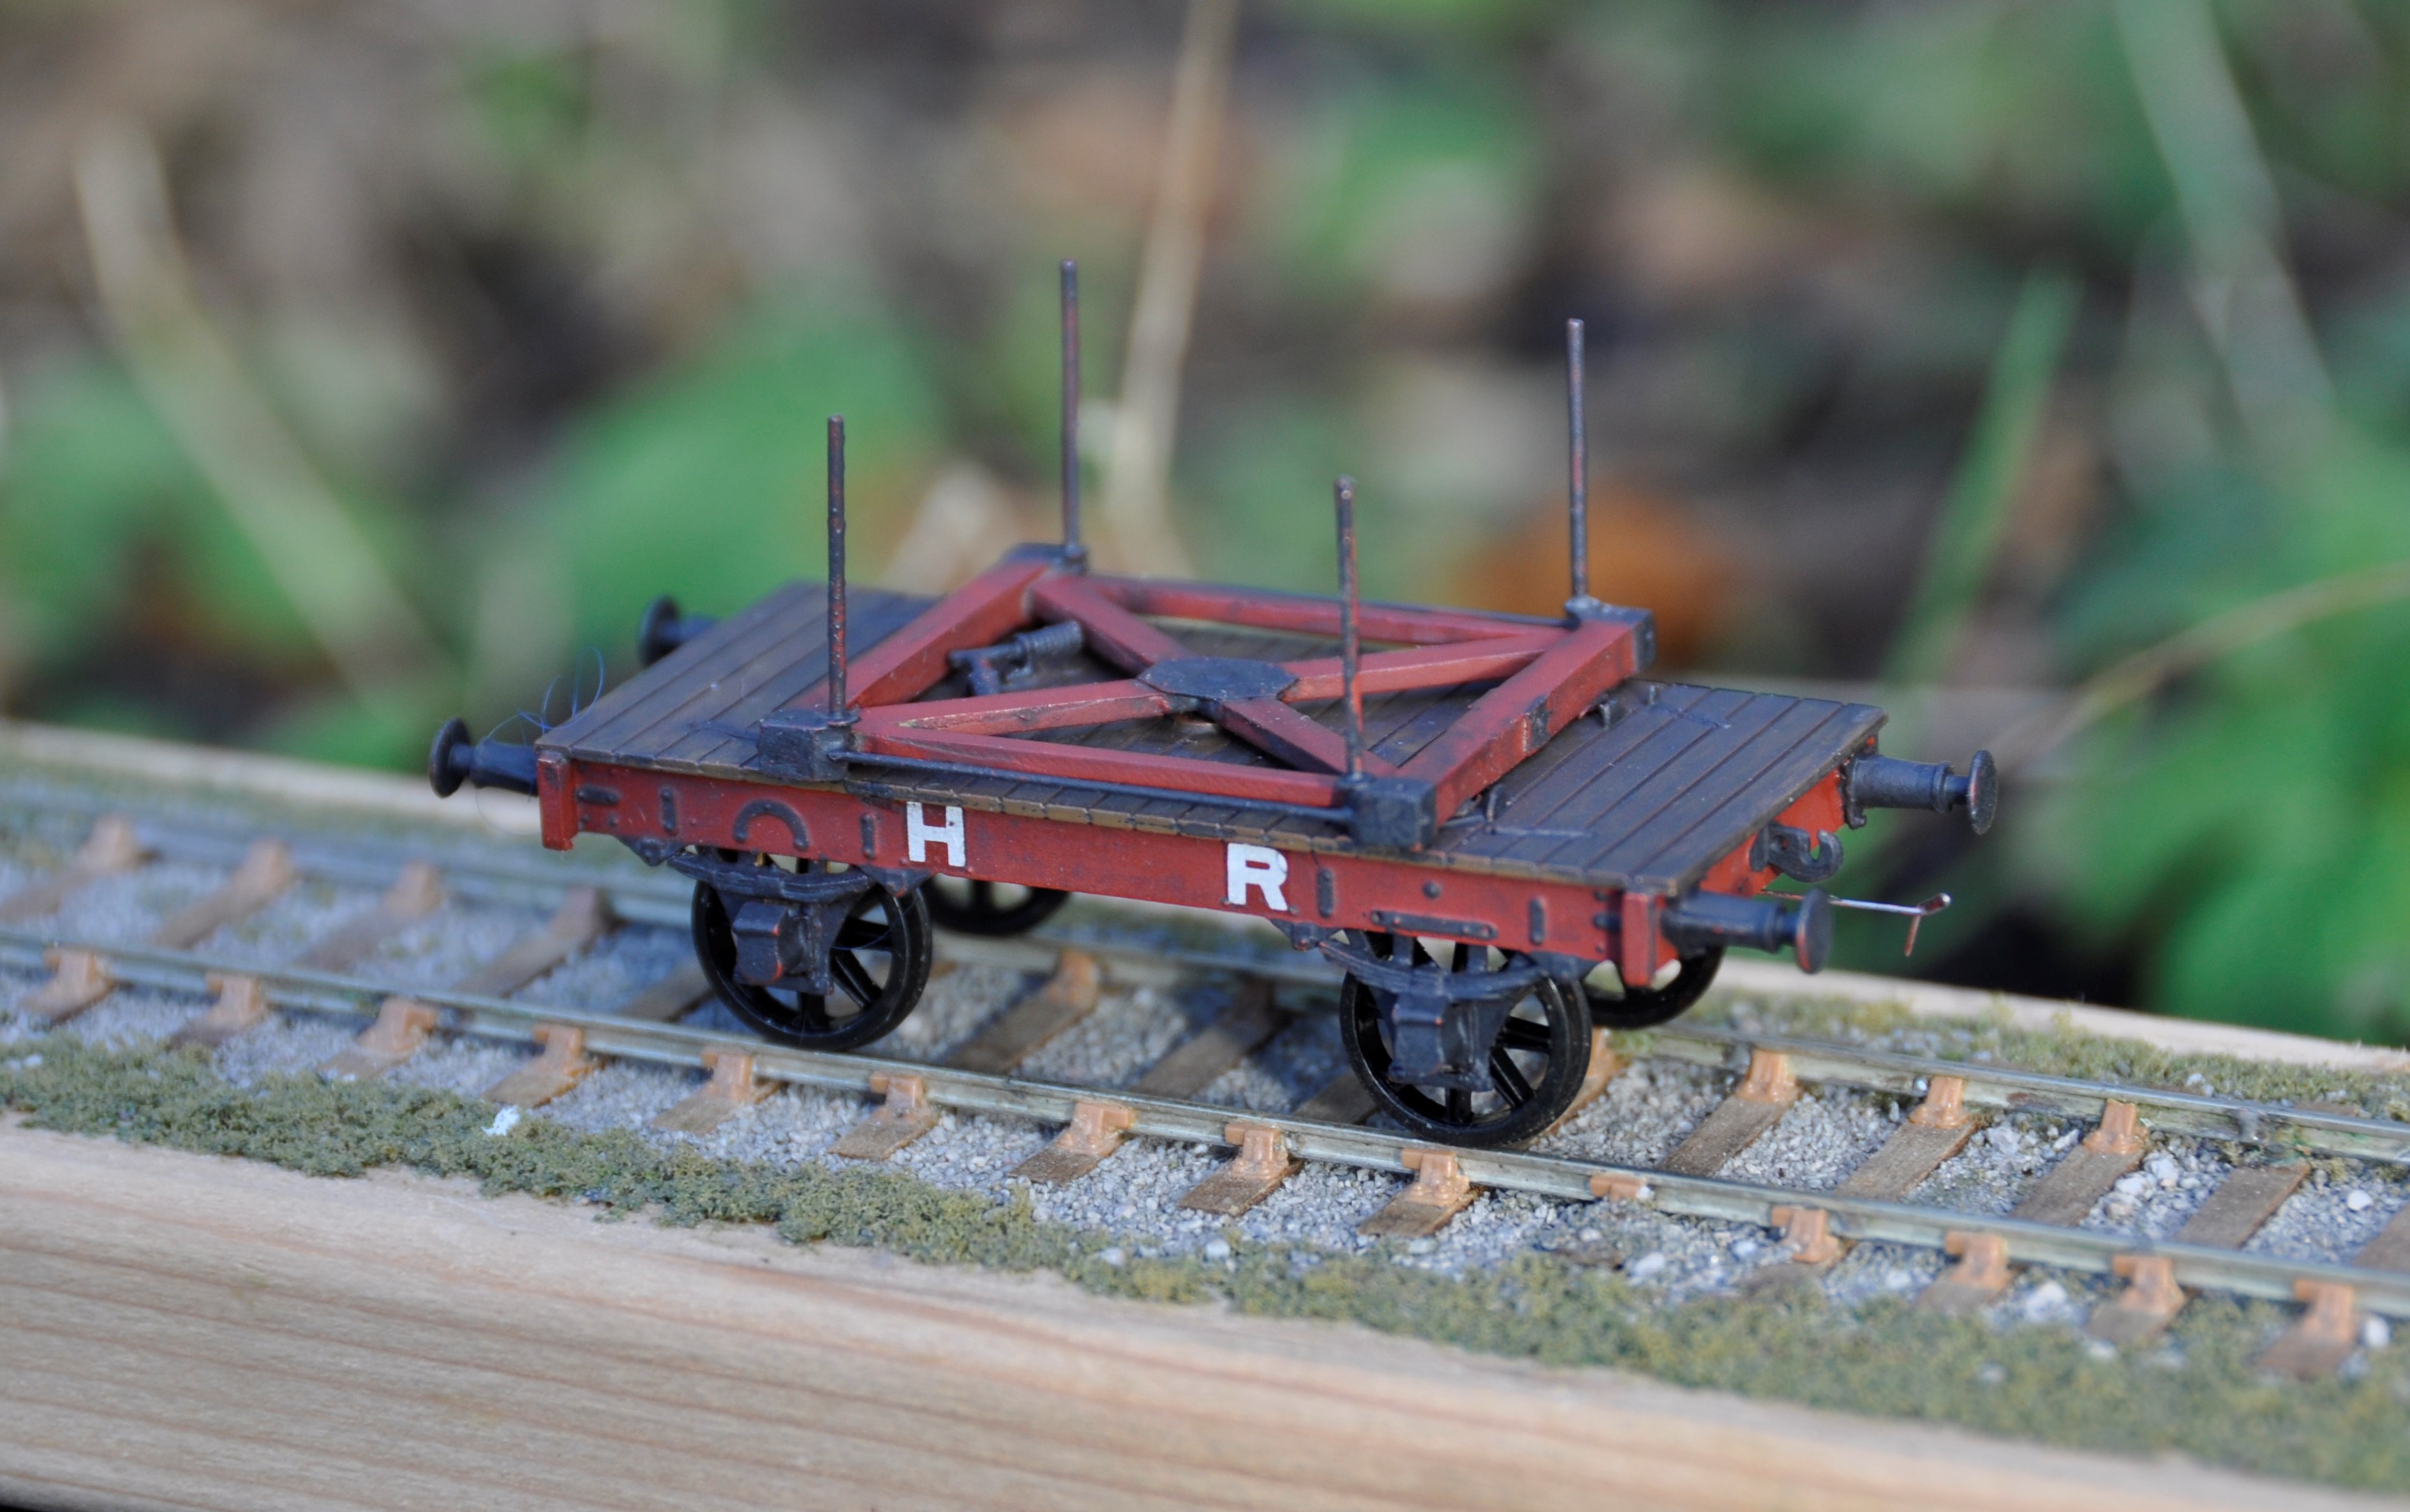
The error that I have had pointed out to me is that the bolsters ought to be tapered and now that I know this they do jar somewhat, so the next one will need to have this sorted out. As they lasted into well into the LMS days, there will be a second one and the one shown here will appear from time to time on Benfieldside jostling amongst the NER stuff!
When I first embarked on this build, I thought that this was such an unusual subject that I was going to be building the first model example ever. A rather foolish notion that was upset by a visit to visit Buckingham a couple of years back where I see Peter Denny had modelled one (it is believed he was friends with Hutchinson, who had measured one up in the 1930/40s) – as you can see below. I have subsequently found out at least two others who have scratch built their own, so clearly I will need to search harder for originality!

Midland Six Wheeled Full Brakes
Although not Highland vehicles, these full brakes have a strong association with the Highland’s branchlines in the post grouping years. Once the LMS took over the Highland’s system in 1923, they seemed to have been horrified by the state of the coaching stock that they inherited! Portions of the Highland’s fleet were speedily retired and large numbers of foreign company’s stock was drafted onto the system (especially the main line from Perth to Inverness, where the trains became fully corridor connected almost overnight).
When it came to the branchlines, the upgrade came primarily by the cascading of the better Highland stock onto these lines but there were exceptions. Although the Highland had full brakes, it was a line that had a lot of parcels/packages traffic, so it seemed that they needed even more and a batch of these Midland six wheeled full brakes were drafted in.
Many photographs of the Highland branchlines of the 1920s had one lurking in the background so I felt one should get to make appearances on Glenmutchkin. Simple, I thought, Slaters do a plastic kit for one and whilst it is no longer available, it is easy to pick up second hand and it should be a nice quick build. Unfortunately, I had not realised what a rubbish kit it was! It is too short and too narrow, most of the mastering is really crude and the panelling in particular would be a scale 6 inches deep. So the Slaters kit made it back on ebay only marginally quicker than it came off and I set about designing my own kit.
It has taken a couple of iterations and about three years, but finally I have got to the stage where I am happy with it but you can form your own view!
The first iteration used a cleminson chassis but in the light of the success I had with sliding axles on some of my other 6 wheeled stock, I redesigned it to include these and some sprung W-irons in the style of Bill Bedford’s.
This proved similarly successful and as you can see in the video, it trundles along quite nicely!
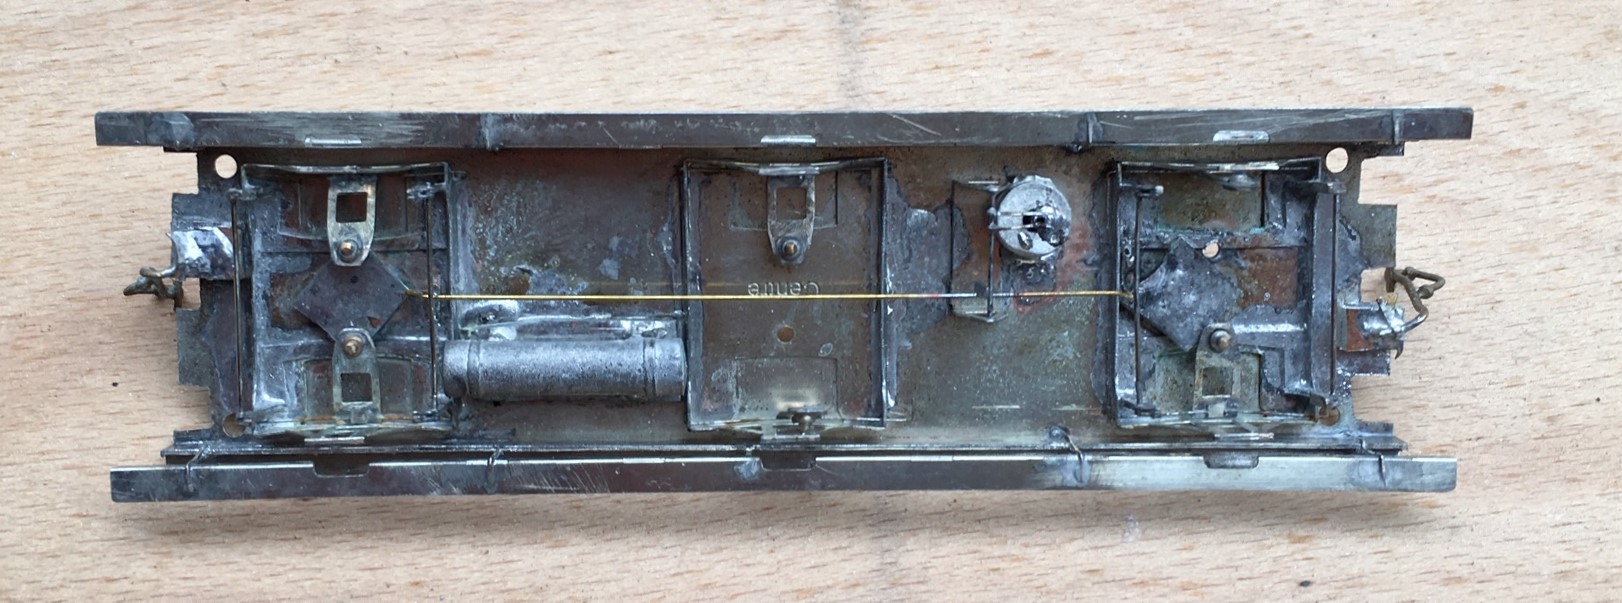
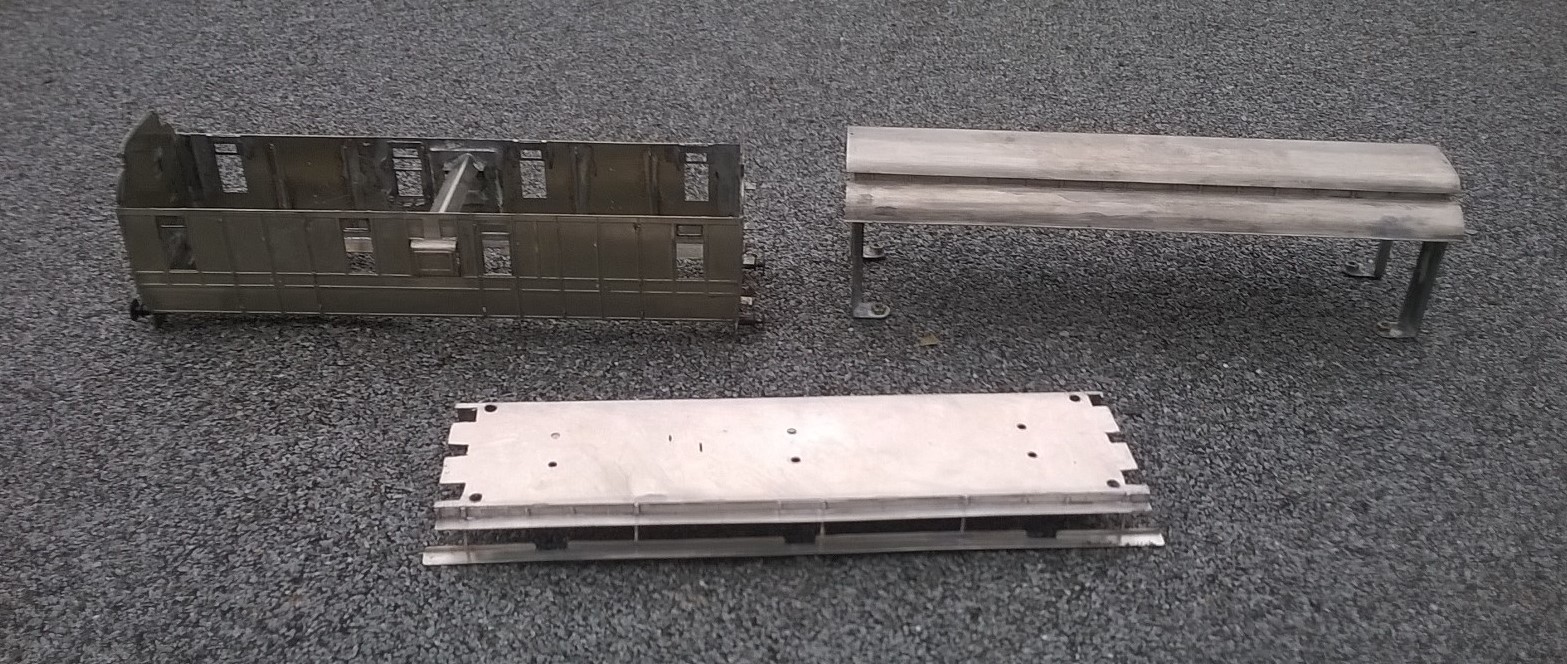
Other than the use of these sliding axles, the main unusual feature of the model is the arrangement of securing the roof. I have found that it is essential to bolt these in place to prevent the roof becoming adrift at some point in the future (which has happened to half my stock over time). Therefore, I designed a set of legs that allow the roof to be bolted through the floor from below and in the process also securing the separate chassis tight too. Broken down, the components look like this and having them separated does make painting a lot easier. It is definitely the route I will take in the future.
It is intended that this kit will be made available for sale as a 4mm/1ft model – albeit you will need to source the fittings/castings yourself. I have prepared some fairly extensive instructions (see link below) and this includes the details of what is required and where to get it from. I am waiting for a quote from the etching company to be able to work out the sensible cost for these; so an update post will follow when I list it on the Miscellany Models site.
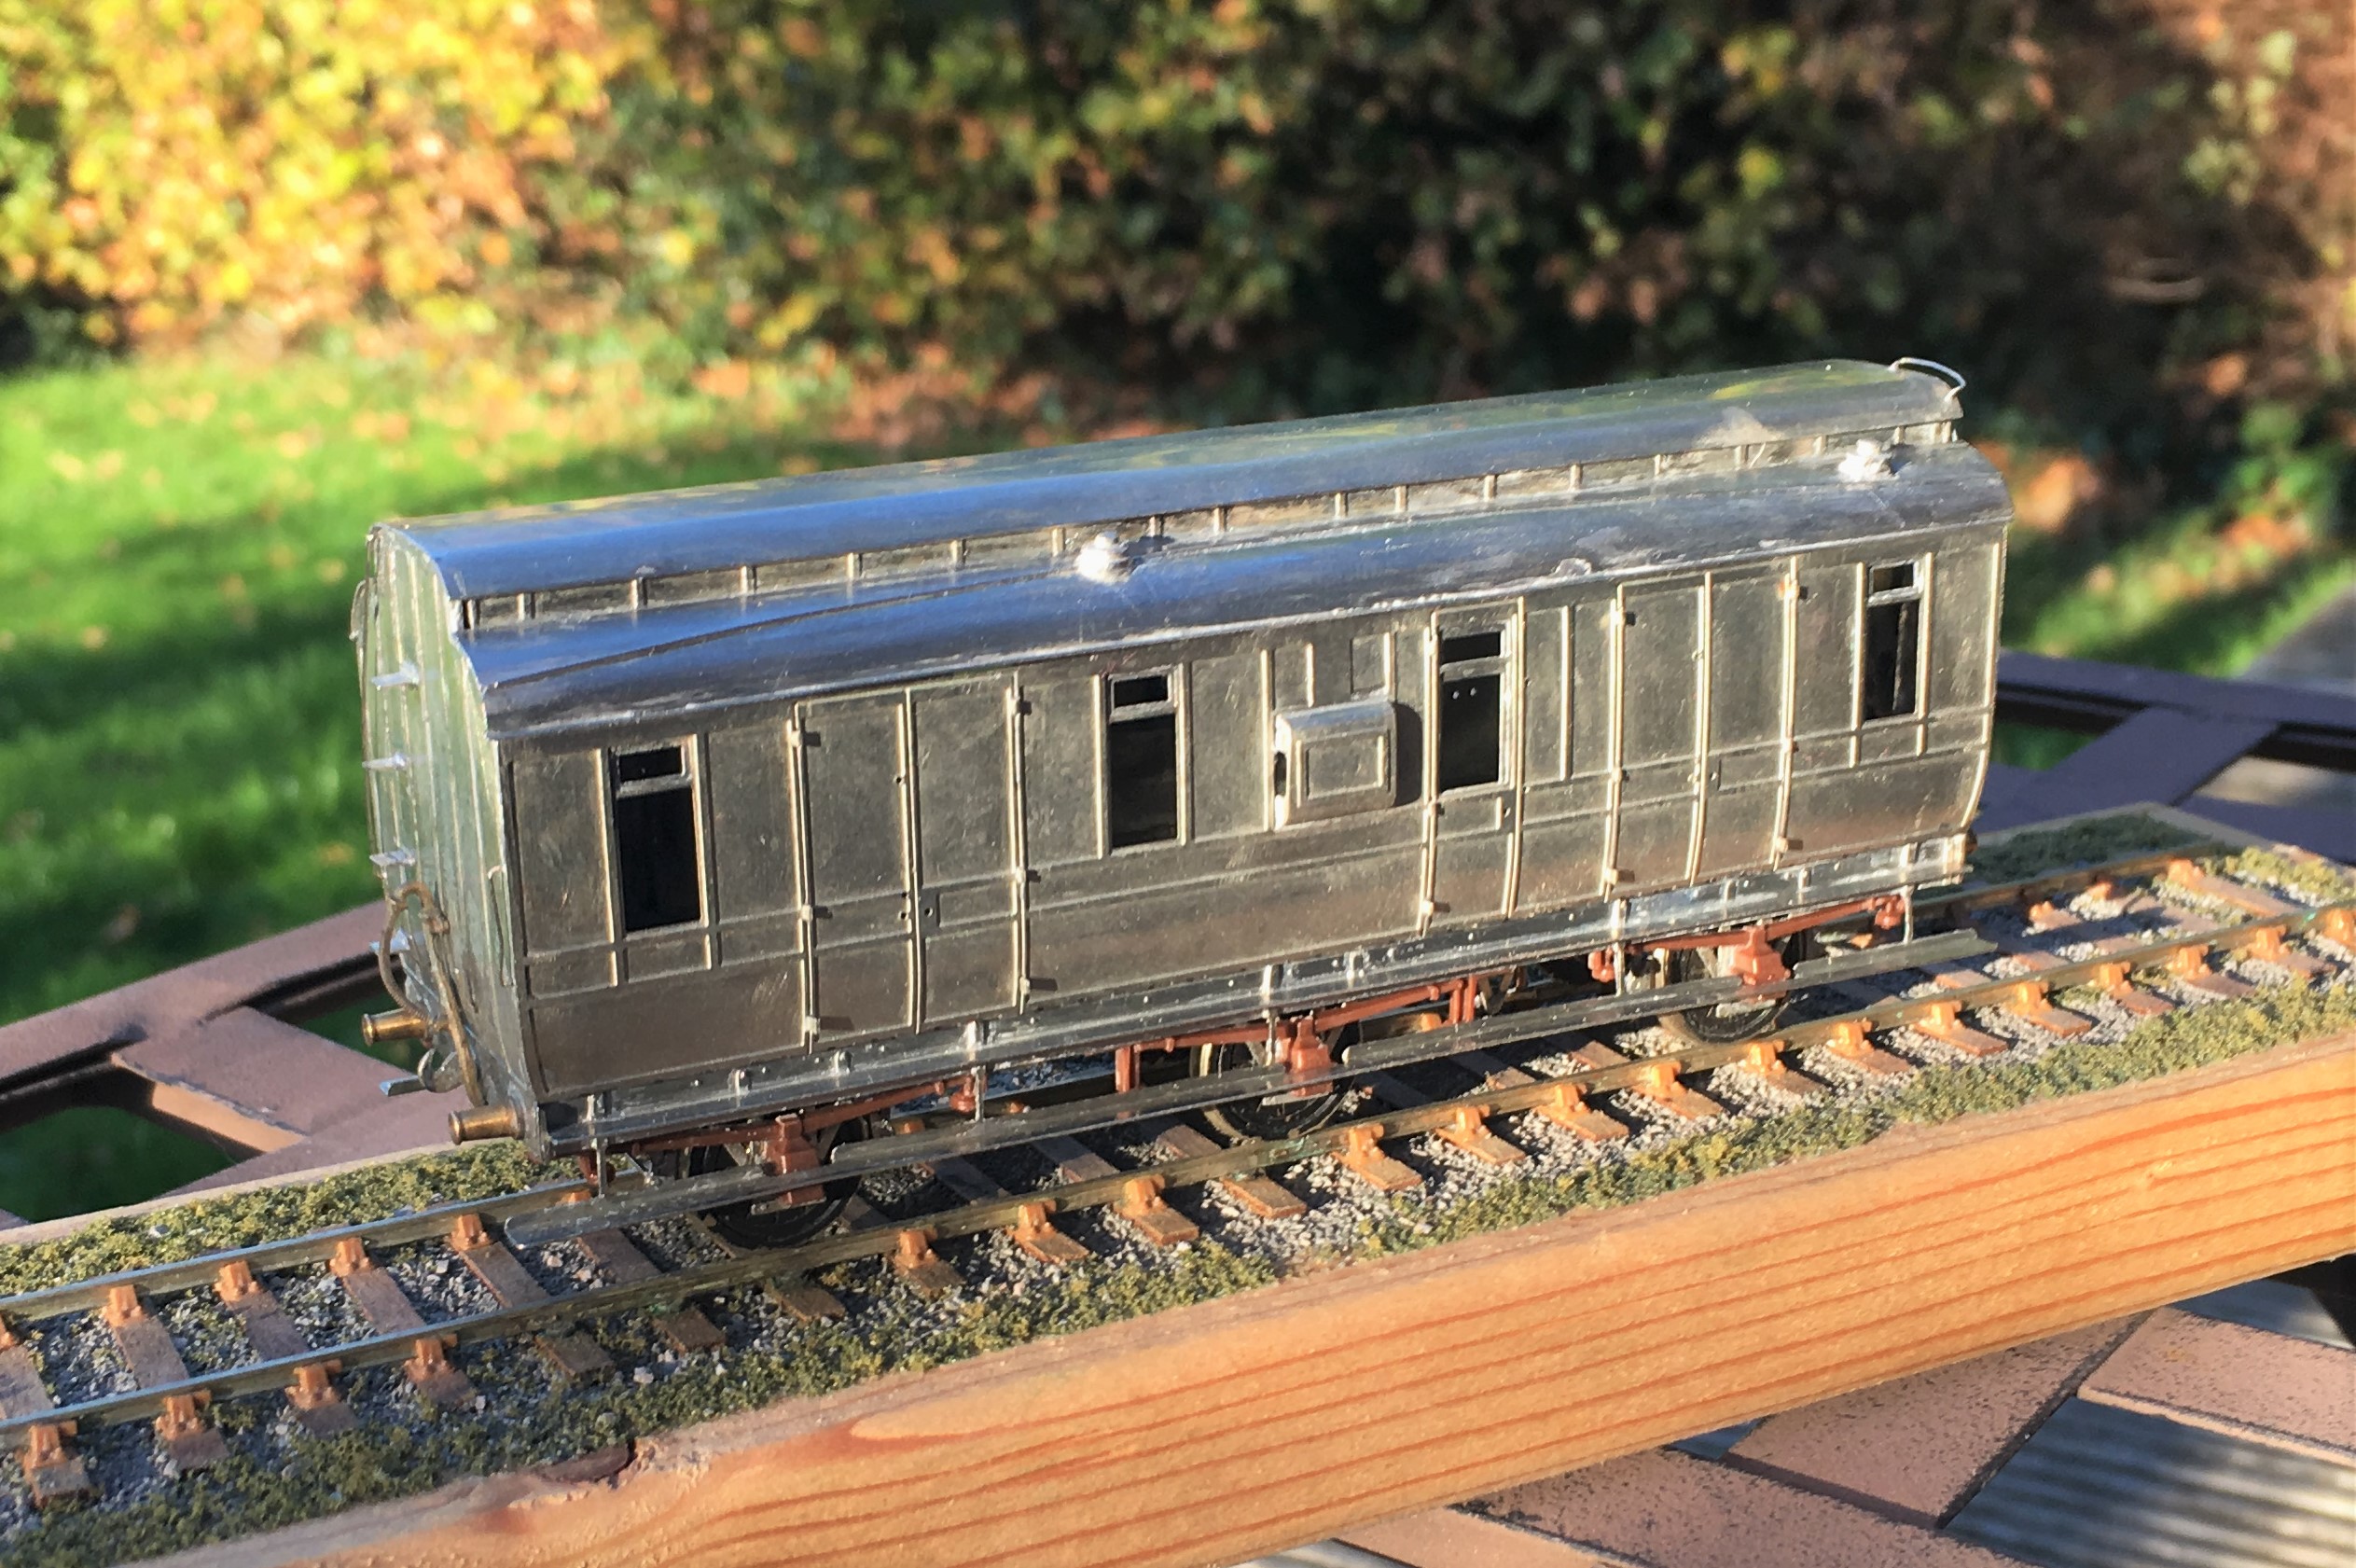
Miscellany Models Rolling Stock 2 – Midland dia 530 Full Brake v2
In the meantime, here are a couple of additional views of the completed vehicle, awaiting its turn in the paintshop!

Cornish Modelling and the Demon Barber of Fleet Street
Don’t worry – this is not announcement of being turned to the dark side of modelling “Green With Rivets” (aka the GWR)! Instead it is a reference to a week’s trip to the extreme west of Cornwall to support my wife who was appearing in a musical that was running for a week at the Minack Theatre – more of this later……
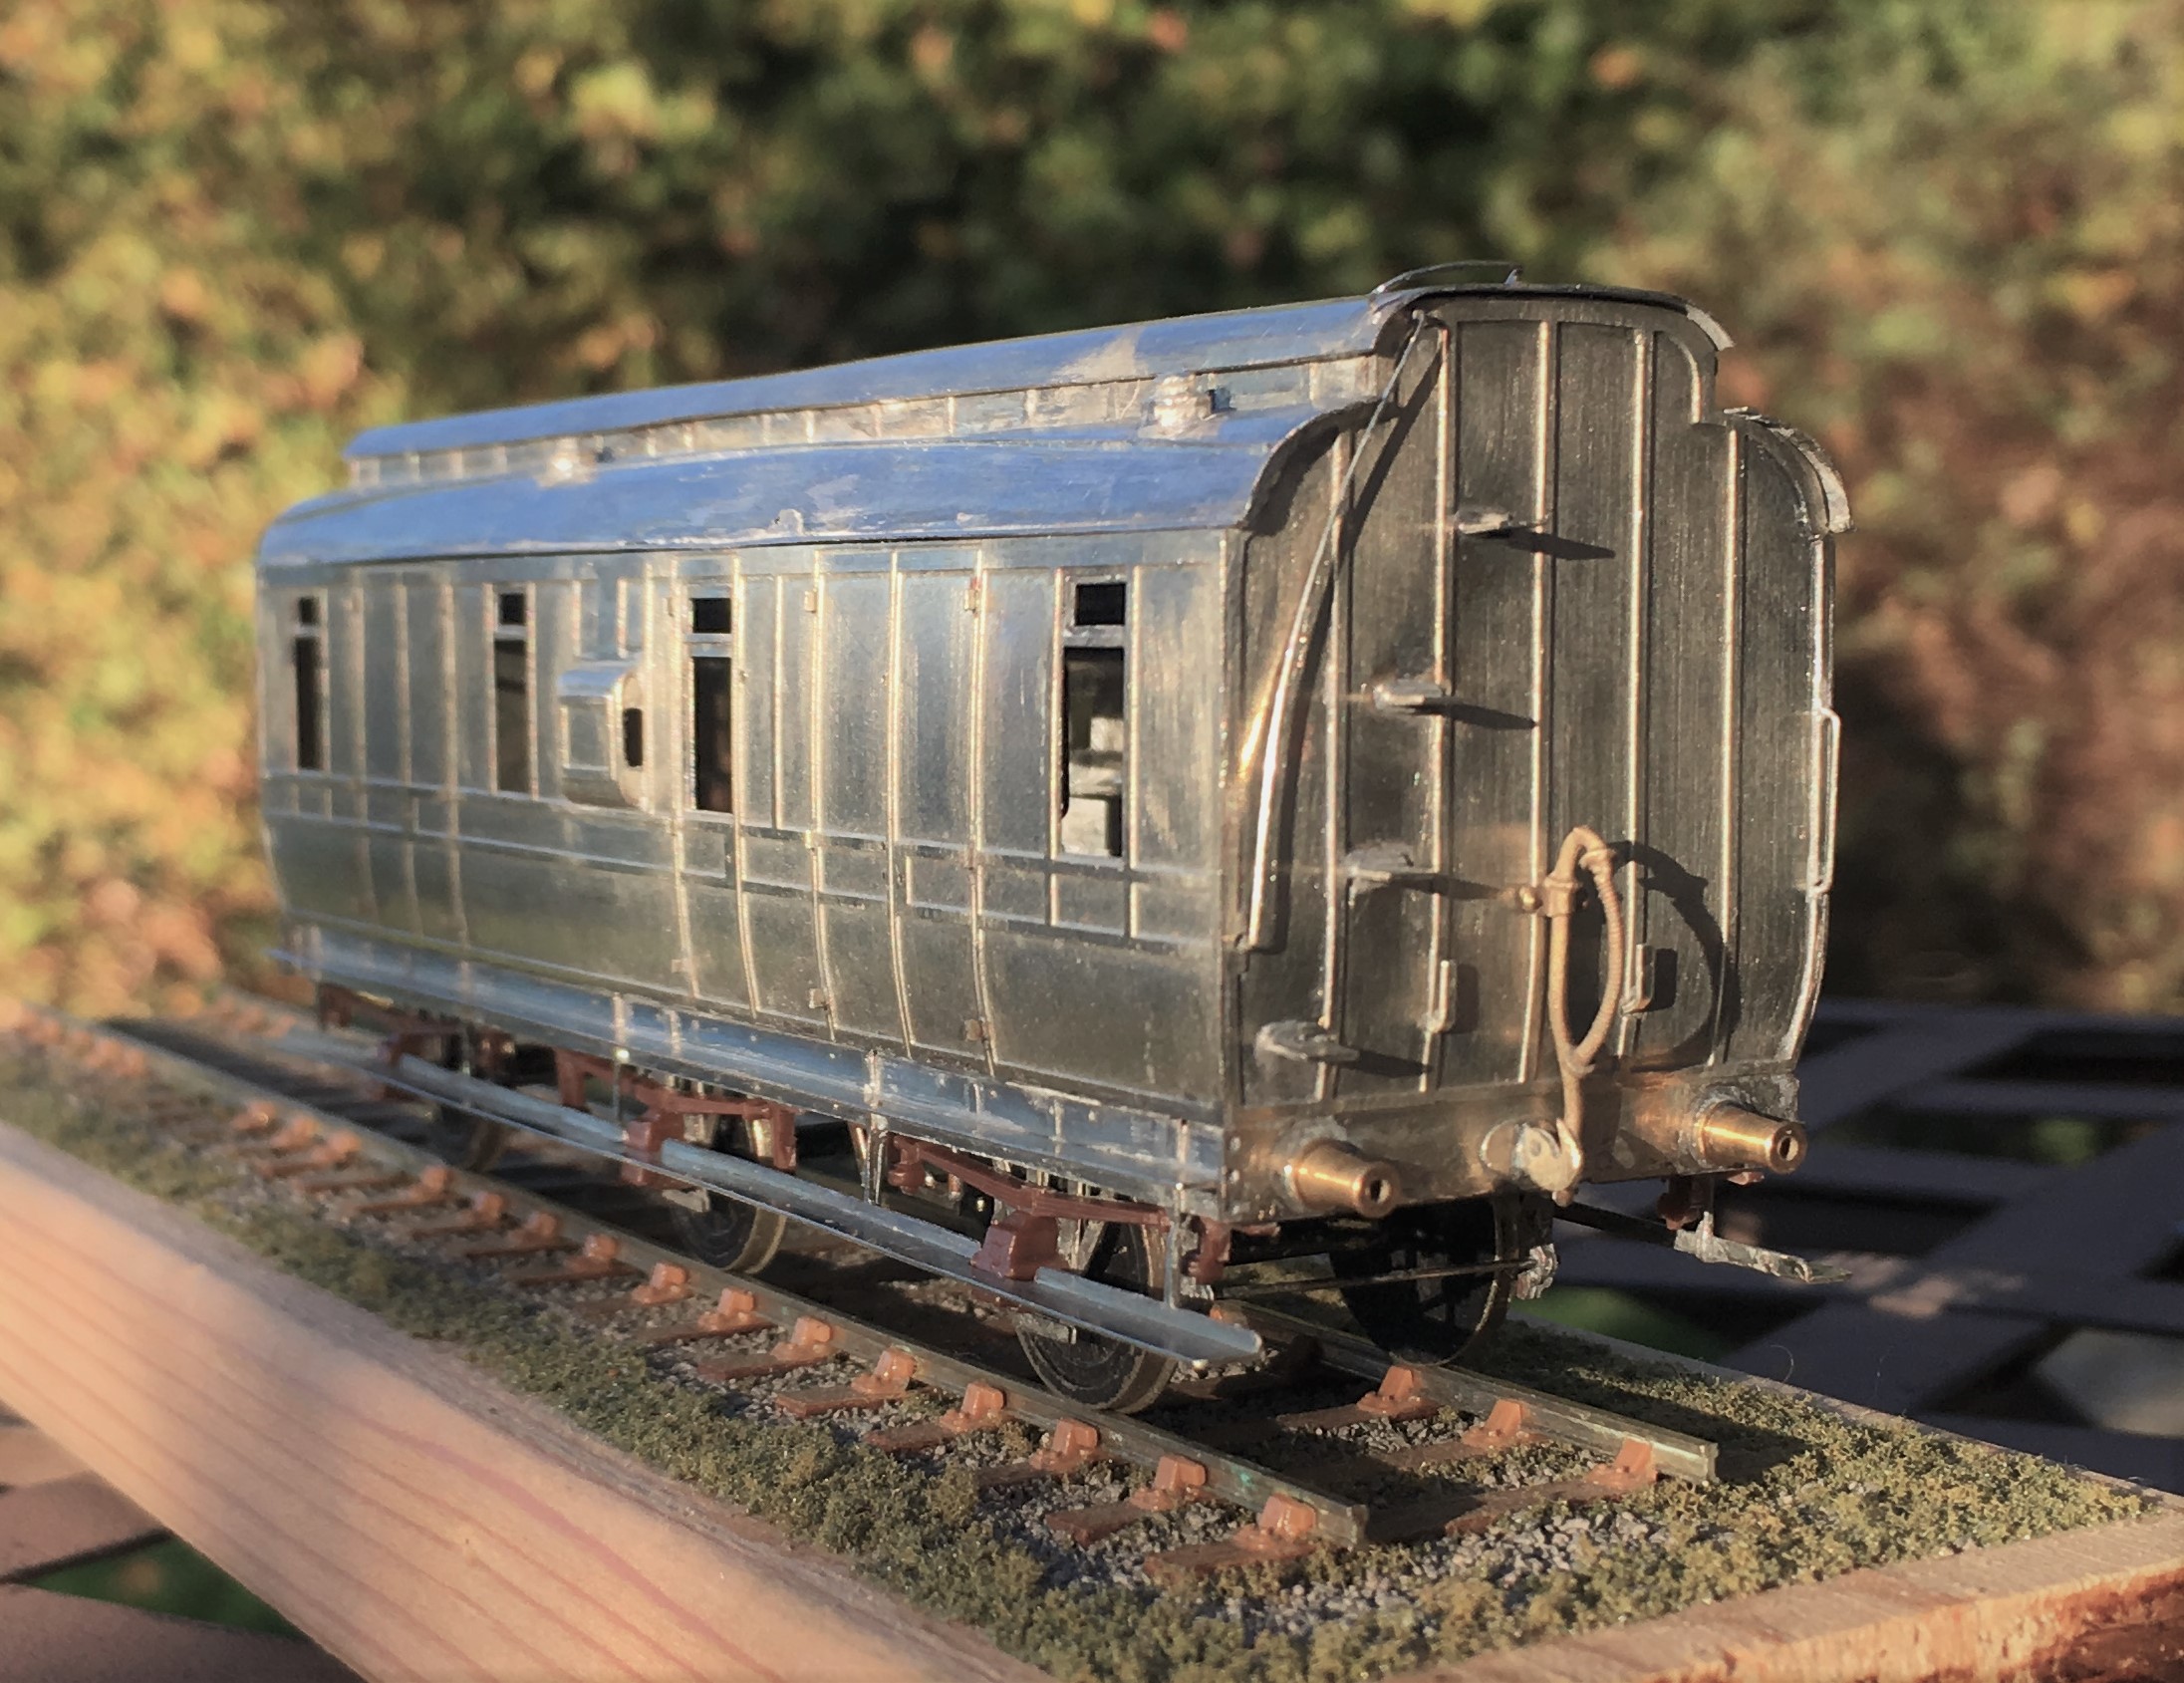
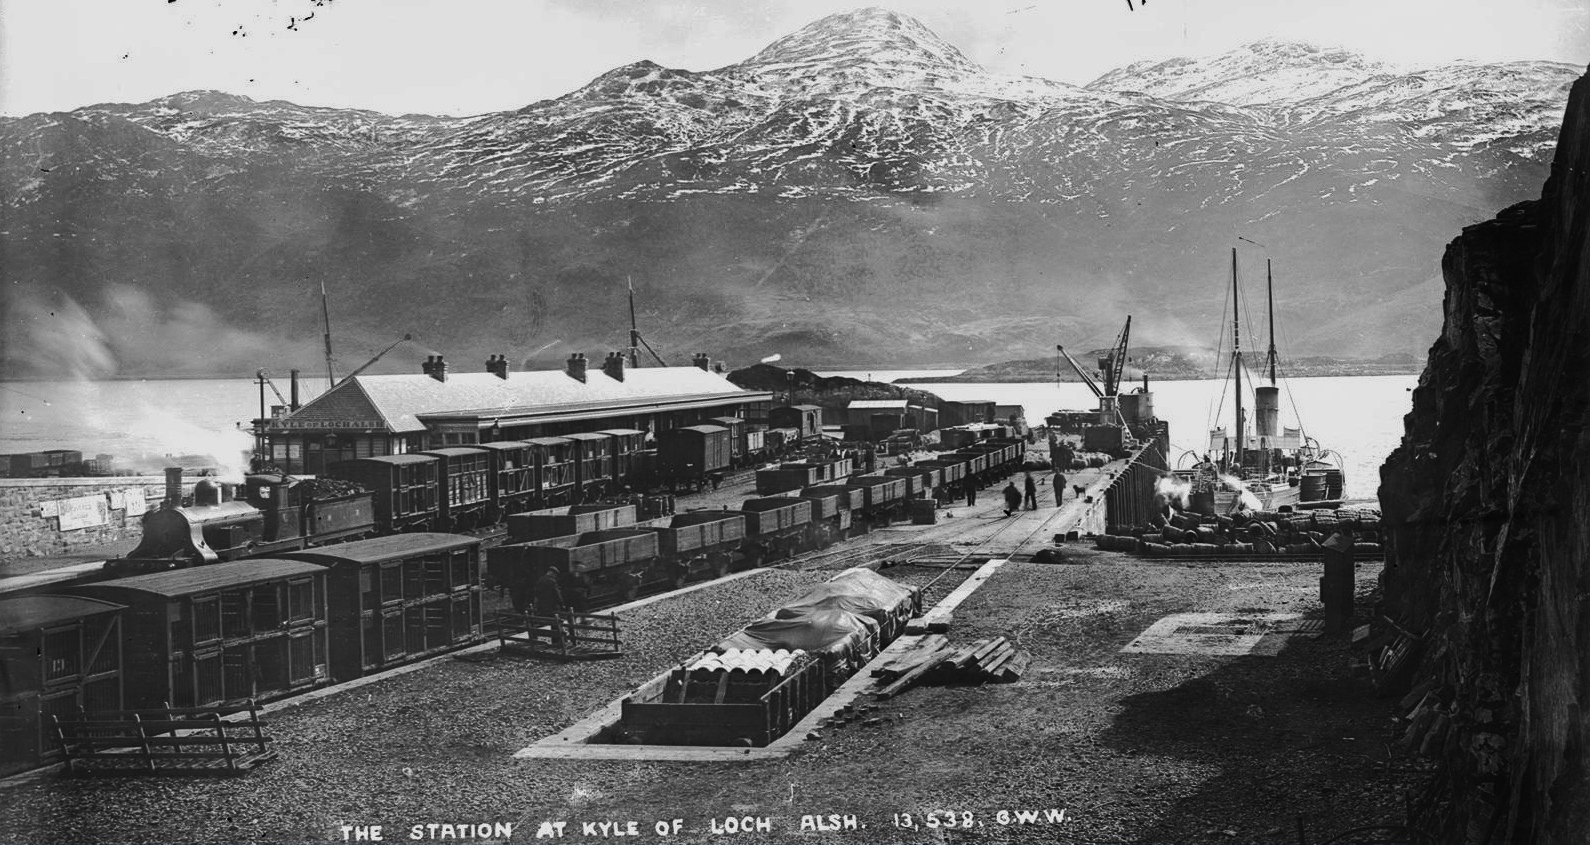
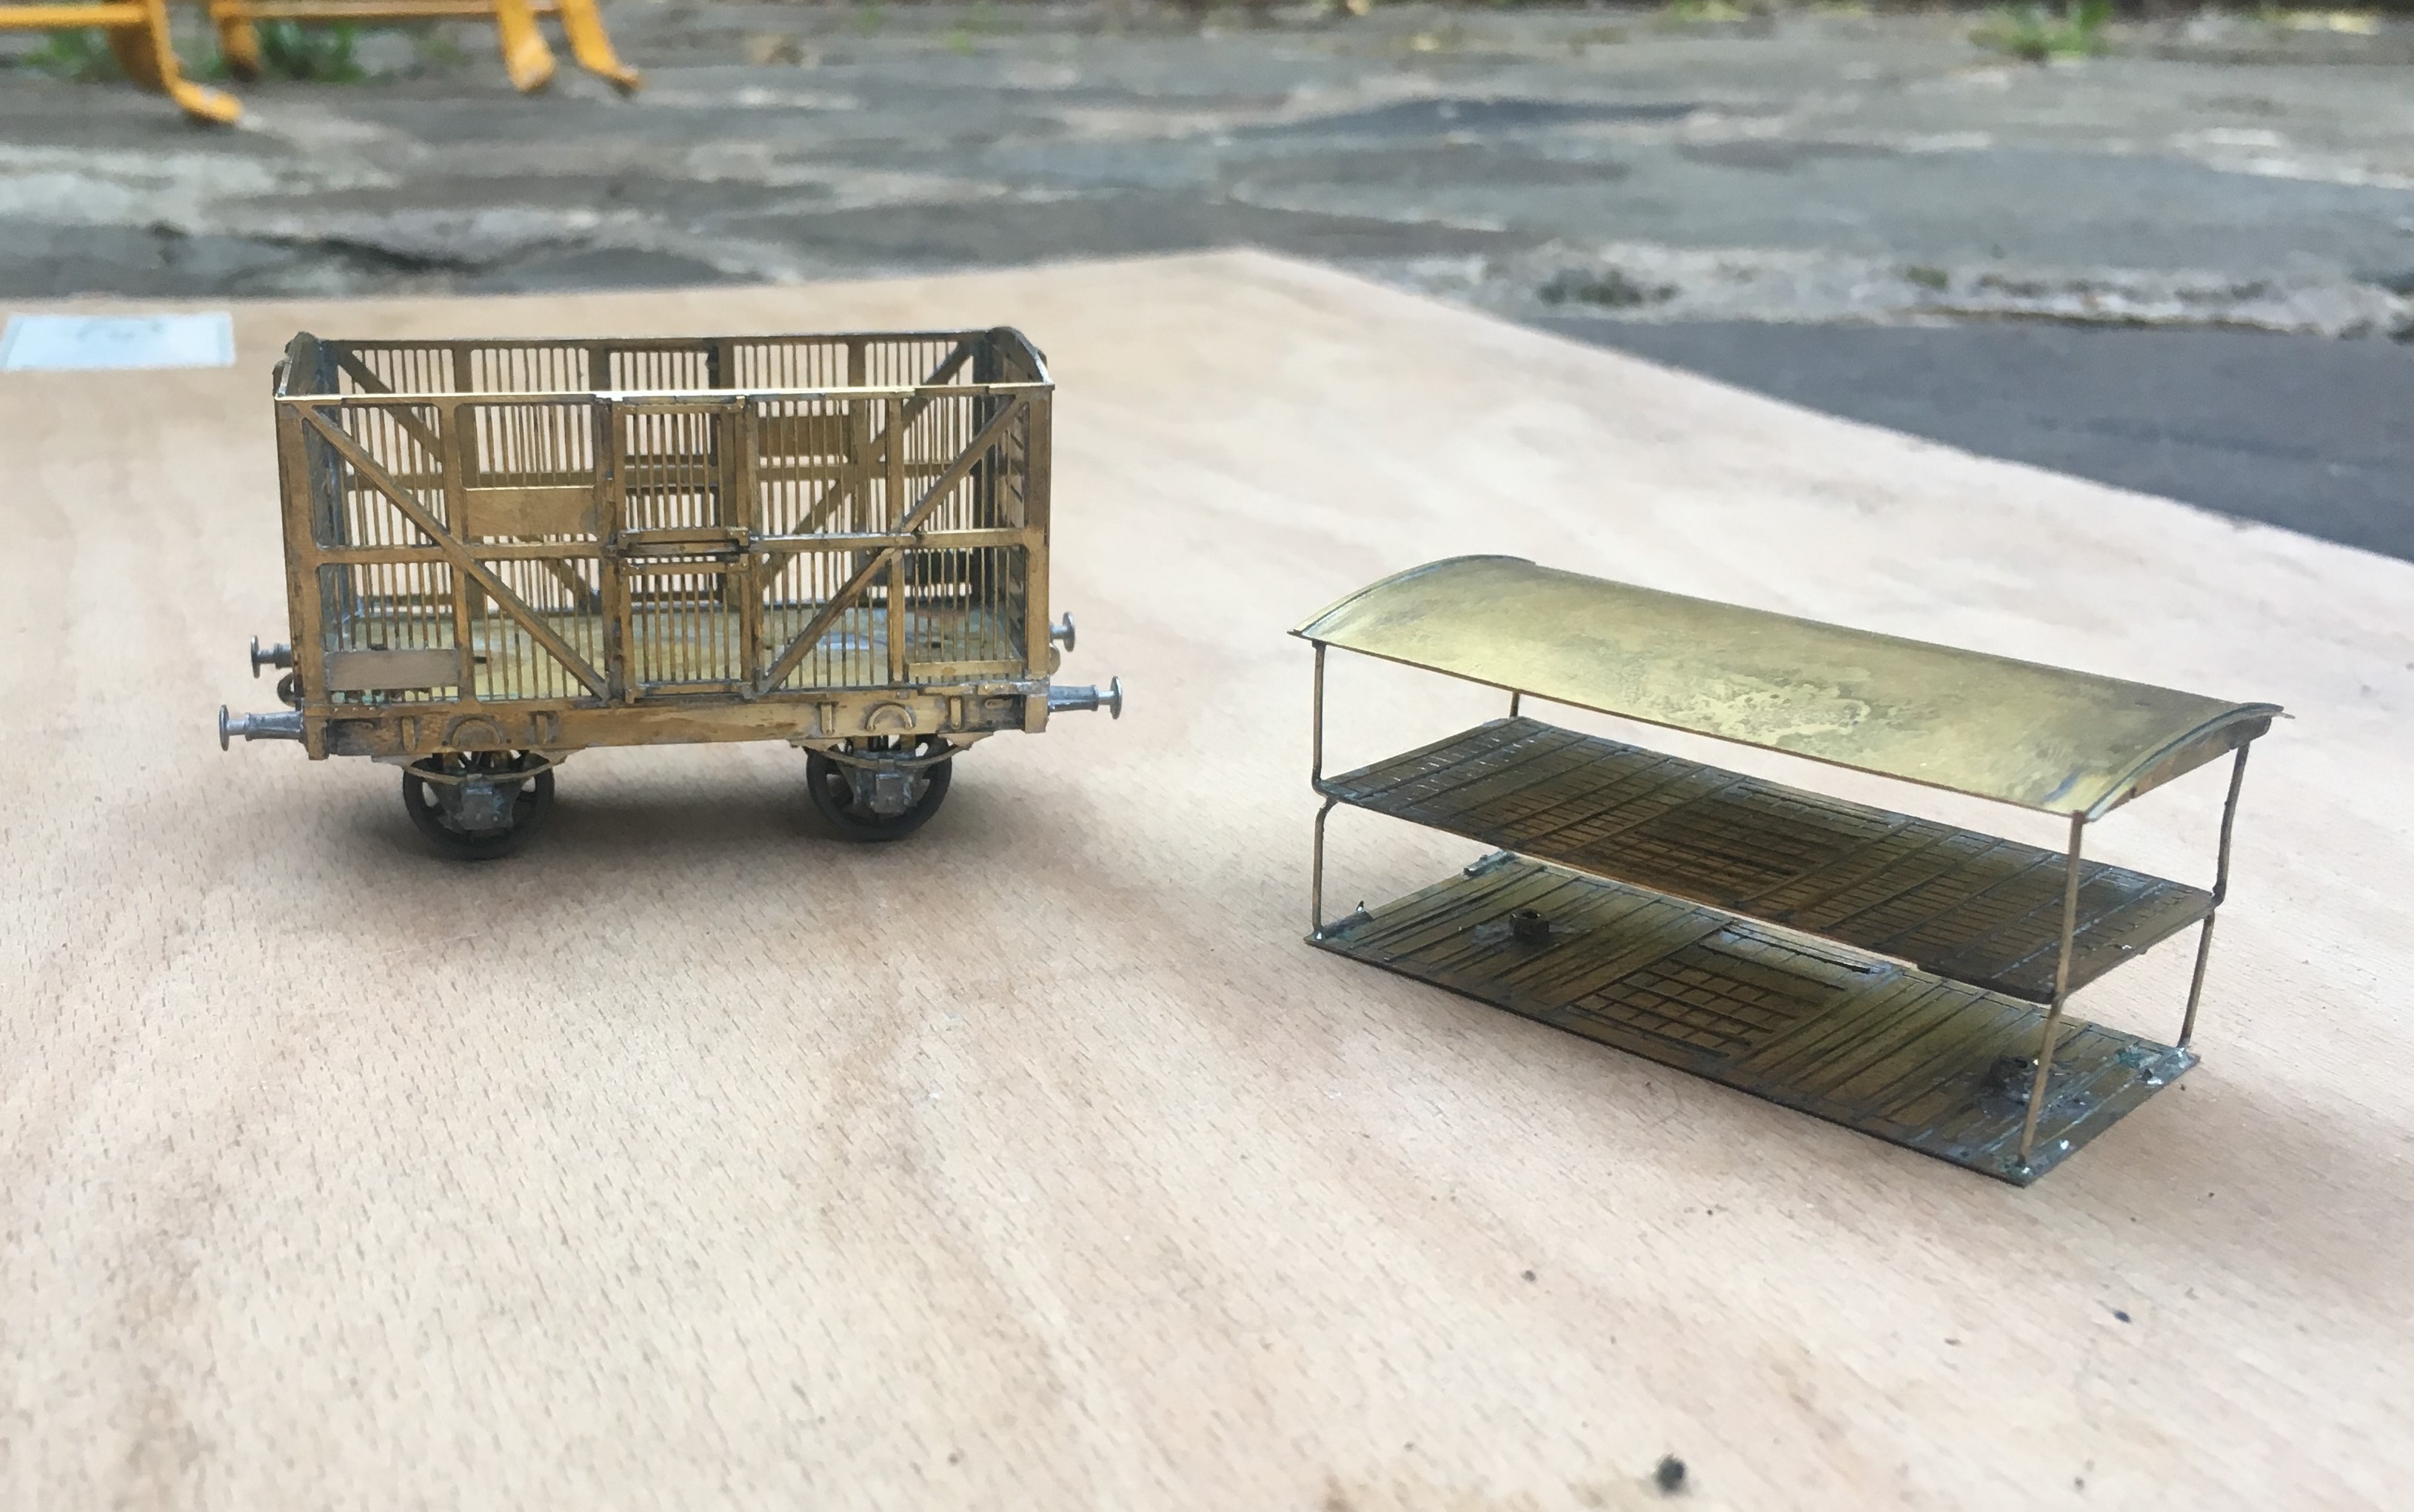
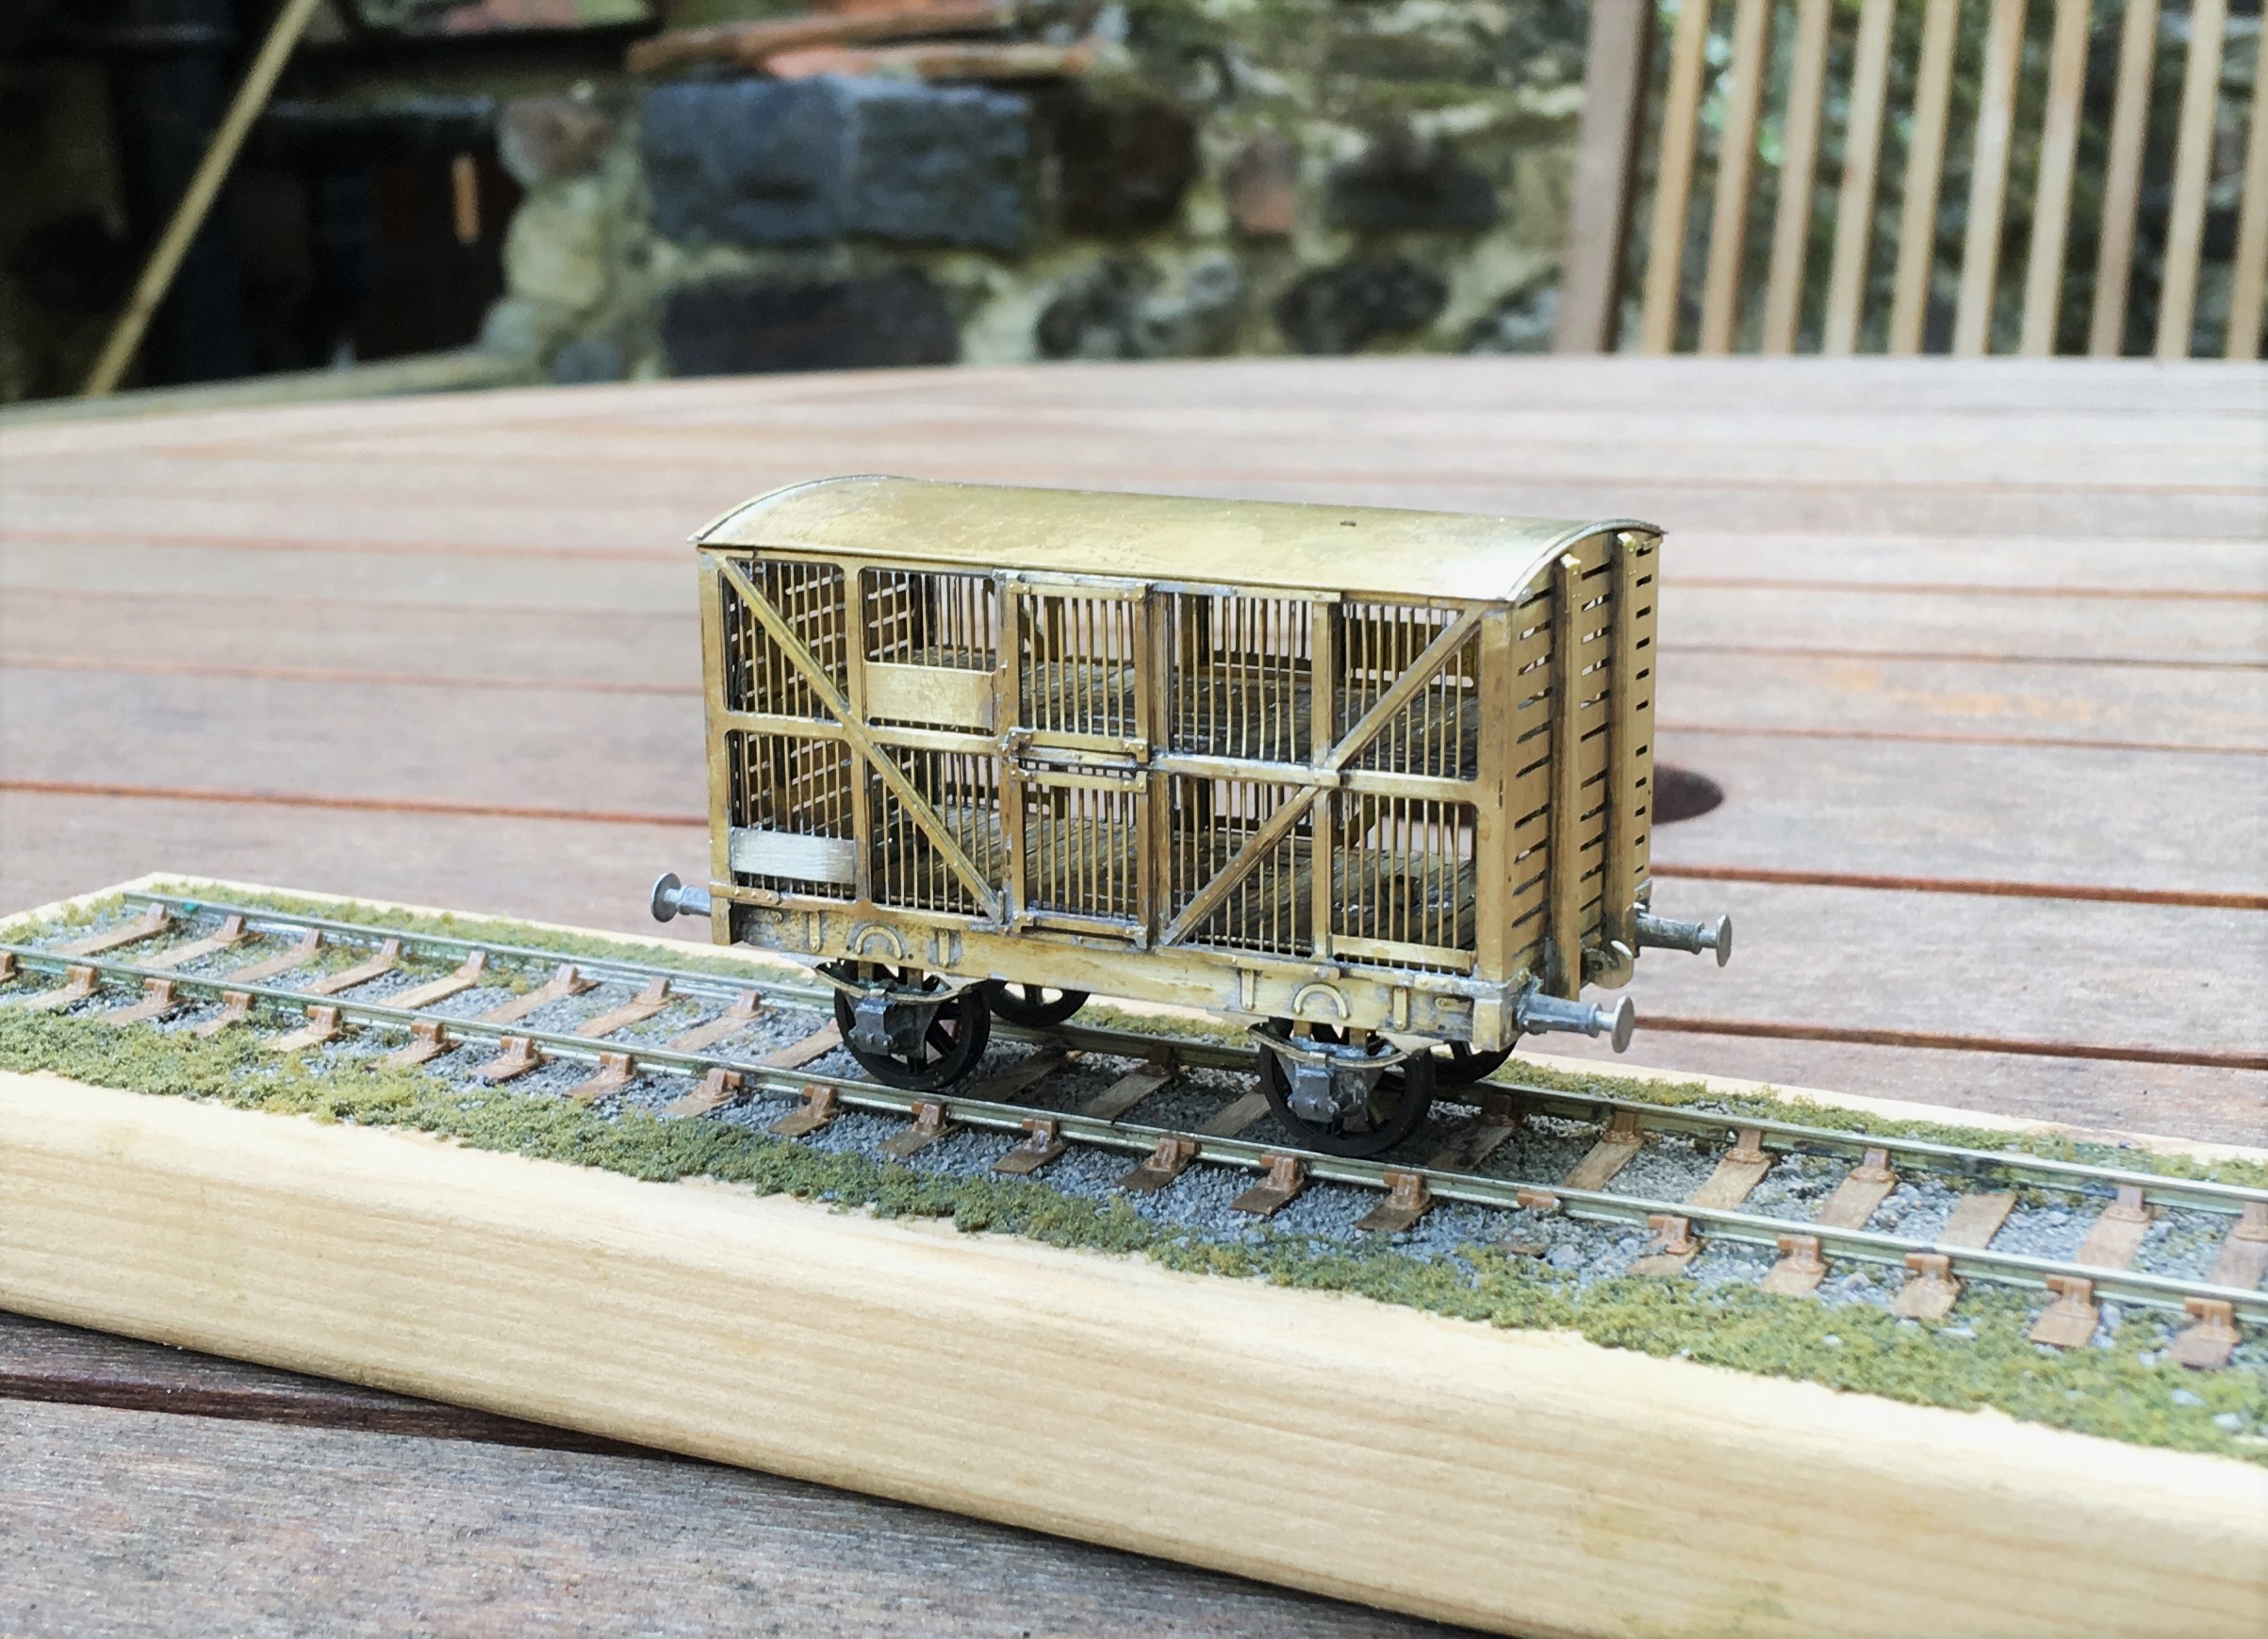
As I was expecting to have a degree of time hanging around whilst the Mrs was on stage, I took a little modelling with me – in this case, a Jones era double deck sheep van. As can be seen in this George Washington Wilson photograph of Kyle – sheep traffic was an important source of traffic to the Highland Railway – the majority of the train in the platform are sheep vans and there is also a row of them in the foreground.
Ever with the eye to efficiency, the Highland developed a double deck van to double the number of sheep that could be transported in one vehicle. I believe that the Cambrian Railway and several railways in Ireland had similar vehicles, but otherwise these were characteristic of the Highland’s lines to the west coast and clearly I have to have a rake of them. Unfortunately, there is quite a lot of effort in each one………….for example each side below is made up of five layers of laminate (and they are delicate too)!!

The highland had several versions of these vans, this time I chose the second era of van, which has a single door and diagonal bracing; I do have plans for some of the other diagrams so this is a topic we will revisit at some point! The starting point for this vehicle was an etched kit from the Lochgorm range (presently unavailable, but we are all hoping……) and as already hinted, it is not an easy one! This is mostly due to the delicacy of the parts and the multi-layering of the etches that take up a lot of care to line up with each other. It takes a fair few hours simply to get the sides made up and ready for assembly and then you still have the metal bracing to do!
There were a number of elements to the kit that did not work for me. The various tabs you see in the above image are to help locate the various floors with each other but in practise they are not correctly located and just get in the way – so I whipped them off! I also ditched the compensated suspension and instead used spring suspension instead with some trusty Bill Bedford sprung units.
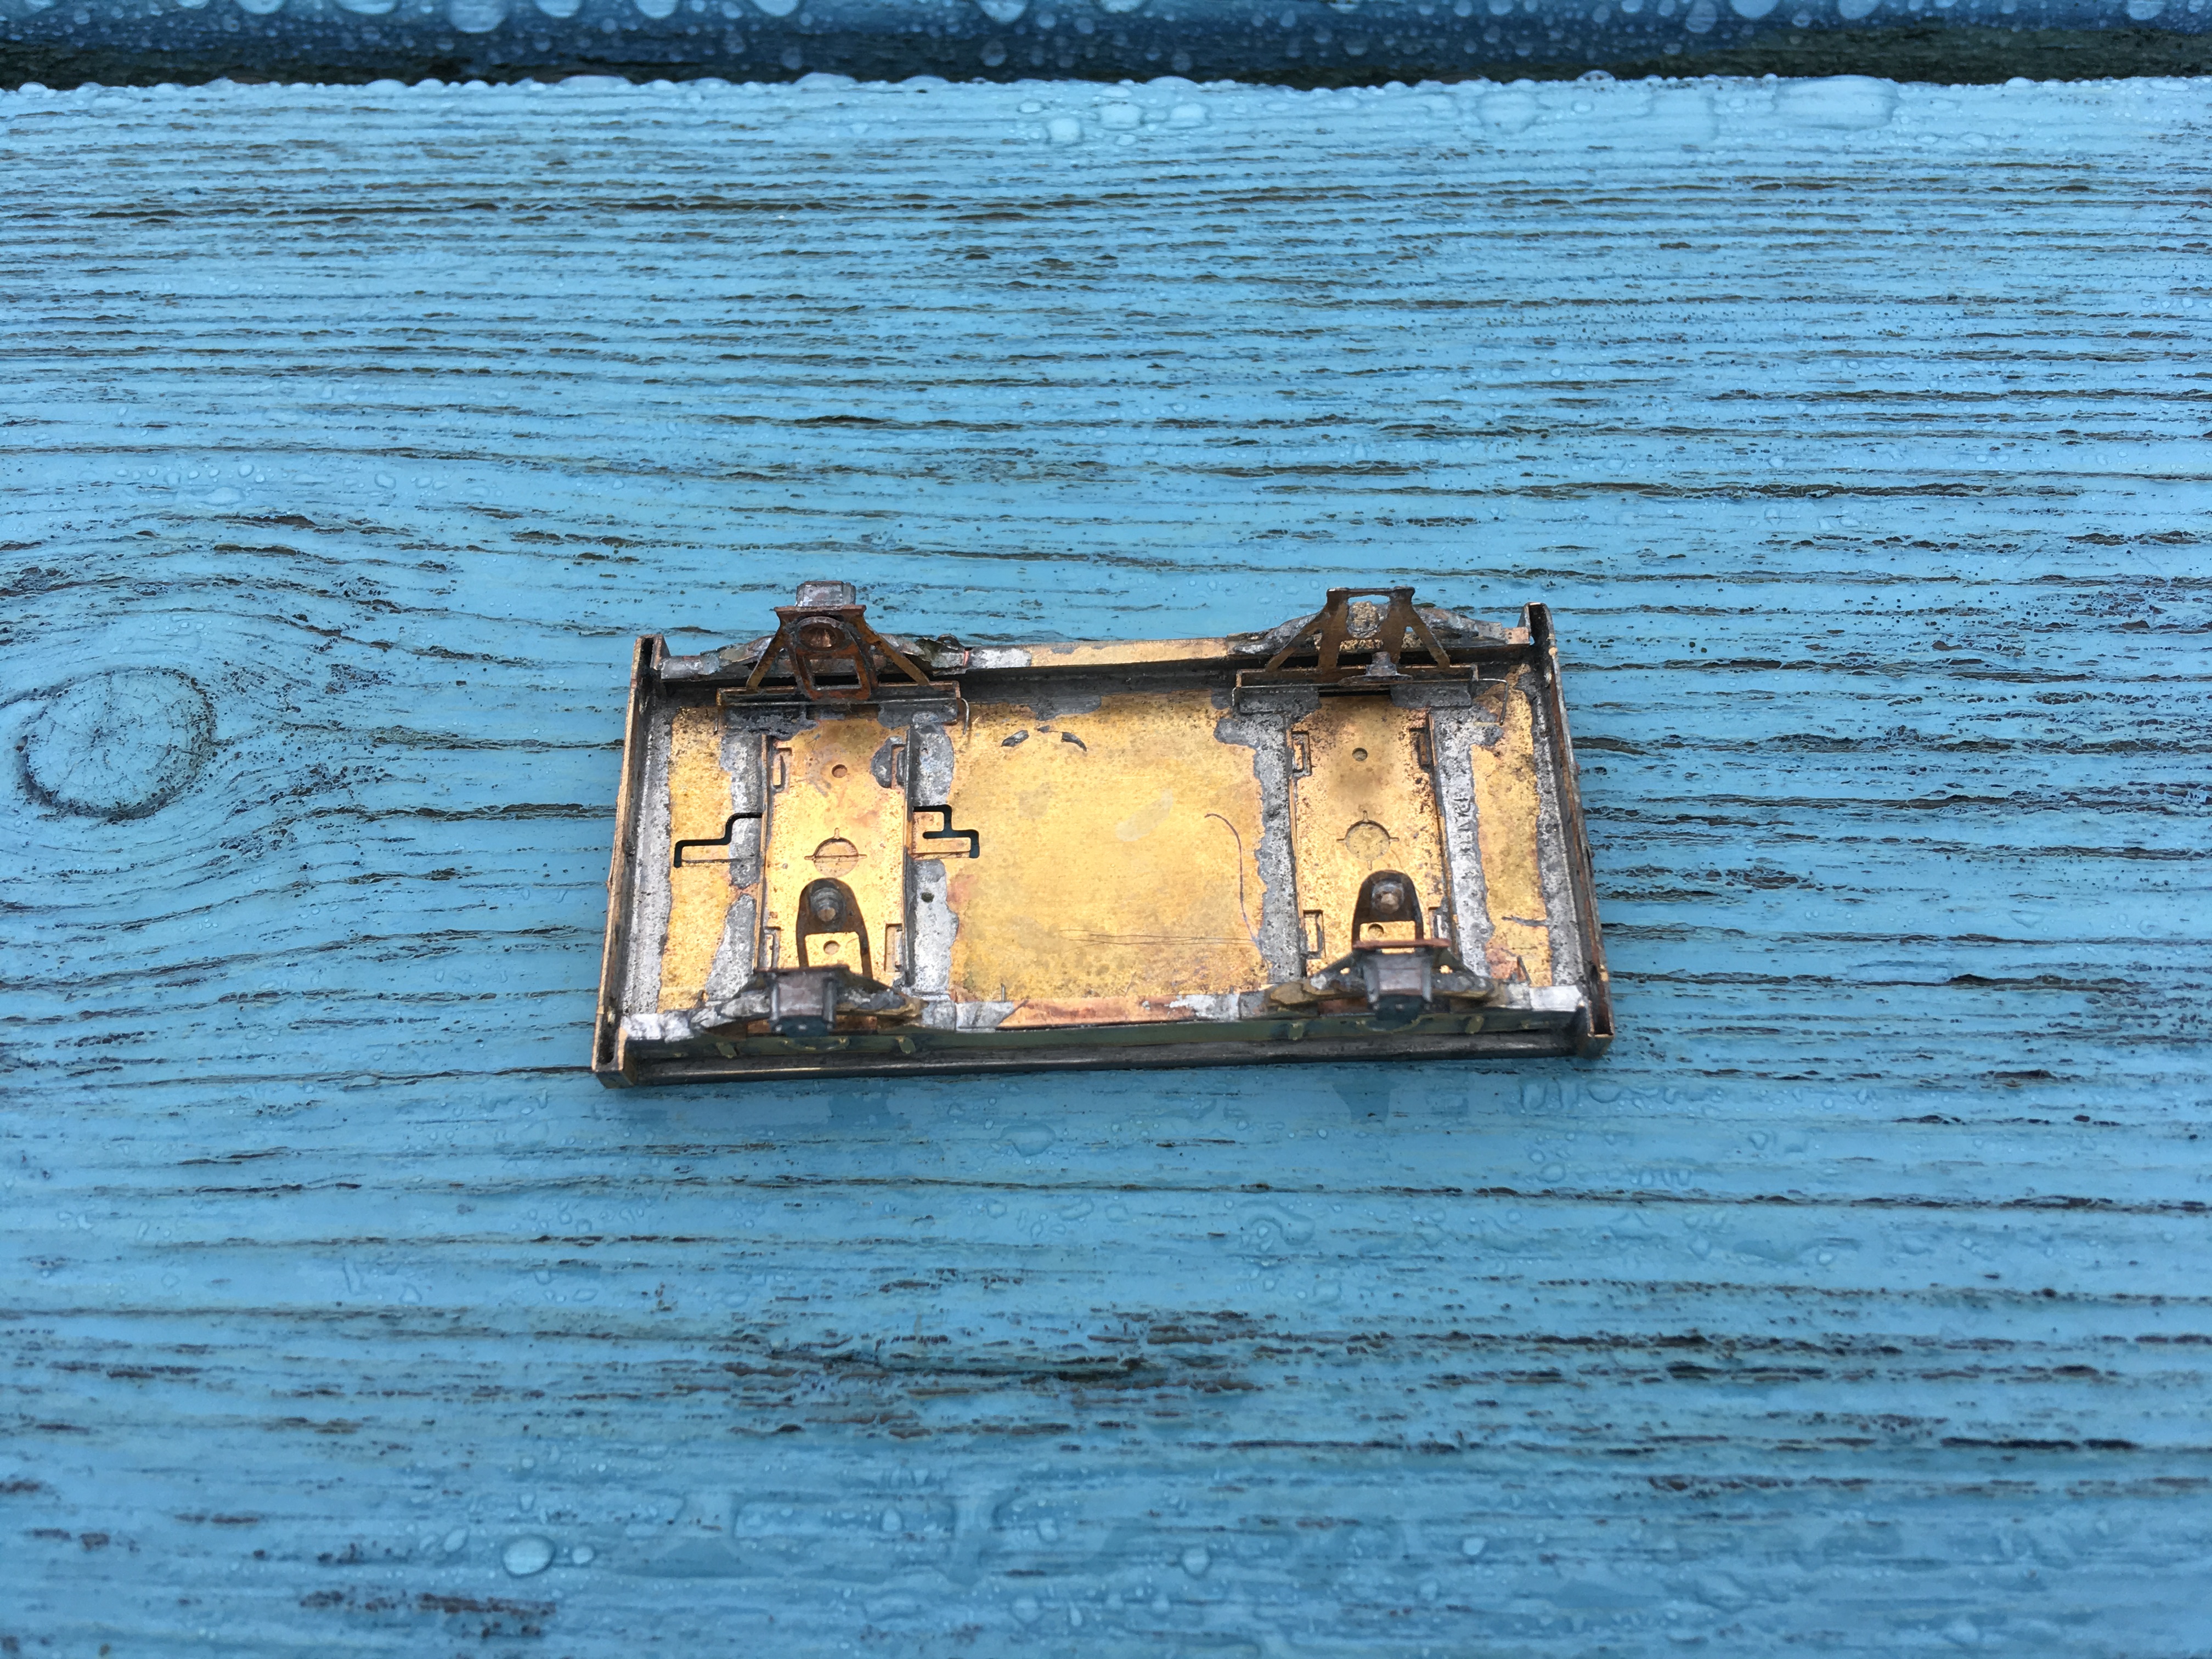
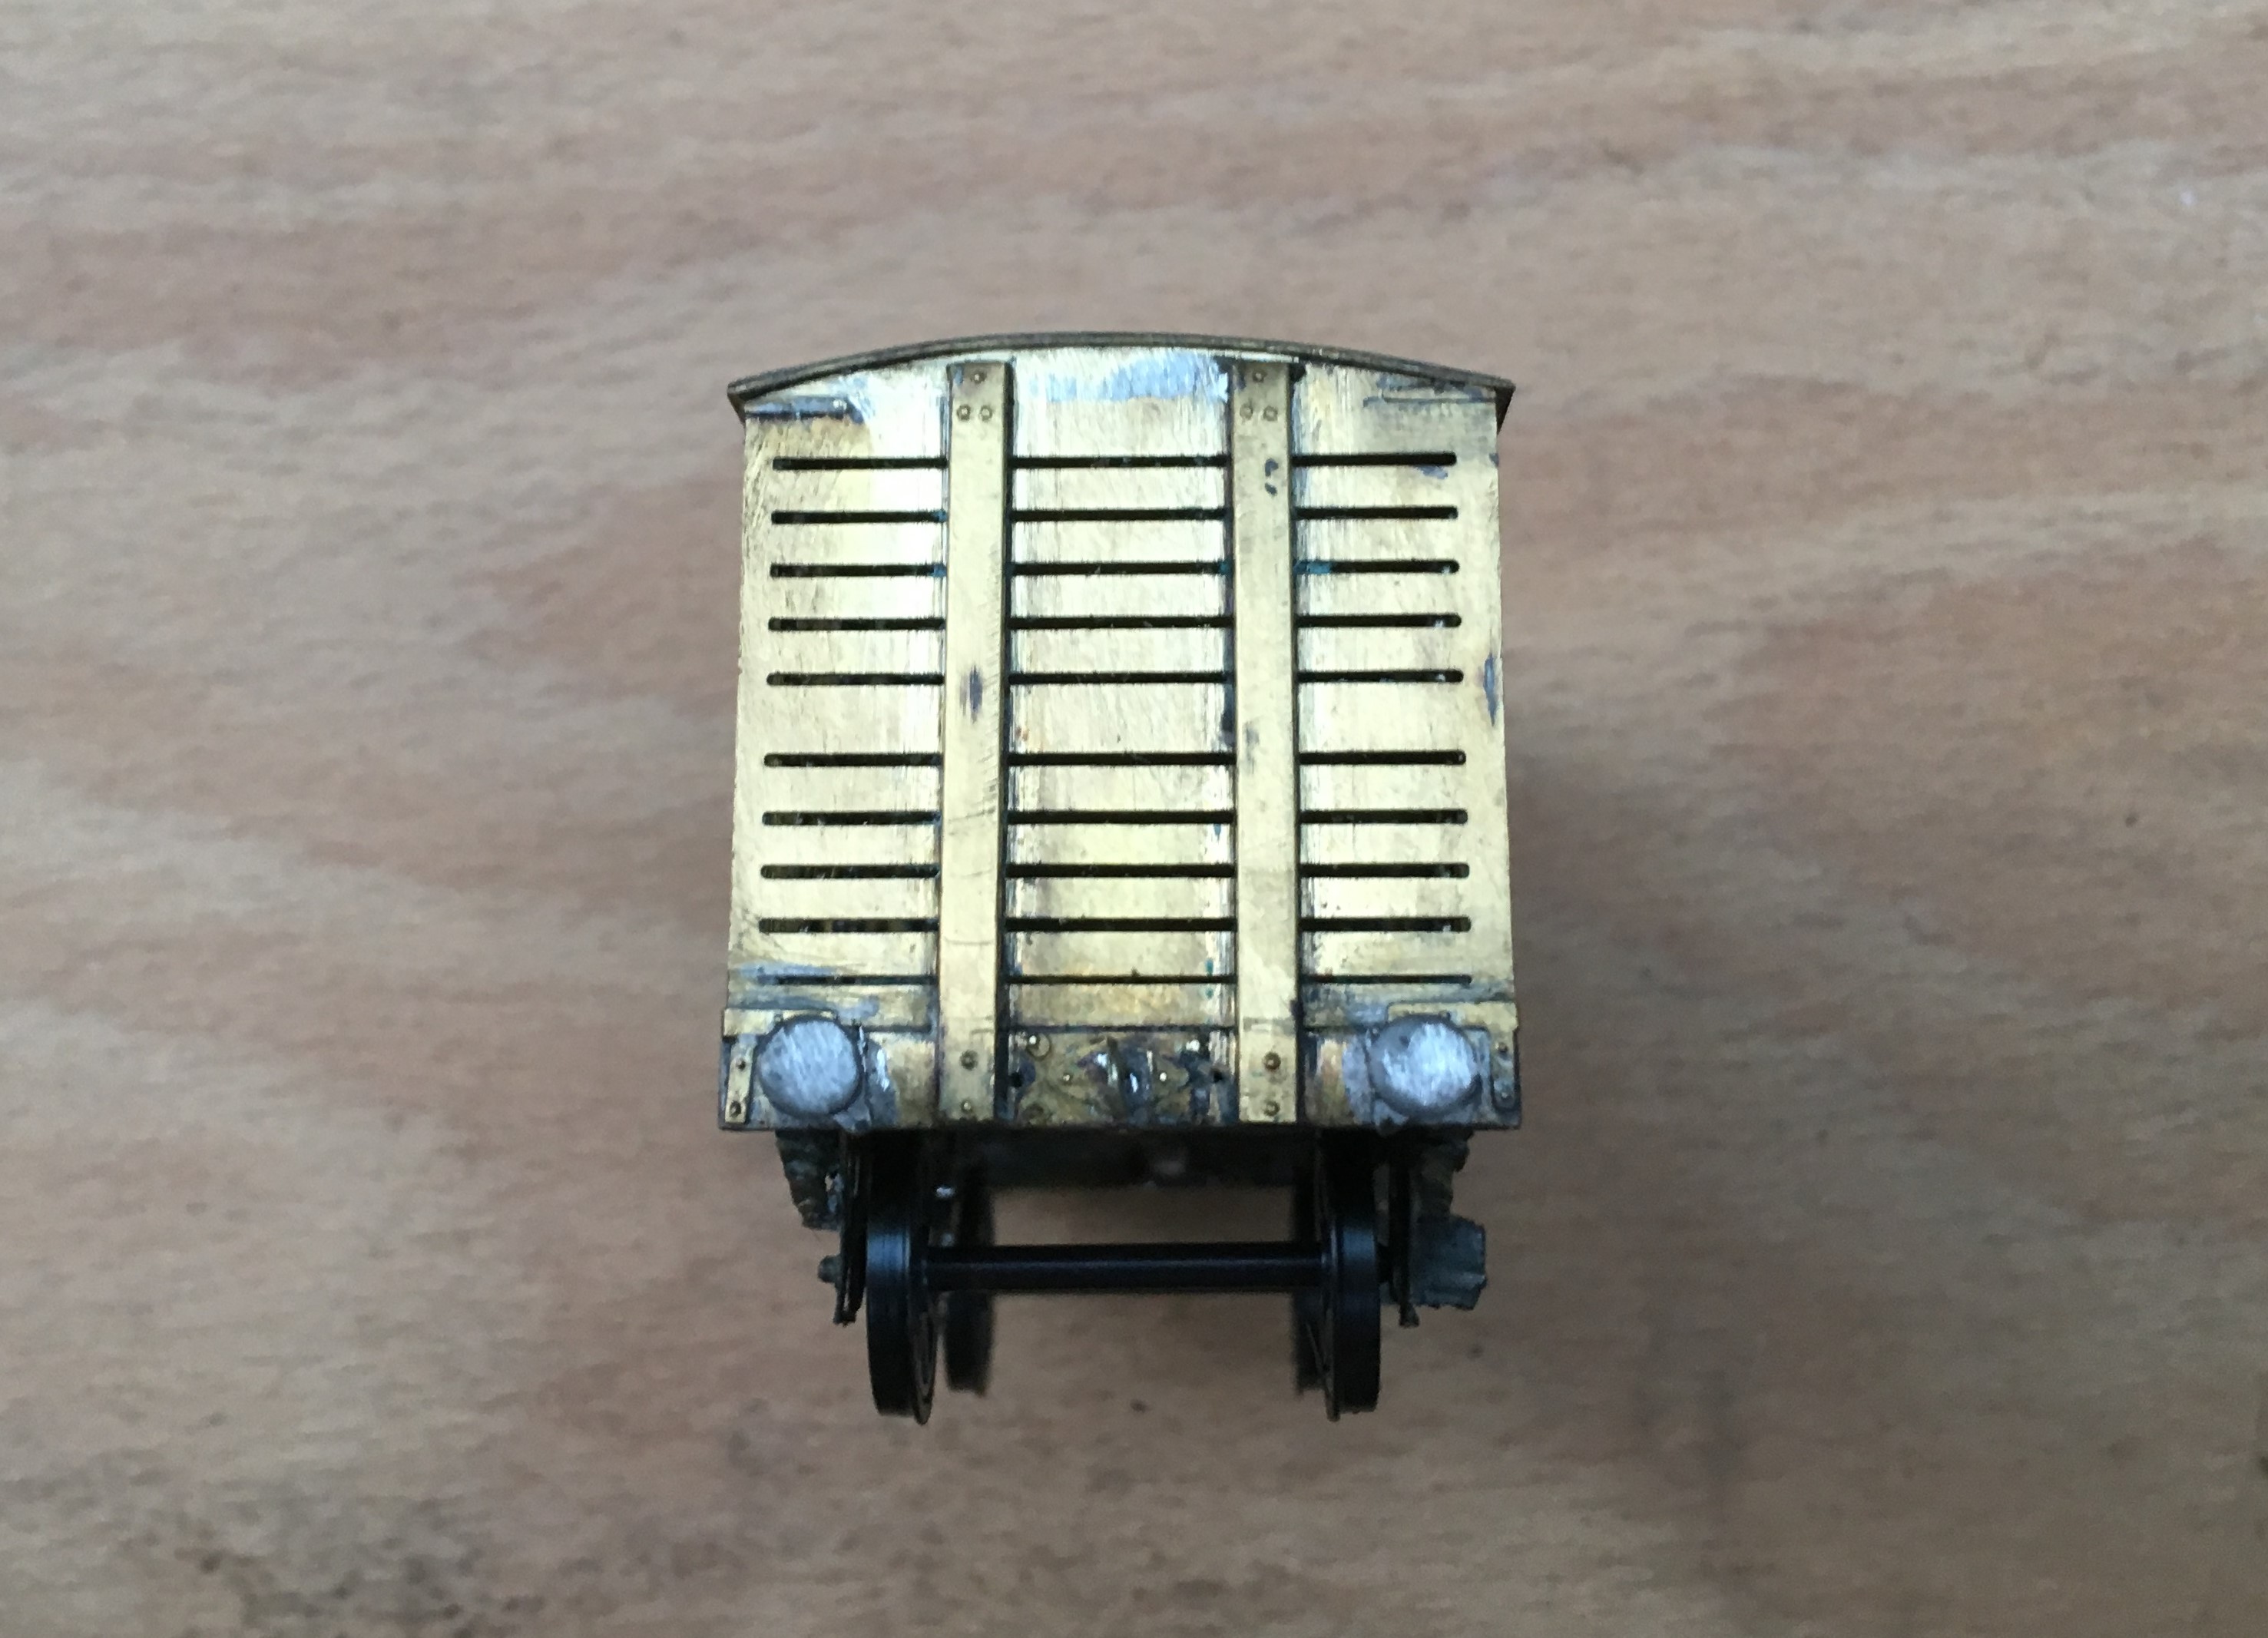
However, I did not spot the biggest problem until it was too late. There is an error with the design of the kit ends where one of them is missing the top gap between slats. The correct end is as per the right hand picture and had I have spotted this prior to the assembly of the ends, I would have been able to insert the additional gap with a piercing saw. Having missed the problem until after I had built the van, I decided not to sweat the parts apart to cut in the slat. It only shows to those that know it is wrong; the problem is that I am one of them so it does niggle!

Contrary to the instructions, I did not loose lay the floors in place and instead created a cage arrangement by hanging the floors from rods that were secured to the roof. As can be seen below, this enables the roof and the floors to be released from the interior of the van. As with all my vans/coaches, this is secured in place with some bolts and nuts, so that the roof can be clamped tightly in place (I hate the cracks of doom that I see on otherwise fine models where roofs are not properly secured!). The detachable roof is necessary to both paint the vehicle but particularly populate it with the necessary sheep. You would be startled by how many sheep are required to fill one of these – around 50 and it costs a fair amount to populate each van. Thus, I have in mind casting some of my own in resin, although that is a story for another day.
The problems with the kit did not finish with the problems noted to date. The iron strapping was not quite right, the springs for the axleboxes are too big and the brake lever/shoe seemed excessively skinny. Thus, these were all adjusted or replaced with alternatives. All this effort and problems to solve meant that the van took a great deal longer to finish than the week that I had available – so it has taken until now to photograph it. This is what it looks like and rather dainty and different I think it is too!
And what of the Minack Theatre? Well, for any that do not know it this theatre’s setting is simply breath-taking, being set in the cliff side only three miles short of Land’s End. As you can see, vertigo is an issue for visitors and all of the set, props and costumes had to be carried down to the stage level – exhausting work that took us three hours! One of other downsides of the theatre is that the seals, dolphins and basking sharks can sometimes be seen over the shoulders of the cast – which is distracting as you can imagine!
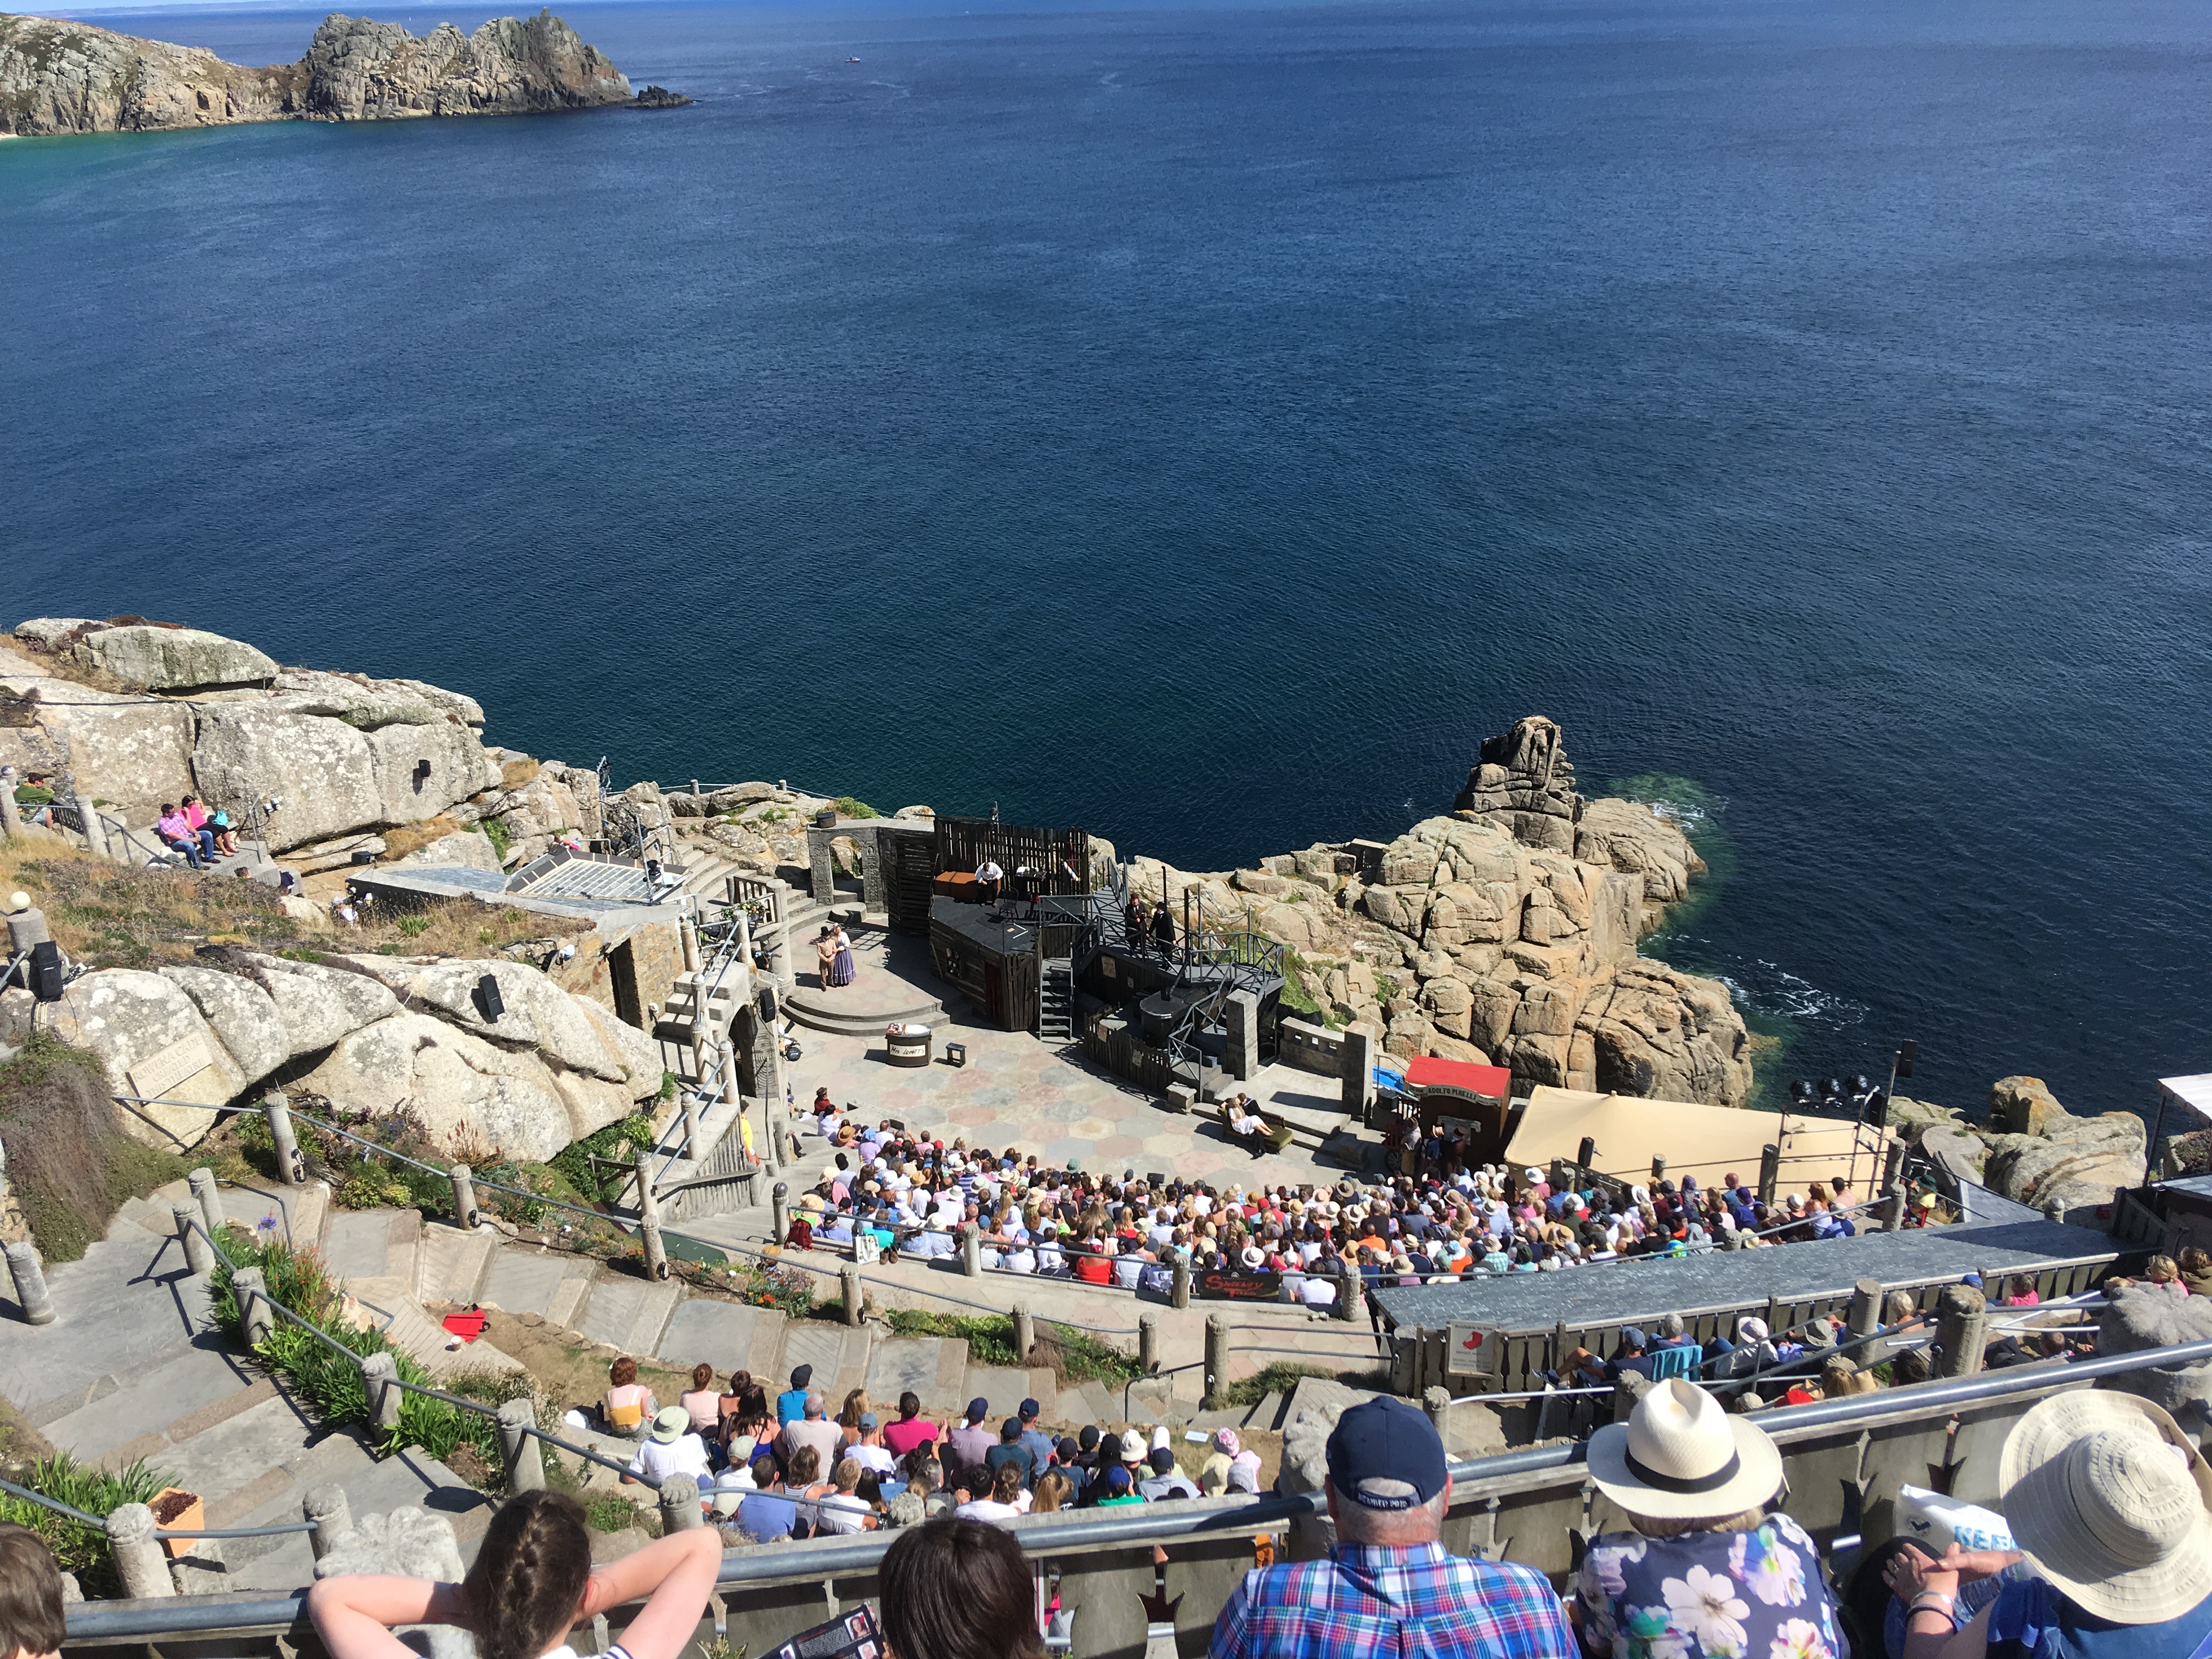
Only my wife was on stage, my duties including the stage building and front of house duties but with 7 public performances in five days, plus rehearsals there wasn’t that much time for modelling!
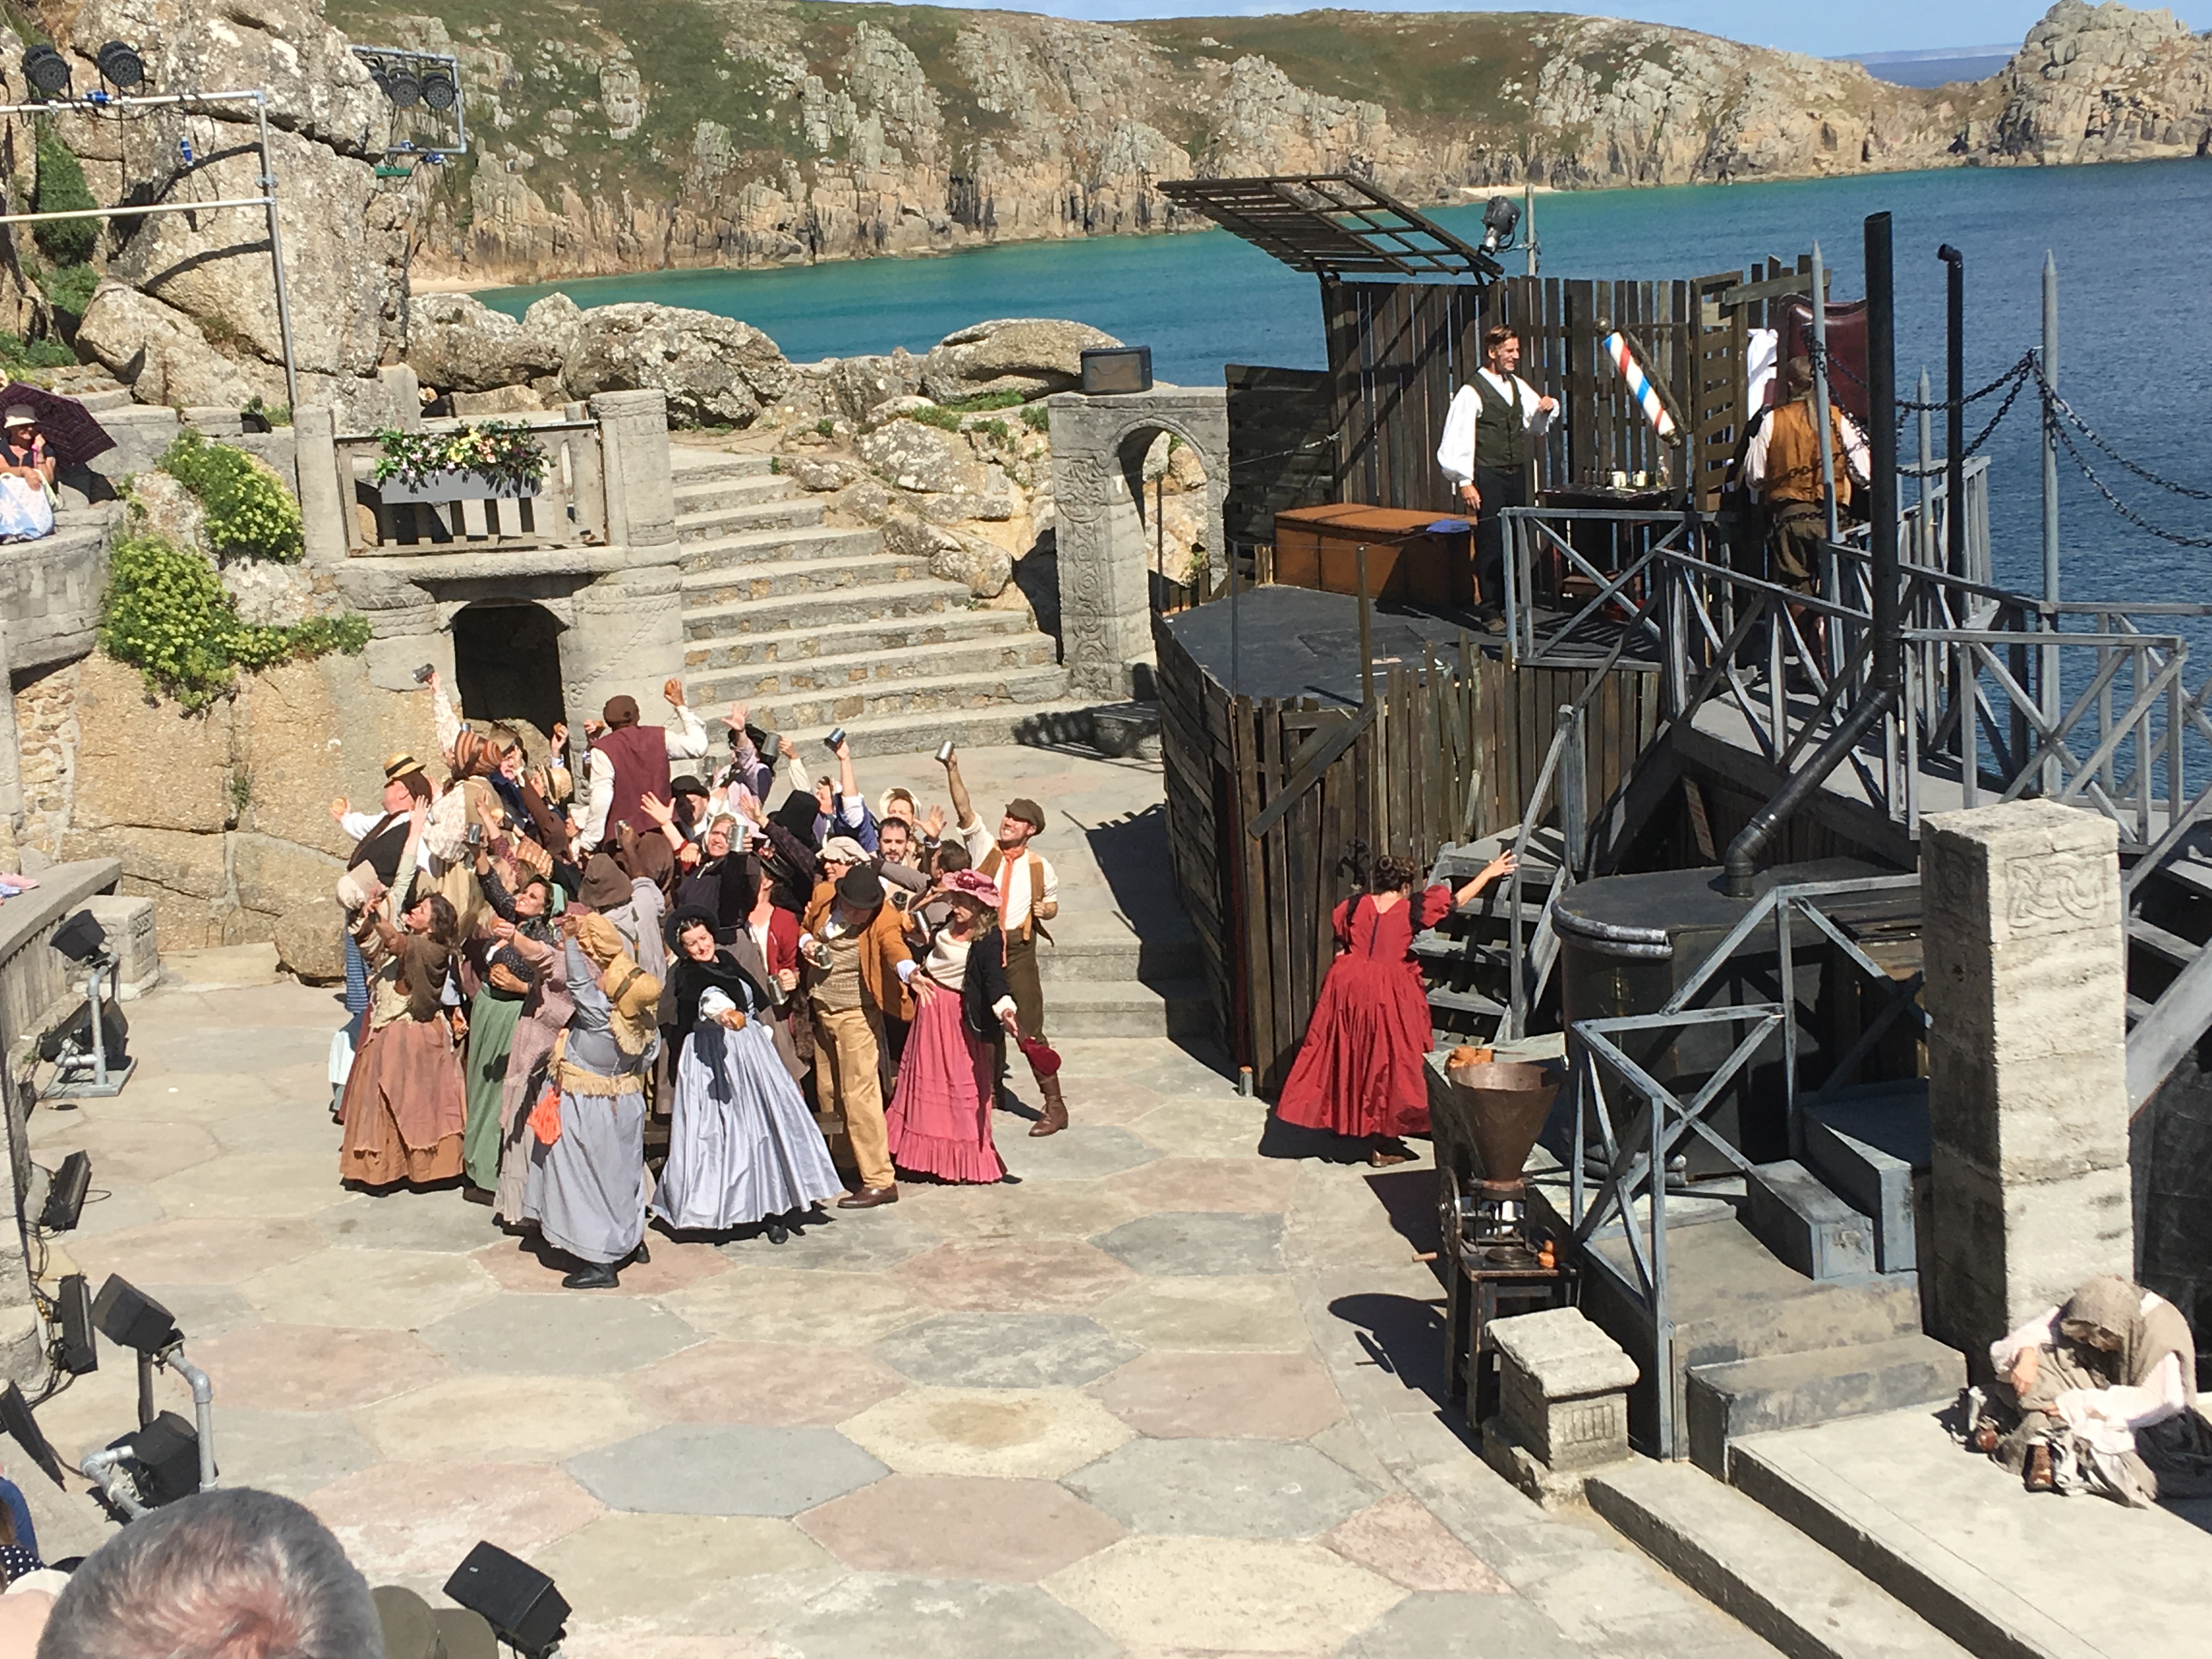
The musical being performed was Sweeney Todd – The Demon Barber of Fleet Street which follows the revenge that its namesake extracts on a corrupt judge and his beadle (with quite significant amounts of collateral!) for wrongly arranging for him to be transported. The most recent Hollywood version is pretty dark and definitely less watchable as a result – our version has just as death but with a great deal of humour too; especially as the leads had some pretty good comic timing to deliver it well.
The by-product of all these killings (ie bodies!) found its way into pies and one of the more jolly parts of the performance is where all the customers of these pies extol the virtues of their meaty dishes. So with apologies for my rather crude phone videoing; enjoy……………(I did, although strangely I had no taste for pasties whilst I was down in Cornwall!)………..
Couldn’t Have Done It Without………….2
I have not managed to get any models to a stage which would make a worthwhile post for a couple of weeks; in a large part due to the disaster I had with the matting agent in my varnish.
This has meant that a number (oh yes, it wasn’t just the one I showed a picture of………) of models have had to get a coating of in nitromors. But nitromors is not enough to to properly clean the model and a lot of attention with a glass fibre scratch pen is required. So I have had an enjoyable weekend plucking glass fibres from my fingers! The models are now at the stage where they have been stripped back and the base coats have been renewed. It is pretty galling to find yourself back to were a month or two back!
It does, however, remind me of another of the tools that I find invaluable in my modelling – a ultrasonic bath. Now they don’t sound like a critical tool to a railway modeller but let me correct you. It is utterly startling how much grot and muck comes off even the most thoroughly cleaned model – you won’t believe me until you have experienced it!

This is the version I have, which is larger than most and is big enough to get a full length coach in it. It also has a heating element in it and the warm water helps the cleaning process. So too does this stuff; Shiny Sinks.

This is a very effective cleaner and does not leave a residual film (which washing up liquid does).
The really handy thing about this set of recommended tools is that they won’t get you in trouble with the domestic authorities. That is because this combination is excellent for cleaning jewellery so you can earn a few brownie points for giving these a spring clean!
I got mine from Maplins and it cost about £60. Given that they are going through their liquidation sale at the moment, you may be able to do better than me but they are available (at a higher cost) via Fleabay or Amazon – such as this one https://www.ebay.co.uk/itm/JPL-ULTRA-8060-Ultrasonic-Cleaner-3-Litre/131291011406?epid=21015637893&hash=item1e918dd94e:g:byYAAOSwgQ9VkUcO

Clyde Bogie
The stock for Glenmutchkin has a recent addition and a rather beautiful one too.
This is a Clyde Bogie; the prototype being designed by David Jones and delivered in 1886. Initially this was a top link locomotive of the line but as time went past it was relegated to lesser duties. On Glenmutchkin it will be one of the locomotives for the branch passenger trains – equivalent to what the real locomotive did at the end of its live. This particular example was the last in service and lasted until 1930 and, as you can see, it picked up the LMS’s first livery of fully lined Crimson Lake.
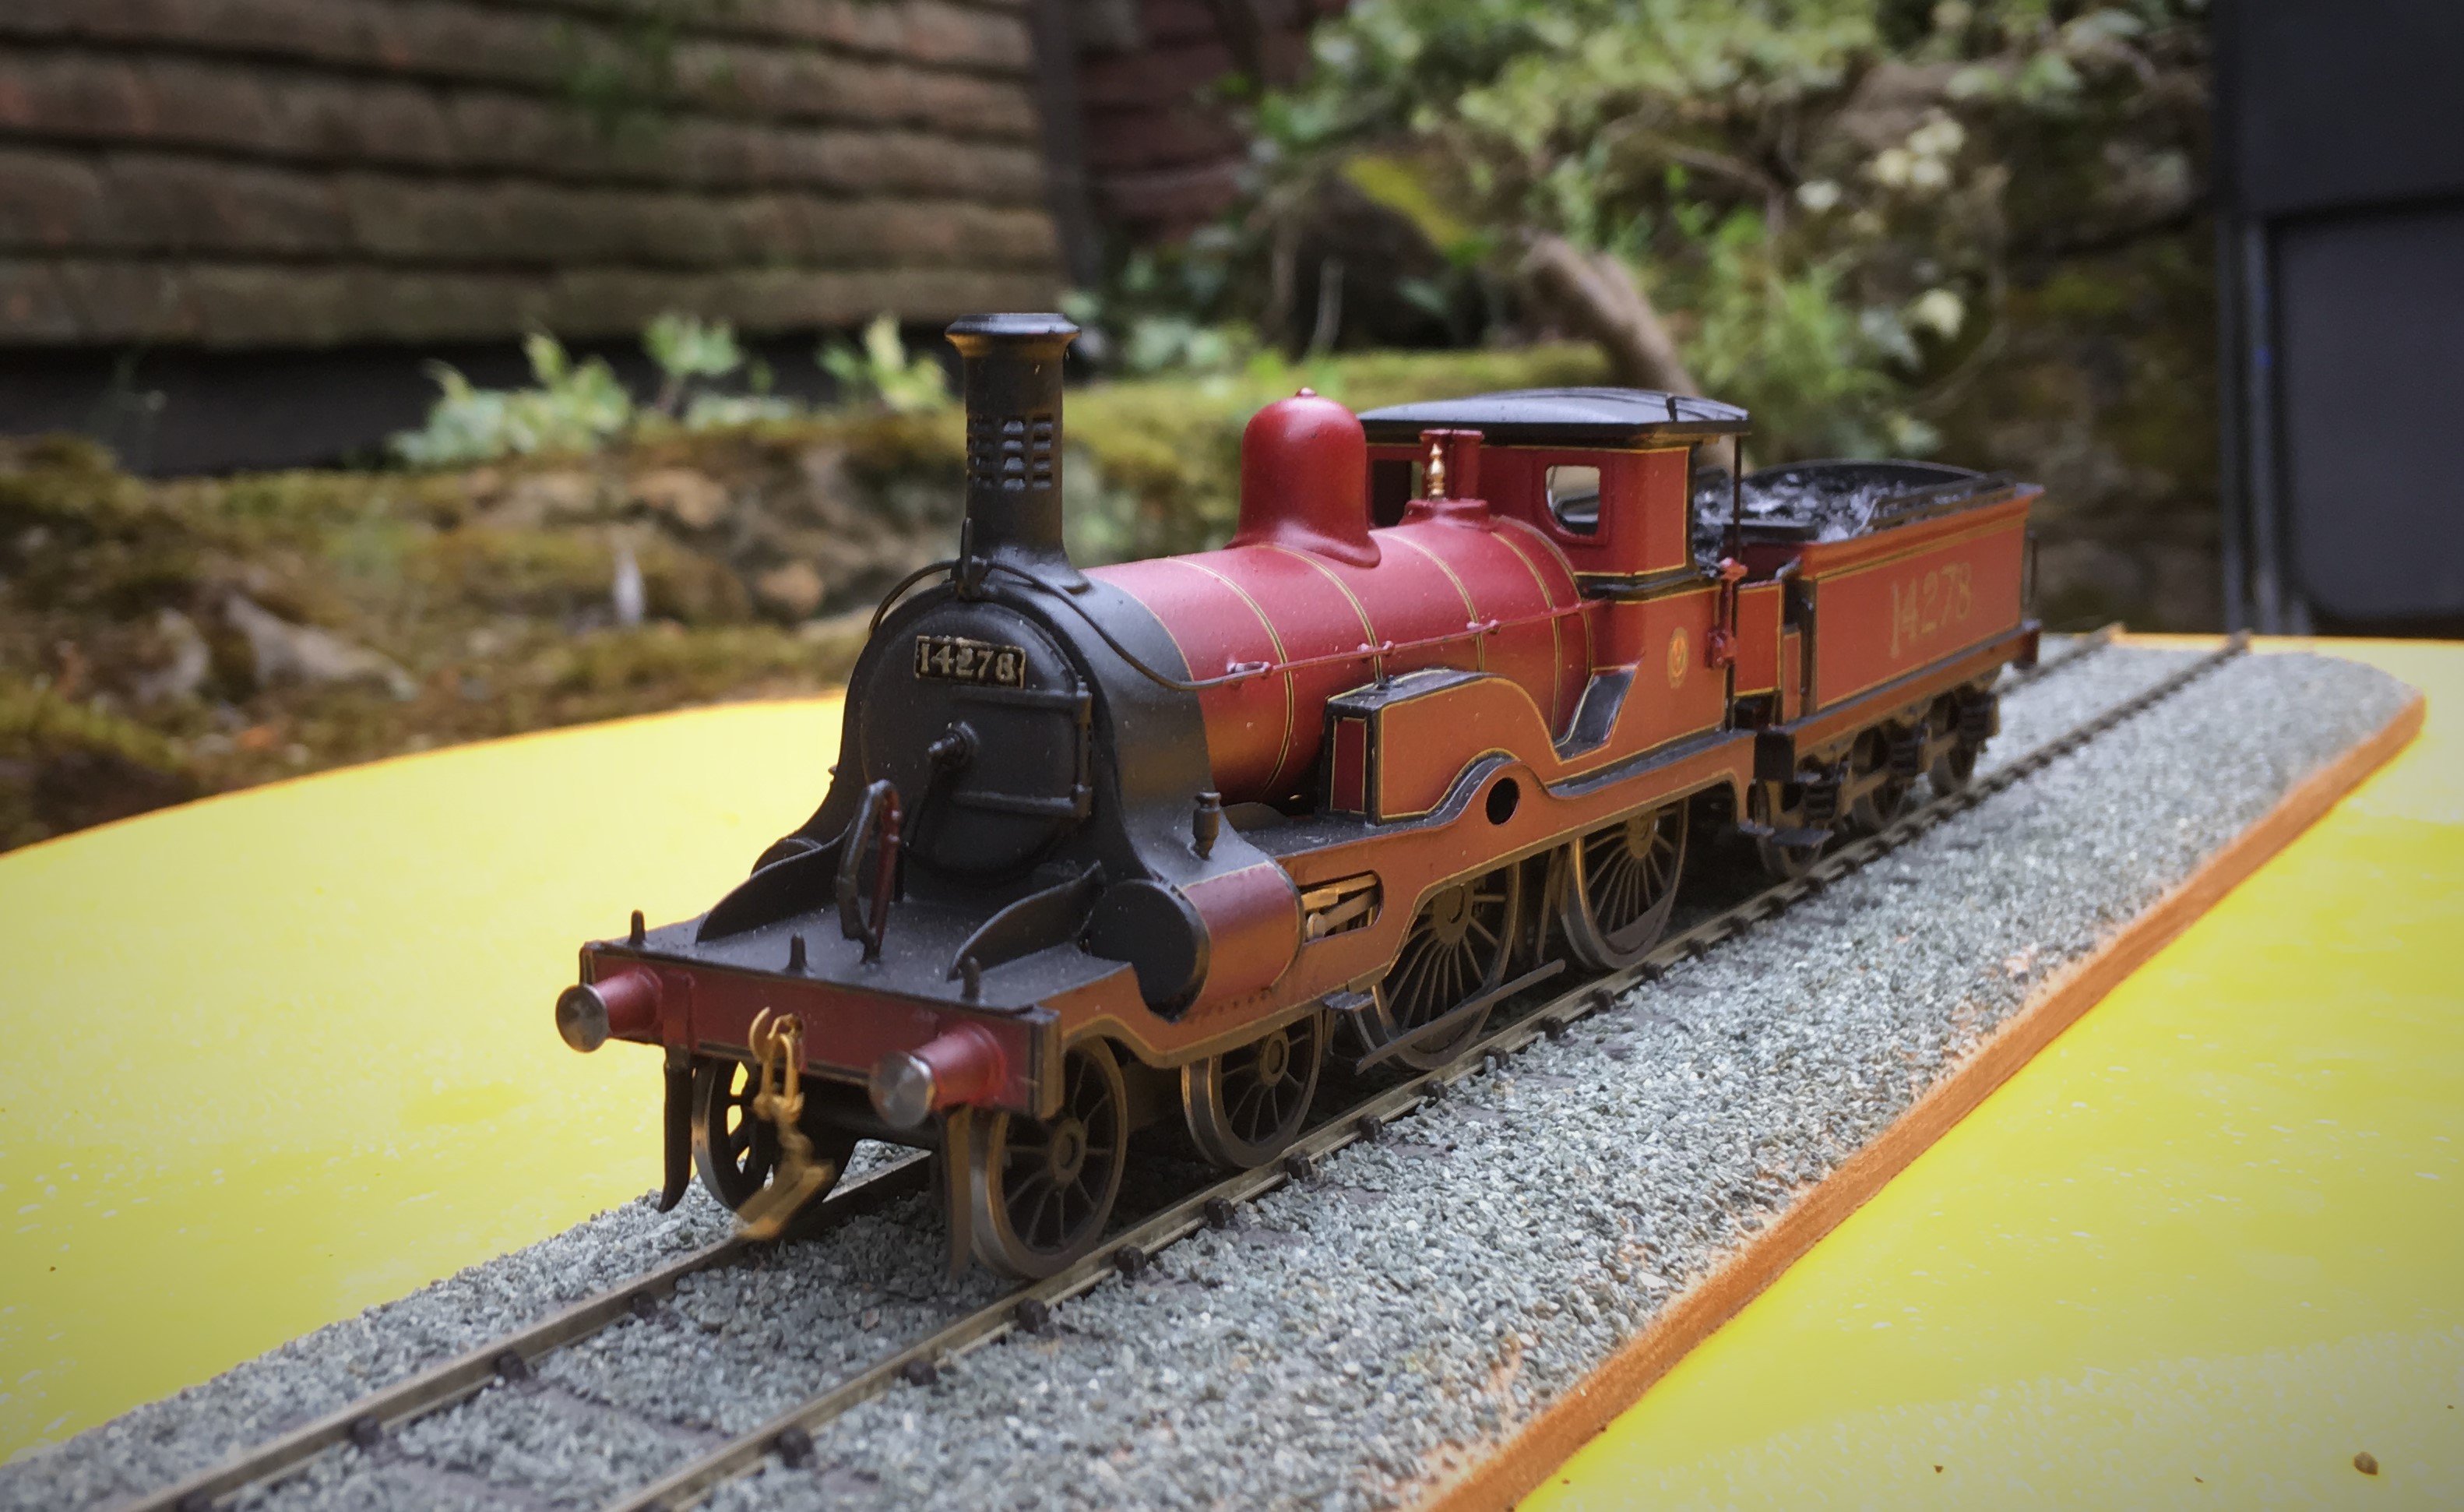
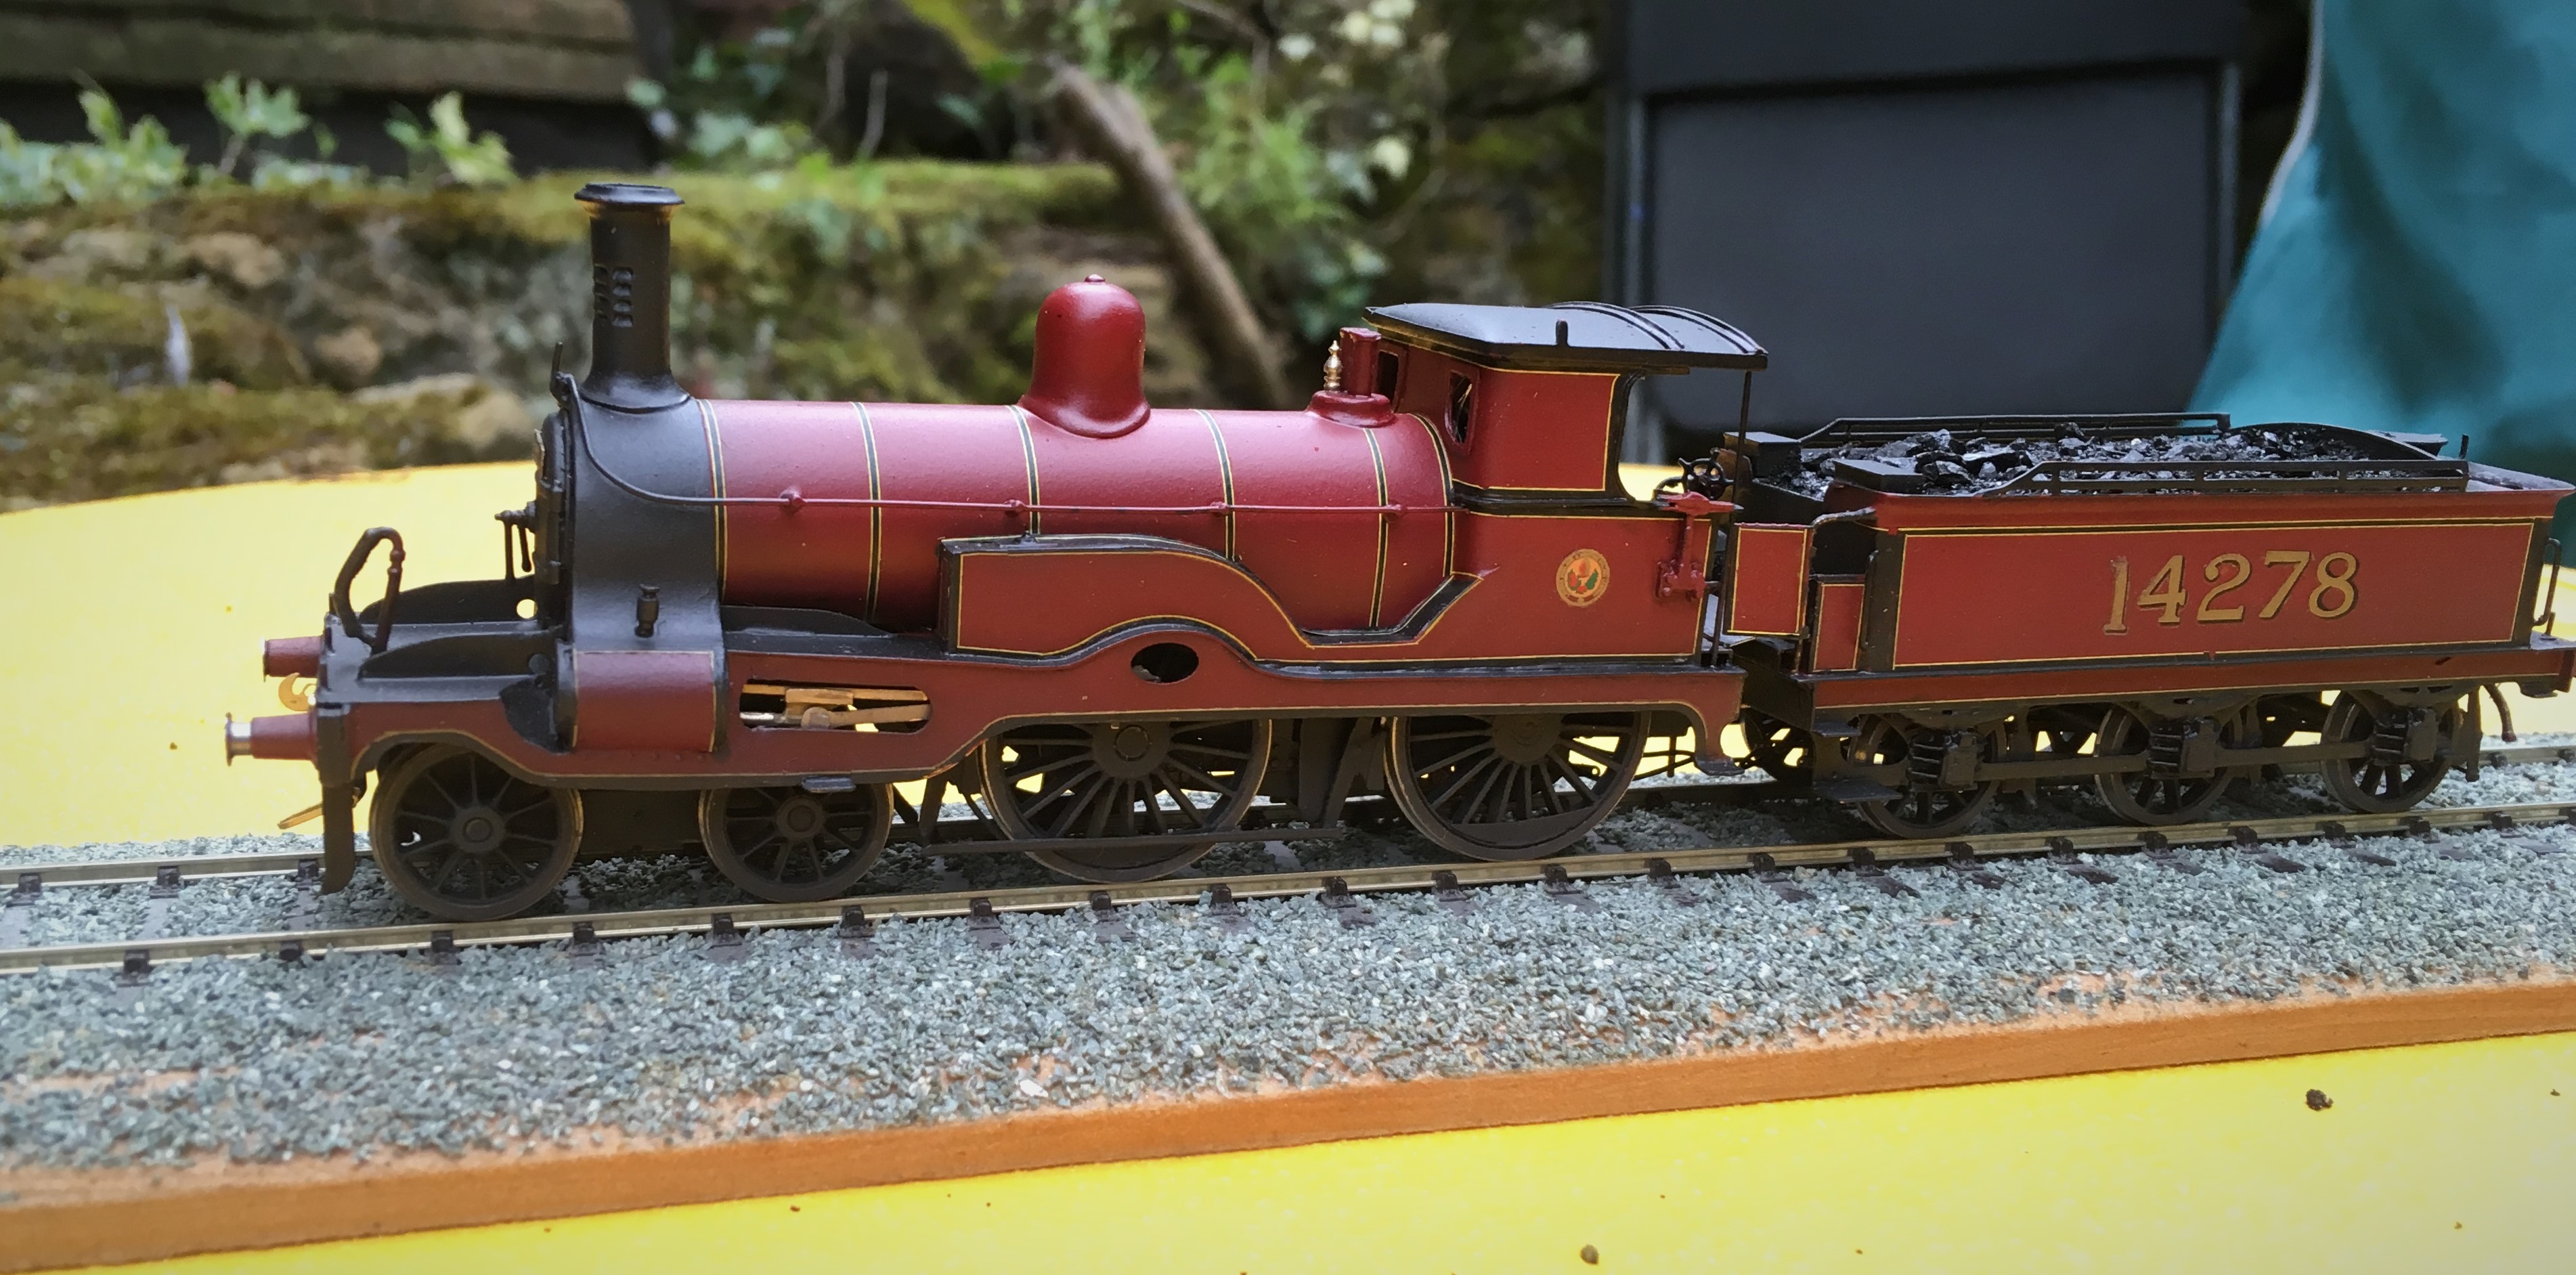
The model was built for me by John James from a Lochgorm Models etched kit. It is fair to say it was not an easy kit to master and John has cursed me a fair amount I believe for asking him to do this particular prototype…………… He would have cursed more if he also had to make the louvred chimney!
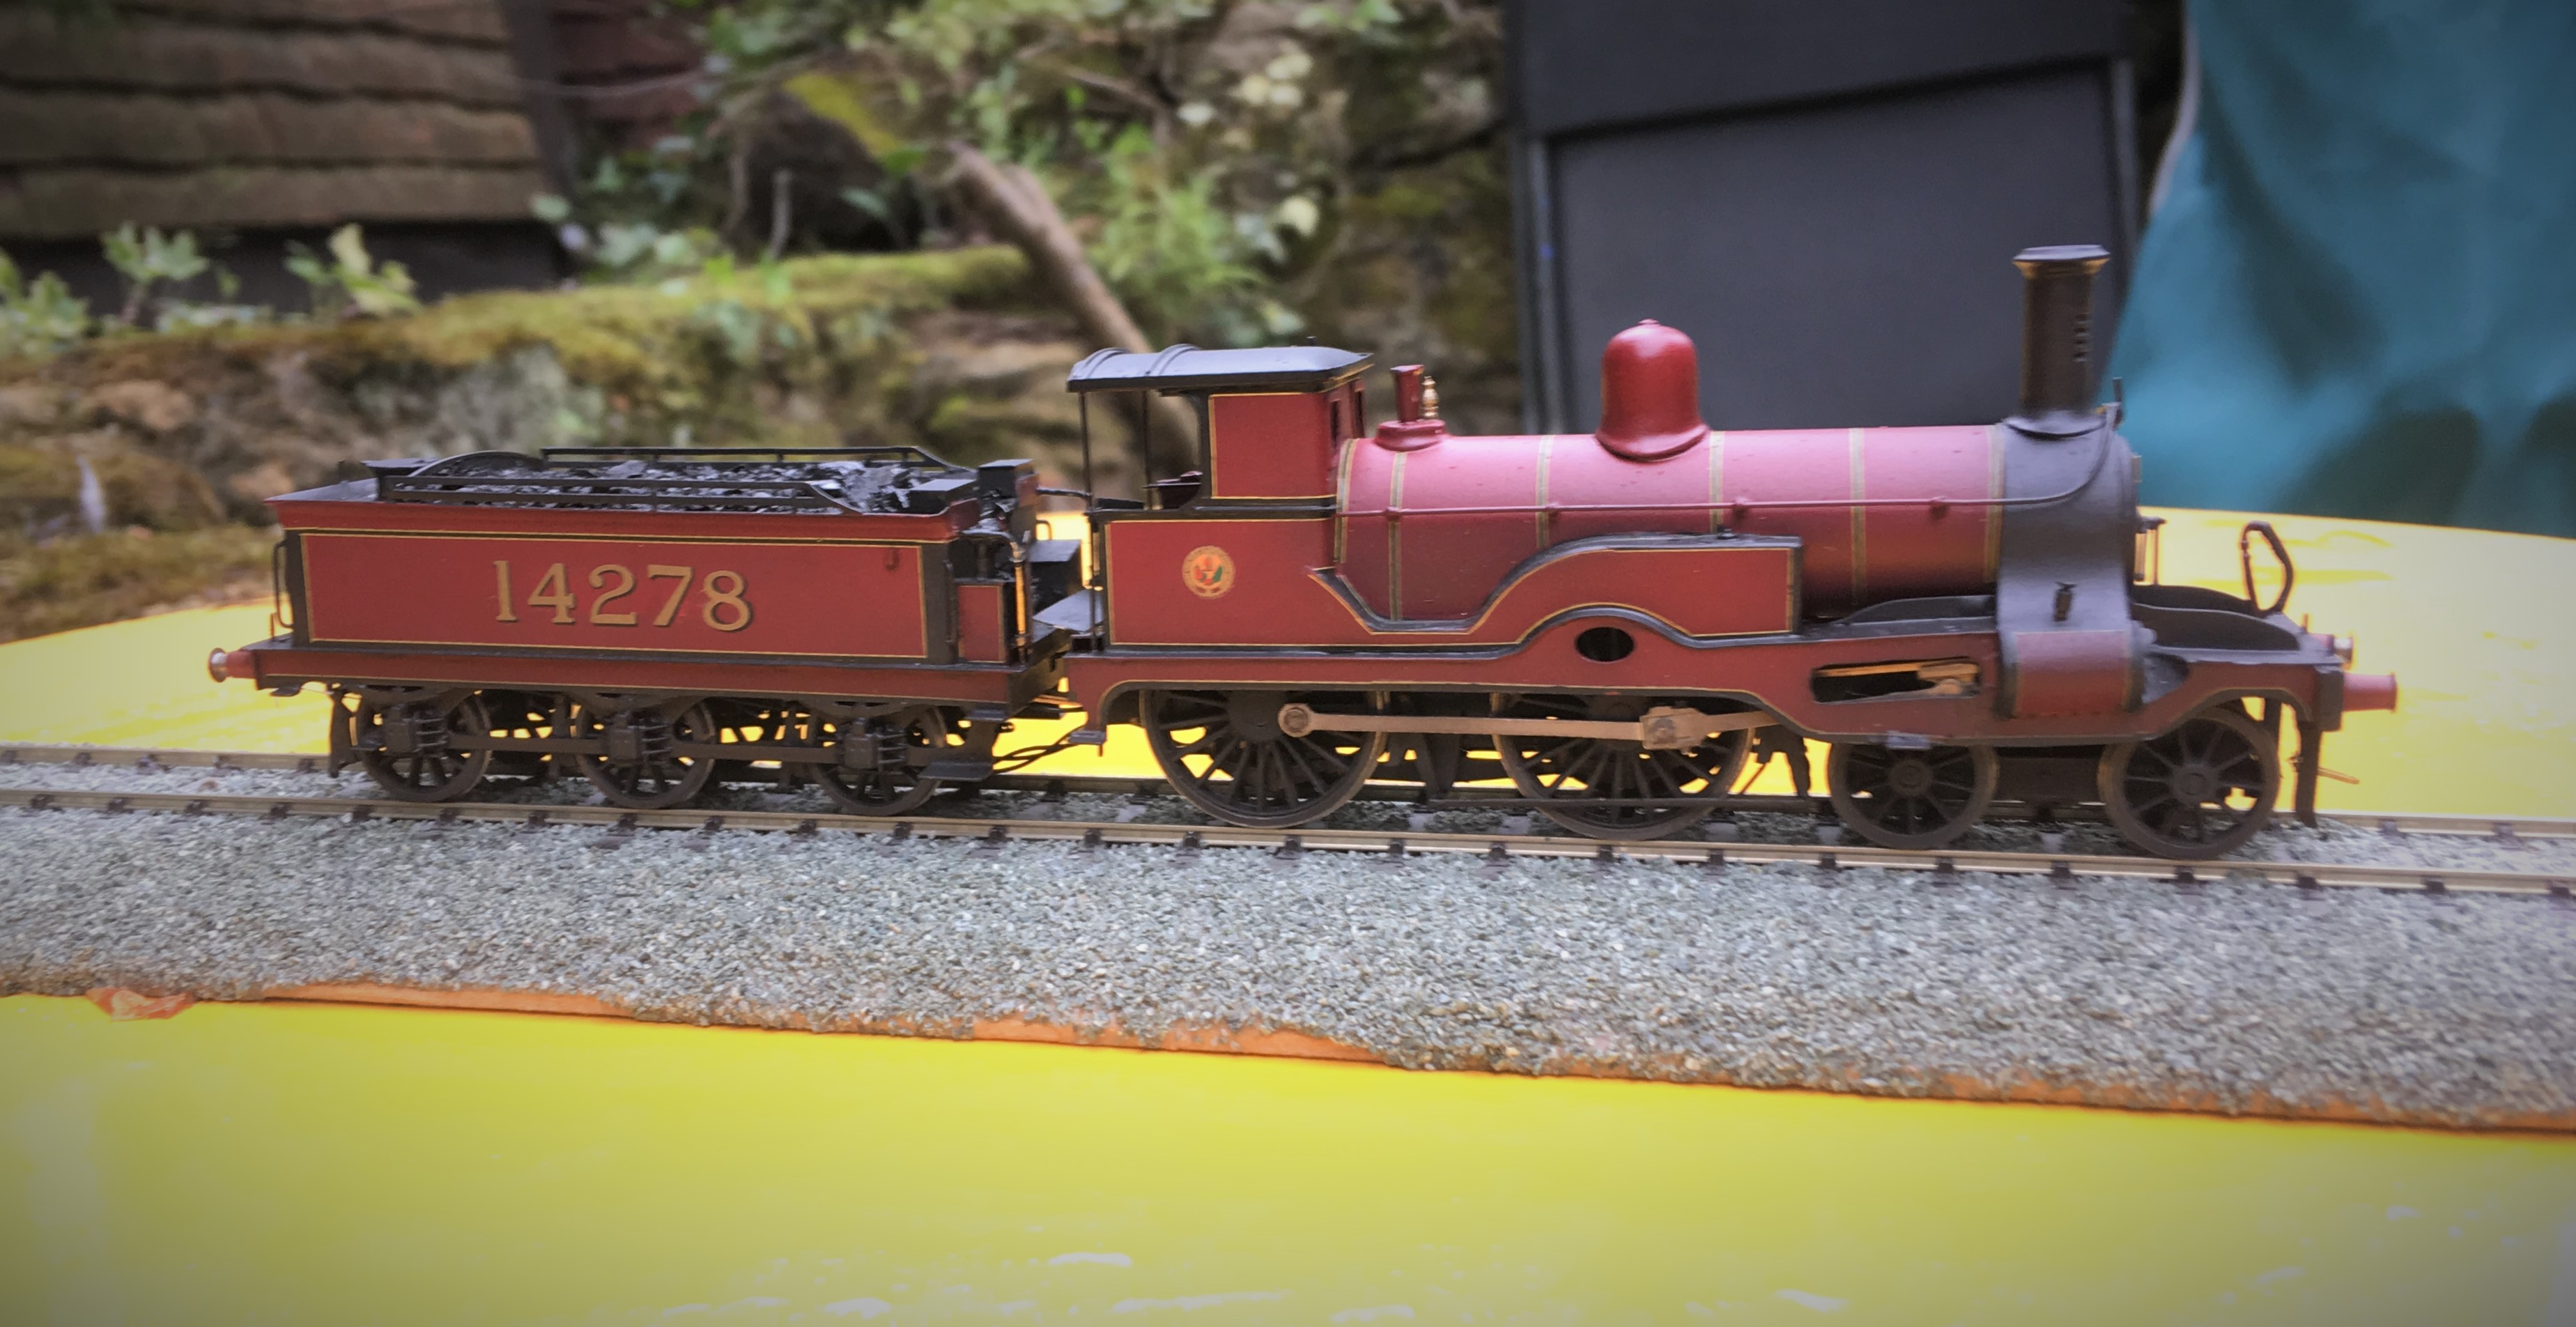
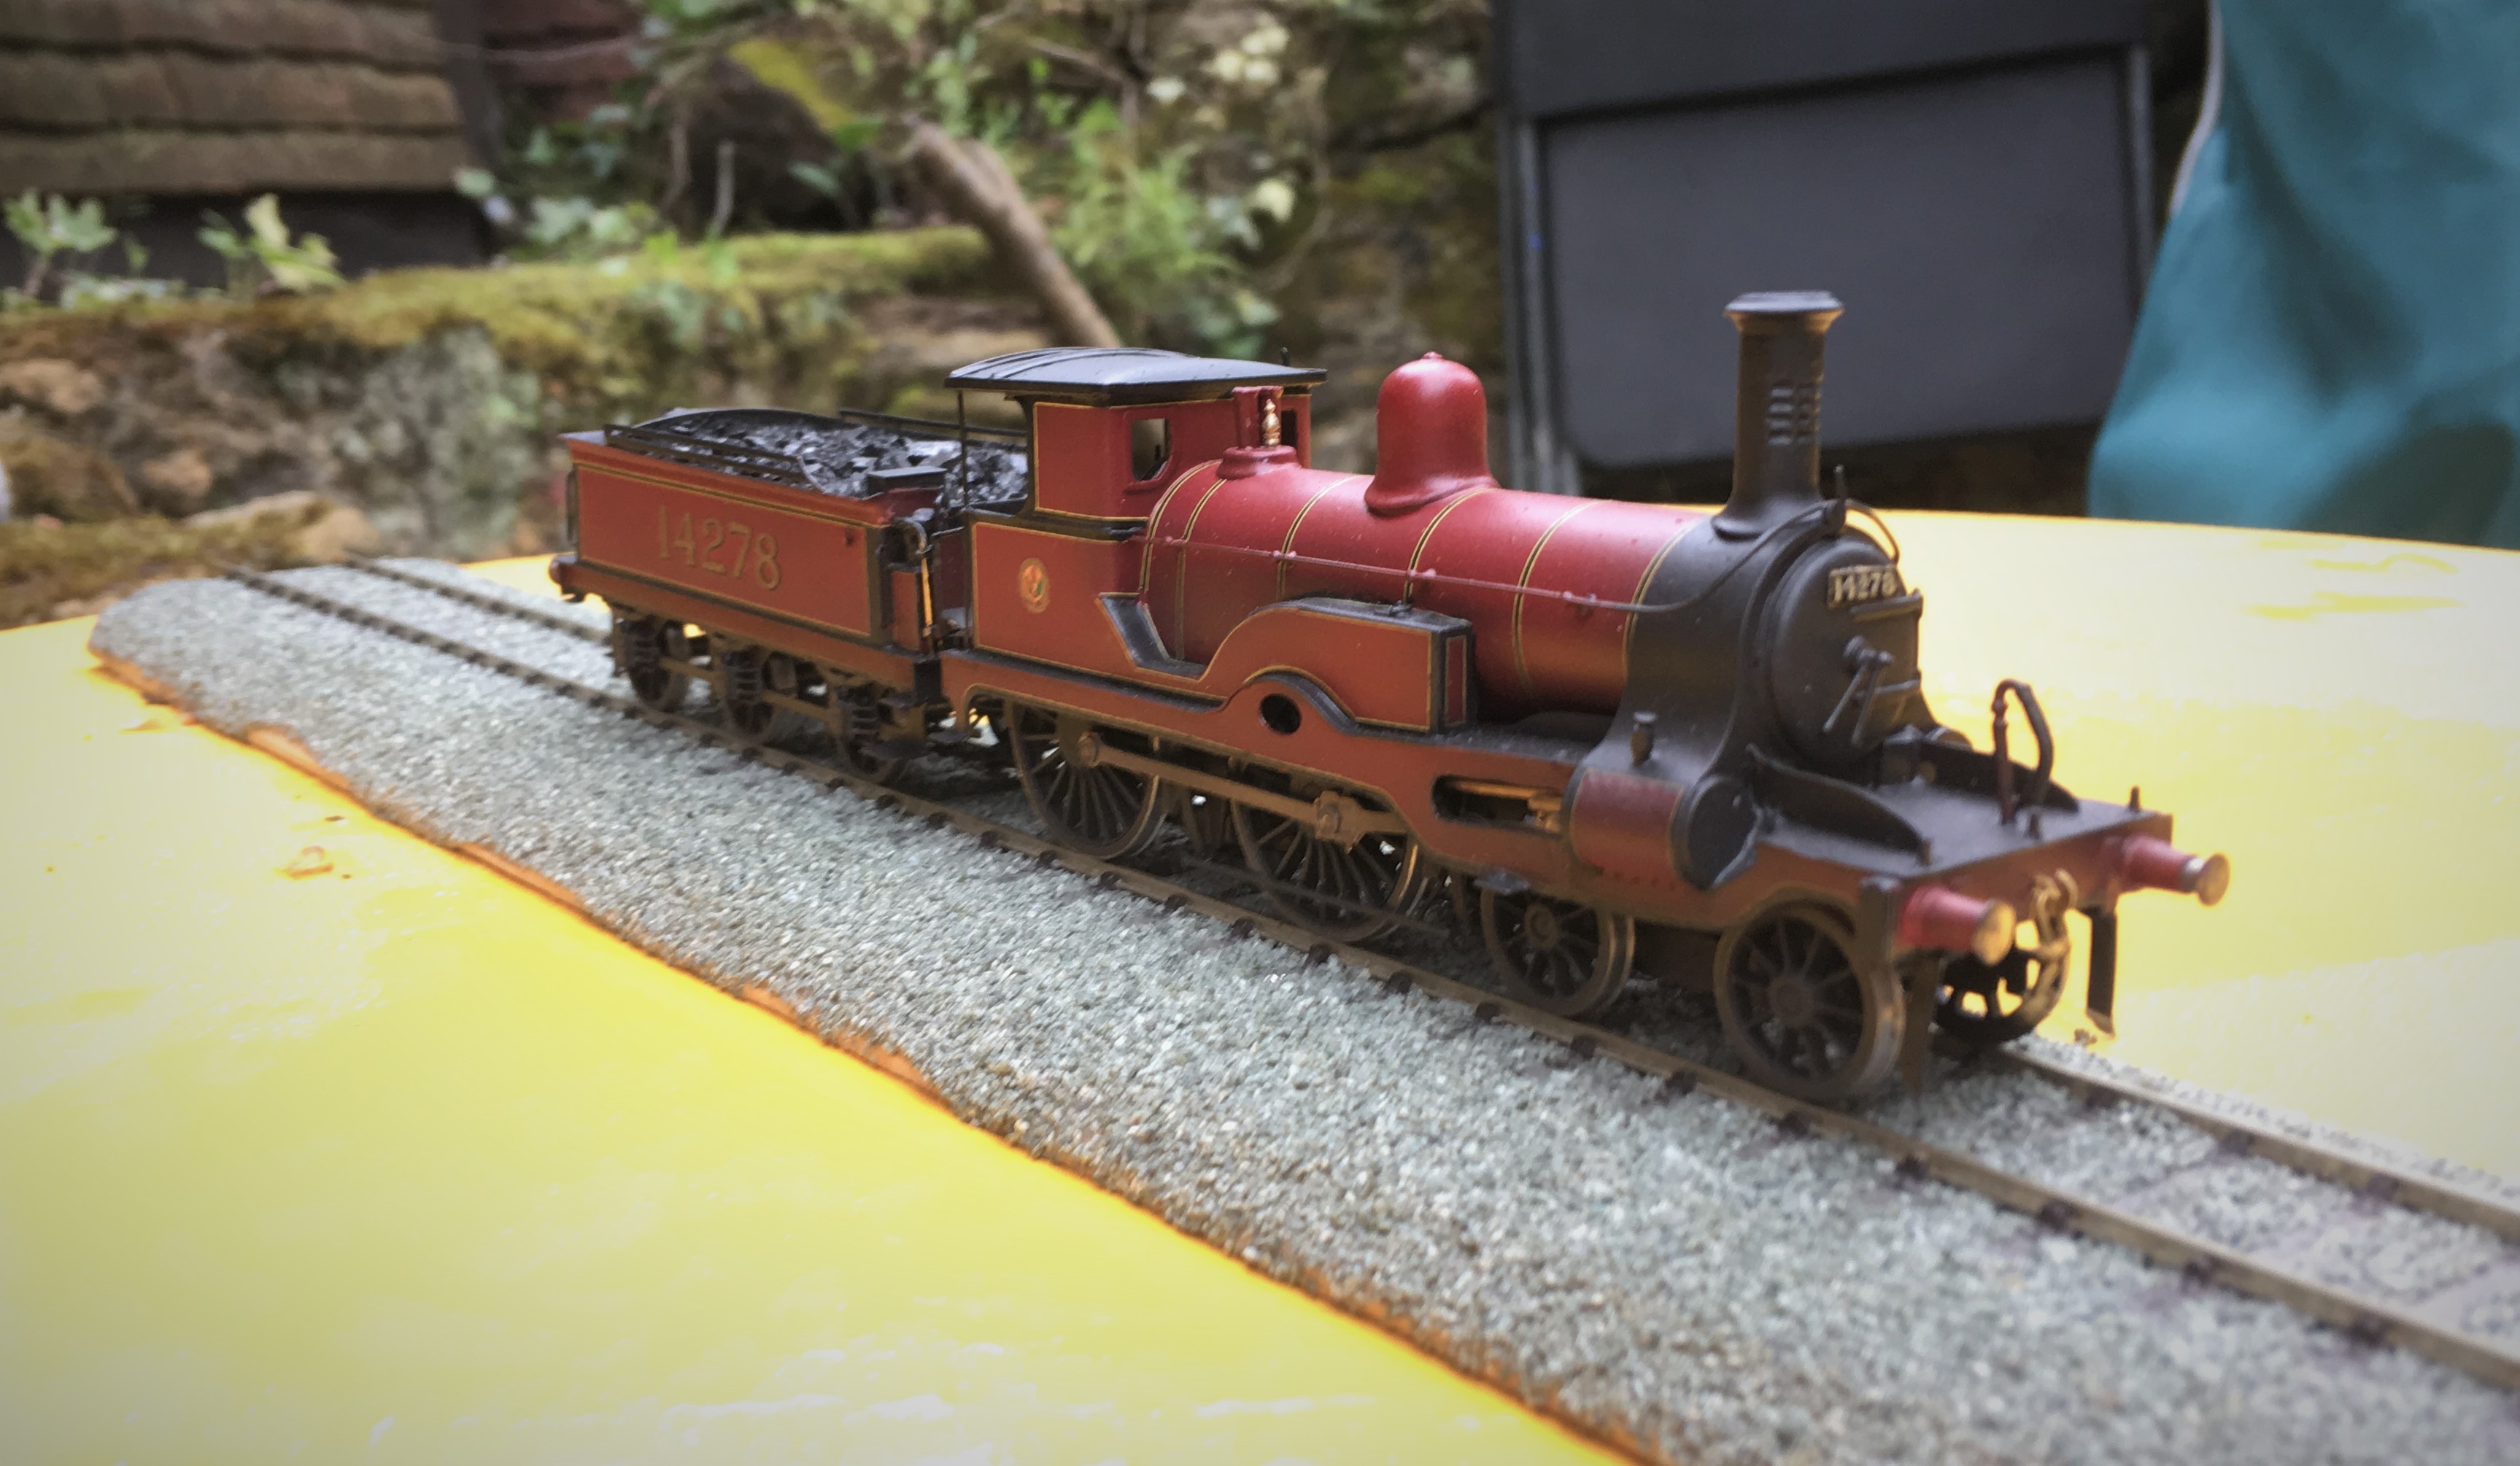
Since John has delivered it to me I have fitted a sound chip and some AJs. I need to fit some loco crew too before long. I suspect I am not going to find another sound fitted Clyde Bogie anytime soon as I have only ever seen one other built example so I can confidently say this is a first! I also seem to have disturbed the seating of the tender chassis as it is sitting rather low – a little task to attend to soon.
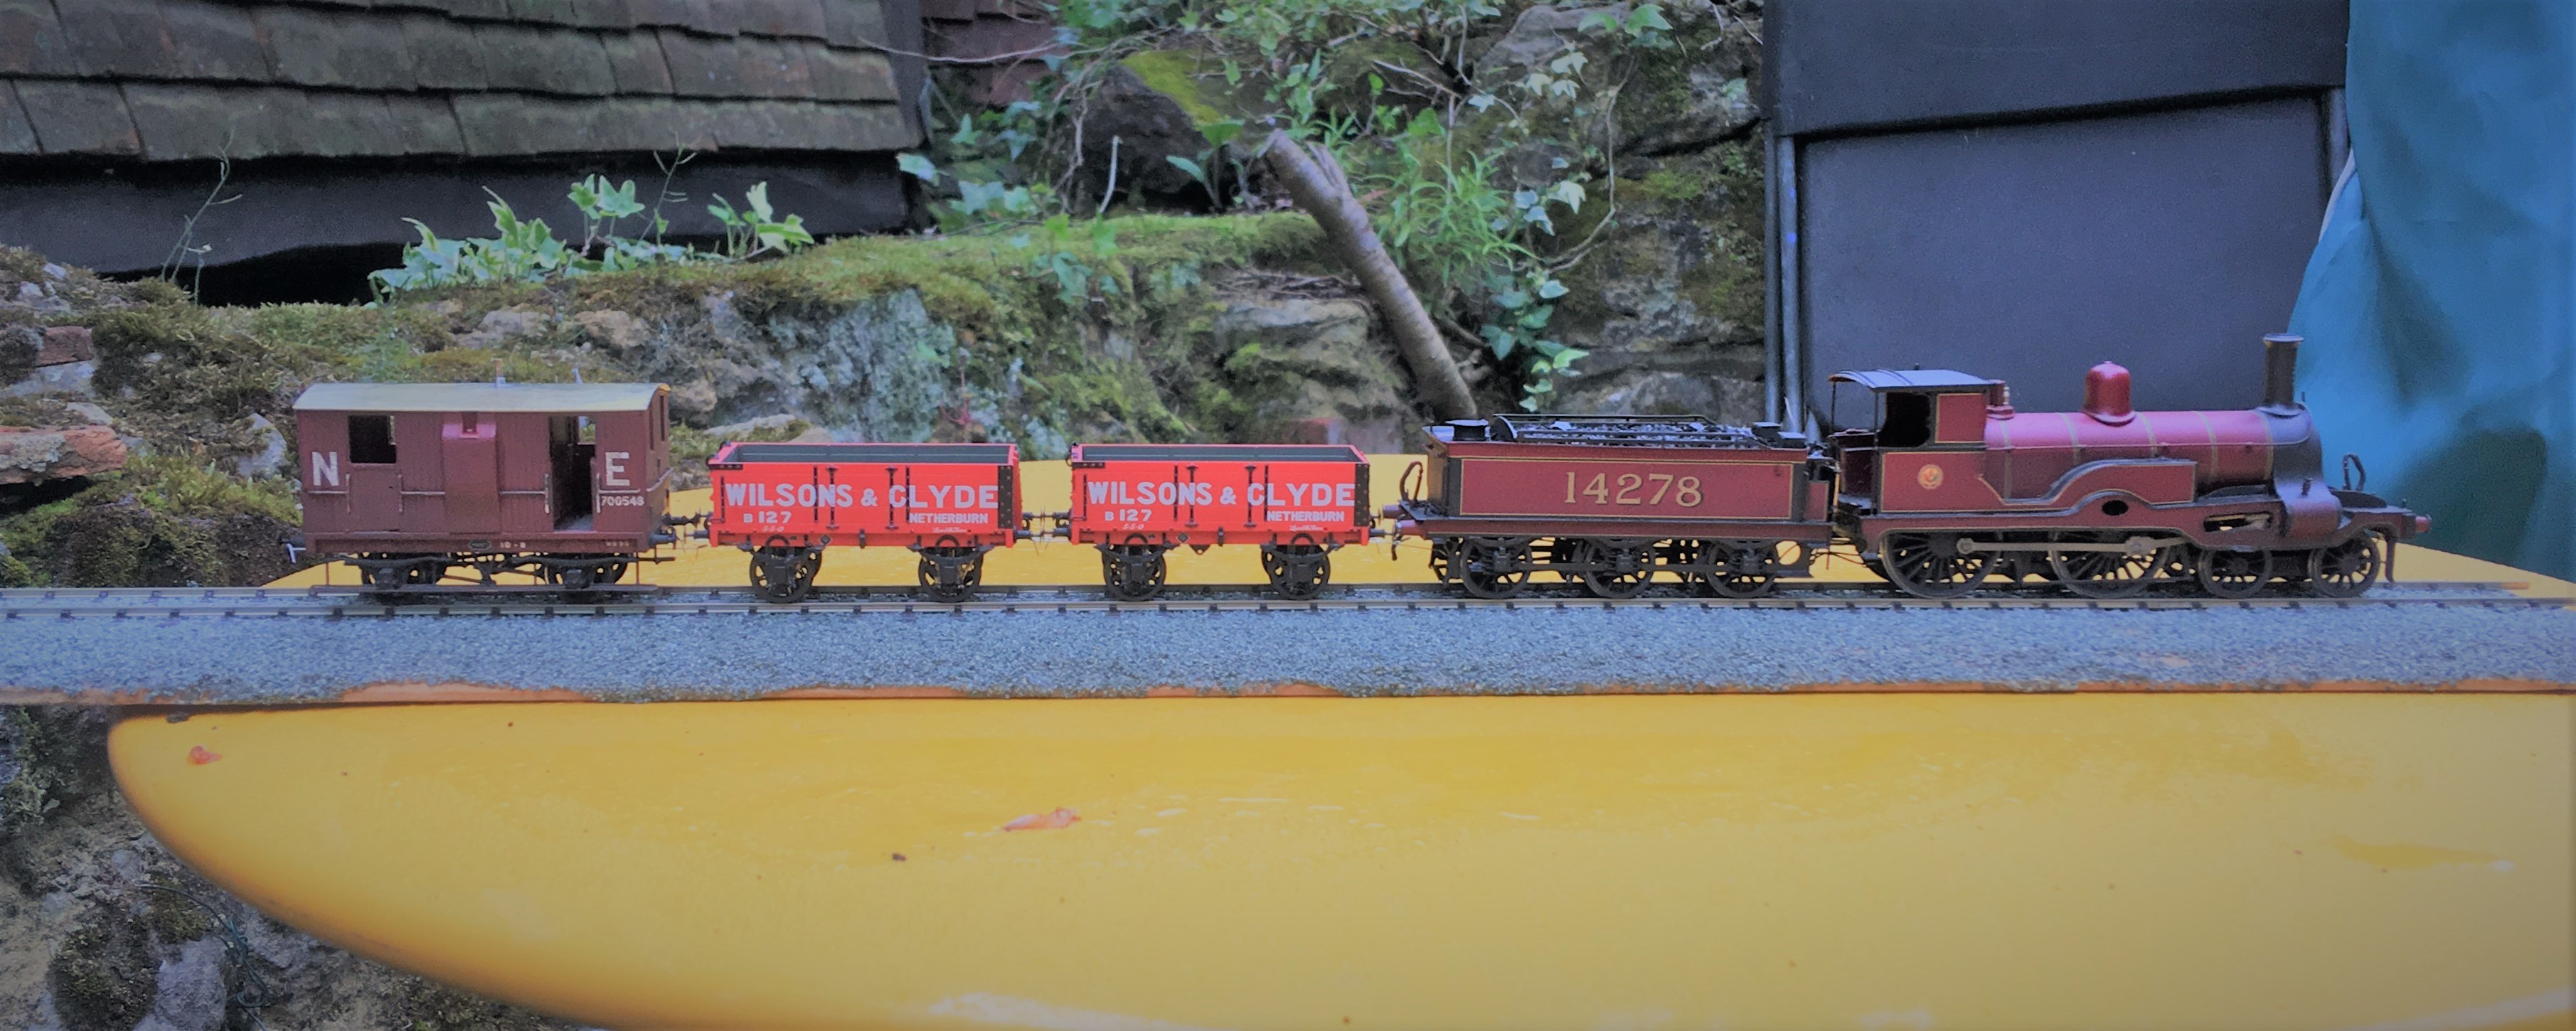
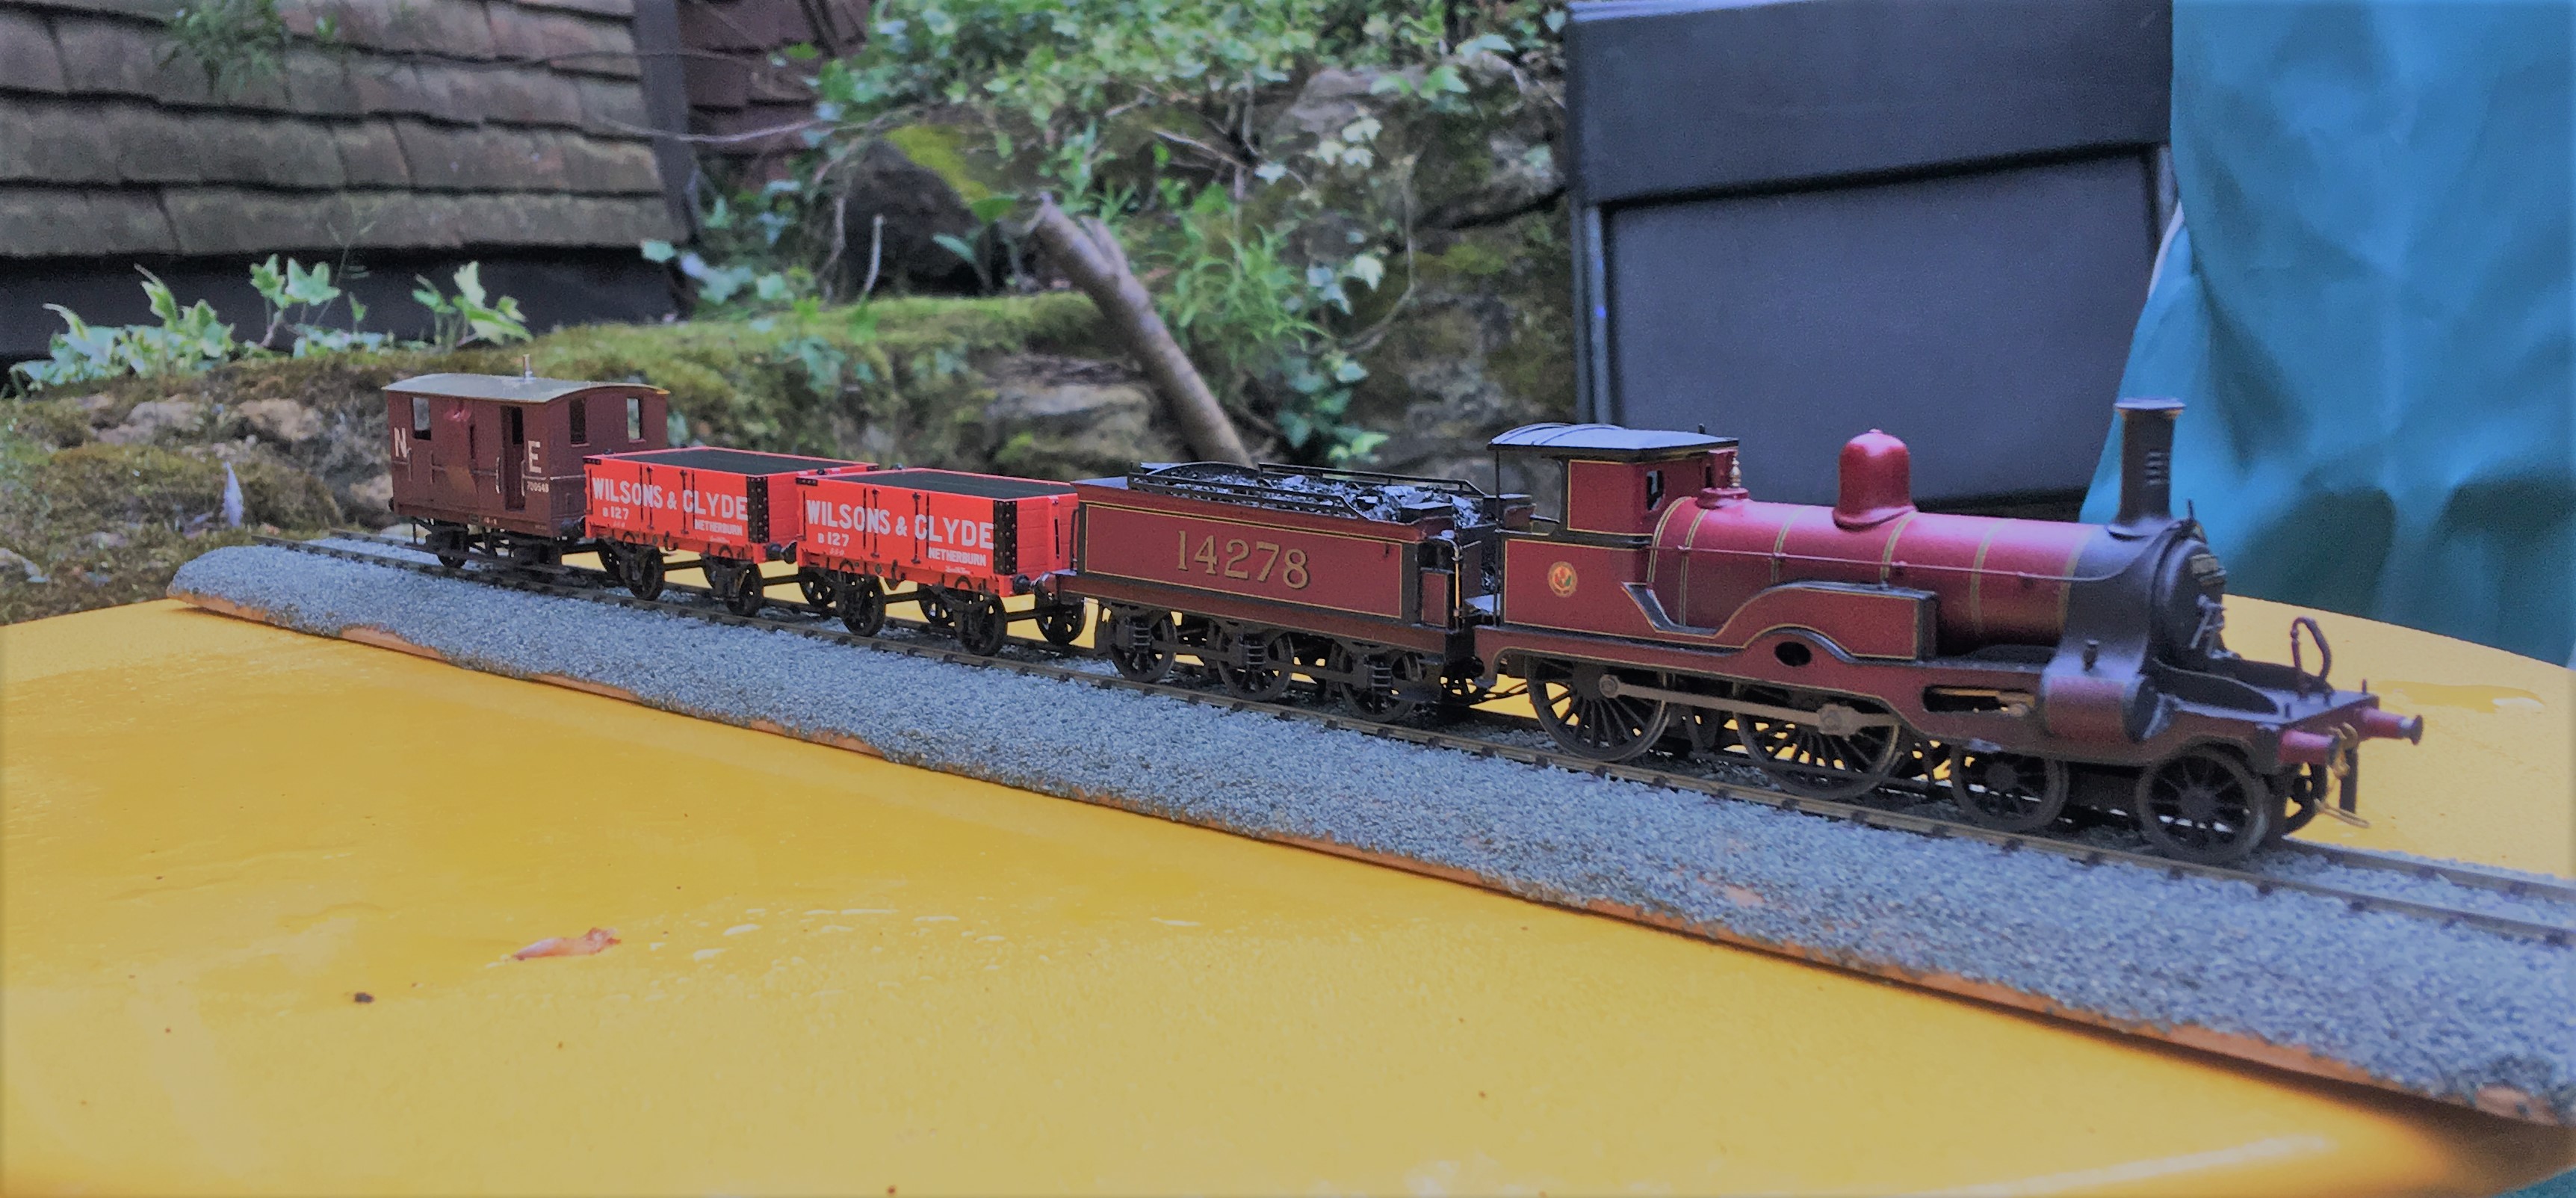
I have not been entirely idle whilst John has been busy and have been doing a number of little projects. Most of these will appear in future blogs but the pair of Wilsons & Clyde open wagons will not because this is effectively the same as the NB Jubilee Wagon I discussed previously. However, it is worth noting that Wilsons and Clyde were known to be one of the major providers of loco coal to the Highland so I am presuming these to be loco coal wagons.
And here is a picture of 14278 in action; albeit not at this point with sound fitted.
