Blog Archives

Gresley Buffet – Part 4 Finished!
…..but, before it was counted as finished, it needs to be doing the job it was designed for – buffeting. And that means it needs to be populated with people.
Regrettably few modellers, even finescale modellers, actually put people in thier coaches (and sometimes in contrast to platforms which are stuffed with them!). This is a shame as they do make a difference to even a fairly casual viewer. At a show recently, a dad and his son who were probably not modellers spotted the people in my coaches instantly. I’ll take that as proof of the point!

As is common with rtr coaches, the seats are moulded in place such that there is no room for the little peoples legs, so some severe amupation is required! In the case of Hornby’s buffet, the seats are also modelled pushed tightly underneath the tables – which has meant that the backs to the seats or the lip of the table also needs to be hacked away a bit. As all of this surgery occurs below the waistline of the coach, it is not visible from outside so your Dr Crippins’ tendancies will go unnoticed!!
Next up was to paint the exterior where the new plastic was cut in and here I had some problems. I was warned by Brian of Shawplan that I should paint the whole side when I repainted the new sections but I decided not to follow this advice – something I now regret!! So having masked up theadjacent areas and sprayed in only the affected sections i found that the grey that Hornby used was notably bluer than that provided by Precision Paints. The first attempt at repainting had the colours sticking out like a sore thumb and even on the second attempt, with a dab of blue in the mix is not perfect but is just ok underneath the grime. So, if you are proposing to do follow this build follow Brian’s advice, not mine!
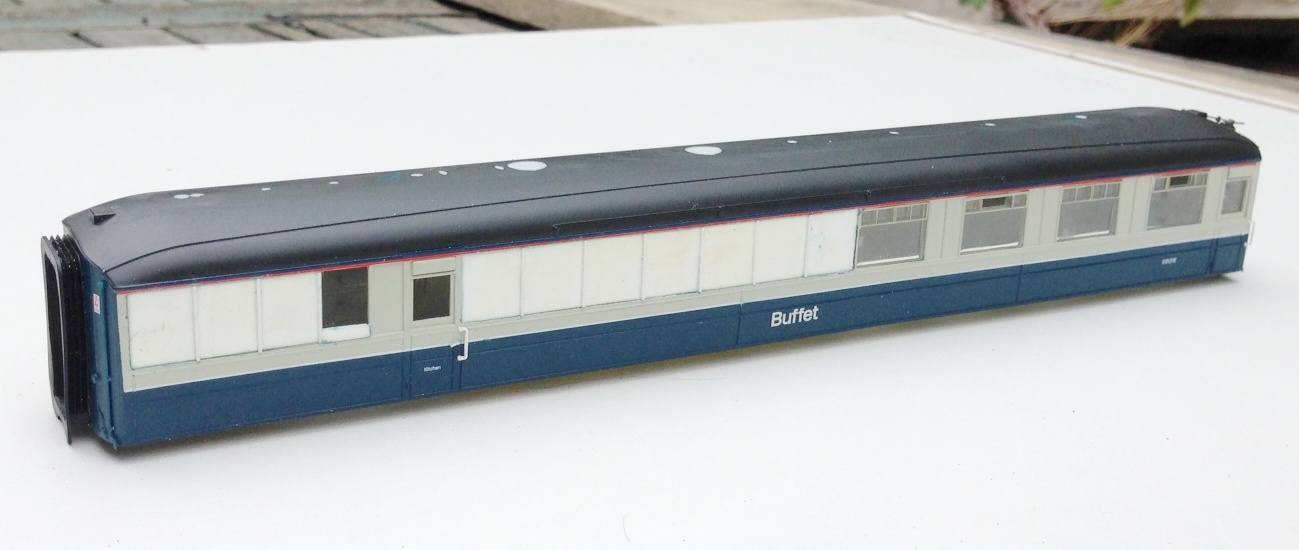
Once a couple of new windows were cut into the reshaped windows in the kitchen area of the buffet car, it was necessary to weather the vehicle. These buffet cars were notorious for being really tatty by the 1970’s; partly because the paint supposedly was prone to debonding from the underlying teak but also because the automatic washers were not good at getting into the corners of the panelling. After an overall spray of dirt to tone down the colours and another to represent the brake dust and track muck, I used two techniques to represent the weathering on the panelling. The first was to spray the whole coach with a mist and once it had started to dry a stiff artist’s brush was dipped in thinners was used to remove the bulk of the paint. The areas that it does not come away from are the nooks and crannies around the panelling; the same areas that would have retained the dirt in the real things. I to find, however, that the margine between where the paint has been removed and not can be a bit stark, so I used a second technique to both hramonise this and also acceptuate the effect. Using a heavily thinned dirty black paint, run a brush over the whole of the sides – the paint runs to the corners and achieves the same effect. It pays to be brave with this as the wetting effect of the thinners makes this initially look much darker until the thinners have dried off.
And this is what the finished article looks like………
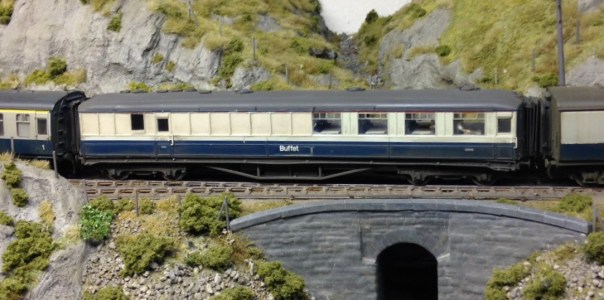
So thanks Hornby for supplying the model in the first place and the inspiration to do some plastic surgery. Whilst this write up may have lasted some months, actually this was quite a quick conversion – the basic surgery on the side was only 4 hours – so why not have a go?
Gresley Buffet – Part 3; Corridor Connections
I guess that it is pretty difficult for the RTR manufacturer to take a stab decent corridor connections because they have to design for toy train set curves and clumsey hands but it is a weakness of all proprietary coaches. Hornby’s buffet also seems to have overly skinny corridor connections and most noticeable they are mounted too low – they should finish at the meeting of the roof with the ends.
Whilst it is possible to simply slice off the connections off and move them up, I chose to remove the and them with some produced by Comet – as this is an LNER vehicle, you need the Pullman type. The core of the operation of the corridor connections are the bellows which are formed with a pair of sheets of fairly stiff paper. These have slots cut to half their width and are then folded into a concertina shape, with the slot between the folds. Two such pieces are then offered up to each other, with the slots opposing and these then slide over each other as shown in the first picture.
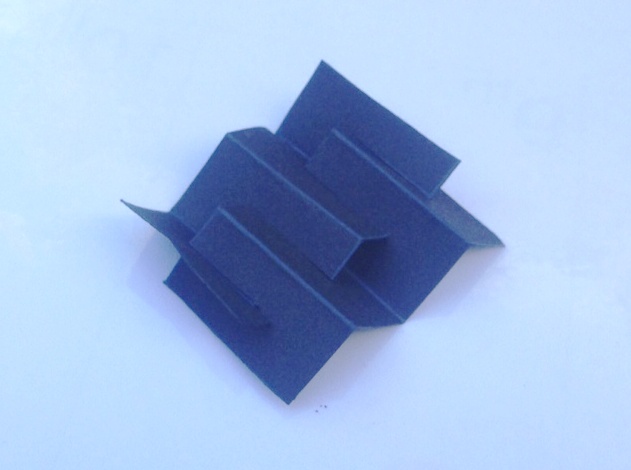
To create a concertina bellows like this.
Thereafter, the etched end plate is attached to one face. Whilst not provided in the kit, I formed a second plate from plasticard and affixed this to the other end. it is important to ensure that no glue gets on the concertina sections of the paper, as they need to be capable of compressing with minimal effort to correctly operate without derailing the carriage.
This is how Comet envisage that the completed connection should look like but I felt that the bellows did not look very realistic, especially from above where the crossing point is all too obvious. In practise, the top of these connections had a fabric roof and applying this dramatically improves the appearance of the connection and has the added advantage of providing some control to the operation of the connections which do tend to expand out and look rather flabby!
I dealt with this by putting the rain hood on the top of the connection, which is afterall prototypical (and makes a huge difference to the appearance as you can see). I did this in a manner that meant it acted as a restraint to the movement of the connection. I acheived this by only gluing it at the very back and front of the connection, so that the bellows could move unimpeeded but once they had moved to the required extent, the rain hood pulled tight and stopped them going any further. I found that doing this at the top was not sufficient as their movement continued at the bottom and they took on rather drunken appearance – however, this was solved by simply repeating this at the bottom.
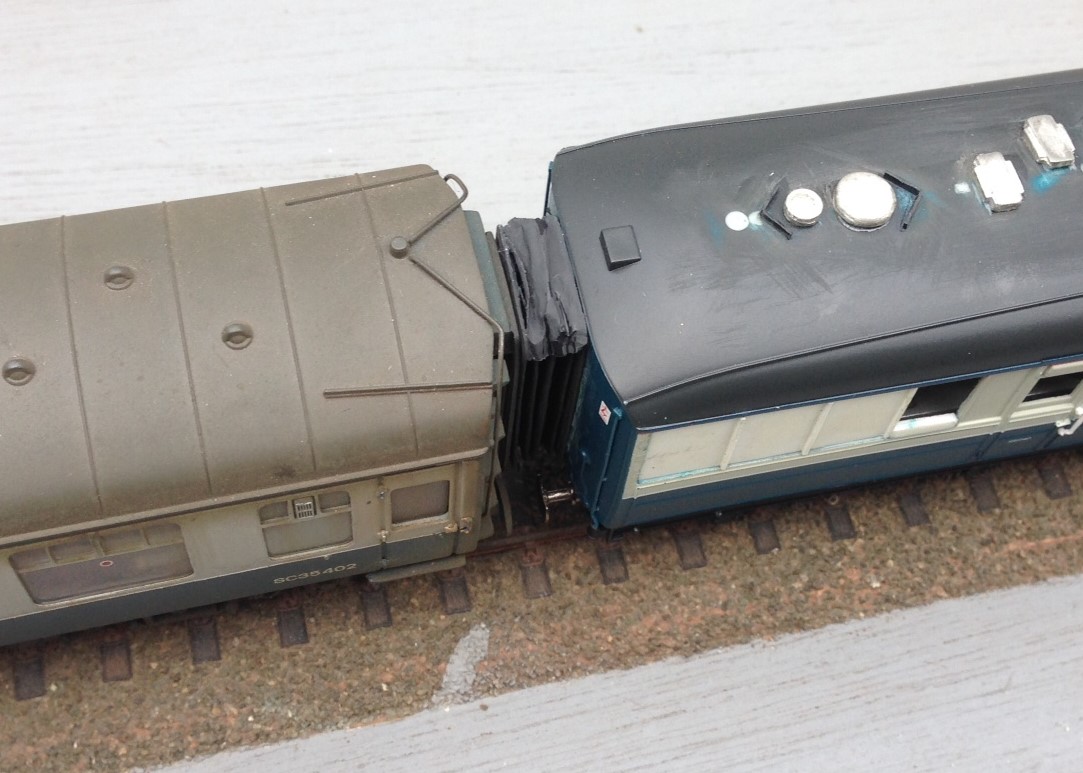
Key to getting this to work was to use material for these restraints that was ultra flexible. I did think about trying silk but settled instead on the rather more mundale – plastic from a bin liner. This is remarkably thin but is still tough enough to hold the connections. A tiny dab of super glue at the front and back and then it can be laid onto. It is important not to sigh with releif for some time though – the stuff is so light that it blows away at the slightest. So this is what it looks like:
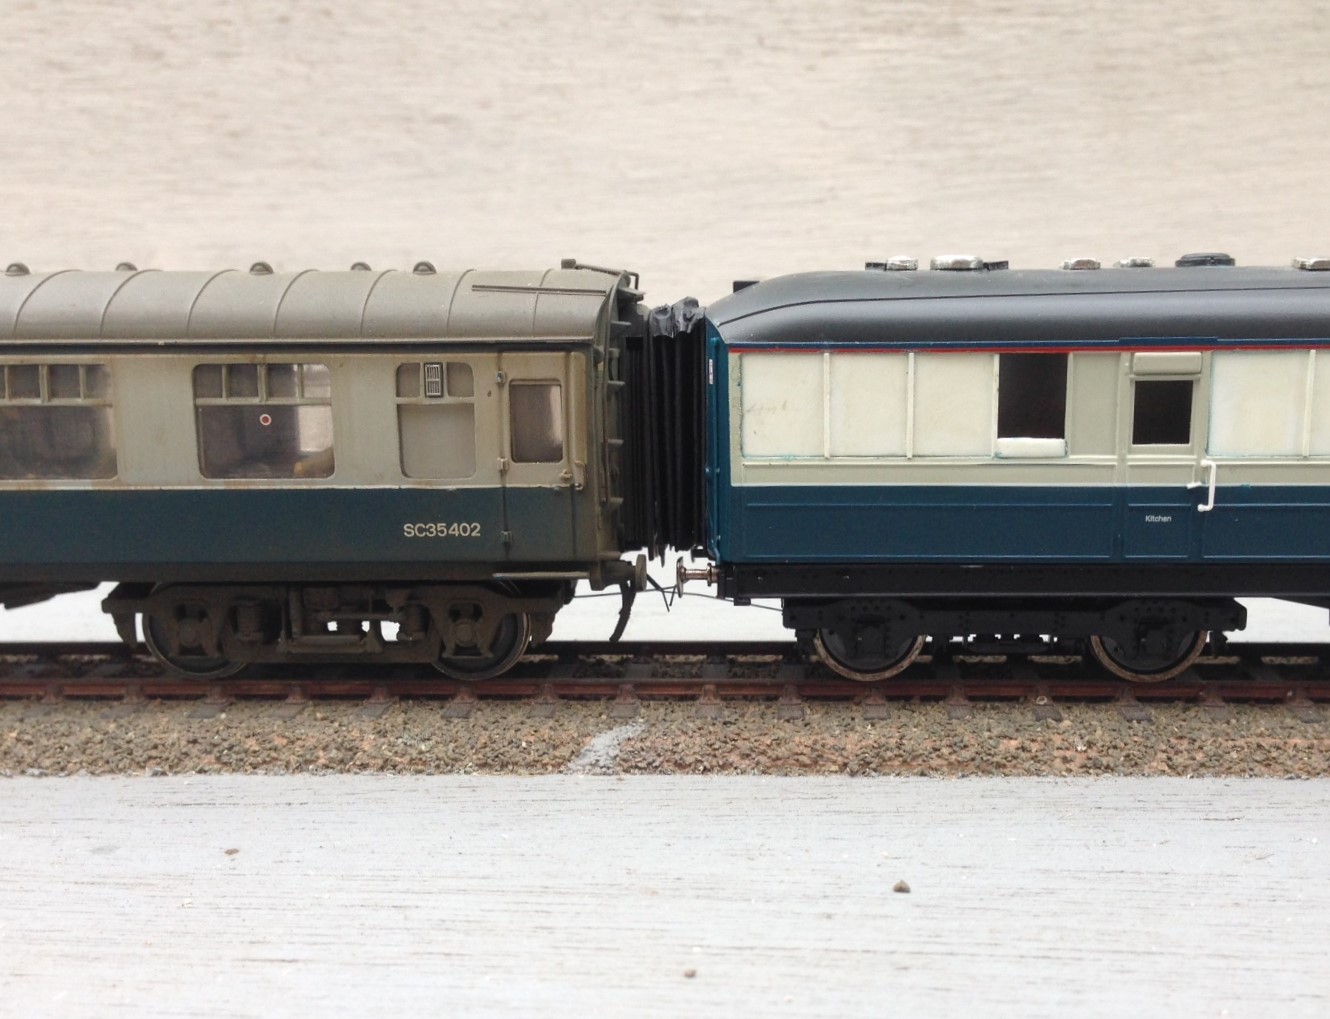
I think that I have still allowed the connections to be too big and if there were two together this would definitely be true but next to a rather skinny Bachmann corridor connection, I think they look pretty good (and a big improvement on the originals).
The Cruellest Cut – Carrying on with Hornby’s Gresley Buffet
The first task in dealing with ready to run vehicles is to work out how to get into them – not always as easy as it sounds! In this case, this is achieved by slipping finger nails between the sides and the underframe solebars; this releases four catches and the top pops off. The interior then slips out without bother but the glazing is a little more tricky as it is secured with some very gooey glue. Whilst this releases the perspex relatively easily, it was difficult to then remove the remaining glue – I found it best to do this by rolling it with a thumb and accumulating the residue on a scrap of paper but it was a pain getting it all off.
Prior to attacking the model with knife and blade, a sensible precaution is to protected all of the areas that are not to be cut with masking tape, which you will see I have done. This was effective but I did find that I dislodged a filler pipe when I removed it, so perhaps a slip of paper over these would be prudent next time.
Then it was time to get cutting; I varied between using a razor saw and a scalpel to cut a grove by using parallel cuts but in both cases it is important to cut to the waste side of the finished line. I found that it was best to work to an existing bead line, even though when working to the saloon end of the coach the bead was the side of door jamb (this is where I found the knife best and I made sure this was one of the first cuts to be made) so that there was no stress on the thin piece of material. By the time the cutting had been finished the holes were quite big!
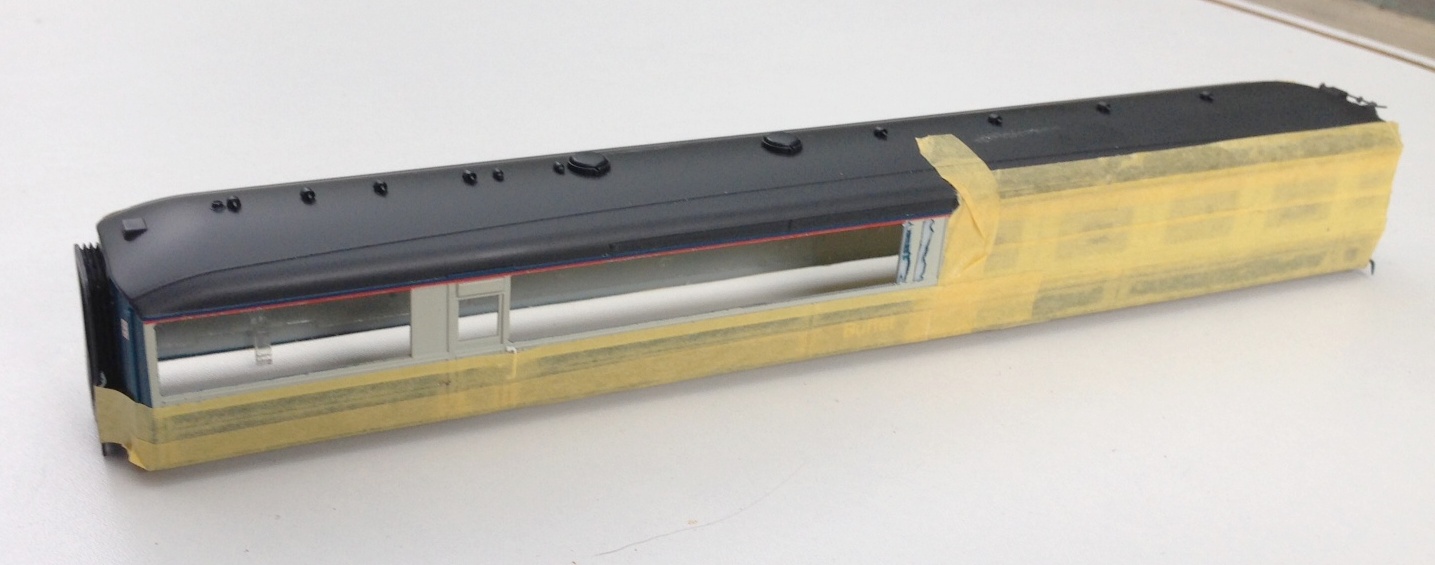
Nearly all the cutting done now; but the last panel to the right did also get cut away
It pays to dress the sides of the opening with care so that they are straight and square as this makes the fitting of the infill pieces much easier. These should be cut fractionally over large and then sanded back by small degrees checking regularly to determine if it fits and taking care to ensure that the square/straight edges are maintained. Once it fits, I let it into the hole and secured with butonone and then left it to cure for a couple of hours so that I did not disturb it when I subsequently fitted the beading. This was formed with 0.2 * 0.2mm microstrip and these needed to be set out with considerable care – aided by the use of venier calipers – to get them regularly spaced and vertical. Even the most minor of inconsistencies detract from the affect.
Replacement panels now in place, including a partial infill of the window by the door
Next up was the removal of the various roof vents and cowls as these too changed. I suspect that these were no consistent across differing vehicles and it is quite difficult to determine what goes where but I was assisted by some photographs from here. Utilising some of the vents salvaged from the Hornby model and also from Comet Models, the latter generally with their shields filed away as the roof views I have have straight flanges as shields – which I formed with brass strip as I though plasticard would be knocked off.

Roof vents in place, based on a photograph of the roof of 9132 at SRPS in the 1970s. I also noted that the alarm gear on the roof was at the other end of the vehicle in comparison to the Hornby model, so this is going to need to be cut away and recreated at the opposite end.
Dinner Time – A Gresley Buffet for Portchullin
Whilst my memories of the former HR’s line from the 1970s and early 80’s only ever had BR mk1s as coaching stock, there were occasional strays coming onto the line in the form of Thompson/Stanier full brakes and Gresley buffet cars. As I understand it, a pair of the latter were indeed the regulars on Glasgow to Inverness trains. So, wishing to enliven my passenger trains up a little on Portchullin, I thought that it was time that the punters had a buffet car to buy that notorious rock hard pork pie in!
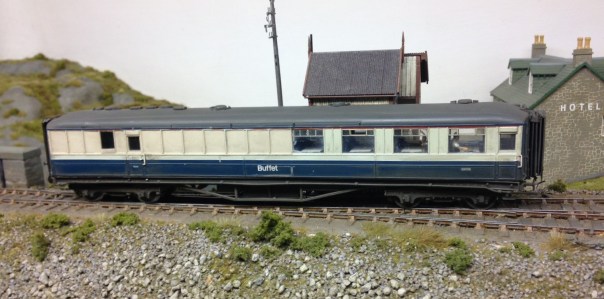
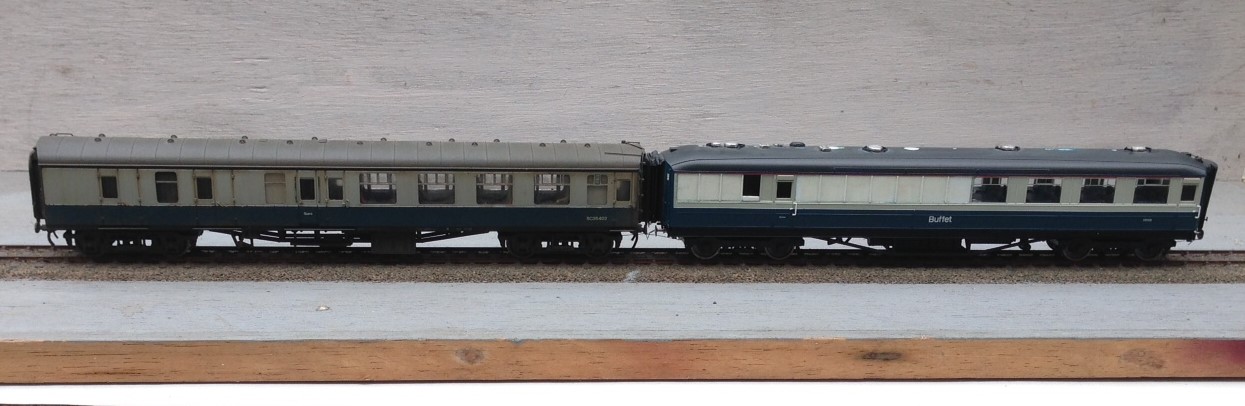
Hornby introduced a range of Gresley stock some ten years or so ago and they represented a significant step forward in terms of quality of coaching stock generally and particularly in comparison with their predecessors. If I recall correctly there were some problems with the direction of the graining that Hornby quite quickly sorted out and the teak coaches look the part – especially as to do them oneself is a very challenging exercise. The only vehicle that they offer in blue/grey is the buffet and this is what it looks like.

As with nearly all r-t-r models now a days, the finish is exemplary and at first glance it definitely looks the part, capturing the curves at the roof very well and it will stand out nicely in comparison with the remainder of the coaches on Portchullin. It is true that the panelling cover beads are a bit thick, which is not visible on the teak finished coaches due to the graining but is rather more visible on the grey here but as I am going to weather down this vehicle to a fairly battered condition, I am hoping this will fade to a lessor impact. Some commentators criticise the tumblehome being too slight and the bogies being subtly incorrect but I am struggling to see either defect so will ignore these points.
What I will not be ignoring, however, is the most significant problem with the model. These vehicles only made it into the 1970s because they underwent a fairly significant rebuild in the 1950s. Hornby have simply painted their LNER era model in blue/grey whereas the rebuild affected their appearance on one side quite significantly. Here is a comparison and you can see that three windows have disappeared altogether, the panelling arrangement on the near end is different and the roof vents were adjusted to accommodate the revised internal arrangement.


I have seen moans on the forums about this error and even moans from people at the people who are moaning. I make no criticism of Hornby at all; it is obvious that the revised tooling that would have been necessary to correct this would have made the model uneconomic. Therefore, we have to either accept it is as it is or pick up our tools to correct it. I make model railways to do simply that, make them and I derive the greater proportion of my satisfaction from building or modifying things – thus I simply see this as part of the pleasure!
So my next project will be a bit of plastic surgery on an old lady, to get her looking proper! I do not propose to do a full respray so it is not that difficult to do; so to both the moaners and the moaners at the moaners, I would simply encourage you to pick up your knives to follow suit!
Thank you to Hornby for providing the base model and also for the use of the colour photos. The prototype photograph is courtesy of Paul Barlett.
