Bob Symes (1924 – 2015)
In a rare departure from my general policy of ignoring of topics beyond strictly modelling, I thought I really ought to comment on the passing of Bob Symes at the beginning of this week
.
To those in the UK of my age, you probably will have first encountered Bob as the presenter of the Model World TV series in the early 1970s. This was a series of six (I think) episodes, each dealing with a different modelling subject; military modelling, ship modelling, aeroplane modelling and, of course, model railways. You couldn’t see the BBC risking BBC channel 73 with a series on making models now, let alone a prime evening slot on BBC 2 which is where I think these were aired. Most of the episodes are available on youtube (for example this one) and whilst perhaps the quality of modelling has come quite a long way in the last 40 years, I wonder if the charm that Bob seemed to impart to his interest may have been lost? And for you that really were there watching these back in the 1970’s, the opening music will instantly wipe away the years………….

Thereafter, I encountered Bob quite regularly as he was the president of my then local model railway club; the Astolat Club in Guildford. He would attend most of the Astolat’s shows and was always encouraging to the efforts of the juniors, such as myself, which was certainly appreciated. He would also have an open day at his house in the summer where you could get to see and play with his trainsets – and didn’t he have a few! It is not everyone that has what must be something like a 12 inch guage circuit in their garden; and gauge 1 circuit, and a couple of others besides and that is even before you get to his steam powered generator and water pump!

I still pass close by to where he lived quite regularly and thought I ought to see if I could get a further invite. Now the chance is gone. So rest in peace Bob, you definitely were an asset to the hobby.

The majority of these photographs are with thanks to Guy Carpenter of Gullwing Photography and he retains copyright of them. For more information please go to Guy’s website and for some more of Guy’s fine photographs of his visit to Bob’s house please go here.
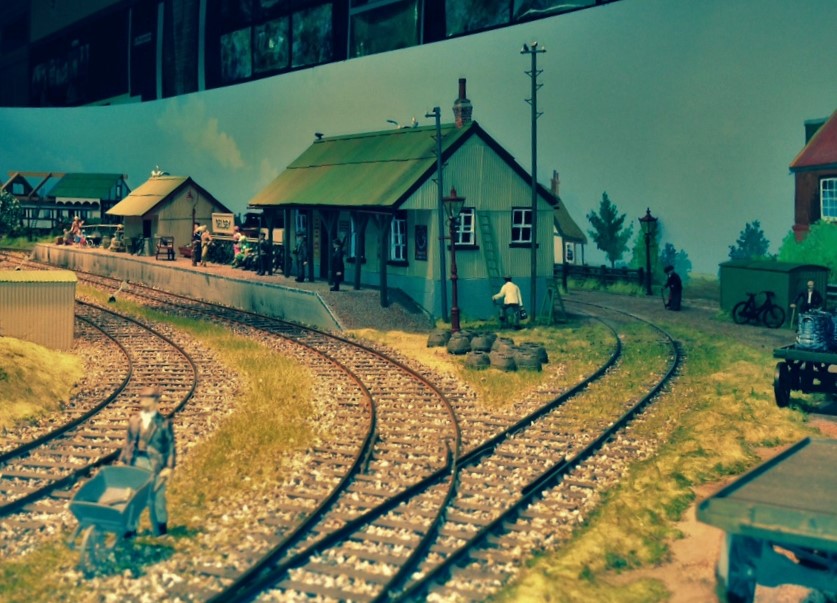
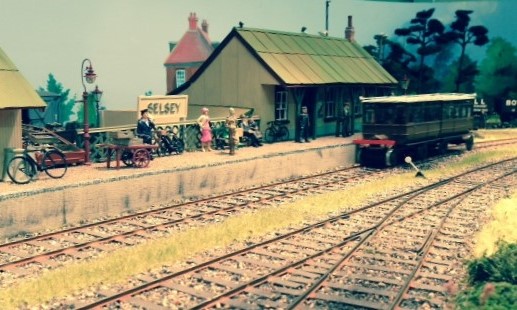
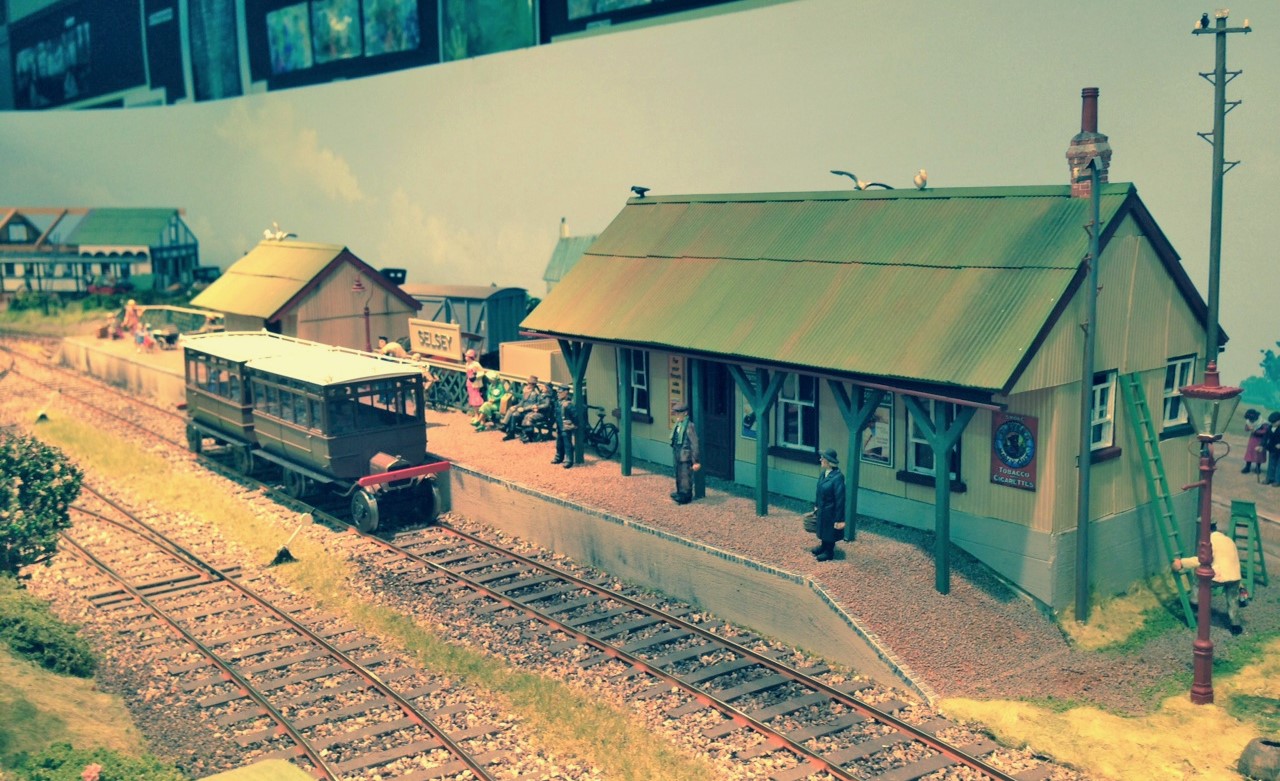
The Hundred of Manhood and Selsey Tramway
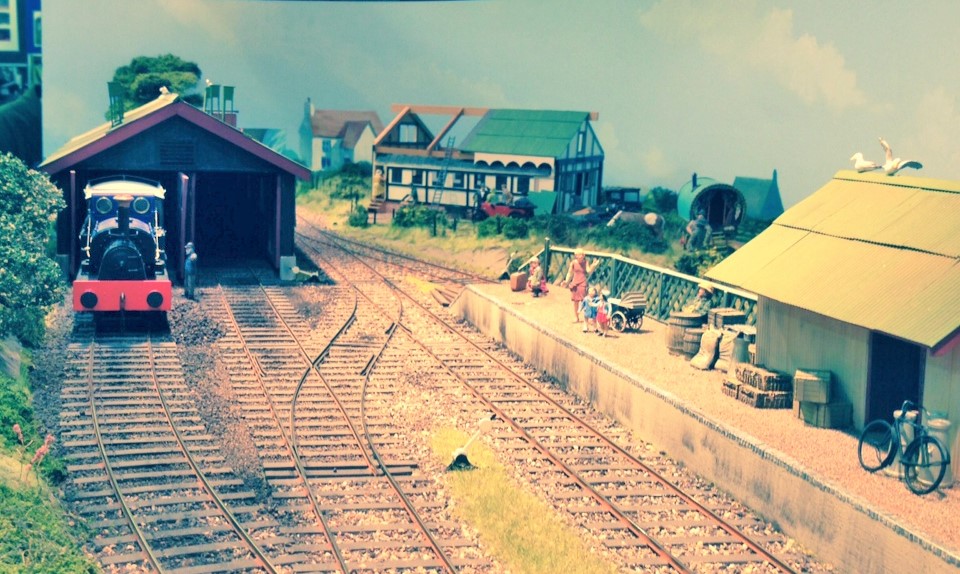
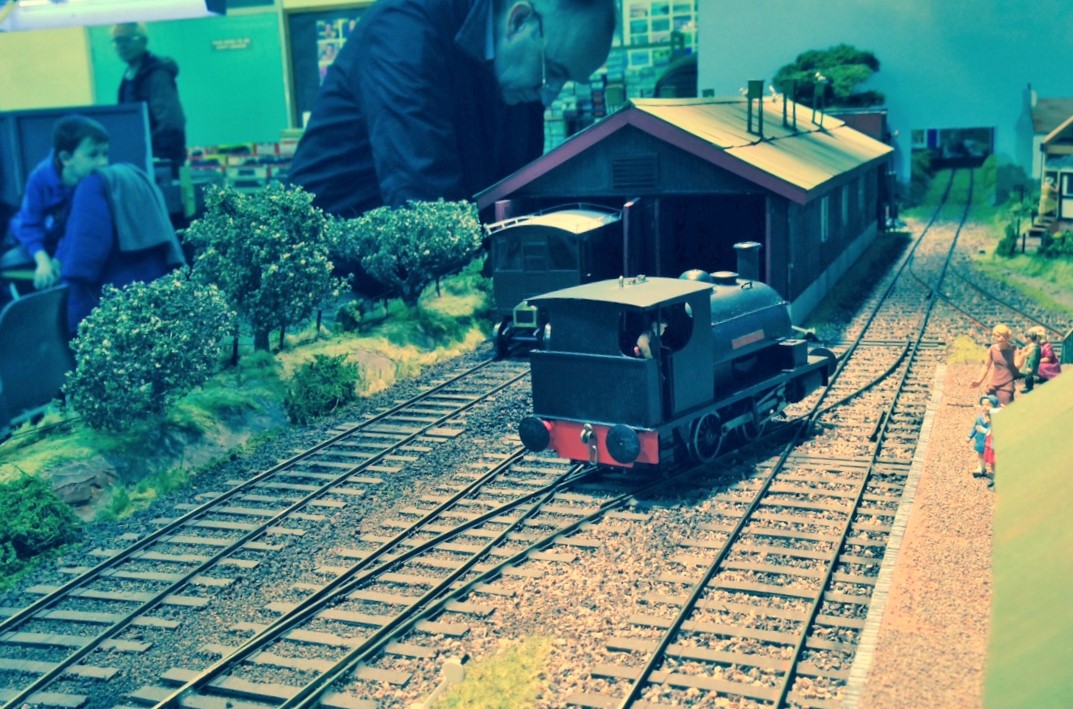
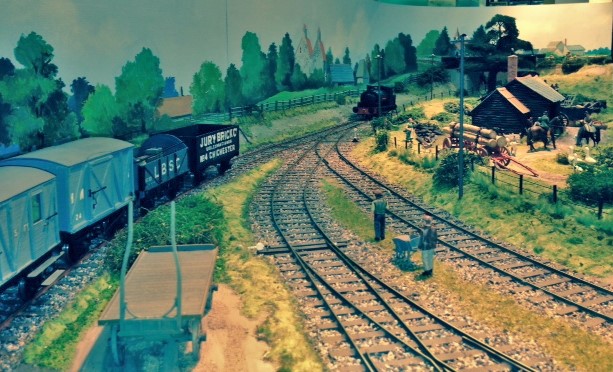
On Sunday, I got to play trains on something that is mildly different for me. This is a layout called Selsey Town which depicts the same on one of the best named railways you can imagine – the Hundred of Manhood and Selsey Tramway (you couldn’t make it up could you?).
This line was one of Colonel Stephen’s light railways; this being engineered by him, managed by him and largely owened by him at the end. The line was incorporated in 1896 and opened the following year. It ran from Chichester, which was on the LBSC coast line about 25 miles west of Brighton down to Selsey which was on the coast. It ran across predominantly flat ground but this was quite marshy (indeed, floods severed the line on a number of occassions).
In typical Colonel Stephens style, the line was a real hotch potch of cobbled together equipment that was patch, patched again and then patched some more to get it to go. The line operated without Board of Trade approval for its first thirty years on the basis that it operated exclusively on private land. My knowledge of the controls is that this can’t be true, but it certainly did not have approvals in place until much later in its life.
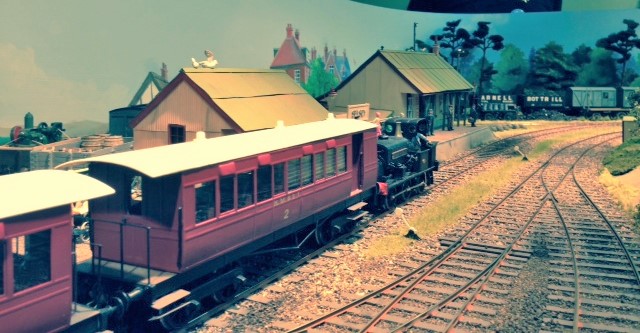
The line was famous for the first use of petrol railcars; something of a calling card for Colonel Stephen’s lines. These came in several different forms and on the layout a pair of them work back to back. There are apparently plans for a further pair; one of which will be a flat bad lorry. To bad if the compartment is full!
One rather curious procedure that happened on the real line was the some waht unorthadox mixed trains. On the outward journey from Chichester the wagons would be tucked behind the coaches but on the return journey they were sometimes propelled by the train, whilst the remainder of the train was pulled. Somehow, I don’t think the Board of Trade would have approved!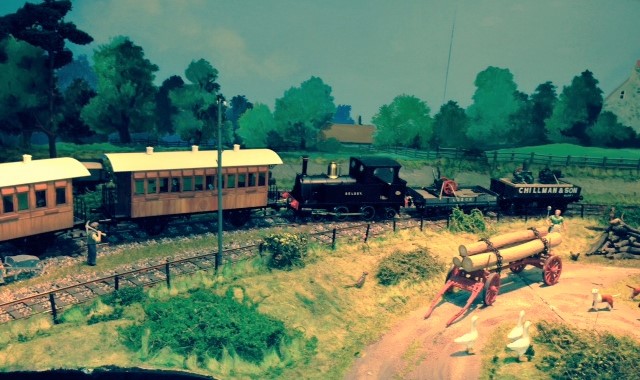
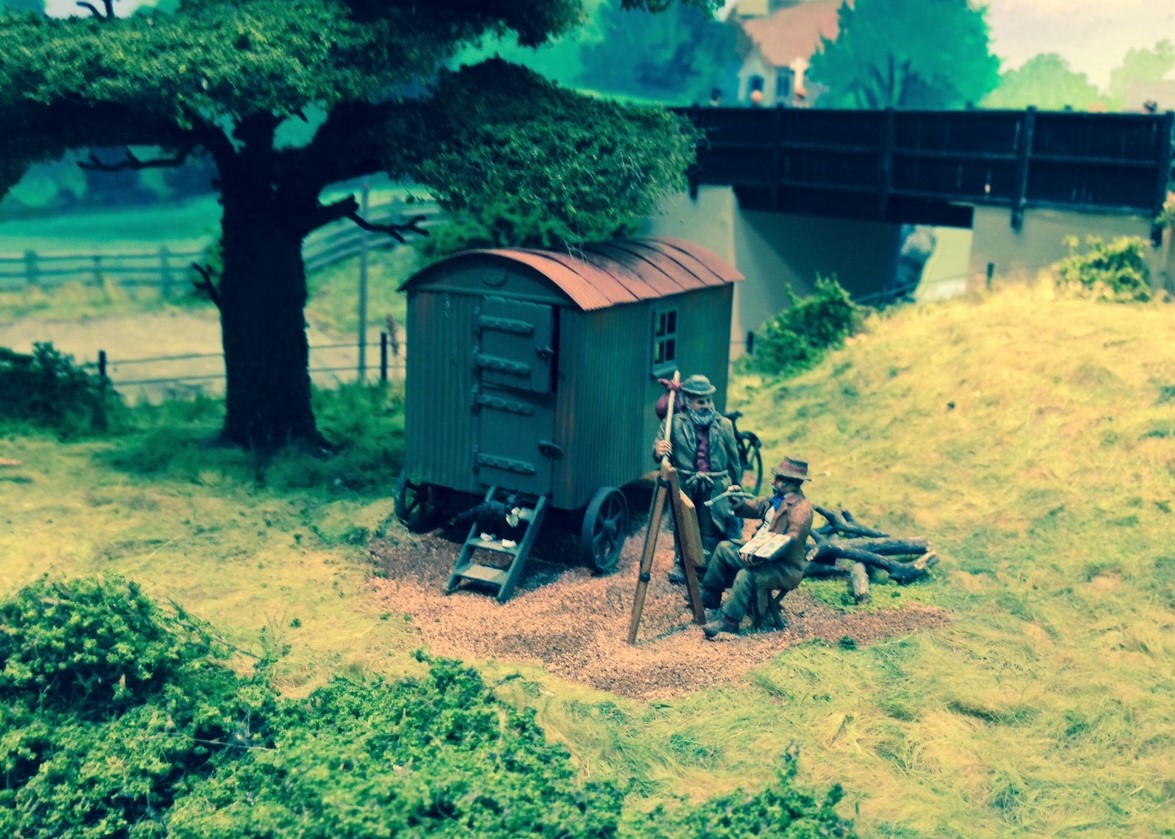
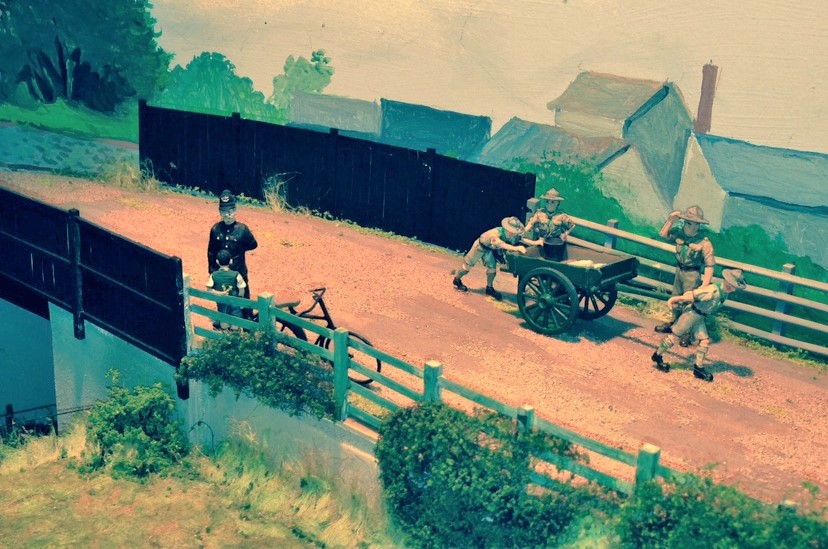
The layout was built by Keith Smith; although he was convalescing so was not actually there – thats why they needed a bit of assistance and how I bummed my invite! Keith’s pleasure is making the scenary and there are large number of very well executed people and cameos on the layout. Here are a couple; an artist being interrogated by a shepherd and a little boy going through a rather more severe interrogation from a police office – I wonder if Dixon of Dock Green will see the caterpolt behind the boy’s back?
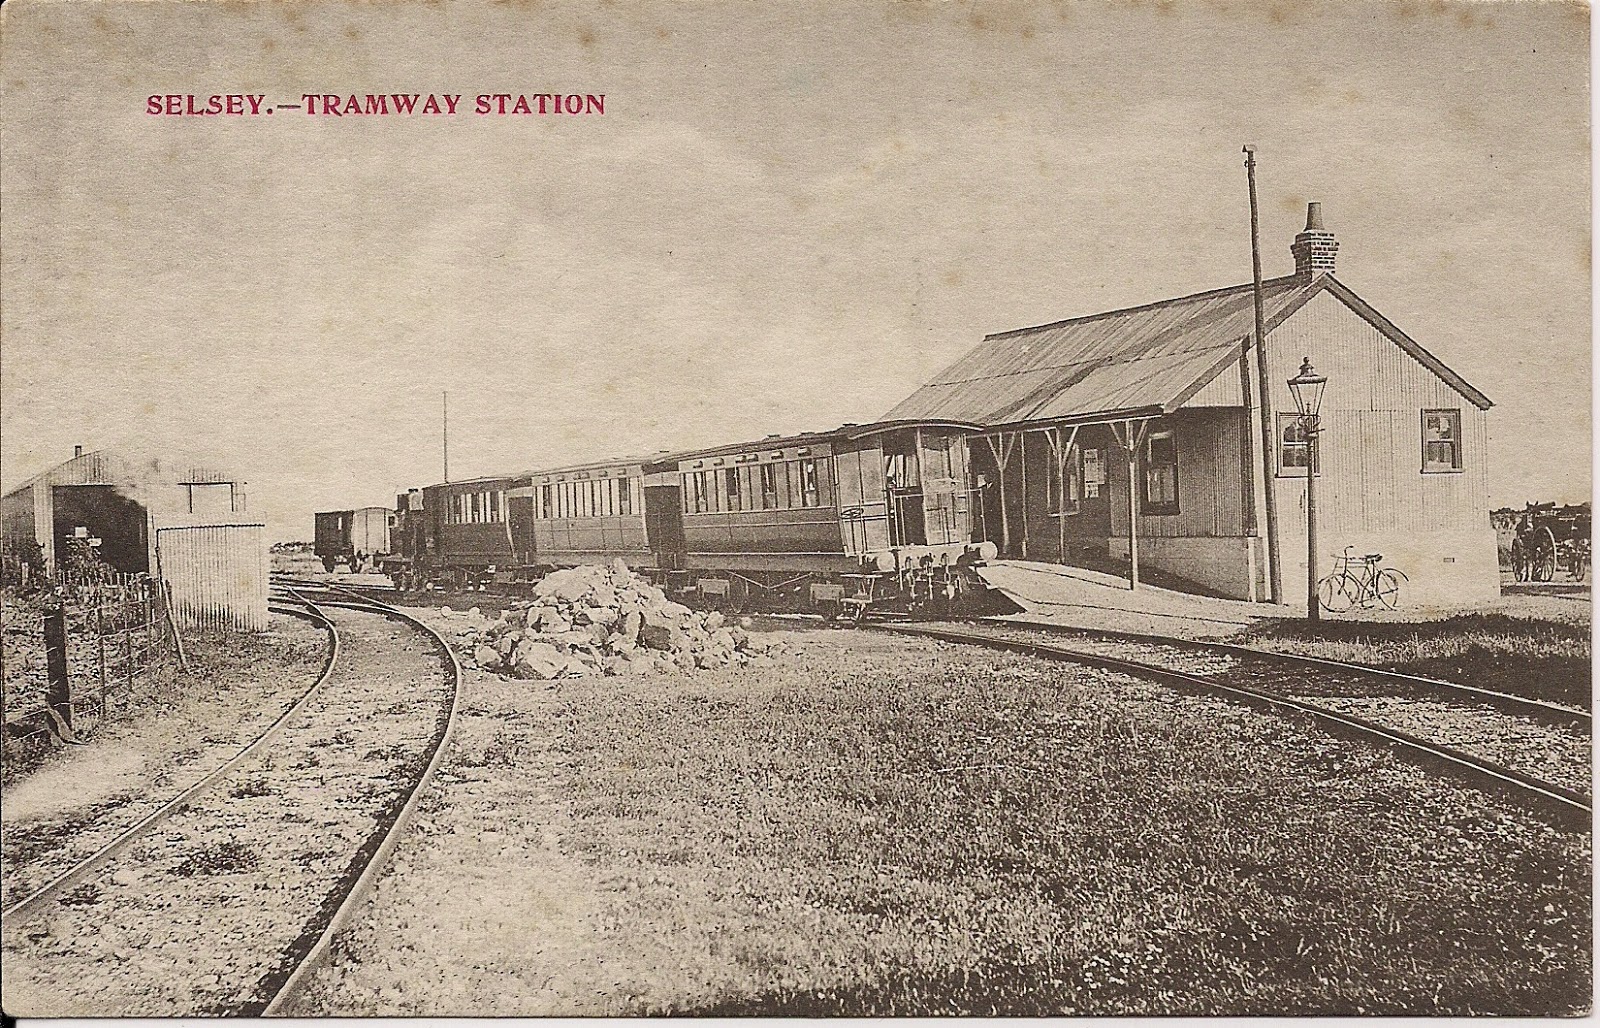
And finally, here are a couple of postcards of what the line lloked like in real life; with those Ford Railcars out in action. The line was famous for the poor condition of its trackwork; a point that can’t be disputed by the first photograph at least! The line eventually closed in 1935, a few years after Colonal Stephens died and now there is very little remaining of it.

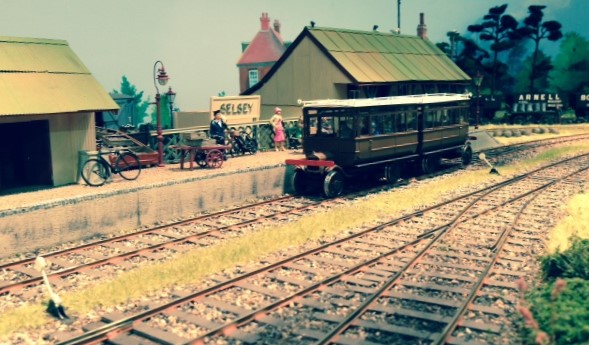
Compare this!
NER Hoppers – Part 2; liveries
I have made more progress with the hoppers, having completed the main paintwork of these and also the lettering.
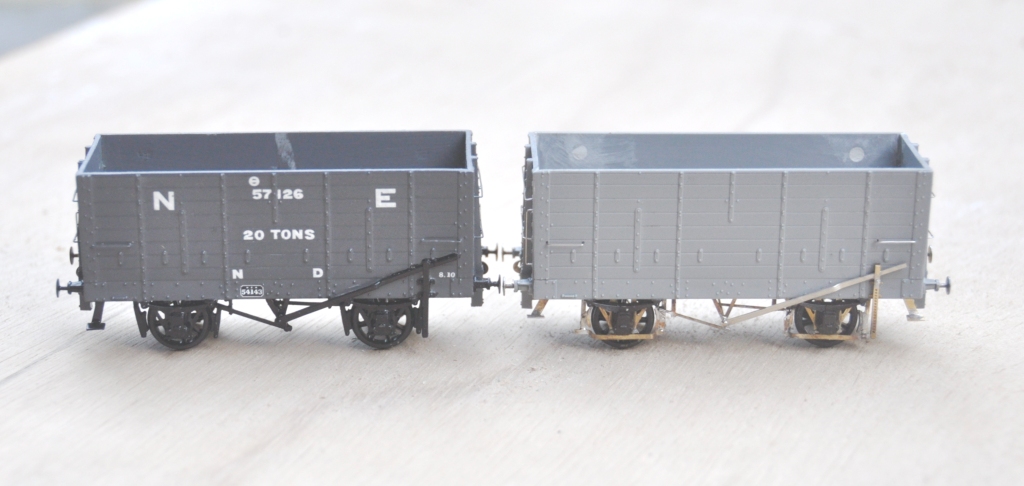
Both the livery and the lettering offer further opportunities for variety, which I have taken. First up are a pair of wagons lettered with the full legend “North Eastern Railway”; a livery applied on some of them upto 1903. This was a fair pain to create, as the full words had to be spelt out from an alphabet; even now I am not totally happy with this and a few tweeks to some of the letters is possible.
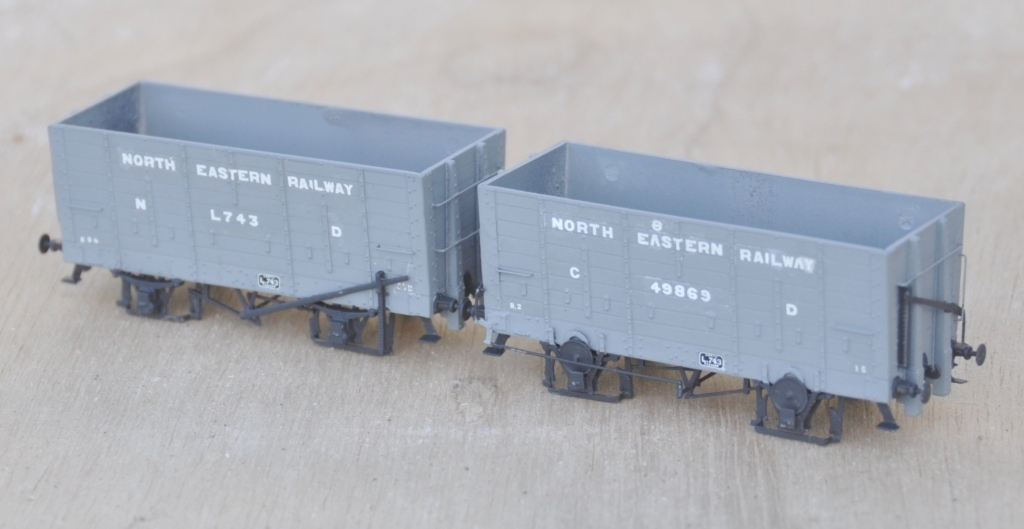
The most common livery for the period that Benfieldside is set (just prior to the first war), was the livery applied between 1903 and 1911 and the legend NER was used.
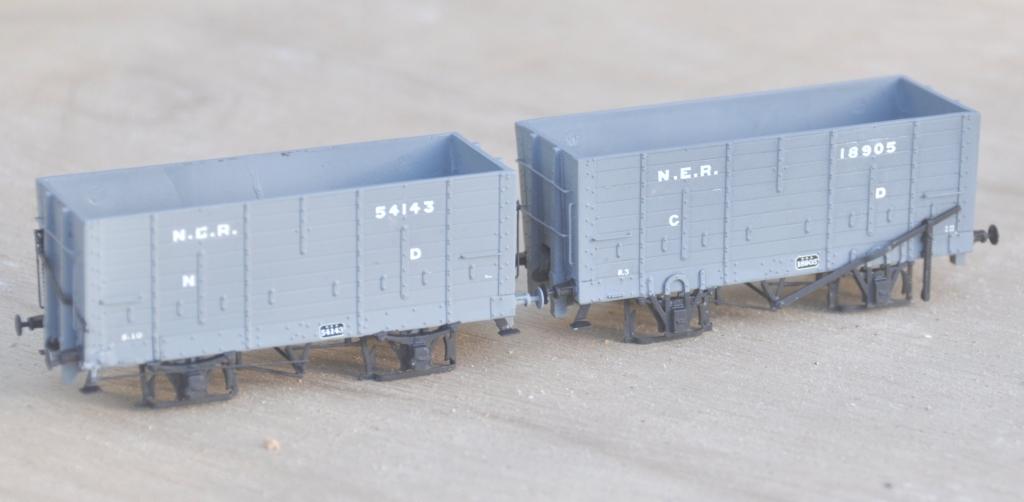
The final livery was on a darker grey and NER was dropped and replaced with a mere NE. This vehicle had a load designation on its end too, which appeared to be an occasional feature.
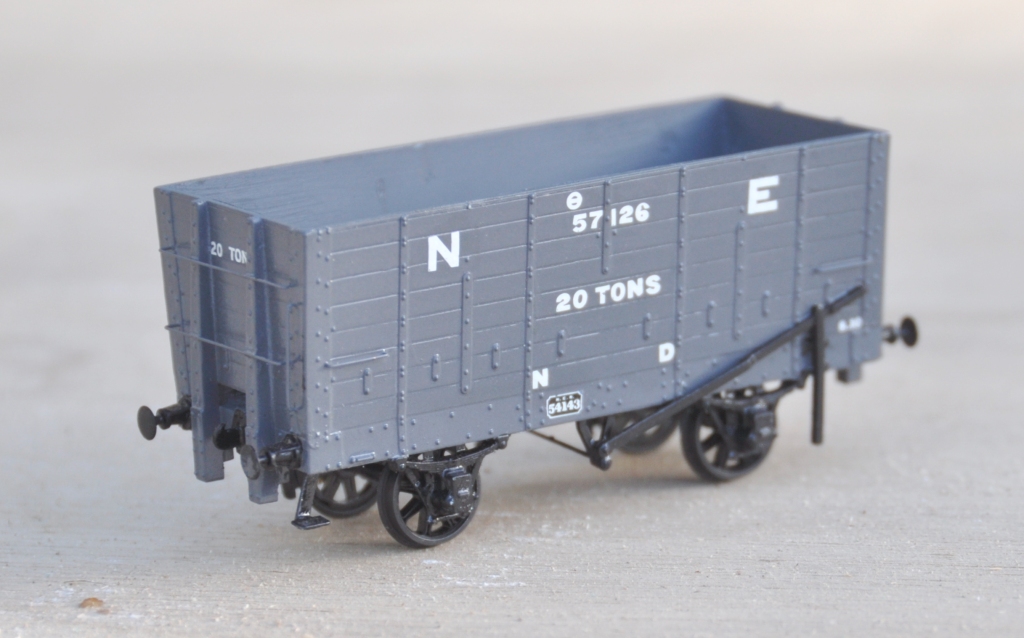
Once I have had a chance to tidy up the lettering, I will paint the interior a dirty black and speckle it with coal dust. I will also make a coal load. Then these need the application of grunge as I can’t believe that coal wagons were kept particularly well!
Christmas is the season for…………. jolly well finishing stuff off!
Over the break, I have been concentrating on trying to finish things. Like many people, I find it much easier to start a kit or project than it is to get it fully finished. Indeed, do we every truly finish our models – certainly not our layouts!
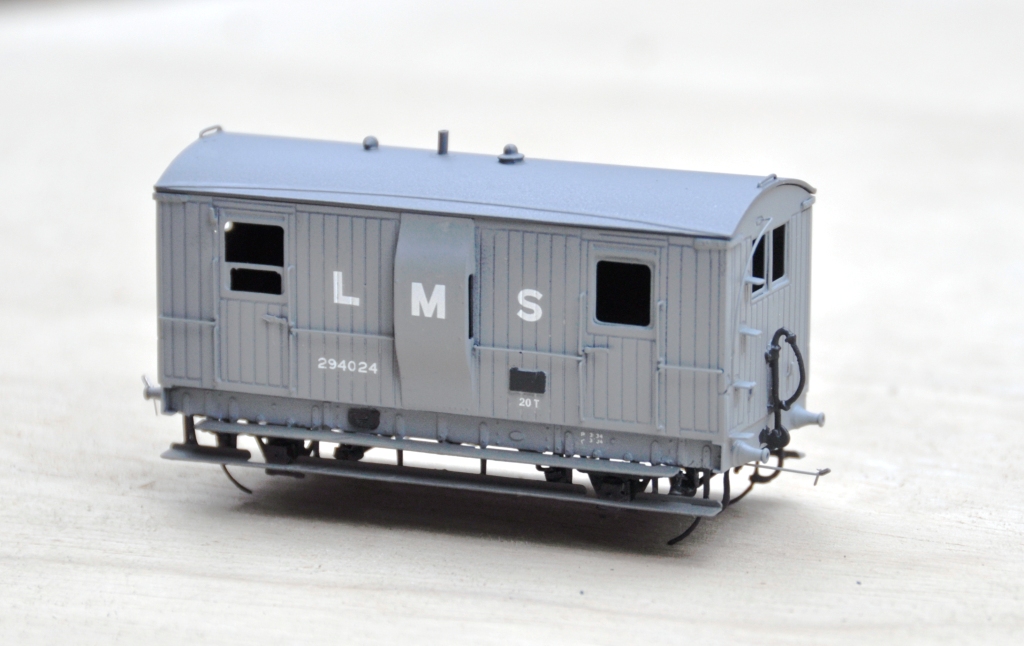
Back in March 2013, I completed a dia 39 goods break. These were the final Highland Railway break vans and it is not clear that they were actually finished prior to the end of the HR era. Given that I model in the mid 1920’s, I am quite content to do this in LMS grey which to date I have not seen the model depicted in! The main body painting has been completed and the van has been lettered but weathering, the interior and final detailing/glazing is still to be completed. Based on the Lochgorm Models kit with minimal adjustments (a few pipes below the chassis and sprung W irons in lieu of the compensation provided in the kit) this is what it presently looks like:
Also coming through the paint shops are a pair of vans. The first is a Great Central van build from a Mousa Models etched brass kit and the other is a LMS early standard van from an injection plastic moulded kit from Cambrian Models. Both are pretty simple models to build; the Mousa Models one was built as designed and no adjustments were found to be necessary. I only fitted springing to the Cambrian one and got rid of the rather too thick W irons in the process. Again the bulk of the painting is complete, but some dirtying work is definitely still required.

Apologies for the slightly squiffy photos; I left it a bit late in the day to take them and the light was poor. I have made a lot of progress painting the NER hoppers, but the photos of these really did not make it and need to be repeated. Something to post tomorrow I suspect!
NER Hoppers
I am presently cracking on with a batch of NER hoppers for Benfieldside. Having acquired the layout, Tim and Julian have very little stock to run on it, so as part of the repayment for the use of their facilities and expertese on my boards, I thought I would help to correct this shortfall.
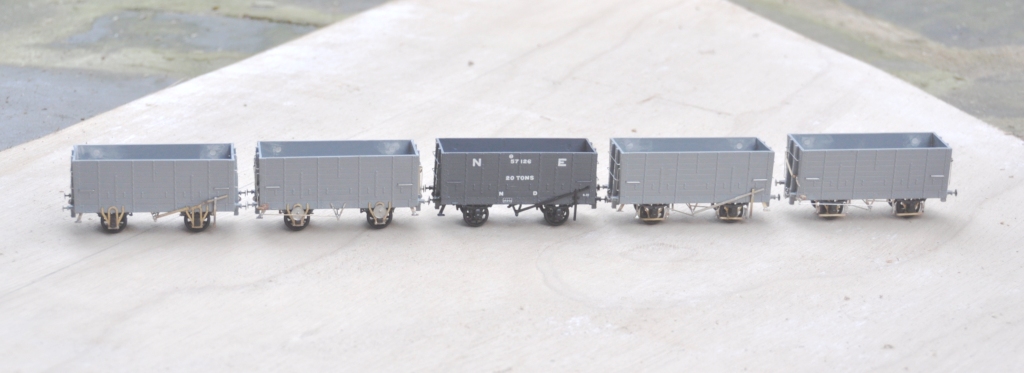
The origins of all of this present batch of hoppers all go back to the Slaters’ injection moulded kit, which is of diagram P7 wagon. There were around 17,500 of these wagons at the time of the grouping and the LNER carried on building them for some years thereafter with only subtle differences; so not unsurprisingly there were quite a lot of variants. Thus, I have been doing a lot of modifying!
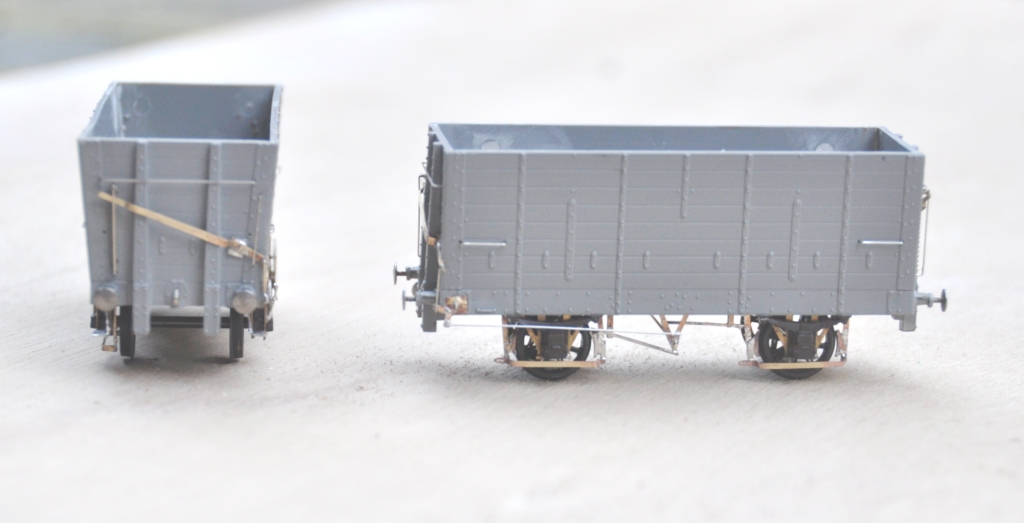
In each case, I replaced the very clunky W irons with Bill Bedford replacements; even though these were to be to EM, I felt that they would improve their performance. The first examples were essentially built as the kit was intended with fairly traditional brake gear (which was to one side only). However, having built my first one, I decided to refine the brake gear by drawing an etch for replacement steps, V hangers, morton brake mechanisms and brake levers. This (along with a comparison with the plastic equivalent – the painted wagon), is below:
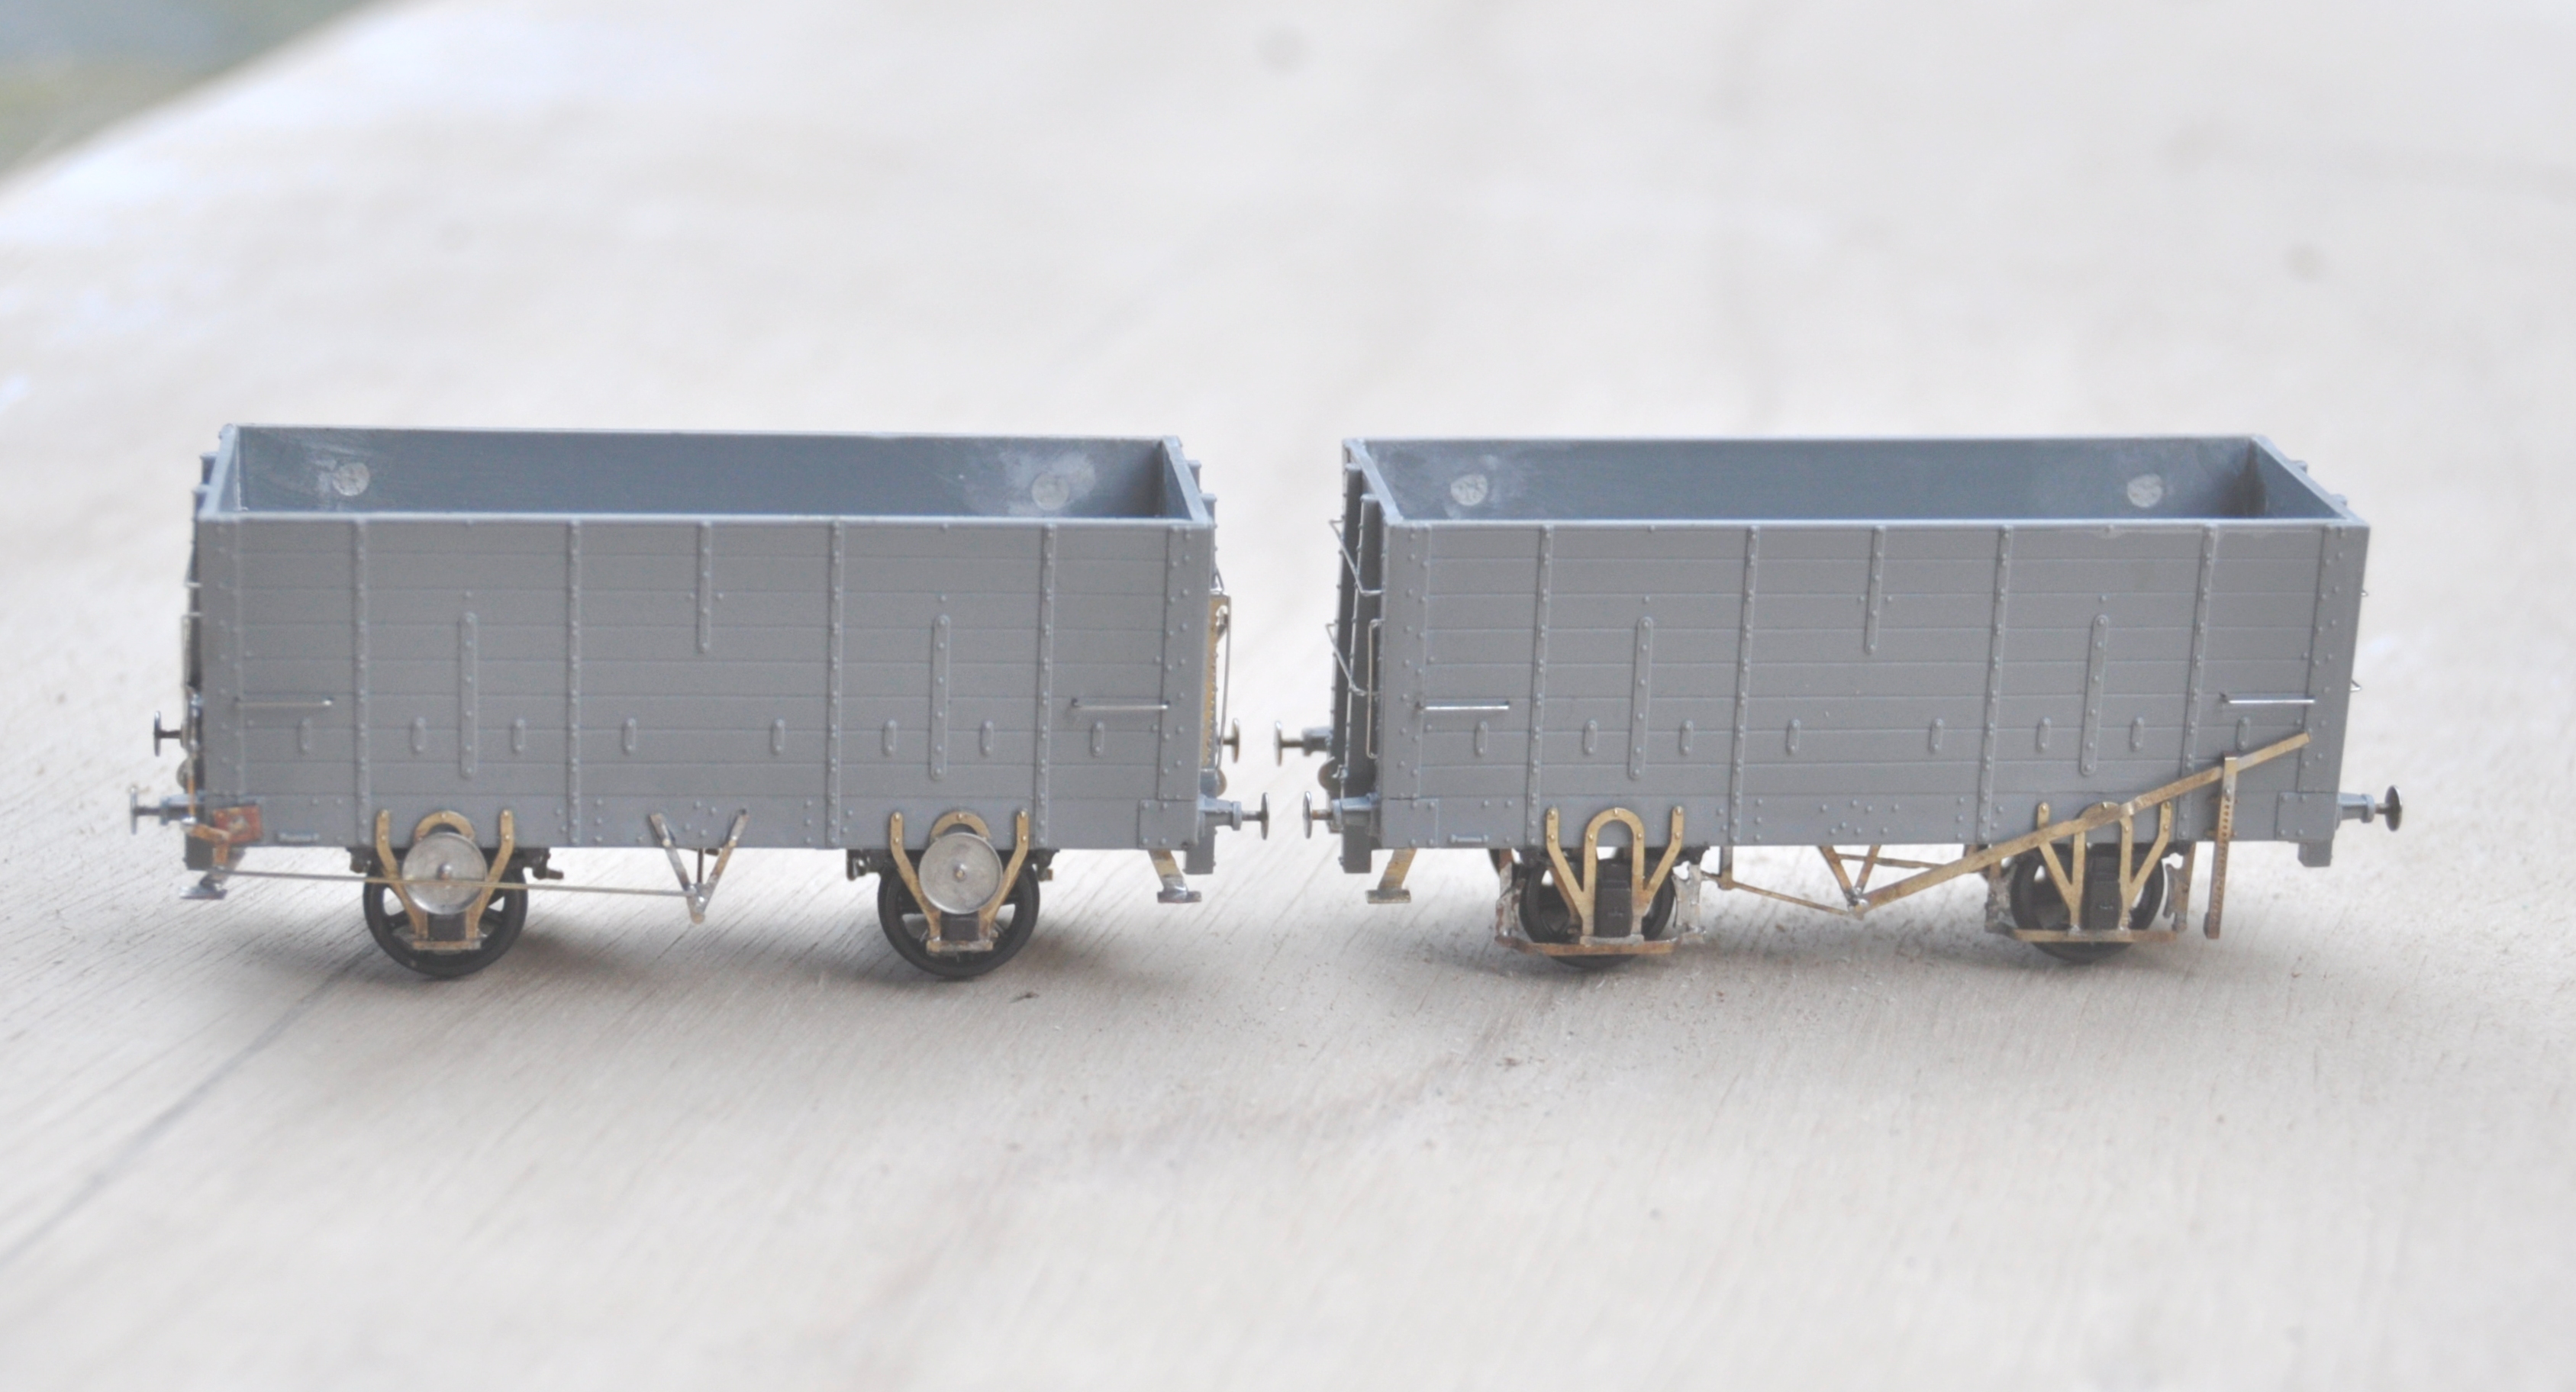
However, a significant proportion were modified with end levers that operated a crank that was connected to the Morton gear. At the ends, there was a much more chunky ratchet arrangement to retain the lever in position. Again, I drew this up on the etch, and the arrangement looks like this:
The NER undertook a number of experiments with these vehicles to attempt to reduce rolling resistance and this was the subject of my next modification. On the right (below), shows the provision of a second outside set of W irons. This was to add stiffening to the axles. There is a set of Bill Bedford W irons to cater for this, but I chose instead to create a fresh set on the etch. On the left is a further variant, where an anti-friction bearing was added in addition to the outer W irons. This was a wheel that ran on the top of the axle and I presume the idea was that as it rotated less, there would be less friction. I suspect that the introduction of an open bearing surface that would instantly get contaminated with coal and grot would actually have the exact opposite impact – as these were removed by the grouping era, I may well be right!
The final variation of construction that I have modelled was a slot cut into the ends, which appeared on some vehicles. The NER used these on vehicles that were hauled up rope inclines – of which they had many. A plank of wood was inserted into the hole and wedged such that it was secured behind the end posts to ensure that the haulage point was close to the centre of the wagon. They found without this that there was a tendency to pull the end posts loose due to the uneven point of pressure.
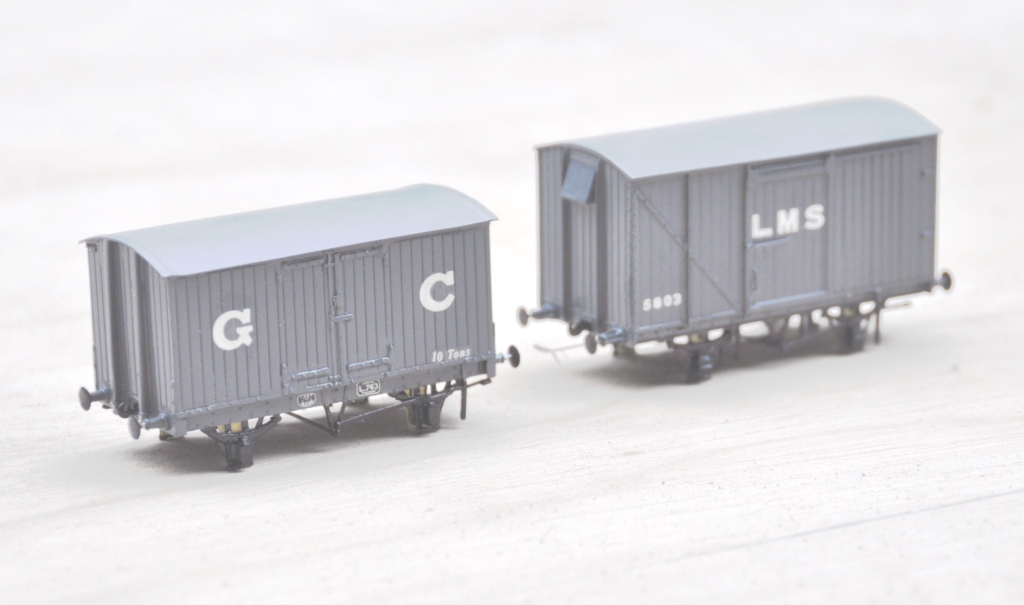
Next up will be the painting and lettering of these; where I have three eras to chose from that would have all been apparent immediately pre- first war, which is when Benfieldside will be set. More on this in a future post.
If there is a desire from anybody for the etches, I would be able to offer them; so drop me a note?
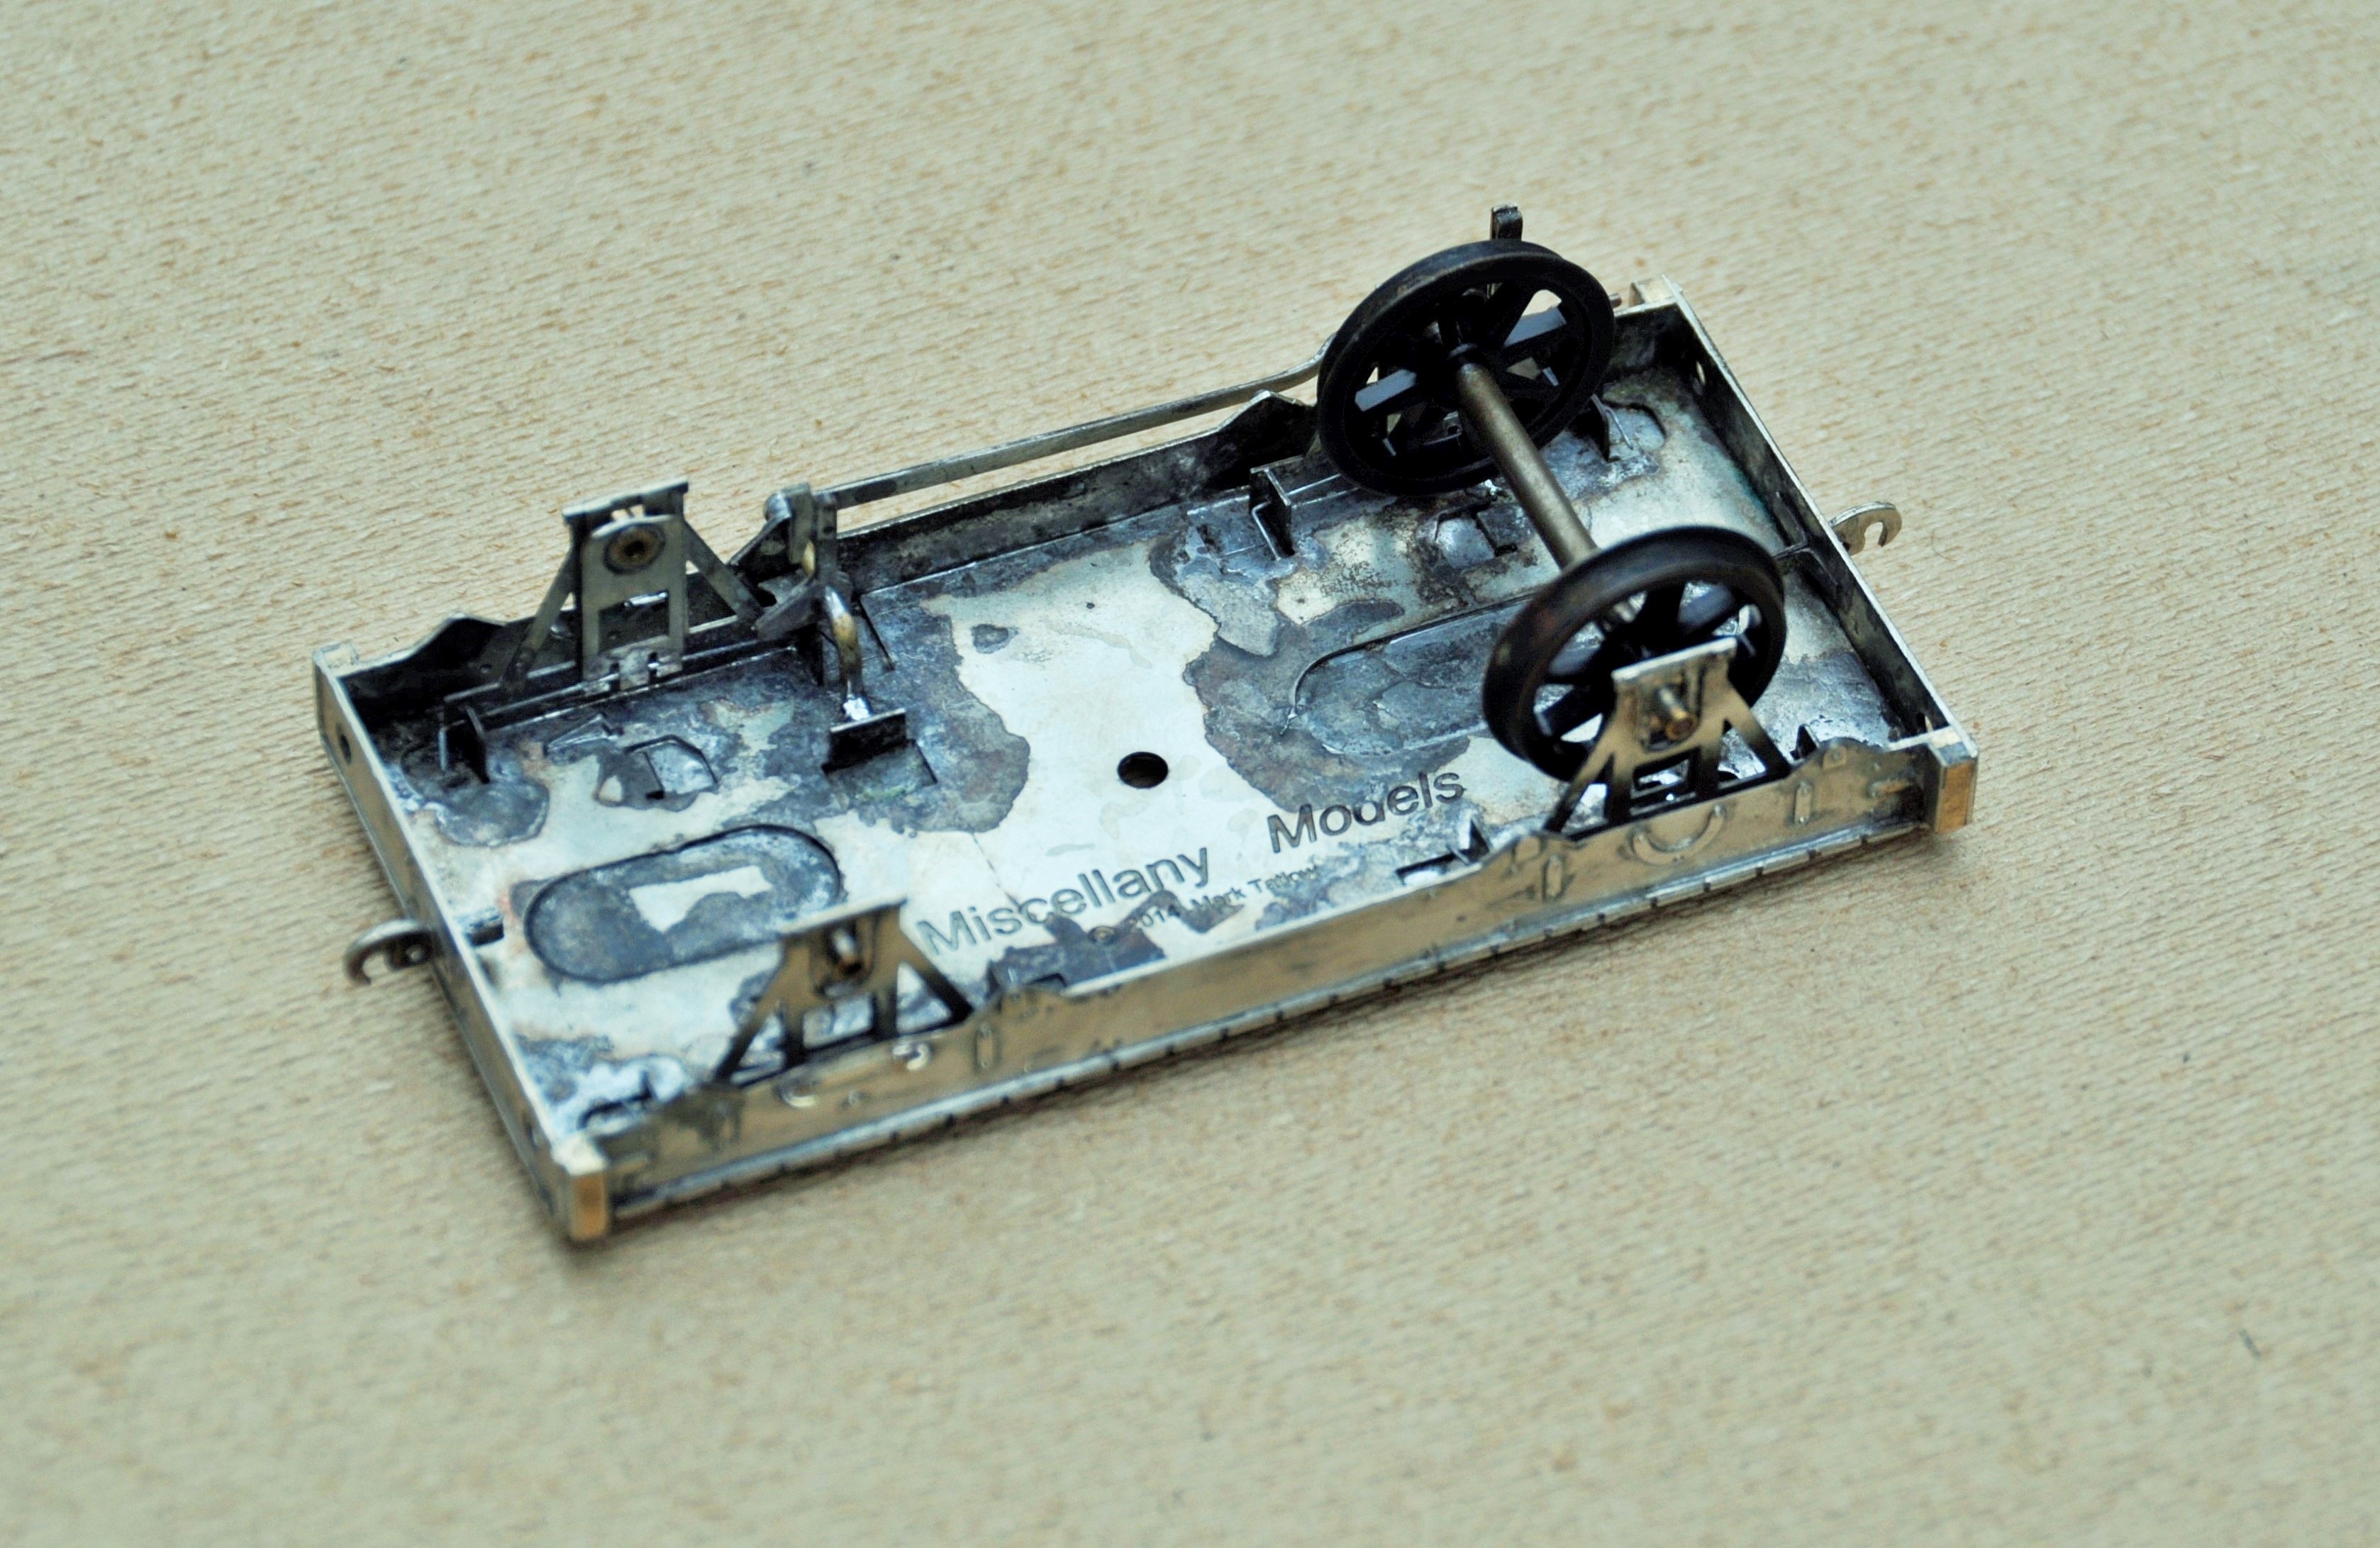
HR Cradle Bolster – First Test Build
I had a delivery from PPD a week back, so I have been playing with some test builds of this:

This is a dia 25 cradle bolster; a type of vehicle that I have not seen on another railway. It has a square cradle that sits on the top of this, with four bolsters protruding from the corners of the cradle. They were used on pairs and the whole cradle rotated when the pair of vehicle went around curves. The intention, I presume, was to offer the load more support by offering more points of contact. Anyway, as no one else had tackled this vehicle before, I thought I would have a go!
As this is my first etched design for a vehicle, I have certainly encountered a number of problems. As the top photograph shows I produced this in both 4mm and 7mm; the latter has proved more successful due to the thickness of metal being greater. The main issue that I created for myself was to half etch the solebar overlays so that the rivets and the ironwork could be portrayed. However, rather than backing them on a further layer of etch (like the etched kits I have built – they evidently knew something……), I spanned it between supports. The intention had been to make the kit fold up more readily but in practise what has happened is that the half etched solebars have distorted (badly in the case of the 4mm one) due to the stresses introduced in the heat from soldering. Thus, whilst I have a working model (at least in 7mm), a rework is going to be required.

Both the 4mm and 7mm versions will have sprung axleboxes, using a varient of the guitar wire sprung version used by Bill Bedford and others. The 7mm chaps don’t seem to use it much and I guess the mass of their models helps. However, it does glide with the springing and is better as a result I reckon.
I have also done a 3-D design for the cradle, which I am proposing to use as a master for some resin castings (certainly in 7mm, I might go down the lost wax brass route in 4mm). A new process that I have not previously attempted. I need to find out where to get axleboxes and buffers from – Larrie Griffin I presume.
Also back from PPD, were some etches for something altogether more bold (which is a worry in the light of the problems I have encountered on a relatively simple wagon!). This is the chassis and body etch for a Drummond Scrap Tank. I have made a start on this and again, some reworking will be required but again there is a viable model in an amongst these parts; it just needs tweeking. More to follow once I have got further with it.


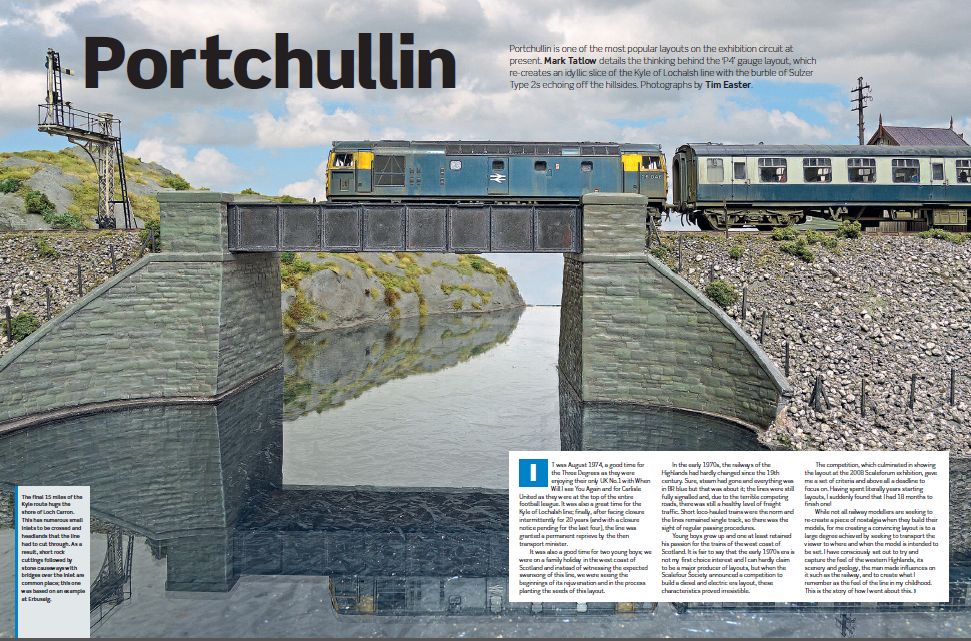
Portchullin – Recommended Reading
Portchullin is in the press!
Rail Express have for many years included a modelling section to what is otherwise a prototype magazine. This year (and going forward in future years I beleive), they are producing a yearbook which is dedicated to only modelling features. Portchullin is the leading article with a series of photos from Tim Easter – and it is no less than 13 pages long.
Here is a taster and if you want to get a copy, it can be obtained here:
Benfieldside’s Signals – An Update
We have not had an update on the signals for Benfieldside for a bit. The first four of these, including the three that were restorations (although in respect of the twin doll signal, very little was reused indeed) are complete. This is what they look like (with thanks to Phil Hall & the Scalefour Society for the pictures):
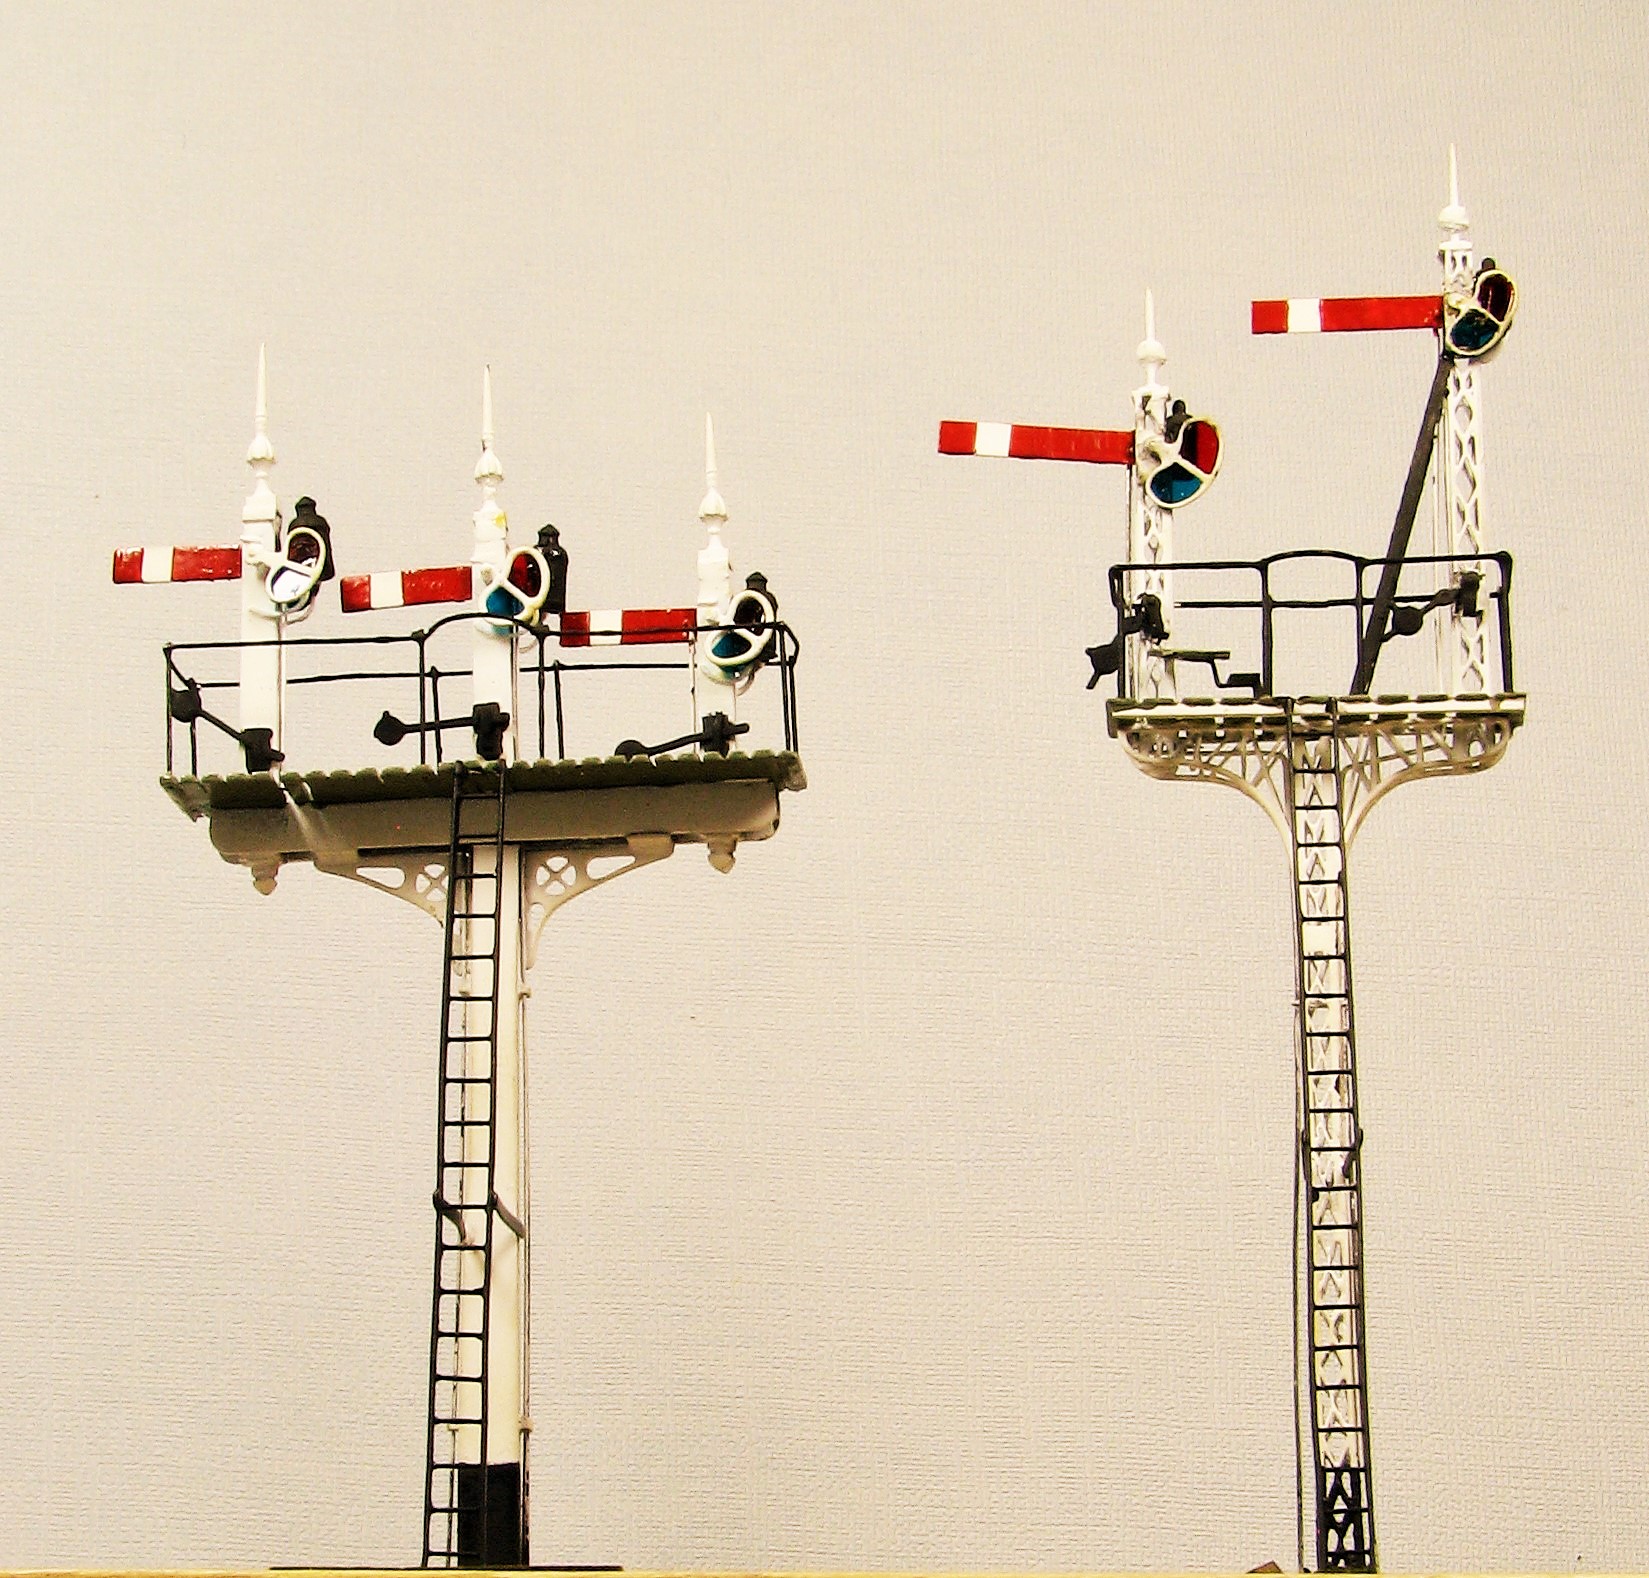
The three doll is a restoration from John H Wrights work, so too is the other in theory but the only components reused were the slated deck for the landing and the curved metal that formed the brackets!
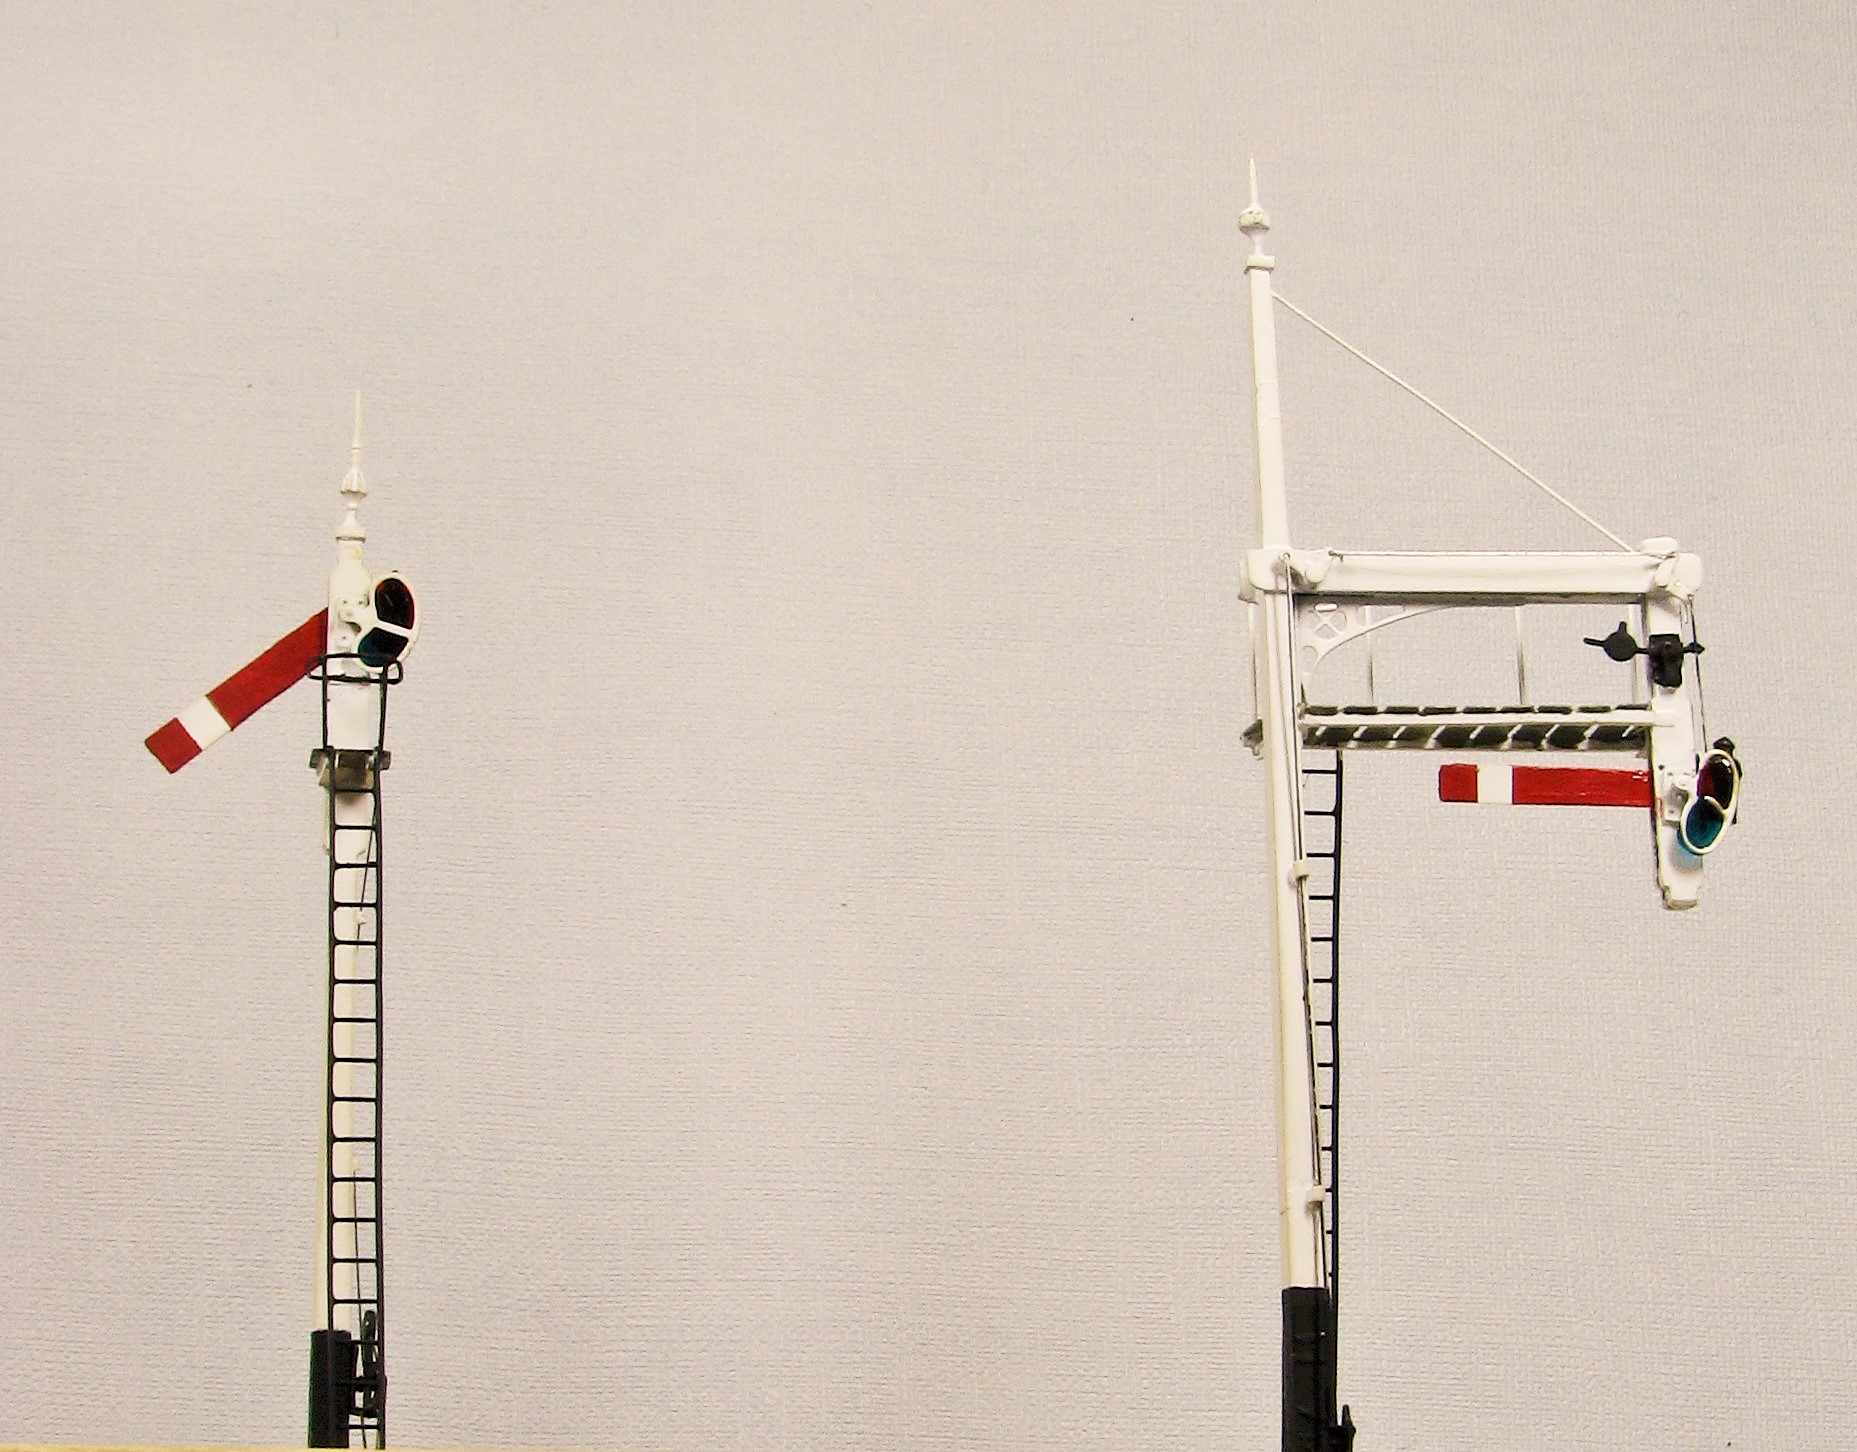
Gallows bracket to the right, restored from the John H Wright original. The simple post signal is all mine!
The gubbins for operating these is not shown in the views and I will write up a bit more on this at some point but an article I wrote for Rail Express on the signals I did for Elcot Road can be found here. A few of you may have played with these on the MERG stand at Scaleforum too, as I understnad it they kept people amused. There is more Benfieldside signal updates to follow, when I can get my camera out in the light to take some piccies.
Peter Bond’s Aultbea
I can’t claim any of the credit for this one, it is the work of one of my friends and stalwart operators of Portchullin, Peter Bond.
His latest layout (in EM) is based on the line that was proposed from Achnasheen to Gairloch and Aultbea. This was a real proposal in the late 19th century but the scheme came to nothing. Peter has imagined that not only was it built but it thrived; to a large degree due to the naval connection where the navy did use Gairloch as a significant port. He has also presumed that Aultbea became the port for the Hebrides and thus the Kyle line faded away (a point I don’t like!).
You can see in this view the rather nice model of the signal cabin for Aultbea, based on that at Kyle. The description of the building of this was in BRM in September and October 2012 and is worth a read.
The layout is pretty big; some 30 feet long and relatively deep at the station end. Peter envisaged that with the rise in traffic during the first war, the station had to be enlarged – much like Oban was when the Ballachulish line was built. Indeed, Peter is taking a lot of his inspiration from Oban, including portions of the trackplan, the overall roof and the engine shed being a little detached from the rest of the station. As you can see, it will be set in the late 1960’s so a little earlier than Portchullin.
Now Peter is an inveterate starter of layouts, so by posting these progress pictures, I am hoping to prod him along to finishing this one.
Over to you Pete!
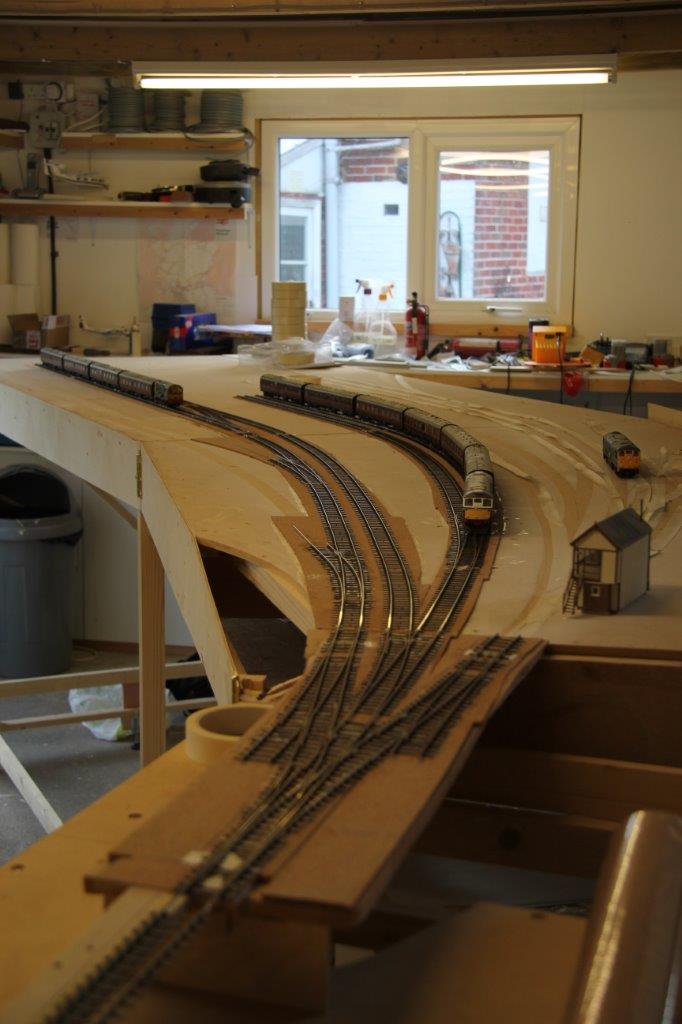
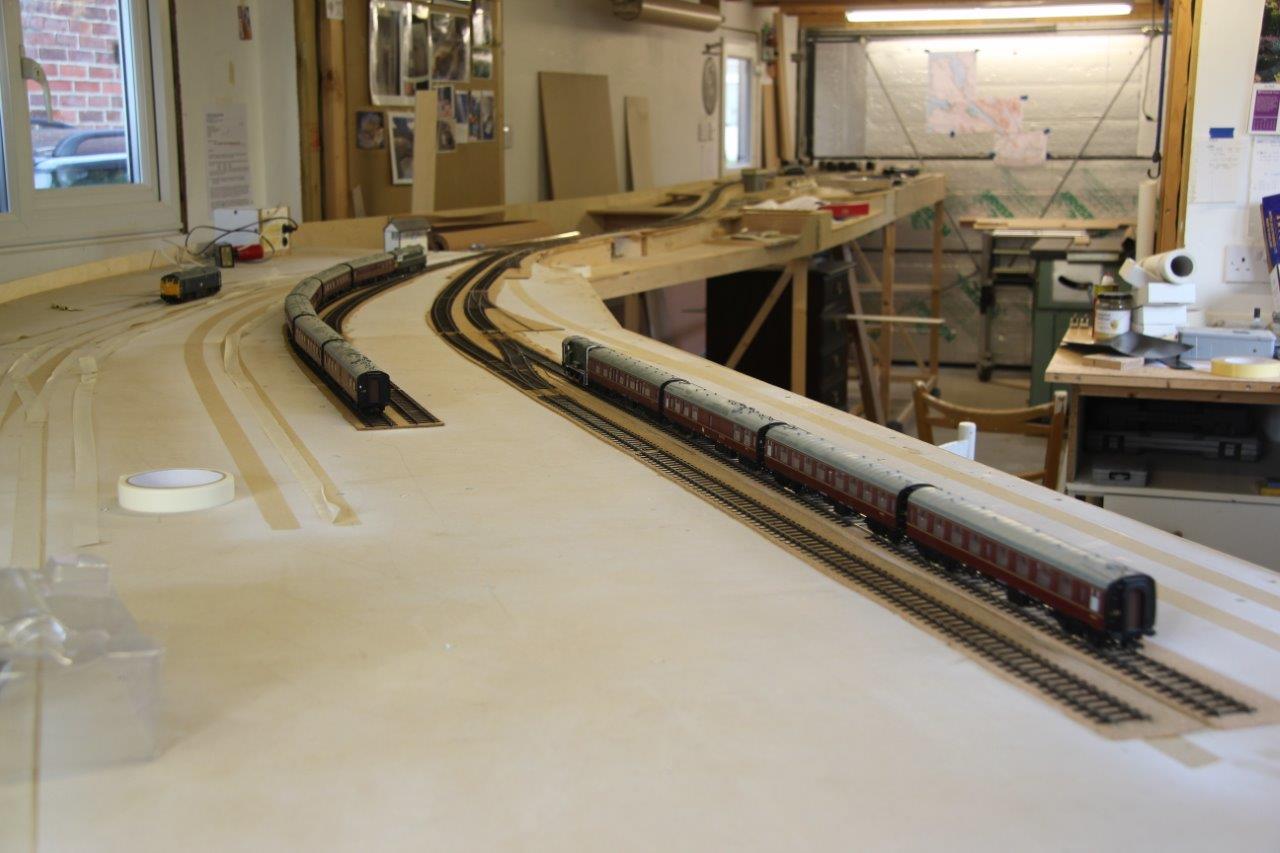
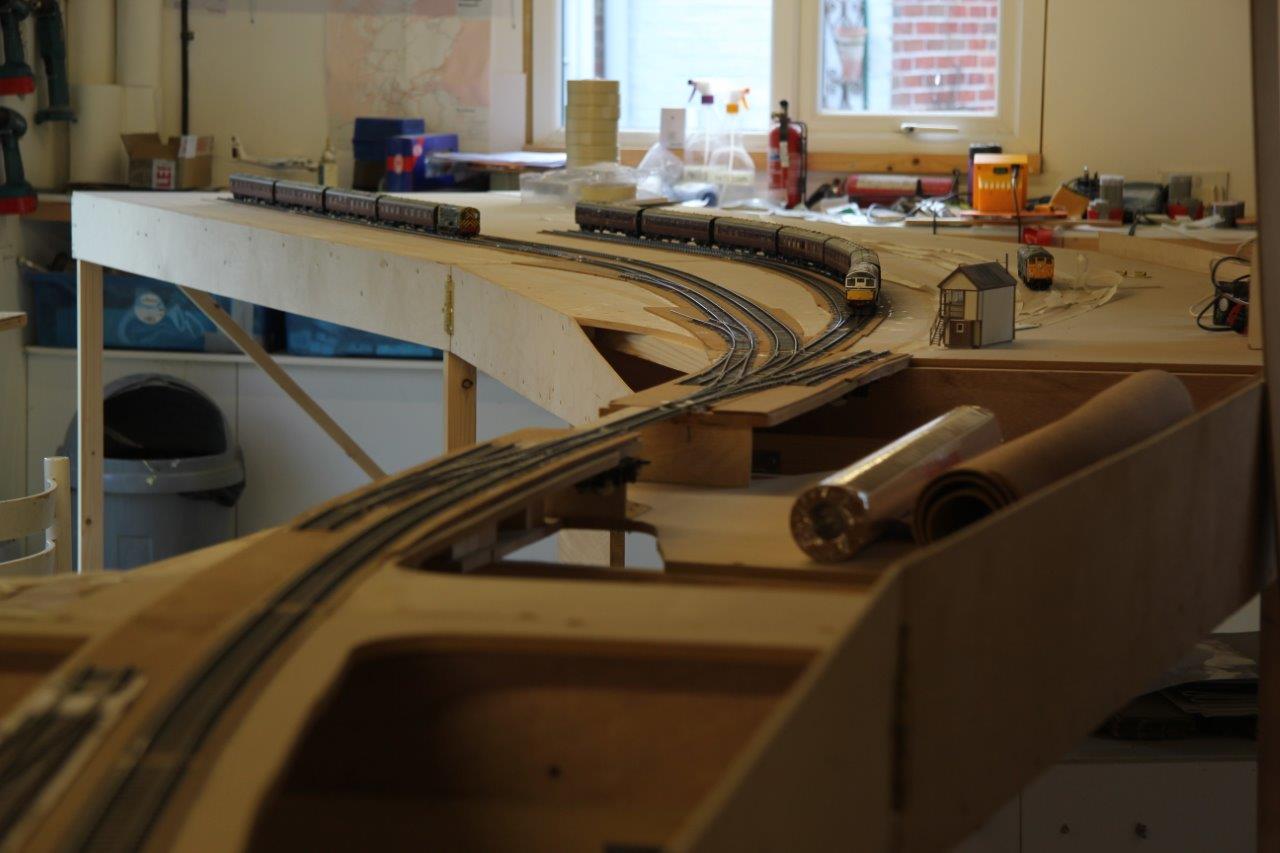
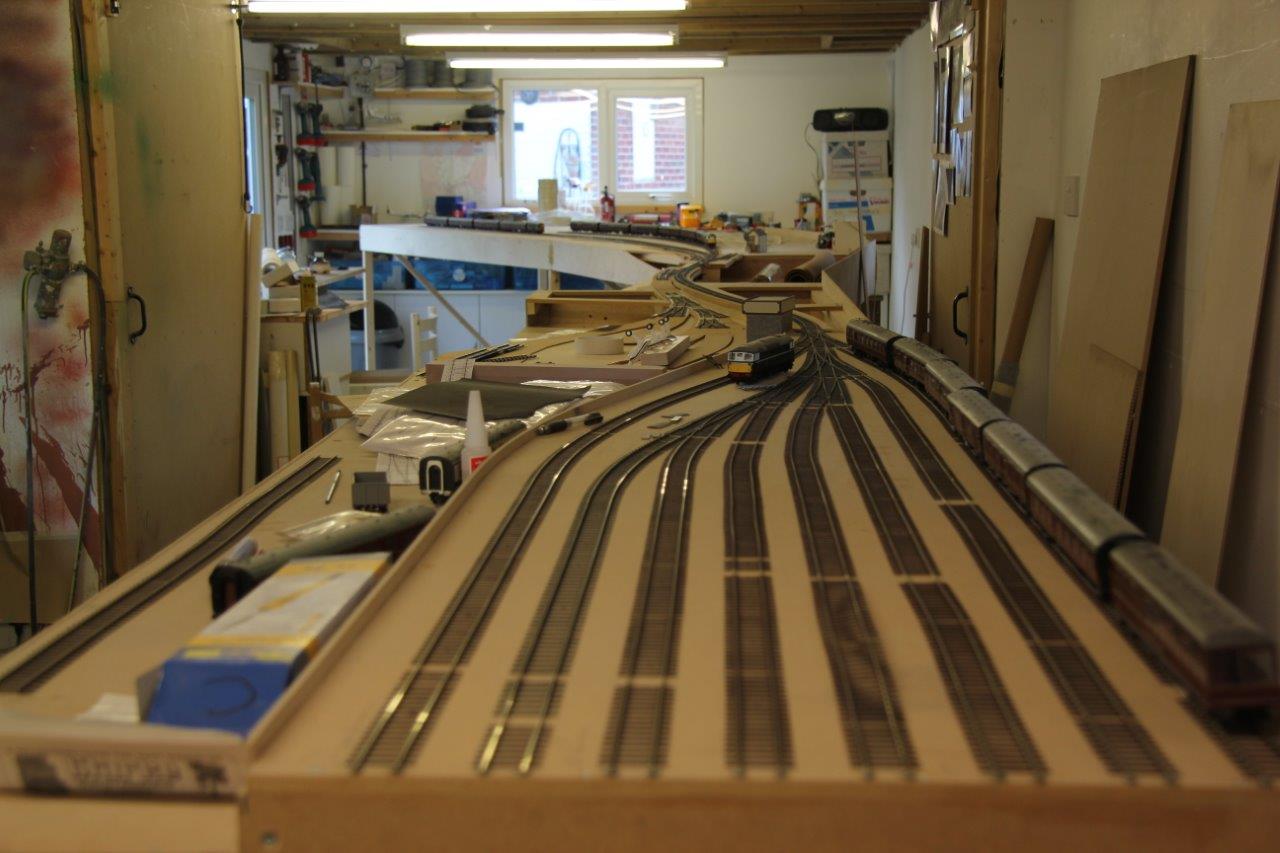
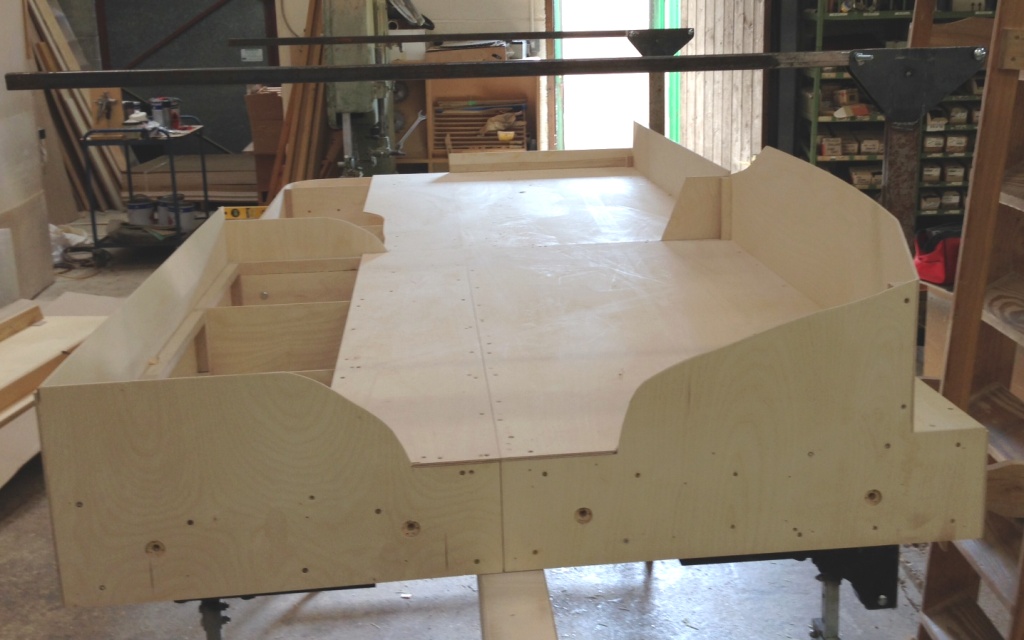
First Four Boards Complete!
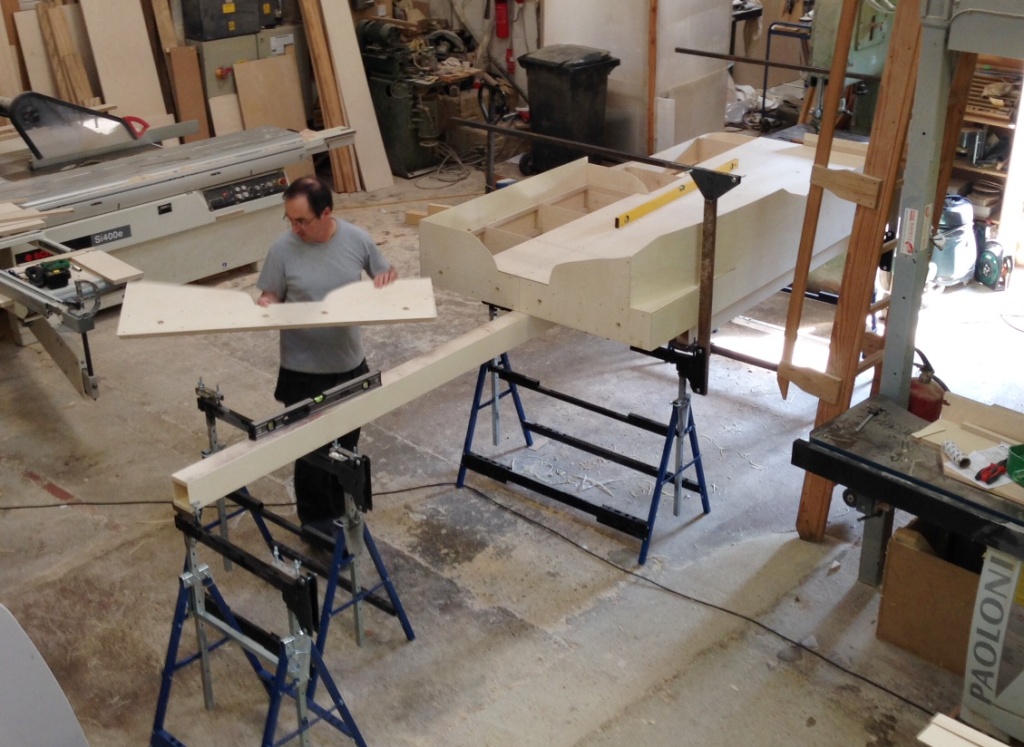
Julian and I have been putting a bit more time in on the baseboards, to the point where the first four are complete with the exception of their varnishing/painting.
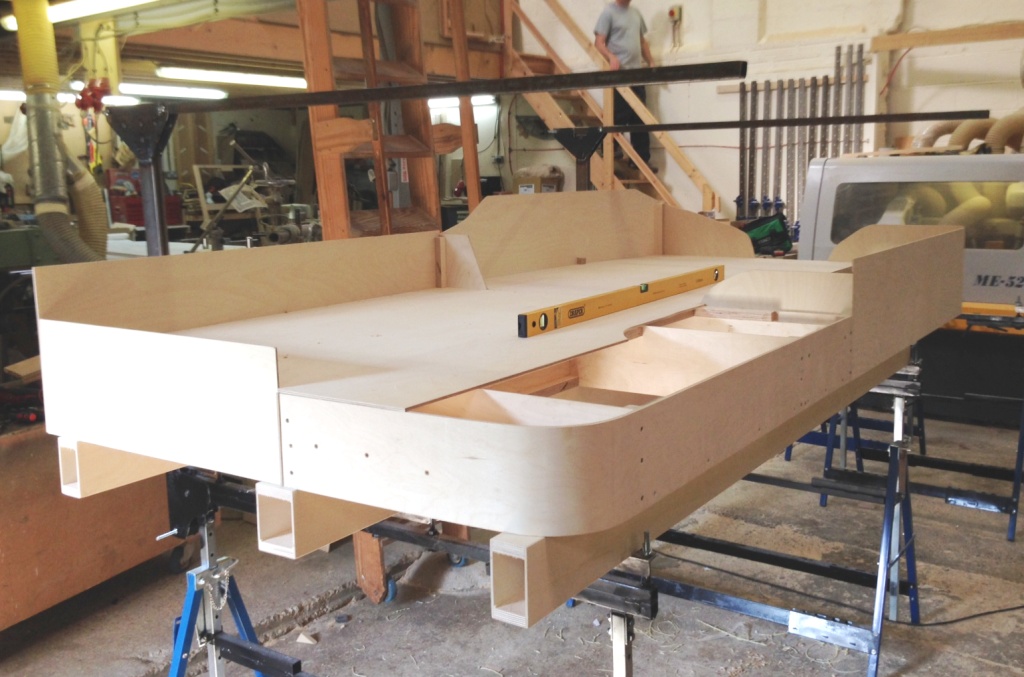
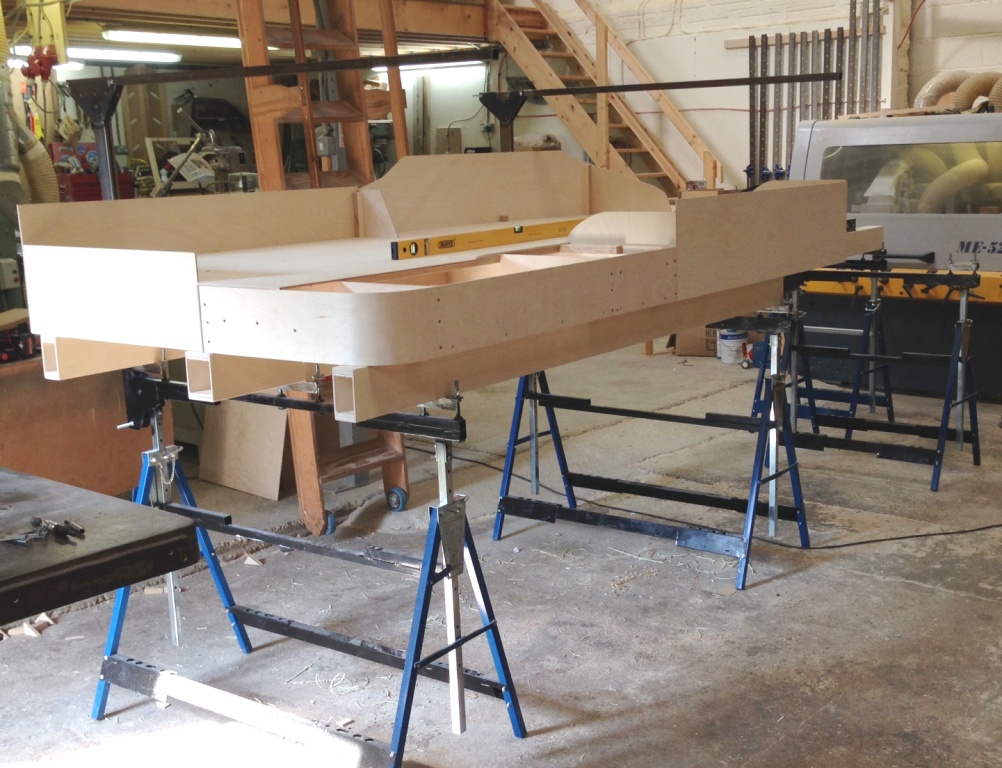
You will also see in the pictures that the beams that support the boards have also been completed. These span between the brackets that were shown here which in turn are supported by bolts that have been affixed to the builders trestles. This means that each point of contact can be adjusted for both overall level and also cant. The idea is that this is done prior to placing the boards on the beams, so that the whole thing can be levelled as one and the boards then just get plonked on. So long as the floor is not too wonky (like that in Tim & Julian’s place!), this does not take long and it is very idiot-proof assembling the layout perfectly each time.
Also visible in the views are the gallows brackets that will support the lighting and facia. These are fairly meaty as they have to span over 1300mm from front to back, so the moment on them is quite high. What we have just found is that they are a tad low due to the beans being a bit higher than I had expected. A bit of adjustment will be required in due course; especially as the layout level is also a bit high.
But the acid test of the new boards is shown in this view. On Portchullin one of the problems is that the boards rise up slightly at the joints – a problem I see a lot on layouts. This is dead flat; so we won’t see the trains doing any Casey Jones runs over the mountain ranges!
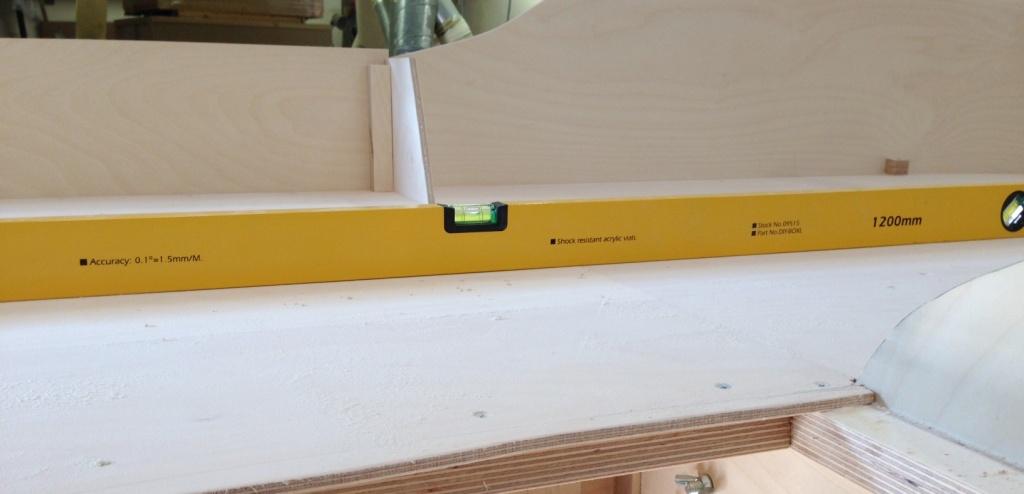
The next visit will get on with the last two boards, which will take up the rather obvious space where Julian is working. These will only be a single width in size as the boards are tapering in to 700mm wide at the end on the left in the view below. To give a sense of scale, the yellow spirit level is 1200mm and the dark one 750mm. (see Mr Ullyot – two spirit levels now………..)
So thanks again to Tim & Julian and if any of readers are looking at electric loft ladders; give them a call. S&T Joinery.
