Blog Archives

ExpoEM – Portchullin’s Next Outing
Portchullin’s next outing will be this forthcoming weekend; 18/19 May at Bracknell Leisure Centre, Bracknell, RG12 9SE.
We’ll be taking you back to the 1970’s where blue and grey ruled in the western highlands, with the odd stray green one………….
Pop by and say hello?
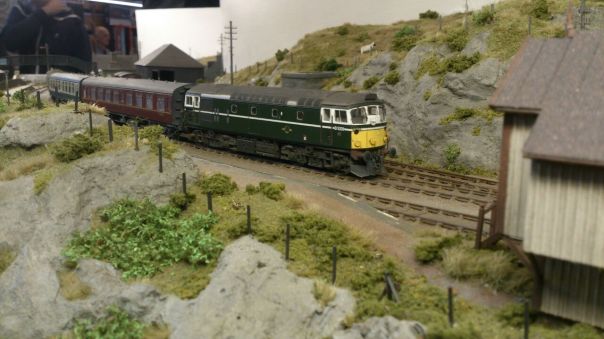
A Dirty Skinhead……….the SLW Class 24
A skinhead; what’s he on? Well for the steam age people out there, a skinhead is the nickname for those BR built sulzer class 24s that did not have headcode boxes – as you can see below in Paul Winter’s photograph they did have a rather bald headed appearance and it is not difficult to see where the nickname came from.

Whilst the bulk of the class that ran on the ex Highland lines had the headcode box, for a long time one or two skinheads were allocated at Inverness and visited both the far north and Kyle lines. Given that they do look quite different I could hardly resist getting one to offer a bit of variety on the layout. I had been plotting getting one for a time, having bought the Bachmann version and even converted it to P4 but I had not quite got to enhancing or weathering it so it did not ever make it out onto the layout.
There are failings in the Bachmann model that have annimated many; the worse being the slope of the cab front which is too steep. Whilst I feel it is close to invisible when the Bachmann model is used as a doner for conversion to a headcode fitted version (see my article in the Highland Railway Journal, issues 96 & 97) it is more apparent without the headcodes, simply because they act as a bit of a counterpose to the slope. This was one of the reasons that my skinhead was languishing in its box (although, doing other things was the real reason!). Although I am aware that a recast of the model has been in the offing for a while I did not know that a new manufacturer, Sutton Locomotive Works, was in the process of producing one until it simply appeared at the turn of the year.

It is fair to say I was a little sceptical initially, partly due to the pretty punchy cost of the model but also due to the amount of airwaves noise it was eliciting. However, they were at one of the shows that Portchullin was at and of course I went over to have a gander………. What I found was that it was really a cut above the Bachmann version, both in terms of correcting the cab and also with the quality of detailing but more than that, it had an onboard sound system that was significantly better too (and tellingly, more controllable). An added bonus is that the model can be supplied, at a small additional cost, with your choice of EM and P4 wheels, thus making it the first true ready to run P4 loco.
Initially the model was available as one of the first batch in a “just built” form in green and as 24 081 in blue, as it now is in preservation. A bit of hunting about prototype information – notably Derby Sulzers – showed me that no’s 5113 & 5114 were transferred to Inverness for the last couple of years of their life (which coincide’s with Portchullin’s era) and that these were pretty close in form to the 24 081 form of the model. That decided it; off went a cheque and back came the model – in a spectacularly substantial amount of box and glinting clean like a museum piece!

A look over the model proved to me that it was really very good, but not perfect. The worst problem, by far, is the glazing that suffers from the moulding lines no less severely than Bachmann/Hornby models – apparently, short of putting in individual pieces of glazing, this problem is insurmountable. Good news for Shawplan and their glass replacement kits – if Brian is not going to do a set for this model (are you Brian?). It will repay doing them by hand no matter how hard this is if Shawplan don’t do them. The other problem was a lot less than crisp junction between the yellow ends and the blue sides – most visible in the fianl photograph. I did make this a little better with some 1200 grade wet & dry, but it is still not all that I would wish it to be.
It is fair to say that the good bits are very good indeed. It runs perfectly (although some others have muttered about theirs) and all of the detail is very delicate – compare the door grabrails with the other models or prototype for example. I understand that the number of seperately applied parts is exceptionally high and I can beleive that, it really does look quite a lot better than the alternatives even after the “supe-ing up” that I gave the two headcode box fitted versions I have. There are a lot of detail variations between the vehicles and care is needed to chose wisely if you have a specific example in mind – time for a good book!

Sutton Locomotive Works approach is to release relatively short runs of differing varients, their second and third batch has already been released (see their website). They are not saying, but I suspect some Highland Sulzers will be inevitable before too long – I am saving up anyway!
But the model is way too clean; although Inverness did not allow their locos to get too decrepit looking and they clearly saw the inside of the washer plant pretty regularly, they did take on a careworn appearance especially given that they were knocling on 20 years old by the time I am modeling them. So, some subtle weathering was required – do I have the subtly of skill to do this – not really was my conclusion, not on my own anyway! So some help was enlisted from OTMC who I share occassional modelling days with and yesterday we had a weathering day instead.

Prior to starting the weathering, the number was removed with 1200 grade wet and dry and replaced with Fox transfers, protected by some brushed on matt varnish. The dirty-ing of the model then started with the creation of some “gunk” – a mix darkish grey with a tad of brown mix – Tamiya acrylics. Whilst this was a relatively thick mix, it was brush painted over the more extreme coloured sections of the model – the lifting points, axle boxes and coloured pipework to the bogie and drawbar. Then the gunk was diluted to a wash and sprayed onto the model; heavily on the underframe/bogies and more lightly on the body side. An acrylic solvent was used and this evaporated almost immediately and once the paint was on, efforts were taken to remove it from the sides. Cotten buds and make up buds (similar but with a flat head) dipped in acrylic thinners were dragged downwards on the sides and ends. This removes the majority of the paint, leaving only that which gets into the nocks and crannies and can not readily be reached by the buds. If the paint gets a bit stubborn (which it did, especially on the ends) then the process is repeated using enamel thinners which is much more vigerous and takes the acrylic off almost immediately but acheives the same effect.
 #
#
I did encounter a couple of problems. The first was not of my making in that it proved very difficult getting the wash out from behind the grab handles to the front of the cab – eventually this was fixed with the use of cocktail sticks. The second was firmly of my making in that I used some meths to clean of some grease stains from my fingers right at the end. It would appear that meths is pretty effecitive at removing both the wash and also lightening significantly the original blue paint on the model – aghhhhh! Ultimately, I have had to repeat the wash effect a couple of times on the side that I did this on and it does not look nearly as subtle as it did before – so do as I say, not as I do!!!

The wash was then darkened a bit and used on the roof. Initially this applied without masking to the centre and then subsequently with some masking. The masking was applied such that the edge of the tape was at the line of the roof with the cab front yellow and pressed home. However, along the sides the tape projected 5mm above the cant rail but not pressed home (so it sort of flaps above the edge of the roof). This gives a soft boundary between where the spray goes and the protected surface below and neatly mimics the effect of the washing brushes failing to reach the roof as it slopes away.
The grilles were picked out with a black wash effect that has a touch of gloss in it. The same was then used at the axleboxes and around the fuel filler points to mimic spilt fuel oil. The while of the underframe and boigie then had stone colour mig powders dabbed on them. As with the wash, once it is on, take it off with a brush – in this case it tends to attach itself to those parts that the brush presses it home on. So it tends to catch more the projections than the recesses and neatly highlights the detail on the underframe/bogies. Not done yet, but I will apply some break dust powders around the brake blocks and wheels to finish the full effect.
Portchullin’s next outing will be down in the west country – 30 July 2016 in Barnstaple. Come and see the new engine – hopefully it looks a bit like this? ry
ry
In the light of all the excitement that tresspassing to see the Flying Scotsman is presently giving Network Rail, I wonder what they might have made of this – and then there are the flairs to consider…………. Chris Longley, is that you – I know you were on this particular tour!
