Making Louvered Chimneys
One of the most characteristic features of the Highland Railway’s locomotives for many years was the louvered chimney. This was fitted to almost all of David Jones’ locomotives and although some lost them over their lives, most retained them until withdrawal. Indeed this style of chimney can still be seen on the preserved Jones Goods which is presently in the Riverside Museum of Transport in Glasgow.
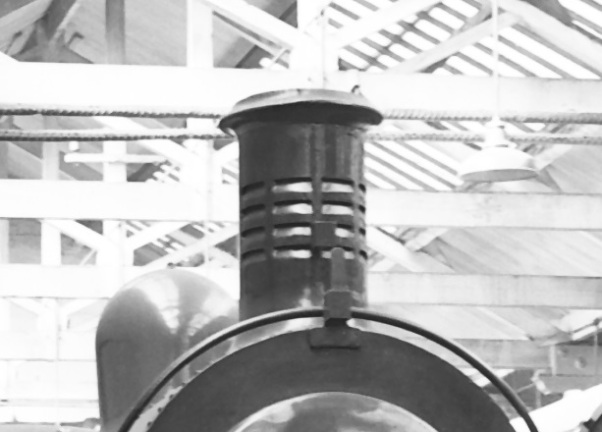
There is debate as to the reason that these chimneys were fitted but it is generally considered that they sought to assist in the drafting of the fire on the downhill sections of the line. There were many long descents on the line and regulator would be closed for such descents and thus the fire was not drafted by the exhaust from the cylinders. The louvres would have allowed the passing air to pull on the fire to keep .
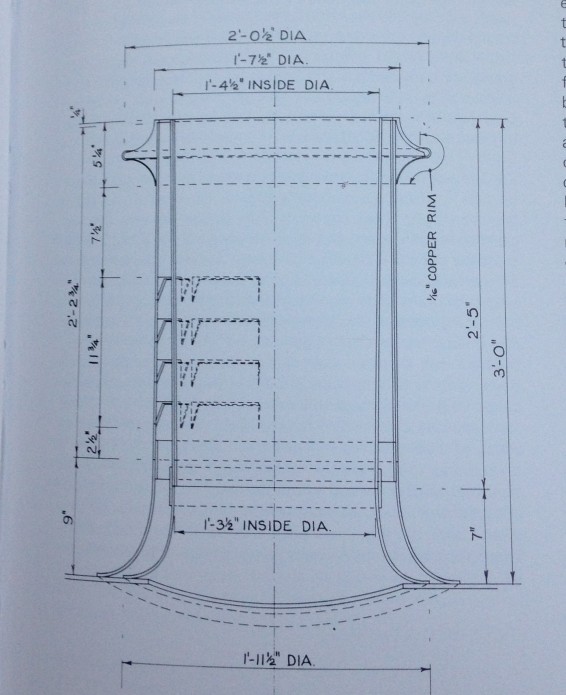
Clearly for such a characteristic feature of the line, it is important to model it well on my locos but I am not totally happy with the renditions that are available. The whitemetal chimneys look too chunky and neither the cast brass (Lochgorm) or turned brass (Jidenco/Falcon Brass) have very distinct louvres. I feel that they can be improved and this is how I go about doing so; in this case starting with the Lochgorm Models cast brass chimney. Similarly, if you are turning your own chimney, the same situation arises,
I started by some basic improvements to the chimney. I found that my casting was not parallel down the shaft of the chimney, being fatter at the top, and also not particularly smooth. I therefore turned it down a little on a drill with some needle files. The casting sprue was not particularly central so to be able to turn the chimney it was first necessary to file this to get it more central. Thereafter, I drilled out the chimney to 4.5mm diameter to its full depth on a pillar drill. I am doing this partly for appearance but really because I intend to put sound speakers in the smokebox and it is necessary to leave routes for the sound to escape – the most authentic being to chimney! Casting brass is very hard and this is no little task – it takes some time, lubricant and anyone in the house need to be able to tolerate a good amount of noise!
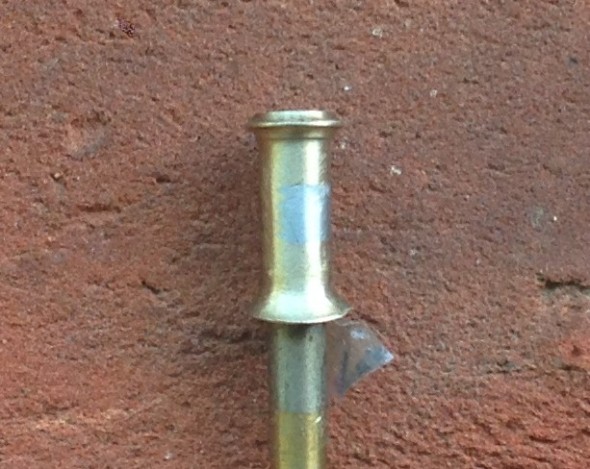
The Lochgorm Models cast chimney has a series of depressions to represent the louvres and these are what I felt needed improving. I started this with a piercing saw with a fine (OOOO) slot at the top of the cast depressions. This is cut across the whole width of the depressions and a little further beyond, ignoring where the pillars between the slots are.
These are then given a chamfer slope with a needle file that has a blank face (to make sure it does not cut above the slot). This also needs to be taken beyond either end of the intended louvres to avoid the impact of any taper. The top three have been formed in the picture below, with the lowest still just the piercing saw cut.
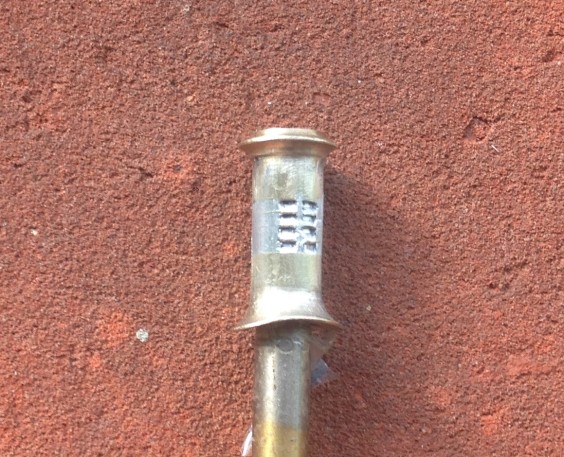
Once all have been formed, the next task is to undo all of the work by filling them in again! All of the gaps are flooded with solder. I used 145 solder as it would survive the reasonable temperatures that would be incurred in soldering it to the boiler but also be soft enough to carve out again.
The louvres were then marked out, starting with the two vertical rows either side of the central pillar that must match the highest point of the flare. Then with a knife, the solder infill between these is cut back out. The knife can cut through the solder to cut it out but does it will not affect the brass, so the louvre is reformed. I found that the technique was to initially cut it away and once a basic amount was removed the blade can be scraped side to side within the louvre to get a smooth surface. This brings up burrs of solder at either side of the louvre which are then cut out. This is what it looks like with the first two columns of louvres done – I found it best to do it like this as it was easier to get them vertical than by doing them in rows.
You will find that you get through a fair few blades doing this as the most challenging part is getting the corners crisp (and the photography is very cruel in this regard!). It is also easy to be a bit enthusiastic and accidentally cut pillar – if this happens, it can be reformed with a dab of solder and the process repeated until there is a neat row of four slots in four columns.
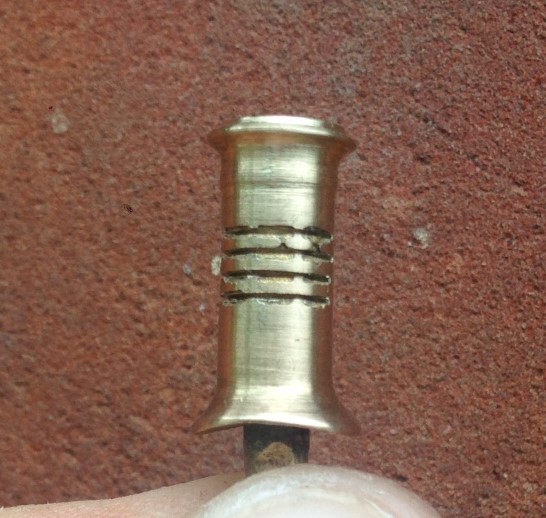
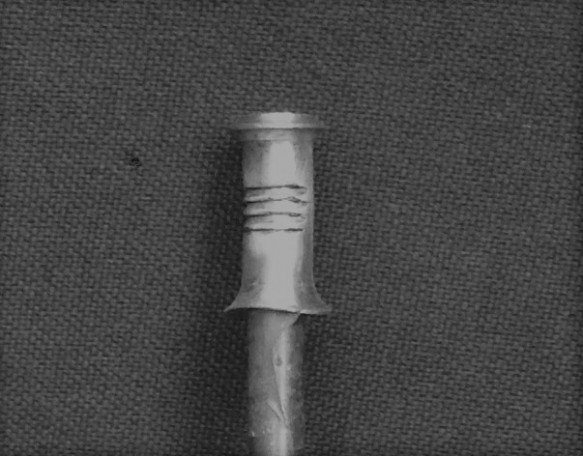
Once you are near to finished, a dusting of grey primer shows up any remaining inconsistencies and hopefully it looks something like this:.
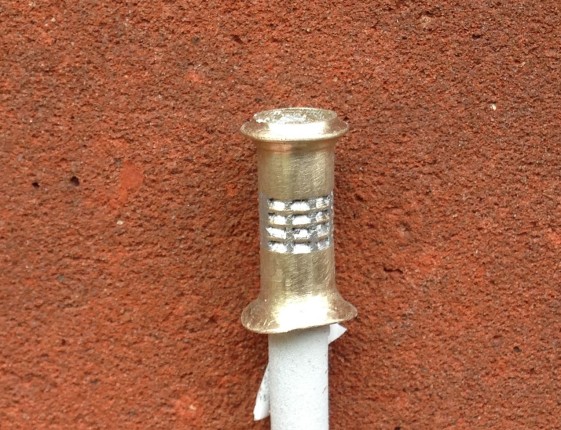
This process creates not only the slope of the louvre opening but also the dark shadow of the cavity. In my view these features are necessary to capture the feel of the distinctive feature of the Highland Railway. It takes around 2-3 hours to make each chimney and in I reckon it is worth the time and effort.
Posted on August 20, 2017, in Workbench (stock) and tagged Chimney, David Jones, Highland Railway, Locomotive, Louvred Chimney, Model Railway. Bookmark the permalink. 3 Comments.

Amazing work. Patience of a saint!
Hi, Just for your info, I am currently working on a 3D print Jones Goods. I was going to use the Lochgorm chimney but following your comments decided to revisit 3D printing for a better result. Having already sucessfully printed a Macintosh chimney in brass, I have just sent a Jones prototype off for printing will send pics when it returns. Regards Duncan Petfrod
Pingback: Clyde Bogie | highland miscellany