Blog Archives

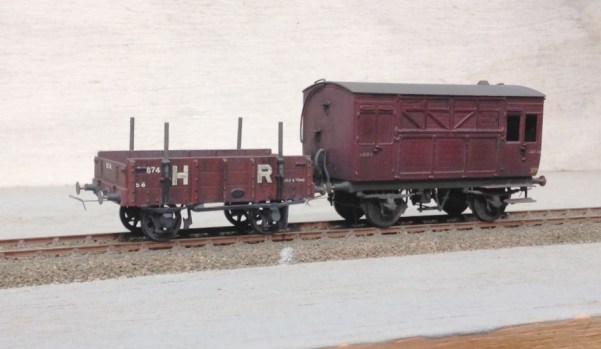
Improving the Oxford Rail North British Jubilee Wagon
As I mentioned in my previous post the Oxford Rail Jubilee wagon is a pretty good rendition of the original but it does have a few small issues and is fundamentally the wrong colour! Actually, these proved very simple to fix and the conversion to P4 was relatively painless; so within a couple of hours you can have a good rendition of this typically Scottish wagon.

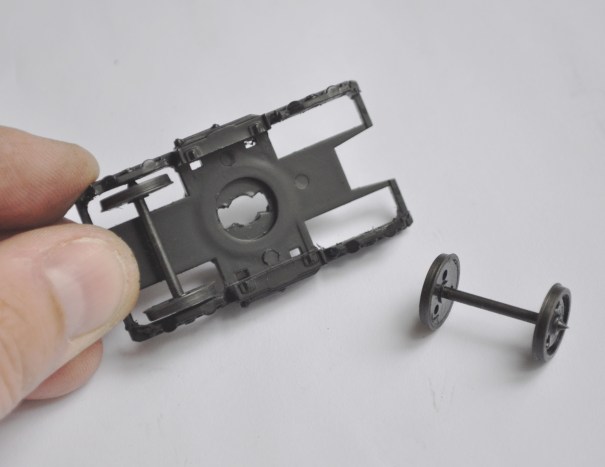
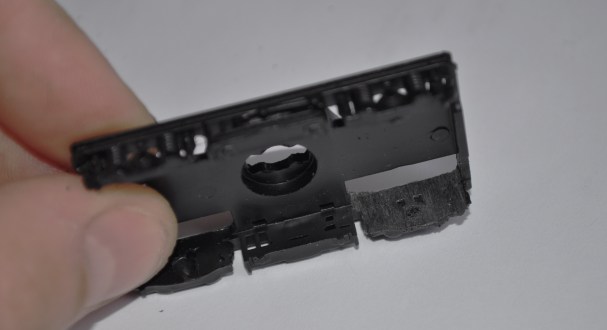
First off was the conversion to P4 which is not possible to do with the existing underframe as it is too narrow. In an approach that I have not seen before, Oxford Models have created an underframe that slips between the solebars. Even better, this is not secured with glue and merely popping out the buffer shanks from their housings allows this to drop out. Neither the buffers nor the brake gear are secured with glue either and I elected to temporarily detach these from the model throughout to prevent any damage to them. Bill Bedford pre 1907 RCH sprung W irons were then used but it was necessary to scrape back about ½mm of the inside of each solebar to get these in. Checking the ride height against the buffer height gauge I found that the right height was achieved without the need for any packing.

Although the axleboxes that are provided as part of the model are a bit crude, I did not have any better ones available (although 51L do provide them) so sought to retain these. There is a fair amount of cutting required to remove the remains of the plastic W iron and open up the rear of the axle box to take even a waisted pin-point bearing. Definitely do this with a finger drill and not a powered one as you need to remove as much plastic as you can short of actually going through it. Cutting these rebates was the slowest part of the whole task.
The end stanchions were separate pieces and popped off without bother but the planking joints did not run behind them continuously. Therefore, whilst it was easy to reattach the stanchions with glue, I had to score the missing plank joints in first. The buffer shanks are a tad too long, more appropriate for NBR fitted wagons than unfitted but these were easy to deal with. The metal heads pop out easily and then a few strokes with a file takes off about ½mm to reduce the length. The fixing hole needs to be deepened slightly and then the head can be resecured with a dab of glue.

The missing ironwork to the solebar was from a left over etch; Mainly Trains do alternatives. I found that the bolt heads to the straps either side of the door had some of its bolts in impossible locations (in the joint between planks) and I therefore shaved these off prior to applying replacements with Archer transfer rivets. This is the first time I have actually used these and they are really easy to use; much quicker than any other method. The strapping to the inside of the wagon was missing, so this was added with microstrip and more Archer’s rivets. The hinge rings to the end door should be almost a full circle so these were replaced with pieces of bent wire to conclude the physical modifications.
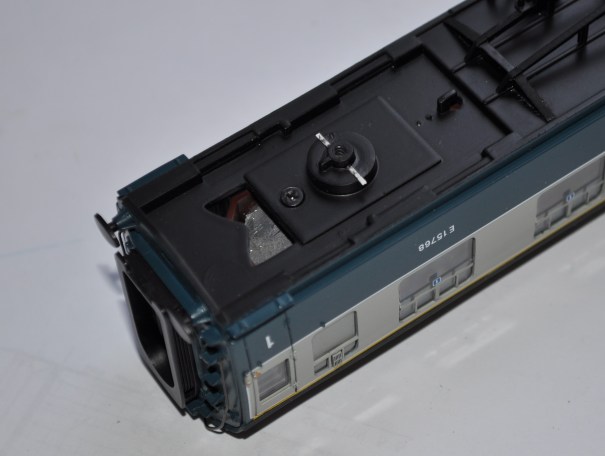
The model comes fitted with scotch fulcrum brakes to both sides which is correct for some vehicles but I cut away one side as I wished to represent the more common variant that had these only to one side. The actual fulcrum and brake block detach from the underframe without difficulty and I found that I could reuse it, after first mounting them on a piece of plasticard secured to the underside of the floor. I did, however, change the brake lever which I thought to be a bit clunky with an etched replacement and added a fair amount of lead as the model is very light. I also attached a piece of scrap brass to the underside – as seen below – as a temporary means to hold the wagon whilst it is painted.

I chose to lightly abrade the surface of the existing lettering with a fine wet & dry paper as I was concerned that they might leave an impression through the new paint. Thereafter I painted them all over with Tamiya Paints, German Grey, picking out the ironwork to the solebar and below with black. The lettering was from PC Transfers sheet 20 but it will be partially lost below weathering; when I get it to this stage!

Here we can see the benefit of the brass strip to hold the model with during painting and weathering.

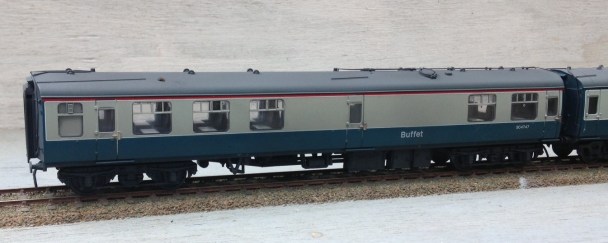
Oxford Rail North British Jubilee Wagon
Until recently, there have never been any mainstream ready to run locomotives or stock suitable for the pre-group modeller of the Highland. Whilst there remains nothing that emanated out of Lochgorm, with the release by Oxford Rail of a NB 8 ton jubilee wagon we do at least have one that would have made it onto the system regularly!
The first of these wagons originated from 1887, the year of Victoria’s jubilee (hence their name) and the bulk were constructed at Cowlairs but with others from several outside contractors. The design was developed and eventually over 20,000 were constructed, forming the mainstay of the North British’s mineral fleet. The model represents an example of the diagram 16B wagons, built from 1896 and marginally longer than those that went before. Oxford Rail presently produce this in NB livery and five private owner liveries, recognising that many of the railway company’s vehicles were leased to collieries and took on their lessee’s branding.
Dimensionally, the model matches the prototype well and as a result the proportions capture the character of the prototype. One exception seems to be the stanchions to the fixed ends which are placed rather too close together. Although with such a large number of examples spread over many batches there may have had examples with this closer spacing, I have not been able to unearth any photographs to confirm this. This problem is not difficult to solve, as the end stanchions are separately applied with small spigots attaching them to the body – thus it is easy to prise them off and reattach them on fresh holes at the correct distance apart.

The model correctly incorporates scotch fulcrum brakes, although it provides one complete set per side. Although not wrong, it was more common for the wagon to be fitted with brakes to one side only and this variety can be provided by the relatively simple task of the removal of one set. In an approach that I have not seen before, the solebars are part of the body moulding with a separate chassis moulding that sits inside this. This does make the colour changes between the ironwork and the timber crisp but has resulted in the width between the W irons being narrower than usual – especially as the width over the solebars is a tad narrow. It is possible to convert the wagon to EM but it requires the shaving of a large degree of the inside of the W irons to take the increased width across the wheel faces. It is not possible to widen it further to accommodate P4 wheels, so to convert the wagon to P4 requires the replacement of the W irons in total. Few P4 modellers will be put off by this as with some carving away of some the inside of the solebars, Bill Bedford sprung W irons can readily be used. If the vehicle is to be kept as OO, the wheels can be retained as the correct split spoke wheels have been provided – a first I believe for a ready to run model.
The moulding is beautifully crisp throughout and the detail neatly incorporated. There are good amounts of separately added elements of detail – such as brake gear and buffers – assist in achieving a quality rendition of the prototype. They are also readily removed/reinstated, which is of assistance if you chose to enhance your model or convert it to one of the wider gauges. Rather peculiarly, a number of fairly obvious elements of ironwork to the solebar have been overlooked, including the crown plates. On the private owner variants these are visible so it appears to have been the intention to paint these on the model but this has not occurred in the North British liveried version for some reason. However, it is not particularly difficult to add these as they are available as etches from a number of sources. The most obvious issue with the model, however, is its colour; it is much too light for North British wagon grey and no amount of weathering will disguise this. This is a shame because the printing of its lettering is exquisite and any repaint will obliterate this.
Other points of detail that are not quite correct are the end hinges, part missing internal strapping, buffers that are too long for an unfitted wagon, overly skinny side door hinges and a few rivets that are in impossible positions. However, only the more fastidious modeller will want to change these (although this might include me!) and but for the colour this would be a “ready to plonk” model for most people. Helpfully, none of these points are insurmountable with a little effort and for those that want to improve the model, it will be a task of only a few hours.

So overall, I would commend this to the Scottish modeller of the pregroup or grouping era as it captures the look of these distinctively Scottish wagons even if it does really need a repaint. As I have hinted, I have attacked my wagon to correct these issues and convert it to P4; this will appear in the next blog post.

1955, somewhere in North London
In my travels, I have managed to blag an invite to see Bob How’s developing model of King’s Cross and portions of the Great Northern’s main line in north London. This is depicted in the mid 1950’s when the pacifics still reigned supreme and there was a full mix of locals, semi-fast and express passengers, along with a modicum of freight on the metropolitan widened lines.
It is hardly surprising, given the magnitude of the layout, that this is still a work in progress but what has been built is largely operational and therefore playing of trains is a regular feature in the How household. Given the location of the prototype, this means even the relatively short trains were 6 coaches in length and the full expresses upto 10. All this is in P4 and includes various gradients/curves to allow the lines to cross each other, so it tests the haulage power of loco’s upto prototype levels!


The more scenically finished portions of the layout are on the continuous run outer loop which comprises twin tracks to one side and four tracks to the other. This culminates in a very impressive junction where the main line to Kings Cross joins and a dive under to give access to the fiddle yard passes below.

As can be seen, there is still lots of work to do to these areas, including the provision of signals but the impressive nature of the layout is immediately apparent. But the real magnitude of the endeavour becomes apparent once a look at the terminus is made.


Even without any meaningfully completed elements of scenery, this is unmistakably Kings Cross that no doubt all of us are familiar with either from personal experience or photographs. Just imagine what it will be like with the full trainshed and a batch of northbound trains waiting their due departure time?

Bob’s intentions are to model the full station, including the MPD, the suburban station and milk depot; although at present these last areas are sill to be started. It will be a monster when it is finished! As you can see, even the fiddle yard is somewhat of a giant, although Bob was close to admitting that it is rather too small for the layout!

Apologies for the grainy photos, the layout lighting is a task still to be confronted and photography was pushing the camera to its limit!
You have some catching up to do Mr Hanson………….

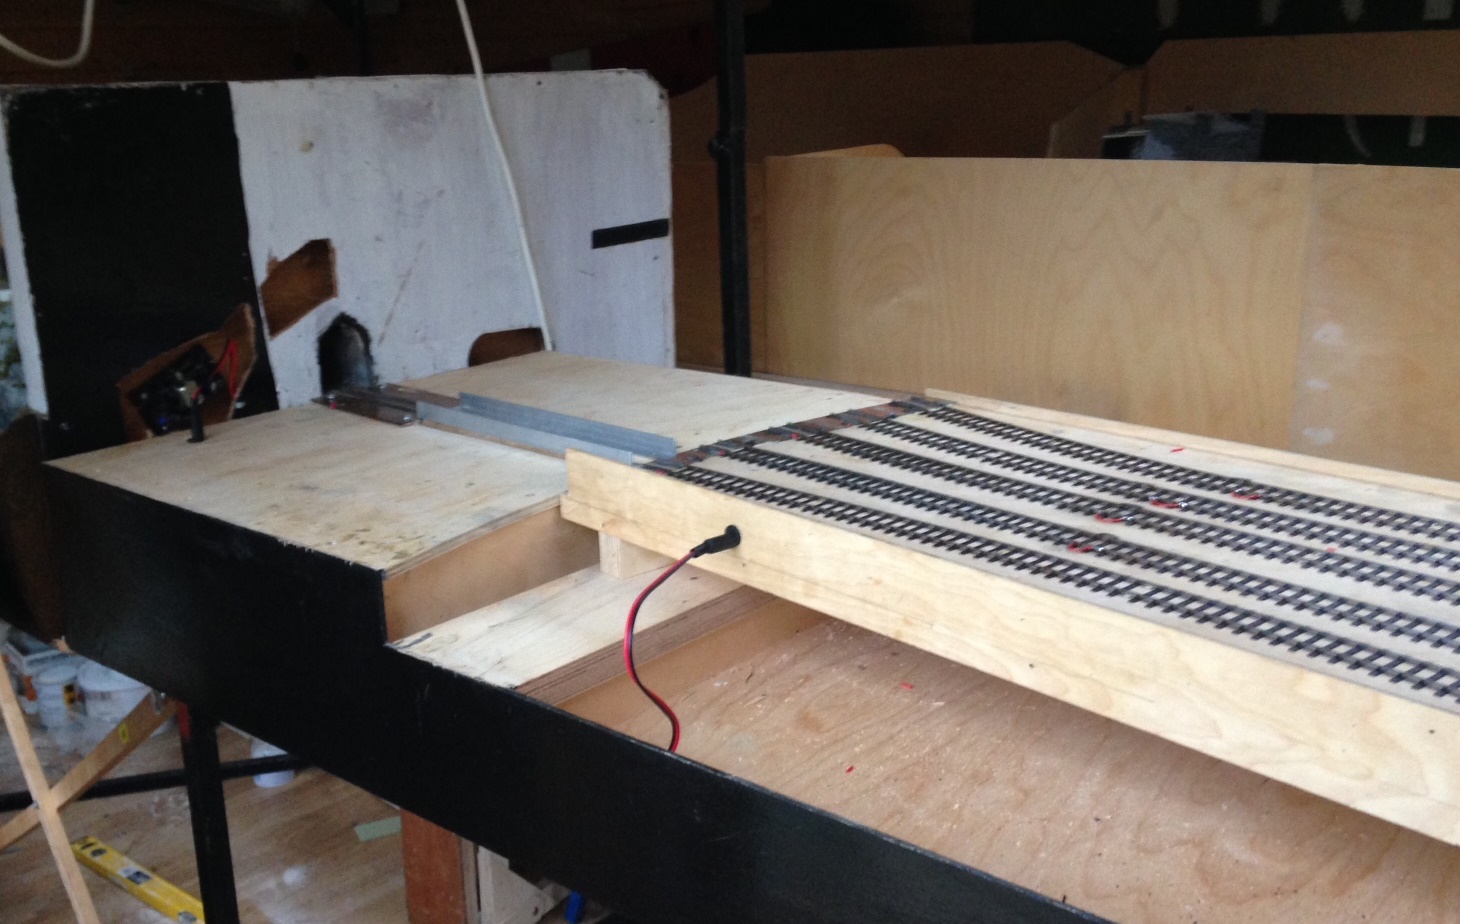
Control Freak
I have been back onto the layout of late, with a view to get the first wheel turning on it before too long. That means attacking the electrickery things, beginning with the control panel.
I made a start on this by drawing up a diagrammatic representation in MS Paint and then using this to get one of the online firms (Vistaprint) to print me up a poster board to form the basis of the control panel. I am not sure I chose the right material as it turned up on a light weight foam board and I had to mount a sheet of aluminium behind for it to be stiff enough to be useable. But it did look pretty smart I thought………….
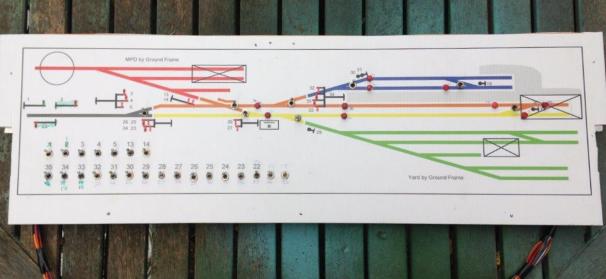
The control panel deals with all of the signals and turnouts that the cabin will have controlled, with local ground frames (which will be located on the boards locally) to be used to control the goods yard and the MPD. The latter will be arranged such that it can be located either to the front or the rear, to allow some flexibility in operation.
I have got to the point where the full extent of switches have been wired in and I am just completing the jumper leads. I took a lot of care to plan the wiring prior to any construction – despite the locos being DCC controlled, there are an awful lot of wires. This is because I have stuck with traditional control for the turnouts and signals. There is further complication as a result of the desire to incorporate some bells and even a block instruments (well maybe, at the moment it is just the wires!). So in all, there are 90 odd wires doing something or another on the layout.
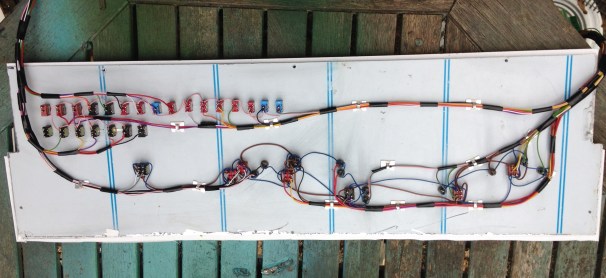
Somewhat in contrast to Portchullin, I have sought to keep the wiring as tidy as possible; everything is neatly collour coded and even labelled (to be fair it was labelled on Portchullin, but in a non colourfast ink………..!). I am hoping that this will make the wiring easier to debug at the start of the matter and repair if it does get damaged.
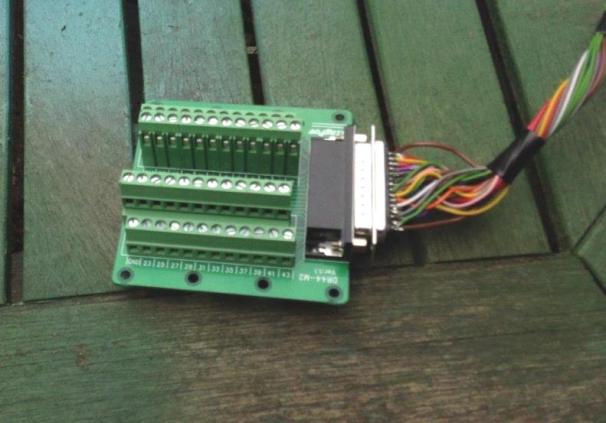
I am proposing to use a variety of connectors between boards and to the control panel, including this rather nifty varient of the D-sub range that is wired directly onot a cheeseblock wireless connector. Available to a variety of types from ebay including from this seller.

Going Long – Part 2; Bogies Most of the Way There
As originally conceived by Barry Fleming, the floor was to be permanently attached to the body sides and so too were the lower roof sections. The only access internally, therefore, was to be the clerestory roof/sides to the centre of the roof. In addition to being very restricted, over time there was a little distortion of this section relative to the more chunky body, such that it has developed a bit of a bow – see the final picture of this post. I have been building a few coaches of late and have arrived at the view that it is desirable to have the underframe detachable from the body and if at all possible the roof too. In this case, I am going to give up making the roof detachable but will keep the underframe as a separate piece and arrange for the floor and interior to slide out of the body. In order to provide a mount onto which I can secure the securing bolts to retain the two parts together, I came up with a metal bracket that has been glued into the coach vestibule where it is hidden as below.
With this completed, I turned my attention to the bogies. These are based around the Bill Bedford sprung bogies, now supplied by Eileen’s Emporium – there is one with the right dimensions for the ECJS bogie. These are only the sprung assembly and offer no detail of the real bogie at all and these were quite characteristic riveted plates. I am not aware of any offerings from the trade for these, so I have had to create my own – out comes the CAD machine again! Actually, they are quite easy to draft and there was a fairly good drawing available. As with some of my other etch designs, I have used folding jigs to ensure that the layers come together correctly without bother. In the photo below you can see the basic Bill Bedford sprung frame on the left upper, the basic etch to the bottom right and the finished side with the layers laminated to the bottom left.
And this is a close up of the bogie sides fitted and some of the brake hangers fitted.
After searching around, I decided that the best means of making the axleboxes and springs was to use the Drummond pattern axlebox/spring assembly from Lochgorm Models. These are really nice but the springs are too long such that the hangers are a bit far out for the six wheeled bogie – hence I formed a hanger point as part of the etching, which you can see yet to be folded down on the above picture. The intention will be to insert a brass rod through the hole in this and to then mount small washers on it to give the impression of the springs. A similar rechnique is used on some of the 5522 models bogies and is quite effective. With this representing the hangers, those to the casting could be cut away.
The axleboxes are rather nice, as you will see, and are of cast brass. The bad news about this is that they are really hard and quite a lot of work is required with a dental burr to open out the rear to be free of the bearing.
And a look at both bogies together, now with the bearing spring hangers in place along with the brake hangers and rods.

A key feature of these bogies was the transverse bolster springs, which are apparent between the axle spacings. I did come up with a scheme to form these but they have not proved to work. I think I can cut and paste a pair of the bolsters from what I have produced (ie half the number I need) so I am going to have another bash and if not, it is back to the drawing board! So whilst I work out how I am going to wrestle with this (I do have some ideas, I just need a bit of time to implement them!), lets at least admire what the coach looks like in its semi-complete state:
There are other things to do with the coach; the centre part of the roof has a bow, there is various detail missing from the underframe, roof and ends yet to go – but it does look the part doesn’t it?
In response to the first part of this blog, Bill Bedford did contact me to help with some prototype details. He was able to tell me that the buffers that I used would only be correct for the brakes and that the udnerframe only had two trusses, not the four that I have modelled. So some corrections will be required……………but first those transverse bolster springs and maybe give the carriage a bit of an outing (I will bring it to Scaleforum for that).
 for Portchullin")
A New Ending (and Beginning) for Portchullin
Don’t worry, it is not as dramatic as all that, I have not burnt it or anything……………………oh hang on a minute, I have – well a bit of it anyway!
One of Portchullin’s quaint little foibles was it did occassionally like to derail trains as they left the fiddleyards; especially the fiddle yard representing Kyle. There were various reasons for this; including some proper cr*p woodwork on my part, the hand shunting that occurred every time a train was turned around, the effects on thermal expansion that was not catered for and, something that I had not seen until recently, a bit of a dogleg at the baseboard joint. Add to this the rather Heath Robinson approach to the legs for the fiddle yard boards, electrical connections and facia support and it was fundementally a b*ggers muddle. So something had to be done and, a mere 8 years after the layout’s first exhibition, it now has!
So with lots of thanks to Tim and Julian at the Electric Loft Ladder Company again, we have a new fiddle yard at the Kyle end and redesigned legs at the Inverness end. The design adopted is an adaptation of the sector plate that was in use before but with a refinement that it uses cassettes for the locations that the loco arrives and departs at. The idea being that these are both storage points at the end of the fiddle yard roads but also the means to move/turn the locos ready for their next duty. This is a development of the system used by Simon Bendall on his layout Elcot Road, but with a rotating sector plate rather than a traverser.

Other halfway novel ideas are the use of the tray below the traverser as a storage tray for stock (and maybe tea!) and the projection of the sector plate beyond the end of the fixed board to make the ensemble smaller to transport. The facia also folds up rather niftily as well – photos of this will follow once I have taken them!
The new fiddle yard has not yet been tested but will very shortly get its chance to prove if it is a good’n. Portchullin will be out at the Barnstaple MRC’s show in Bear Street, Barnstaple – you can find details here. If you are in North Devon at the weekend, stop by and say hellow?

Benfieldside and her Signals
This weekend I braved the traffic heading to the Festival of Speed in order to complete the building of a replacement fiddle yard for Portchullin (of which more another day) with Tim & Julian. Once complete, I stopped by to see how Benfieldside has been getting on and in particular what my signals looked like in thier proper home.
First up the gallows signal (which has dropped a bit low on its swing).


And then the twin and three doll brackets.


All the above signals were restorations (although not so much was retain on the two doll); the single posts below were made afresh.


And having inspected the signals it was time for a play with the layout and take some pictures to share with you. So here we go:


The guys are still building up sufficent stock for it so it won’t be out on the road for a year yet but I understand that the layout should be at the South Hants MRC show in November 2017. So hopefully I will see you there?
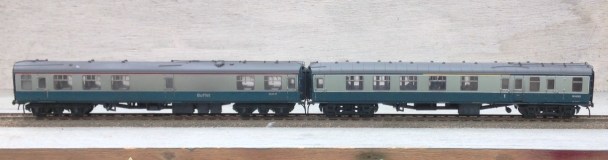
More Weathering Results
The class 24 skinhead was not the only output from the weathering day last weekend – indeed, it was a very busy day!

First up were some of my 1920’s rilling stock – both Highland, a timber truck from a Model Wagon Co whitemetal kit and a horsebox from a Lochgorm etched kit. Both are now close to finished – a load is requird for the former and some glass for the latter (and probably a light colour inside the groom’s compartment.
Neat vehicles though and I am pleased with them – less so than the brakevans that I managed to dislodge the lettering upon and may well need to be stripped – as you would imagine, no photos of these and nor any photo’s from today’s efforts with paintstripper!
But the main additional output was some more coaches for Portchullin. I managed three and Peter Bond looked close to finishing his third as I left, so we had a proper little production line going!
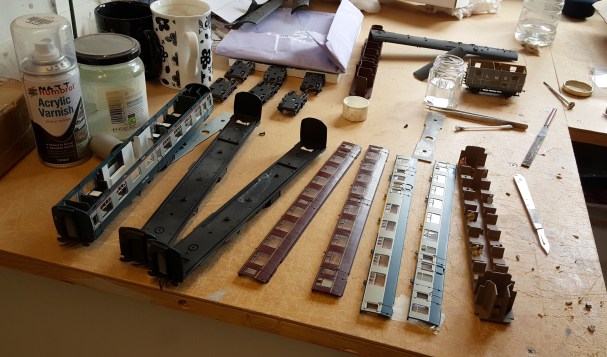
The technique was essentially the same as I described for the class 24, although as you can see the model was broken down rather more (in part to populate the interior of the carriages – I do hate seeing trainloads of empty coaches on model railways!). However, for the maroon coach, rather than using thinners to take back off the paint, T-Cut was used. This is an abrasive so does not work in quite the same manner but acheives broadly the same effect except that it also polishes the paint. I did not think this was right for the blue/grey coaches (they were finished in satin in reality) but the maroon coaches were in a gloss finish and the T-cut gives a slight sheen without actually getting to gloss. I did eventually think it was a bit too shiny, so did waft over with the finest of sprays of the “gunk” again just to take it back a touch.
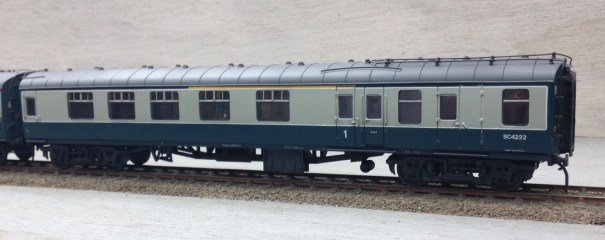
The Bachmann Mk 1s are very good models that have stood the test of time well. They are a doddle to convert to P4; taking maybe 60-80 minutes a go. There are a couple of things to look out for – firstly is that the side frames are a touch to tight for true guage wheels and need to be filed back. The plastic is quite flexible and does create burrs fairly easily, so once the filing has been done some work with a sharp scalpel is required to clean this up.
The next caution is that the bogie mounts are not always parallel with the rail head, meaning that the bogie can lean forward or backward. This is caused by the chassis being screwd a little over-hard onto the body, causing it to flex slightly. You are just as likely to have done this as the manufacturers and I get around it by making it rock slightly with some thin (20 thou) strip like this.
Arguably one of their weaknesses is the corridor connection which is a tad toy-train (well it is a toy train!). A dodge that I have started to do is fit a few of my vehicles with some black foam in the door jambs. Make this so that it sticks out 3-4mm and engages in the equivilent of the adjacent vehicle to block out the light. A simple dodge that makes a big difference. It does mean that the vehicles that are fitted thus have to be in the centre of the train (as the foam looks crude where it is exposed) but this can be done with care – for example a buffet would nearly always be in the centre of a train, so this is the vehicle of the two I fitted with this.
A Dirty Skinhead……….the SLW Class 24
A skinhead; what’s he on? Well for the steam age people out there, a skinhead is the nickname for those BR built sulzer class 24s that did not have headcode boxes – as you can see below in Paul Winter’s photograph they did have a rather bald headed appearance and it is not difficult to see where the nickname came from.

Whilst the bulk of the class that ran on the ex Highland lines had the headcode box, for a long time one or two skinheads were allocated at Inverness and visited both the far north and Kyle lines. Given that they do look quite different I could hardly resist getting one to offer a bit of variety on the layout. I had been plotting getting one for a time, having bought the Bachmann version and even converted it to P4 but I had not quite got to enhancing or weathering it so it did not ever make it out onto the layout.
There are failings in the Bachmann model that have annimated many; the worse being the slope of the cab front which is too steep. Whilst I feel it is close to invisible when the Bachmann model is used as a doner for conversion to a headcode fitted version (see my article in the Highland Railway Journal, issues 96 & 97) it is more apparent without the headcodes, simply because they act as a bit of a counterpose to the slope. This was one of the reasons that my skinhead was languishing in its box (although, doing other things was the real reason!). Although I am aware that a recast of the model has been in the offing for a while I did not know that a new manufacturer, Sutton Locomotive Works, was in the process of producing one until it simply appeared at the turn of the year.

It is fair to say I was a little sceptical initially, partly due to the pretty punchy cost of the model but also due to the amount of airwaves noise it was eliciting. However, they were at one of the shows that Portchullin was at and of course I went over to have a gander………. What I found was that it was really a cut above the Bachmann version, both in terms of correcting the cab and also with the quality of detailing but more than that, it had an onboard sound system that was significantly better too (and tellingly, more controllable). An added bonus is that the model can be supplied, at a small additional cost, with your choice of EM and P4 wheels, thus making it the first true ready to run P4 loco.
Initially the model was available as one of the first batch in a “just built” form in green and as 24 081 in blue, as it now is in preservation. A bit of hunting about prototype information – notably Derby Sulzers – showed me that no’s 5113 & 5114 were transferred to Inverness for the last couple of years of their life (which coincide’s with Portchullin’s era) and that these were pretty close in form to the 24 081 form of the model. That decided it; off went a cheque and back came the model – in a spectacularly substantial amount of box and glinting clean like a museum piece!

A look over the model proved to me that it was really very good, but not perfect. The worst problem, by far, is the glazing that suffers from the moulding lines no less severely than Bachmann/Hornby models – apparently, short of putting in individual pieces of glazing, this problem is insurmountable. Good news for Shawplan and their glass replacement kits – if Brian is not going to do a set for this model (are you Brian?). It will repay doing them by hand no matter how hard this is if Shawplan don’t do them. The other problem was a lot less than crisp junction between the yellow ends and the blue sides – most visible in the fianl photograph. I did make this a little better with some 1200 grade wet & dry, but it is still not all that I would wish it to be.
It is fair to say that the good bits are very good indeed. It runs perfectly (although some others have muttered about theirs) and all of the detail is very delicate – compare the door grabrails with the other models or prototype for example. I understand that the number of seperately applied parts is exceptionally high and I can beleive that, it really does look quite a lot better than the alternatives even after the “supe-ing up” that I gave the two headcode box fitted versions I have. There are a lot of detail variations between the vehicles and care is needed to chose wisely if you have a specific example in mind – time for a good book!

Sutton Locomotive Works approach is to release relatively short runs of differing varients, their second and third batch has already been released (see their website). They are not saying, but I suspect some Highland Sulzers will be inevitable before too long – I am saving up anyway!
But the model is way too clean; although Inverness did not allow their locos to get too decrepit looking and they clearly saw the inside of the washer plant pretty regularly, they did take on a careworn appearance especially given that they were knocling on 20 years old by the time I am modeling them. So, some subtle weathering was required – do I have the subtly of skill to do this – not really was my conclusion, not on my own anyway! So some help was enlisted from OTMC who I share occassional modelling days with and yesterday we had a weathering day instead.

Prior to starting the weathering, the number was removed with 1200 grade wet and dry and replaced with Fox transfers, protected by some brushed on matt varnish. The dirty-ing of the model then started with the creation of some “gunk” – a mix darkish grey with a tad of brown mix – Tamiya acrylics. Whilst this was a relatively thick mix, it was brush painted over the more extreme coloured sections of the model – the lifting points, axle boxes and coloured pipework to the bogie and drawbar. Then the gunk was diluted to a wash and sprayed onto the model; heavily on the underframe/bogies and more lightly on the body side. An acrylic solvent was used and this evaporated almost immediately and once the paint was on, efforts were taken to remove it from the sides. Cotten buds and make up buds (similar but with a flat head) dipped in acrylic thinners were dragged downwards on the sides and ends. This removes the majority of the paint, leaving only that which gets into the nocks and crannies and can not readily be reached by the buds. If the paint gets a bit stubborn (which it did, especially on the ends) then the process is repeated using enamel thinners which is much more vigerous and takes the acrylic off almost immediately but acheives the same effect.
 #
#
I did encounter a couple of problems. The first was not of my making in that it proved very difficult getting the wash out from behind the grab handles to the front of the cab – eventually this was fixed with the use of cocktail sticks. The second was firmly of my making in that I used some meths to clean of some grease stains from my fingers right at the end. It would appear that meths is pretty effecitive at removing both the wash and also lightening significantly the original blue paint on the model – aghhhhh! Ultimately, I have had to repeat the wash effect a couple of times on the side that I did this on and it does not look nearly as subtle as it did before – so do as I say, not as I do!!!

The wash was then darkened a bit and used on the roof. Initially this applied without masking to the centre and then subsequently with some masking. The masking was applied such that the edge of the tape was at the line of the roof with the cab front yellow and pressed home. However, along the sides the tape projected 5mm above the cant rail but not pressed home (so it sort of flaps above the edge of the roof). This gives a soft boundary between where the spray goes and the protected surface below and neatly mimics the effect of the washing brushes failing to reach the roof as it slopes away.
The grilles were picked out with a black wash effect that has a touch of gloss in it. The same was then used at the axleboxes and around the fuel filler points to mimic spilt fuel oil. The while of the underframe and boigie then had stone colour mig powders dabbed on them. As with the wash, once it is on, take it off with a brush – in this case it tends to attach itself to those parts that the brush presses it home on. So it tends to catch more the projections than the recesses and neatly highlights the detail on the underframe/bogies. Not done yet, but I will apply some break dust powders around the brake blocks and wheels to finish the full effect.
Portchullin’s next outing will be down in the west country – 30 July 2016 in Barnstaple. Come and see the new engine – hopefully it looks a bit like this? ry
ry
In the light of all the excitement that tresspassing to see the Flying Scotsman is presently giving Network Rail, I wonder what they might have made of this – and then there are the flairs to consider…………. Chris Longley, is that you – I know you were on this particular tour!

Going Long…….Part 1; the Underframe.
In comparison to the coaches that I use on Portchullin, most coaches from the 1920s (my chosen period for Glenmutchkin) are shorter and in many cases, even without considering the six wheeled vehicles, a lot shorter. This was driven by the technology and in particular the materials available to the railways of the time. There were exceptions though, and my present build is dealing with one of these – an East Coast Joint Stock 12 wheeler.
In the early 1890’s, the journey north was all about speed and culminated in the Railway Races to the North where the rival east and west coast companies competed to get their services to Aberdeen first. This came to an abrupt end in July 1896 when a west coast train took curves too fast at Preston and left the rails. Although the loss of life was relatively limited (for the time), excessive speed as a result of the desire to “speed to the north” was firmly blamed. As a result, the competing companies agreed no longer to race each other and instead sought to compete on the basis of the quality of their service and the luxury of their trains.

A GNR small altlantic hauling an ECJS express at the turn of the 19th Century made up predominantly of 12 wheeled stock
One product of this competition were some really fine 12 wheel coaches built for the East Cost Joint Stock Company (which was a joint company with the GNR, NER & NB contributing to the cost for trans-company trains). Built from 1896 onwards, these were several different lengths (this particular example was 66’11″) but all were long, seeking to use length and mass to iron out any track irregularity. To support this length of coach, six wheeled bogies were used, although these were rather infant in their design and used big transverse leaf springs as bolsters. In addition to being really characteristic and obvious – so they need to be modelled – I suspect they gave a somewhat bouncy ride!

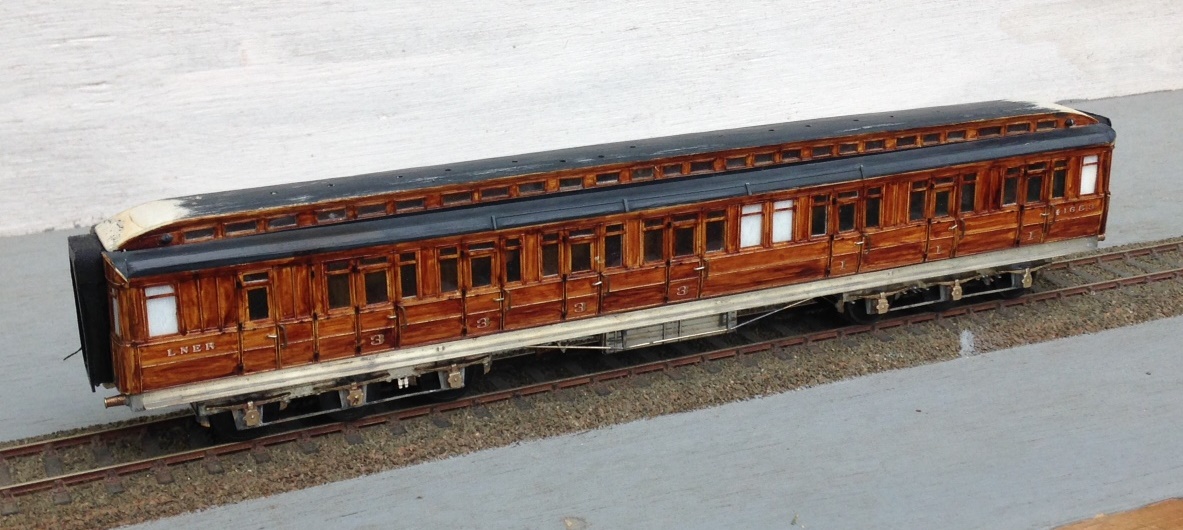
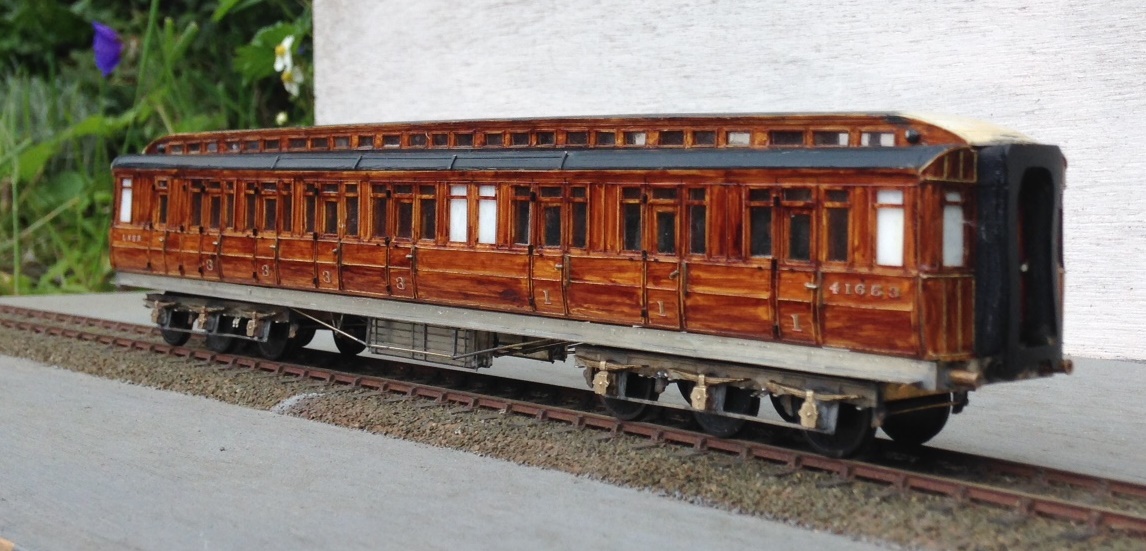
Barry Fleming’s scratchbuilt body and part completed roof
I have been given a big headstart on this build by virtue of being given a nearly complete body/roof for a luggage composite (diagram 6 for those in the know). This was scratchbuilt by the late Barry Fleming in the 1980s and is a class bit of modelling! Barry gave it to my father, along with a couple of other coaches, to complete but as he has not managed to get this particular one, he has passed it to me to have a bash!

My etchings back from PPD
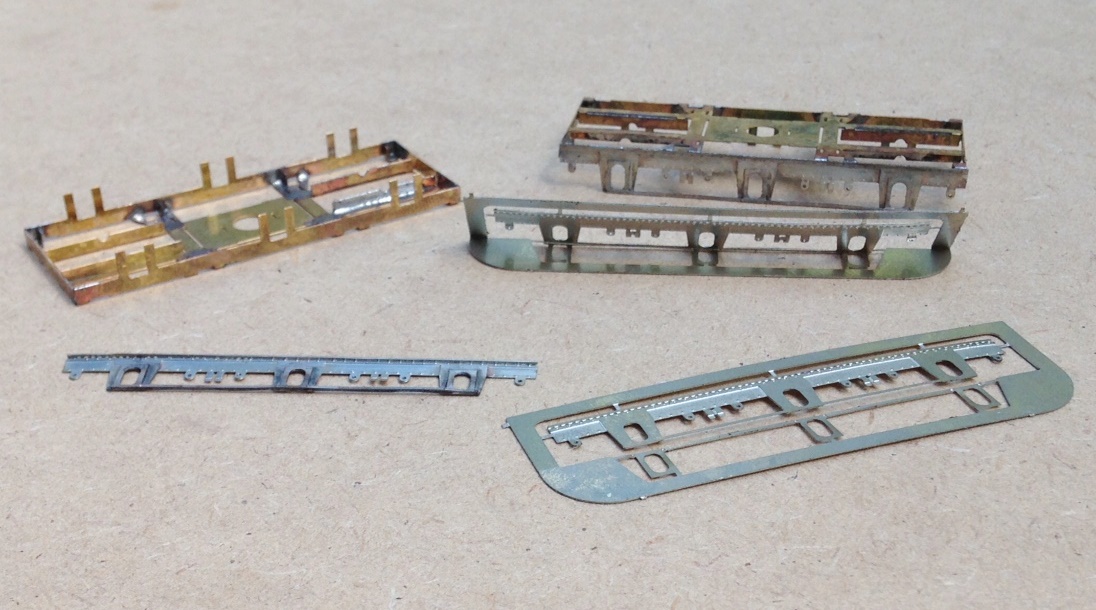
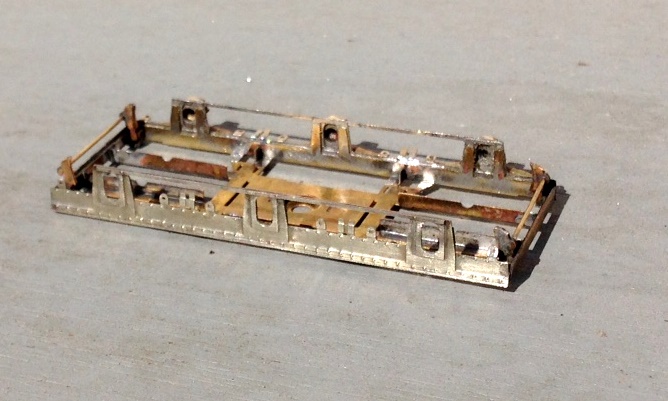
One of the reasons that this model was put to the back of the queue previously was that almost none of the parts required to complete it – in particular the bogies – were available, so it was all going to be a scratchbuild. As I was pouring over the drawings and pictures in the bible on things ECJS it dawned on me that the missing parts would be best dealt with as an etch and given my developing skills in etch designing, I might was well have a go. This is the product, an underframe, some cosmetic bogie sidesand some underframe details fresh back from the etchers.

The basic underframe has fold up solebars and buffer beams. Each of these also has integral fold over layers to laminate on the cosmetic exterior. This just about worked for the solbars but definitely did not for the buffer beams which distorted due to their thinness. I will make these seperate pieces next time, but might use folding jigs.

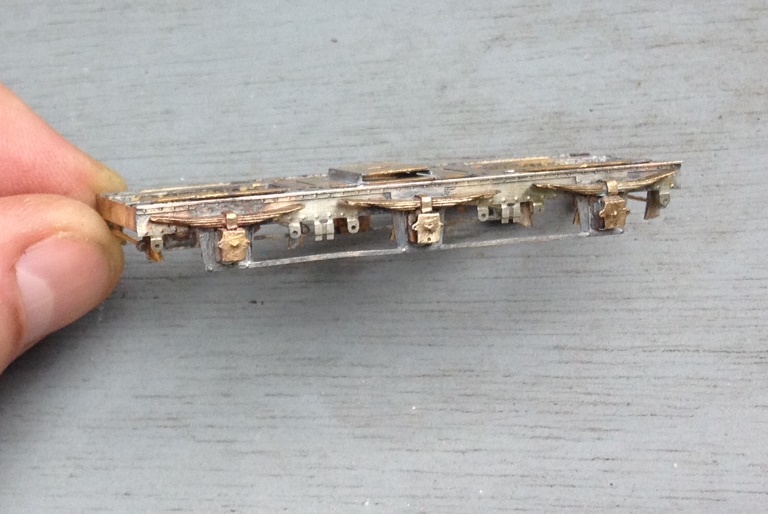
Coaches of this era tended to have four truss rods, each with a pair of queen posts. Stealing an idea from Alistair Wright’s designs, I made the queen posts up by a long etch that has a half etch length to wrap around the wire used for the tie rod. By folding this over the wire and then laminating the two parts together, a robust and simple post can be created. As it is two layers soldered together, it has the strength to allow it to be filed to a round shape to create the appearance of the original.

Although originally gas lit, by the time I will be modelling this vehicle it was electrically lit. Whilst I probably could have bought cast batter boxes, I decided to include them in the etch and very pleased I am too – they have come out much more crisp than any of the castings I have seen and were really easy to both draw and make. The remainder of the fittings seen here were bought in castings though, typically from Comet Models (now distributed by Wizard Models).


And this is where the underframe has presently progressed to.
I will describe the building of the bogies in the next installment, they are not for the faint-hearted!
